A warm welcome to all my visitors,

Thank you for taking the time to come and look at my blog, I really do appreciate it. I would love you to leave me a comment, even if it’s just to say Hi. It means I can come visit you!

All my designs are original, so copyrighted to me. If I have been inspired by someone elses work, I have named them in the post, and where able, I have provided a link.

Please feel free to use my designs for inspiration, I just ask you to credit me, and provide a link back to my blog.

Thanks, Shaz XX

Friday, 31 December 2010

2011 is almost here

                          I hope everyone had a Wonderful Christmas,
                                 and I'd like to wish you
           all a Peaceful, Prosperous and very Happy New Year.

I had  a couple of brilliant 'finds' in the Christmas Crackers this year:


a miniature set of playing cards, and half a dozen mini dominoes.      
           These went straight into the crafting stash, lol.
I am starting on my cardmaking now- I've been stamping images & backgrounds for a couple of days, so now to begin the assembly!

Sunday, 19 December 2010

The Last Batch of Christmas Cards


My final batch of cards use a variety of images,all stamped onto alcohol inked backgrounds using Black Staz-on.  All mounted on a base card embossed with the Papermania Baubles embossing folder, using the Cuttlebug.

              The image on these two is from Hero Arts,K4829, Collage  Merry  Christmas.
   The baubles were accented with sticky gems to match the colour of the image.


The stamp images are:
    Santa & Girl, Inkadinkado 93146.X,
     Seasons Greetings, Hero Arts, Collage Seasons Greetings, K4827,
        Christmas tree collage, Inkadinkado Illuminata,91277.Y and
         St Nick, Butterfly Kisses clear set, which includes sentiments.


Monday, 13 December 2010

More Christmas cards

 These are cards ordered by a work colleague for Christmas, this first one will be for his wife.The backing paper is from Craft Creations, and the Rubber stamp is from Elusive Images,Mistletoe Script .Stamped first onto a silvery blue card, then onto inkjet film with Stazon Black, then glittered. I cut out the glittered image and mounted on top of the stamped image with silicone glue. The heart is made with triple embossing, as I did on my Anniversary card.
 This card is for his son, and teen boys are not easy to make for!This image was stamped on inkjet film with Black stazon again and glittered. I trimmed it square and mounted onto a piece of holographic card with brads.It doesn't show well scanned, but the colours change on the background, almost like reflections of the candle flame. This stamp was from The Stamp Man, unfortunately I think it is retired now. I have scanned the image with white paper behind it so you can see the wording.
Add caption

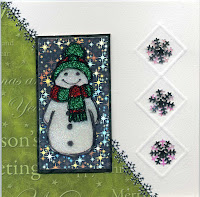
This one is for his daughter, who is much younger, again stamped on inkjet film and mounted onto holographic card with silicone glue behind the glitter. This backing paper is also from Craft Creations, and I used a scoring board from The Glitter Girls for the 3 squares, and snowflake table confetti in pairs, one silver & one holograhic, joined with a brad The snowman stamp is by Funstamps, Scribble Snowman, F-M131..

Sunday, 12 December 2010

Christmas 2010

These are the cards I have been working on lately. My mass produced batch for friends, workmates & my Beloved Husbands forum friends.The Stamp used is Santa Collage, by Rubber Stampede,3408F, and the vellums were stamped with a large u/m snowflakes stamp,origin unknown, sorry.It was stamped in clear embossing ink then embossed with Stampendous 'Stardust' powder.I used a mix of inks to stamp with: Encore silver, gold & metallic blue and Distress Cracked Sapphire, Aged Mahogany and Forest Moss.Each image was matted onto a matching foil paper, then onto white card embossed with the Snowflake Cuttlebug folder, then onto foil paper again. A matching narrow ribbon was wrapped around this, then a bow added.The sentiment was stamped in matching colours and matted onto foil.  All elements were stuck down with silicone glue, due to the glittery vellum. Normal tabs don't always hold very well on this surface, but silicone glue will.

  I trimmed the card front with a fancy edged blade, then stuck a matching strip of foil onto the rear of the card with DST.       

                     The insert is from a CD, called Thomas Kinkade, from Joanna Sheen  
 
                                                                                    
       I will be posting some pictures on how to batch-produce cards on my Tips & Techniques page during the Christmas break.     

Sunday, 14 November 2010

Birthday Knight

For this I took a piece of slightly textured cream paper, and stamped the large wording from the Elusive Images Medieval Heraldry u/m sheet at the top in Staz-on Timber Brown.I stamped this twice, one next to the other. Below this is stamped the script from Elusive Images Scripts & Timepieces u/m plate, also in Timber brown.This was stamped three times down the length of the paper below each of the large words. Over this I stamped the crowns and shield from the Heraldry plate. The shield was stamped in Adirondack Red Pepper, the crowns in Espresso, both second impressions.Tear  the paper at roughly 8 cm wide down its length.  I then used a colour duster to add some Terracotta ink in patches lightly over the design. I stamped the Knight in Copper Pigment ink,(Ink It Up) onto some cream hammer card and embossed with Stampendous Copper Detail powder.The sentiment was also stamped & embossed the same way. Cuttlebug folder 'Forest Branches' was used on a sheet of gold card cut to the width of the embossing folder, but twice the length. Because of the type of pattern, you can emboss half the card, then turn your card round and emboss the other half, just line up the pattern you have already embossed to the bottom of the folder.Trim down the image and matt onto black card, then onto the embossed card, leaving a wide border. Repeat with the sentiment, not leaving so much of a gold border. Black card was cut and folded to make a blank 10 1/2 cm x 20cm. The stamped script paper was then attached to the left side of the card blank with about 1cm folder around the back. The Knight was mounted with foam pads to the right hand side, and the sentiment added to the bottom. Red & Gold cord was wrapped around the spine and a red tassel added.

Monday, 1 November 2010

Halloween

                                           Not a card, but Beloved Husbands Pumpkin for 2010.

Sunday, 31 October 2010

Faerie Birthday

A piece of white card was brayered with Adirondack Lemonade, Sunshine Yellow & Citrus. Lavinia Stamps Faery House was stamped in Black Versafine then heat embossed with a black sparkle powder. 
I also stamped off onto a post-it note, then cut out the mask. I put the mask in place then overstamped with the Faery words plate ( Lavinia stamps) in Plum Archival ink. Leaf Trail ( Lavinia Stamps) was stamped in Olympia Green Versafine, using first & second impressions, and a variety of small foliage stamps stamped along the bottom. 
A small dragonfly stamp was added in a couple of places. This was trimmed down to size and matted onto dark green card. I took a square card blank and covered it with a sheet from the Dovecraft 8x8 designer pack 'Fantasy'. 
The stamped image was then mounted onto the front with sticky fixer pads. A wide black and a narrow green organza ribbon were wrapped around the spine and tied in a bow. 
The sentiment tag was made from an offcut of the brayered sheet. I overstamped it with Artifacts Darting Dragonflies u/m stamp, from The Stamp Bug, using Versafine Frost. Sentiment was stamped in Olympia Green Versafine, then an eyelet added to thread some twine through. 
A small dragonfly embellishment was added to the tag.

Sunday, 24 October 2010

Pink Birthday

Made for our niece, who is very into pink! Its also a version of the monochrome card further down. All the stamp credits are the same, with the exception of the Happy Birthday, which is from Butterfly Kisses,Art Collage clear 2 you sheet. Stamped it twice, on one I just coloured in the letter with an embossing pen, added embossing powder & heated, then coloured the surround in pink marvy marker, went over it with the embossing pen then with pink embossing powder.The embossing folder is Cuttlebug Birds & Swirls, and this I put through the Cuttlebug upside down, so the image is debossed, rather than embossed. This is a useful way to get some variety from your embossing folders, and works with anything that does not contain words.
The tartan panel was stamped with Distress ink, Worn Lipstick.

Saturday, 23 October 2010

Mulan

This was named after the film that gave me the inspiration. Its an Asian cinema film, and if you don't like subtitled films, it's not for you.It seems that the modern dog-tags worn by soldiers are predated by the chinese army by a couple of thousand years- I assume they were made of bamboo, but carried the name of the soldier, so he could be identified. In a scene in the film, Mulan is washing these tags taken from dead soldiers, to remove the blood, before they are returned to their families. The main tag was made by painting dark brown acrylic paint & crackle glaze onto card, then a lighter brown for the top layer. The Asian lettering is from a Great Impressions stamp(#K50), and the warrior from Non Sequiteur plate 67C.Both were stamped in Staz-on Black. I dabbed some red ink onto the stamped tag.The medium tag was made by triple embossing a tag dabbed with black ink, then stamping in Kanji characters in gold Encore. The red tag had oriental letters stamped in black on a red background, triple embossed then a different Kanji stamped into it. I chose the Kanji's for Strength, Honor and Courage, as these seemed most appropriate.Kanji stamps by Stamp & Go (SIEWKFS01B.). The base paper is a torn piece of snakeskin effect paper, which reminded me of the texture of the armour.A small coin, a couple of bits of cocktail stick and two pieces of raffia combined for the final embellishment. Oh, I threaded some thick cord through the tags, and made a small bead out of Black Fimo to thread on to it. The base card was stamped with a Bamboo motif, in Versamark. I have entered this in the 'Cards for Men' challenge at The Stamp Man Blog.

WOYWW

This is my WOYWW for this week- in the middle of making a card for my niece's birthday- she's very into pink. Definitely outside my comfort zone- I do NOT do pink! But I think it all worked out in the end.

Sunday, 10 October 2010

Ist Wedding Anniversary card

This is the card made for my Beloved Husband, for our first wedding anniversary today. Triple embossed hearts,which were first coated with Distress ink Fired Brick.The second layer of embossing powder had some skeleton leaves added to it.The last layer was imprinted with two swirl designs ( large heart S1838 Florentine Swirl, Hero Arts: small heart 2636K Scroll Pattern, Penny Black) in Gold encore ink.The small swirl was also repeated on the black mulberry paper, which was layered onto burgundy mulberry paper. 2 feathers in red & black added with silicone glue. A fancy edge was cut using a paper trimmer.

Saturday, 9 October 2010

My First Ever Award.......

I was given this award by the extremely talented Donna H from Splitcoast Stampers forum. I love this forum- there are threads for absolutely anything you can think of, everyone is so friendly, there is always someone who knows the answer to a problem and the wealth of talent in the Galleries will take your breath away.
The rules for this award are:
1. Thank the person that passed it to you.
2. Copy the award to your blog.
3. Share three things about yourself that you enjoy doing.
4. Pass the award to 5 others.

So first, Donna...Thank you so much- my first ever award, you have made my day, week, month..... 

 Next my 3 shares are:

 1.  Rubber stamping, of course 
 2.   Reading: Fantasy fiction in particular,
 3.   Listening to Heavy Metal

And the 5 ladies that I am passing this award onto are:
 1.    Marg     (Silvercrafter)    My co- Mother -in-Law and very good friend
 2.    Tina       (Scrapdiva)
3.     Cammi   (Cuttin up)
4.    Alison   (Crafty-Bake)   Cardmaking AND Cake- what more could anyone want?
5.    Diane Clark   (Stampin ldglfr62)

Apart from Marg, all these ladies I have found on SCS, and lose many a happy hour (and more) just going round checking out the blogs, so I want to say a huge thank you to all of you for being so inspiring, so creative, and most of all for sharing what you do with all of us.And trying to pick just 5 is so hard- every blog I see I find work that I love...

Tuesday, 28 September 2010

Illuminata

Illuminata (1003, Inkadinkado) is stamped in Versafine Black onto white linen effect card, to give a canvas feel. A mixture of blues and purple dye ink was sponged onto the image, then cut into three equal pieces. This was matted onto black card with space between them then trimmed. A piece of calligraphy vellum was torn and stuck to the right side of the card front. A piece of calligraphy paper was punched with a fleur di lis corner punch (with the guides removed) then cut to length and added to the left side of the image. The image was then mounted using foam pads.
NOTE: make sure you punch down the LEFT side of the paper, or your text will be upside down when you add it. Yes, that is the voice of experience,lol.
An offcut of linen card was again sponged with blue & purple ink, then the letters ART from Anna Griffin's Flourish Alphabet were stamped in black and cut out into tags. Eyelets were added and some fibre threaded through before mounting with silicone glue below the main image.

Monday, 27 September 2010

Mainly Monochrome

Stampsmiths Ophelia was stamped in Black Versafine onto an alcohol ink background, created using Stream, Denim and a tiny spot of Cranberry, with plenty of blending solution. She was cut out using a Nestabilities Petite scalloped ovals large and the black matt cut out with the next size up.Using the card that was left from cutting out the image (the negative shape) I marked the position the image would occupy on the front of the card with a light pencil. Two flourish stamps were then stamped in Black Versafine so they would extend out from under the image, sprinkled with sparkly black embossing powder and heat embossed.The Versafine is quite a 'wet' ink, and on pearlescent card stays wet long enough to take embossing powder. A third flourish was stamped in the top right corner and also heat embossed.The Ophelia image was stuck to the black matt with DST, then the whole thing stuck to the card front, also with DST.Four flowers, 2 black, 2 white, were stamped with 'Describe Her' text in the opposing colour, joined in pairs with a black or white brad and added to the card with silicone glue. Black eyelash wool was used to wrap around the card spine, and as I hadn't got a stamp small enough to blend in with the card, I used a small peel off in black for the Birthday sentiment.

Monochrome Ophelia

A square white card blank was stamped in the upper left & lower right corner with Crafty Individuals CI 021 words background in black Versafine.Stampsmiths 'Ophelia' was stamped also in Versafine black onto white pearl card, trimmed, and the corners punched with a SW punch.This was then matted onto black card and mounted to the front centre of the card with foam pads.A black & white spotted ribbon was wrapped around the spine and tied in a knot.3 small diamonds( waste from a black border peel-off) were added to the top right & bottom left of the central image to provide balance, and echo the diamonds in the script.

Describe Her

A sheet of A4 white pearlescent was creased & folded and used in landscape format. A piece of black pearl paper was embossed with the Swiss Dots folder & Cuttlebug, trimmed to 6x10cm and the corners rounded. A piece of black embroidered paper was cut to the same size and rounded. Butterfly Kisses Stamp 'Tartan Background'(BK1006F) was stamped in Black Versafine onto white cardstock, trimmed and rounded. These three panels were mounted onto silver grey card leaving an equal gap between them, then the grey card cut to just fit the card front and corners rounded.
A length of black organza ribbon was wrapped around the panel and tied in a bow before being stuck down with DST across the centre of the card.  Artifacts stamp 'Describe Her' was stamped in Black onto white pearl card twice, then cut and rounded. A piece of silver vellum was cut about a centimetre larger than the words panel, corners rounded then embossed with the D'vine swirls folder. The word panel was matted onto this, then mounted across the three panels on the front of the card. 
The lady is from a set by The Glitter Girls, and is stamped in Staz-on onto acetate which has been given the 'Caught in Crystal' treatment. She was then mounted to the left side with silicone glue. The sentiment was stamped in black, and comes from an Elusive Images themeplate.

 Caught in Crystal:  This is messy, so cover your workspace with newspaper first! And wear gloves too! Take a sheet of acetate (I use OHP transparencies, from Staples) and pour a couple of tablespoons of Johnsons KLEAR floor polish onto it. Add a few drops of re-inker colours, or alcohol inks, and spread with your fingers or a spatula across the acetate.
Don't mix too much, or you will muddy the colours. If you wish you can sprinkle in some glitter, gold leaf, even seed beads, but remember the lumpier you make it, the harder it will be to get a good stamped image. You can of course stamp your images first, then flip it over and do the floor polish stuff, however this makes it harder to determine where your images colours will be. When you are happy, take a sheet of tissue paper (the sort used for gifts, not the paper hanky type) and either scrumple it up, open out and pat down onto your ink/floor polish mix, or just lay it on flat and pat down. I use any pale colour of tissue, it doesn't have to be white. Just pat down with your fingers- don't press, or you will push the colours around. Now put aside to dry- this may take a day or so, depending on temperature. If you do find it difficult to get a good stamped image, you can clean Staz-on off acetate with Staz-on cleaner & try again, and you may find it helps to put a stamping mat, or mouse-pad, underneath.

Three Wolves

Three Wolves (Coronado Island SJ009-K) is stamped in Black Versafine onto white card, trimmed and matted onto black card. A square brad was added to each corner. 'Describe Him' words from The Stamp Bug's own stamp brand, Artifacts, is stamped 4 times onto white card in Black Versafine then trimmed down to size. Then matted onto black then white card and fixed to the card front with DST. The wolf panel is positioned overlapping the words panel and fixed with foam pads. Both sentiments are from the Rubbadubado Stick & Stamp message sets, and are stamped in black on white, matted onto black then mounted with silicone glue.

Whispers in the Wind.

Two more cards made using the crafty Individuals Treeline stamp, again on oil pastel backgrounds.I love this technique, as you never get the same effect twice, and the streakiness gives wonderful 'Evening sky' backgrounds.

Lakeside nightscape

The background was made using oil pastels in shades of blue top & bottom, and browns for the middle area where the rocks would be.Star Birth (217G) was stamped first, then Tall Peak (182G) then Lakeside cove (049G) all from Stampscapes, in Black Versafine, using a stamp positioner for lining up.Then sprayed with sealer. The image was cropped down and matted onto black then white card, then mounted centrally onto card front. The sentiment panel was cut using a Nestabilities Petite scalloped ovals large die, and the words stamped in black versafine. The words are taken from Non Sequiteur Winter Holidays plate (064). Two slots were punched in the oval and a short length of dark blue ribbon threaded through and the ends trimmed and mounted with foam pads.

Triple embossed birds

The 4 Birds stamp from Crafty Individuals stamped onto an oil pastel background then trimmed down. Mounted onto thick card and dabbed with a clear embossing pad then triple embossed. Dark blue card used in landscape format and a strip of dark blue angel hair paper stuck across the middle, with a slightly narrower strip of embroidered handmade paper placed across this. The bird squares are mounted with silicone glue. 3 Square brads added to the top left corner, and sentiment ( Stick & Stamp magnetic stamps, Rubbadubbado) stamped in silver in lower right.
By the way, if you stamp onto an oil pastel background, either use Staz-on ink, or spray with sealer (or hairspray) to prevent the image being smudged.

Memories

I cut & folded a white card blank to 14 and a half cm square then covered the front with a sheet from Crafty Individuals Book 4 Trees background paper pad. Next I brayered a piece of white cardstock with Encore Enchanted Evening Inkpad, which is  a purple, pink,blue and green metallic rainbow pad.I overstamped this sheet with parts of a tree and the phrase Whispers in the wind (CI 209), and postage marks (CI 124) and others from Stamp Francisco. A separate piece of cardstock was patted with a Versamark pad then  dusted with mica powders.Onto this I stamped the 4 Birds stamp from Crafty Individuals (CI 184) in Black Versafine. I cut the birds out, layered onto the rainbow sheet and cut into tags. A hole was punched in each tag and an eyelet added, along with some fancy wool fibre. I mounted two of the tags with DST and two with foam pads. The phrase 'Memories' was stamped in Versafine Onyx Black along the front edge.

Sunday, 26 September 2010

Let Sleeping Dragons Lie...

This is from a Tanda Stamps themeplate, Dragons & Fantasy plate 4.  The dragon was stamped with clear embossing ink onto black card, then an assortment of Moonglow embossing powders was sprinkled over it and heat embossed. Trimmed and matted onto gold then purple card, three dull gold brads added to bottom right corner. The backing paper is from Robert Adams Celtic CD. This was cut down and matted onto purple card. Everything mounted onto a black landscape card. If you click to enlarge the image, you will be able to see it clearly- doesn't show up well in a small image, lol.

Its nearly THAT time again!

So, its heading towards December, and yet again I am saying I shall not be making last minute cards in the week before Christmas. Hmmm, we shall see. These are the cards I made last year for friends, colleagues et al. This uses a brass stencil of baubles (Ling Studios BS162) with Gold or Silver embossing paste. I then sprinkled a little glitter over the wet paste and put aside to dry. The base card was covered with Christmas vellum, and the red panel is stamped using Inca stamp 1023-K Merry Christmas background.The Merry Christmas is from a Hero Arts set called Holiday Messages, which I think is discontinued, as I couldn't find them to link to. The message was cut out using a Nestabilities die and gold or silver ink run around the edges then matted onto more red card and fixed in place with a glue dot. The bauble image was trimmed and matted onto gold or black card and attached with foam pads. By the way, the stencil is actually longer than this, it has 10 baubles on it, but this would have been too long for my card base, so I masked off the bottom two with low-tack tape before stencilling.
 A tip for using stencil paste with brass stencils: It is very easy to bend brass stencils while cleaning them, so try to work with your stencil flat on your work space to clean them, rather than dropping into a bowl to scrub. Have some baby wipes flat on your work surface, and each time you use the stencil, lay it on the baby wipe and fold the wipe over it. This stops the paste drying. Then use another wipe to rub over your stencil ( both sides) to remove any paste before stencilling again. This stencil has some very fine lines so you may want to have a toothbrush handy to make sure there is no paste left in them. Then lay on a towel and again rub over it flat on your table to dry.

Fast Christmas cards.

Two versions of a Christmas Card. The stamps are by Butterfly Kisses- there are quite a few designs of these trees, available as wood-mounted or unmounted. They all also have a matching background, in this case I used the background to the swirl tree to stamp long lines of the swirl, embossed with sparkly  or holographic embossing powder. These were trimmed and then stuck with DST and the edges covered with peeloff lines. With the holographic powder I found that heat applied for different lengths of time produced varying shades- an unexpected surprise, and looks good for the trees.I added a few self adhesive jewels to the trees, then matted onto opposing colour, then attached to the card front with foam tape. A peel off greeting finished them off. I need to make around 150 Christmas cards each year for friends, workmates, mine & Hubbys friends on forums etc, before I get to the special ones for family, so apart from starting early ( anyone who knows me knows this will never happen) I go for something that can be quickly put together but still look good, so I am not averse to using peeloffs for sentiments or edging.

Sympathy

A return to the same stamp for a sympathy card, this time in shades of purple. Stamped in black stazon, on an oil pastel background, then matted onto black card and trimmed to a narrow border. Two shades of purple vellum punched with a rope border and fixed down the centre of a white card blank. The sentiment is stamped onto an offcut of the background and fixed with foam pads.

Friday, 17 September 2010

Stampscapes

This card uses two Stampscapes rubber stamps,Star Birth (217G) and Lakeside Cove Lge (049G).The background was made by dragging oil pastels to give a 'Northern Lights' feel vertically over the top two thirds of a piece of white card, and dragging blues horizontally across the bottom third for the water. I then stamped the Star Birth in Black Versafine, then lined up the Lakeside cove below it, also in Versafine black. The image was cropped then matted onto Black then White card. I scored and folded a sheet of dark blue card, then trimmed down to make a square card blank. Crafty Individuals stamp CI 021, which is a words background was stamped in Black Versafine in the top left and bottom right corners of the card front. The matted image was then mounted centrally on the card base.

Thursday, 16 September 2010

Sympathy

It seems that most people find Sympathy cards difficult, and I  think the key to these is 'keep it simple'.You don't need to use every technique in your card-making arsenal- the fact that you have put your effort into the card will say more than any words.
     Also keep an eye open for stamp images that would be suitable- you want images that you can use in a very basic way- like this just on a pale brayered background for instance.Its very easy to buy stamps that have 'cute' appeal, but sometimes 'cute' just won't do it!
     The thing I love about this stamp is its versatility- it fits this subject perfectly, it would also  be really good for a mans card, and if you look further in the posts, you will find the image in reds and blues, where it seems to really come to life.
 I kept to a muted palette and a simple style for this one. The Treeline stamp from Crafty Individuals is stamped in Adirondack Espresso onto a background of brayed card using Adirondack Sandal, Latte and Hazelnut inkpads.The image was cut out using Nestabilities Labels 8, and a dark brown mat cut with the next die size up. I used two shades of brown vellum, and a Woodware border punch  to create the panel. The image was stuck down with DST, then a dark brown ribbon wrapped around the front & tied in a knot.The sentiment  (Clevercut/Stampsaway ) is stamped in the same Espresso ink onto a scrap of the brayered background, matted onto dark brown card again, and two small brown brads added.This was mounted with silicone glue, just to give a little height to allow for the legs of the brads. You could also use little sticky fixer pads spaced between the brads for the same end.

Dragonfly, Butterfly, Bee

The stamp is #90349,Dragonfly, Butterfly, Bee, The Tapestry Studio Collection, from Stamps Happen. I stamped the image first on a brayered background, then used fusible fibres to make each of the images.These were cut out and mounted onto the three panels with silicone glue.The base card was covered in paper from the Papermania 'Simply Elegant' paper pack. The sentiment is from an Elusive Images themeplate, stamped onto a little of the brayered background and an eyelet added for threading. Eyelash wool was wrapped around the card and crossed on the front, the sentiment threaded on, and also a butterfly charm.

Friday, 10 September 2010

The Night


The stamp is from Stamp Francisco, called The Night. Stamped in Timber Brown Stazon on marble effect card.Matted onto black then marble card. The diamond stamp is by Judikins, Harlequin Background(2671J) also stamped in Timber Brown Stazon over part of the base card, then added atorn piece of text paper from K & cos Lifes Journey pad. Small peeloffs for sentiment.

Rose collage


Used A4 cream linen card as the base. Stamped the main image ( Graphicus) using Sepia Versafine on a spare piece of linen card. Scored folded & trimmed the base card, then stamped with some flourish stamps in the lower left & upper right corner, again using sepia Versafine. Used mica powders to add some colour to the background of the main image, and also for the Rose & leaves. Added Sentiment in Pink Flamingo Ancient Page ink.Mounted image on pink then dark brown matt. Mounted inside the stamped corners. Added insert, then pink organza ribbon bow. Stuck down an acrylic heart with silicone glue to finish.

Kanji strip


For the card on the left I took a strip of thick card and coloured it with red dye ink. This was then triple embossed.The Kanji letters were inked up with Gold Encore ink and pressed into the final embossing. When cold I gently bent the card to get the cracked effect.Edged with gold Krylon pen. I scored a box, slightly larger than my stamped panel, in the centre front of the base card. The panel was mounted with DST, and a gold & Red cord wrapped around the fold. The Kanji stamps are by Stamp & Go .com  and come as a set of 13, plus a pair of koi carp. Item Number SIEWKFS01B.
The card on the right used black dye ink on the panel instead of red.

Serenity.

Japanese lady with Ravens, this time stamped in blue, with a blue washi paper and a small mizhuiki knot. Fibres tied around the spine, and a couple of oriental coins added.The square card was made from an A4 piece of card cut down, the fold creased & scored, then creased again 1''either side of the fold. An insert was added at this point, and the fibres wrapped around the spine. Then I closed the card and made 4 holes between the fold and the crease and inserted eyelets.The word Serenity was stamped onto a scrap of marbled card and mounted onto a scrap of blue card then washi paper.

Oriental'triptych'

This uses the Japanese lady with ravens stamp from an earlier card.Like before I removed the plum ink with cotton buds and added black ink to the ravens with a marker. Image cut into 3 then mounted onto washi paper. A gold triangle frames opposite corners, matted onto black then washi paper again.The Oriental lettering is a small segment of a kanji lettering stamp. I inked a small piece of thick card with black ink, triple embossed, then pressed the letter stamp, inked in gold, into it. When cold I edged with gold Krylon pen, added a tassel and mounted with silicone glue.The black base card has a motif embossed from the Borderfold embossing board from The Glitter Girls.

Wednesday, 8 September 2010

Rose Panel Birthday

The image is from Elusive Images, Rose Stem Script . 
Coloured with H2O's. For the base I used a copper card, and a bronze piece of cardstock was run through the Cuttlebug with the D'vine swirls folder. I cut this to an oblong, then rounded two opposite corners.The image was stamped on white cardstock with Gold Encore Inkpad then heat embossed with Gold embossing powder.I trimmed this panel down, then cut three similar sized panels from fancy handmade paper. I arranged all four panels in a cascade down the cuttlebug embossed card, held inplace with DST. Gold ribbon was then wrapped around and tied in a bow before the panel was attached to the front of the card with DST.

An End of an era

An end of an era

I write this with a broken heart, that only time can heal My beautiful, wonderful wifelet Shaz (Silverwolf) passed away peacefully in the ea...