A warm welcome to all my visitors,

Thank you for taking the time to come and look at my blog, I really do appreciate it. I would love you to leave me a comment, even if it’s just to say Hi. It means I can come visit you!

All my designs are original, so copyrighted to me. If I have been inspired by someone elses work, I have named them in the post, and where able, I have provided a link.

Please feel free to use my designs for inspiration, I just ask you to credit me, and provide a link back to my blog.

Thanks, Shaz XX

Wednesday 30 January 2019

WOYWW #504-The Sink Hole Edition.

Yep, we had one of those last week. Right in front of our house. Pictures at the end, if you're interested.😉
 Desk-wise, it has crafting on it.
 The cards are more finished UFO's, in the post below. Two more UFO's matted up at the back, behind the inkpads. A whole pile awaiting further inspiration over on the right.
 The black case is the one Hubby bought me for my Prismacolor pencils. A hard shell case, so they're well protected. And roomy, I think it'll hold 180, which is more than there are in the range. Currently.

 Only one new item this week, some Micron fineliner pens.
Bought from Amazon, they range from 0.05 to 0.8, plus a brush one. It was the really fine ones I was interested in, as I had to touch up a couple of images last week, the ones in UFO's 2, due to a slight overlap of masking, and my current smallest, 0.3, was still a little thick.

That's all my desk sharing for this week, as always linking up at Julias place, The Stamping Ground.

So, that sink hole.


Started out like this.


 Rapidly became this as Severn Trent arrived and began digging.


Soon uncovered a hole full of water.


And repaired the next day, so not so bad.


Which brings me to......And Finally.......


Saw this last week, and it really made me laugh.

Tuesday 29 January 2019

UFO's Part 3

Still working down my UFO's, these two using another Clarity stencil, Framework Circles.
 I used Distress inks in two shades, applied with brushes.


After I'd done these, I really had no plan on how to use them, which is how they ended up as UFO's.
It occurred to me that flowers were the way to go, and this one is from a Honey Doo set, called Cherry Blossom, which has this flower in 3 sizes, this is the middle sized one. It also has leaves to go with them.


Getting them centred turned out to be a breeze using the Stamping Platform, but you do need to make sure your cardstock is accurately cut to size all around in order for you to be able to stamp the flowers central. I placed the first flower in one corner, then just rotated the cardstock each time to do each corner, then I moved the stamp to the space between the corners, then again just rotated the cardstock.


I'd inked the blue one to give me a darker shaded edge to each circle. Tumbled Glass and Salty Ocean Distress Inks. The flowers are stamped in Archival Cobalt Blue.


After I'd stamped all the flowers, I took a strip of pale blue vellum, and stamped some more, so I could add some layers. Wasn't sure if I wanted to double them up, so did a few extra. Stamped in Archival Cobalt, and as it's on vellum, the ink stays wet long enough to add embossing powder, and I used Stampendous Crystal to give a little sparkle.


 The orange one had been inked in Wild Honey  & Spiced Marmalade, and this time the flowers were stamped in Archival Tiger Lily.

I added a Happy Birthday sentiment in the centre circle on both. This sentiment comes from a cheap set of sentiments from Aliexpress. They are mainly small sentiments, which are often useful.
The only downside is that being cheap silicone stamps, they are rather thin, and even on the 'clear' side of the Platform, they wouldn't pick up on the lid.
However, I found a cheap and easy fix for this.  A while ago, I'd bought a silicone non stick baking sheet from Poundland, intending to use it as a craft mat.
 When I tested it out underneath my card on the platform, it raised the cardstock enough to pick up the stamps. So I cut a piece to fit the platform, as it's about 2 feet square. It will be useful, as I've found in the past that some of my unmounted bare rubber stamps are too thin to work in the platform, even on the clear side. So there's an easy fix for anyone having the same problem.


Before cutting out and adding my flowers, I added some colour to the ones on the cardstock with Prismacolor pencils, then did the same on the back of the vellum ones.

One of the things I'm loving about the Prismacolor pencils is the ability to shade just using one colour of pencil, simply by varying the pressure applied. Quick & easy is definitely a thing for me.


I matted each panel onto a matching cardstock, then mounted onto a 7" card blank, which I did have to trim slightly, as I couldn't get an even border of white card base.


The flowers were added with a dab of silicone glue, then some sparkly glass gems added to the centres, using Multi Matt Medium.


The cardstock used for the mat is from a pack by DoCrafts, the Papermania Capsule collection. It's slightly textured, and the pack has 75 sheets, each a different shade. I get them from The Range, and they come in A5 and A4 sizes, and are great for die cutting too.

Monday 28 January 2019

UFO's- Part 2

Been a couple of weeks, but around other things, finally managed to complete another few of my UFO's.


The three backgrounds are all from Clarity stencils, as are two of the stamped images.

I made the backgrounds quite a while ago, while I was just playing around with stencils, ink & brushes, and they've sat waiting for inspiration to strike. Which it finally did.


This Clarity stencil is called Flare Frame, and is one of their many 7" square ones, which are a perfect fit for their 7"  stencil card, which also comes in other sizes. The design part of the stencil comes out at 5½",so you have matting & layering ability.
It also has the central square 'mask' so you can blank that area off, if you wish.


This first one was done by adding ink through the stencil and letting it dry. I re-taped the stencil in place, then applied Translucent stencil paste (Sweet Poppy) over it, which was sprinkled with glass microbeads, for texture.
 Being a bit messy, I'd got some ink & paste into the central aperture, which I'd masked off, and was partly why it got put to one side, while I figured out what to do with it.

Finally had the idea to mount a small stamped panel over it, and went with that for all three.
 The owl stamp is also by Clarity, and actually has 3 owls on it, but that made it too large for the centre, so I masked off an owl on the right, as that was the easiest one to cover up, inked, removed the tape and stamped.
 Colour was added with Prismacolor pencils,and some Distress Ink in Stormy Sky sponged over the edges, after I'd trimmed it down to a 3" square.


To add all the panels, I die cut a square of white fun foam slightly smaller than the panel,and used that to give the image a little dimension.


These were the images I selected for the panels, the Owl & Lion stamps are both Clarity, the Tree image is from Inkylicious, called Daydreamer. I had to trim off parts of the image for this to get it down to the right size.


I also added some stamped grasses along the bottom of the Lion image, from a set by Indigo Blu called  Nature 1.


This one uses another Clarity stencil, this time called Circles Box. Same size & details as the previous one. This just had ink added through the stencil. The Lion stamp also has three images, so again I masked off one on the right as before.Chose a pale purple cardstock as my mat, and mounted onto a 6" square card base.


Again, ink through the stencil and then I found a closely matching cardstock for the mat.
 The image was stamped in Archival Coffee, which I also blended around the edges.
 This Inkylicious stamp has the person, tree and ground as one stamp, then there's a separate small bird flock, and the word Daydreamer.
 All three are mounted on a 6" square card blank.
 Left them blank at the moment, so I can use them for any reason later.


Entering this in the Crafty Cardmakers Challenge, Add some Texture. 
Crafty Creations Challenge, Anything Goes.

Wednesday 23 January 2019

WOYWW #503- The Fairly Tidy Edition.

'Cos fairly tidy doesn't happen too often. Not very tidy, of course, just fairly.😁
 Wednesdays here again, so time for linking up at Julias place, The Stamping Ground, for another weeks desk baring & sharing.

 It's actually better now, as I've put the stamps away. And the inkpads. And the blending sponges.
 Which are packs of make up sponges from Primark. £2.50 for a pack of 4, 1 large, 2 medium & 1 small.
The Really Useful Box contains dried out-clean- baby wipes, for inking, the way Card-io do it, by blending over the edge of torn paper to produce hills.

 Which was what I was doing at the weekend, making some Christmas Cards for the Club.

 And glittering onto acetate. Well not acetate, but OHP film, which does the job just as well. Got a couple of boxes of it really cheap when our Staples was closing down.


I have to say, the Stamping Platform is ace for this technique, as normally when hand stamped with Staz-on onto film, the stamps have a tendency to slip or slide. Not a problem now.

 Don't know about anyone else, but over the years I've picked up lots of 'glitter glue kits', with bottles & fine nibs, but I always find the nibs clog, and the bottles can be really hard on the hands, needing quite a bit of pressure to squeeze.
 Back to my favourite enabler, Jennifer McGuire, who was talking about some cheap, soft bottles she'd bought on line. So I had a look, and found some on E-Bay. 
10x 10ml bottles, each with a fine nozzle & lid for £1.62. And they are a lovely soft, easy to squeeze bottle.

The lid is attached to the bottle, but I snip that through, otherwise I found it gets in the way. I've also put some Multi Matt Medium in one, and that works great too. And so far,when I've finished with it, I just poke a pin down the nozzle to make sure it's clear, then wipe it with a baby wipe, put the lid on, and not had any clogging at all.

 On the left, stamped image with the Platform.

 On the right, adding glue from those bottles.
Here, 3 of my glittered snowmen when they'd dried.
While we're sort of still on the subject of Staz-On, this acrylic block on the left is why you should never use Staz-on cleaner on them. This happened years ago, long before I learnt what was causing it. So I didn't clean my stamp on the platform, and I've kept this block just for doing that. I know Tim said that you could use anything on them other than acetone, but I'm not taking the chance!


Now, another tip, from another You Tuber. Been watching crafting videos from a guy called Simon Hurley. He's only a young guy,I'd say late teens probably, but is clearly going places, as I saw today he's now got a product line with Ranger at Creativation. 
 His channel is called INKLIPSE.
EDIT:   Actually just found out he's 16! Total respect to someone so young,especially being a lad.
 Anyway, I digress, as usual. He was talking about blending coloured pencils, and how he wasn't happy with the results using blending stumps with things like Gamsol, or Zest -It. What he did was take a Ranger Alcohol Ink Blending Pen, and fill it with the Zest It blender for pencils, and it worked like a charm. Bonus is, you have a solid tip and a brush tip, compared to just the pointy tip on a blending stump.


I can post this card now at the bottom here, as it won't show up on Facebook! This was the card I was working on last week, a Retirement card for a work colleague.


Which brings me to.......And Finally.......


                  ...ain't that the truth!

Sunday 20 January 2019

Christmas Card Club #2- Cute

 Second challenge of the year, and this theme has been chosen by Sylvie, who wanted us to make cute cards.

I went for cute snowmen- although I do think the one on the far right may be a tad more sinister than cute!


The first pair use a really old stamp- I know he's called Scribble Snowman, and used to be a wood mount, and made by Funstamps.
 He was stamped and masked, then I stamped a tree from Visible Image Peace Love Hope Christmas Set.The medium tree is also from this set.
 The snowman was coloured with Prismacolor pencils. I sponged some hills, then added a treeline with stamps from Card-io Christmas Scenery 1.The deer is also Card-io, set called Deer Deer.
 The sleigh and star trail are by Inkylicious. The sentiment from a Crafters Companion set, Christmas Sentiments.
 Sky was sponged in using Distress Inks in Tumbled Glass, Stormy Sky and Chipped Sapphire.

These next pair are both Impression Obsession Snowmen- really not sure about the mouth on the taller one- definitely looks a bit creepy to me!
 Both were stamped onto OHP film- I bought a couple of boxes really cheap when our Staples was closing down- then glitter added on the reverse. Must admit, the stamping platform is great for this, as the stamps tend to slip a little normally when hand stamped.
 The treeline is from the Visible Image set mentioned earlier, as is the lone tree. In the one on the left, the Santa& Sleigh are also from that set, the other uses the Inkylicious one again.


Final two, and back to the Scribble Snowman, again stamped on film and glittered.The Visible Image treeline used again, and the Indigo Blu large tree.


I'm also going to enter this into the
Crimbo Crackers Challenge. 
Winter Wonderland Challenge. 
Christmas Cards All Year Round.
Sparkles Christmas Challenge.
Crafty Hazelnuts Christmas Challenge 
ABC Christmas Challenge 

Wednesday 16 January 2019

WOYWW #502-The Work In Progress Edition.

Bit of a mess today, stuff strewn everywhere.  Can't show yet what I'm working on, as it's a commission card. But, it's Wednesday again, which means we all head off over to Julias place, The Stamping Ground and share our desks in all their glory.
 You may notice the shiny new Glass Media Mat, the Tim Holtz/Tonic one. Lots of great features, not least of which is that it's Black! Unboxing & review HERE, if anyone's interested.

 I did make a hit on my UFO's, I would say dent, but it's more of a pinprick, to be truthful.
9 cards made so far, and the post is HERE. That's Part 1, but we'll be well into double figures by the time I get them all used up. I'll only worry if it looks like I'm going to hit 3 figures!


More on the review front in this post,HERE. You may have heard about Picket Fence Life Changing Brushes. Or not. But if you have, and had considered them, go read this post first.
These are the $50 (£40) brushes- yep, you read that right. 


This set (right) is the £7.99 version from E-bay.
Professional Make Up Brushes. And yes, they are the same thing, as a lot of ladies on SCS were saying. And that's confirmed by a lady who commented on my post, saying she bought a set of the Picket Fence Brushes, and some of hers have 'Foundation' and 'Eyeshadow' on the handles! 
And even the E-Bay sellers are cottoning on to the fact that crafters can be stung for as much as you can get- my set cost £7.99 on Friday, on Monday when I went back there to get a link, they'd gone up to £12.99. American ladies said they were seeing the same thing too. But it still beats $50.
 So, I think I'm done, Oohh no, just remembered something. A couple of Saturdays ago we popped up to Amelias Crafts, as they spent the Christmas Holiday remodelling the shop, with a new layout, so they had a big re-opening. They were giving out raffle tickets for a prize draw, and  yesterday( Tuesday) I got a call to say my ticket got picked out, and I've won a place at a Tracy Evans workshop in September! Apparently, she designs and creates for Aall & Create, so that should be an interesting day.
 Which now does just leave......And Finally.......

Actually, I think it's my Enabler In Chief who gets left unsupervised!

Monday 14 January 2019

A different sort of Ink Blending Brush

Some of you may have seen the hype around the Picket Fence Life Changing Brushes- and from the name they clearly think they're going to be the best thing since sliced bread.
 I did see them demoed by Jennifer McGuire in a video recently, and they seemed to do a great job of soft blending. But the price is Eye watering!

That equates to roughly £40 over here, and I don't think they are actually available in the UK yet.
 However, I came across a thread about them on SCS- 
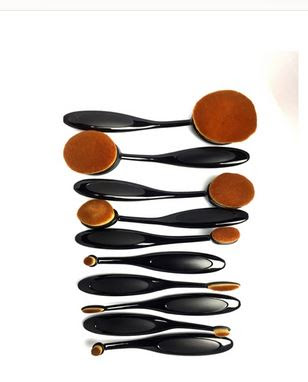
Splitcoast Stampers- in which a number of people said they were no different from the sets of Professional Make Up Brushes you could get on Amazon & E-bay for a few quid. The pic top left is of the actual PF brushes. This pic is my set of Make Up Brushes ordered off E-Bay.
Similar much?
 So, in the interests of saving you money, I decided to give them a go. My set cost me £7.99 but when I went to get a link for you, I see they've gone up to £12.99, and I only ordered mine last Friday. Interestingly, some of the American ladies were saying they had seen just this happening, as sellers had obviously realised that crafters were jumping on them smartish.
 The link I have given goes to the search results page, and if you scroll down a little, there are still a lot on offer around the same price I paid. And the few sets on Amazon are a lot more expensive.
 So, quality.
 They are a really super-soft brush, and feel very smooth. There is a wide selection of sizes, from a very small round one you get two of, up to a quite large round one.So 7 in this shape, as you get two of the smallest.

You also get three sizes of a thin, narrow brush too- I can see that being really useful if you wanted to apply colour into a narrow space.

I have to say that in trying them out, I didn't get any problem at all with shedding hairs. Not one.
 The handles are a nice soft black rubber feel where you hold it, and I have to be totally honest and say the rest of the plastic handle does seem as though it could break easily with too much pressure, but as you will see, that actually shouldn't happen.


Now I'll show you my trial and error, along with the results. At first I could only get a blotchy application. I dabbed the second largest brush on my Distress Inkpad, and dabbed it off on the glass mat first, then started in from the edge. As you can see I got quite a lot of ink at the edge, before it started to fade out. But I will say the fading out goes on for a long time, putting a very pale coat on the cardstock.


So I moved around the cardstock, getting very similar results, and I'm starting to think these are not going to do the job at all. I could get really light applications, but not right from the start.


Here I've flipped the cardstock over, and tried again. This time with way more success, as I realised the secret to these is to hold the black part of the handle in your fingers, and to not put any pressure on the head of the brush. Which means it shouldn't snap.
 I'd been applying pressure by sort of leaning onto the brush part.


This time using Oxides, and I got a lovely pale, smooth application of colour.


Switching over to red.
It has been said that all you need to do to clean the ink off is to wipe them over a Microfibre cloth, but to be honest, I found that still left some ink behind. I think you probably need to scrub them back & forth over one, rather than just wipe.

Also, you can wash them out after use.


Here I was trying out the very small round brush, and one of the narrow ones.
 
I think the small round would be good for 'spot' addition of ink. Like if you'd white heat embossed a snowflake, say, and wanted to highlight it with some blue ink.
 Very easy to get narrow streaks of colour with the thinner brush. Again, it starts out really pale, but you can build up the colour.

To sum up, these actually do a really good job of applying an extremely light coat of ink. If that's something you want to do, and struggle with sponges/regular brushes, these may well be worth a try. The most important bit to remember is to use only the lightest touch, no pressure on or towards the brush end. That will only get you a heavy application of ink, and I'm pretty sure snap the handle.

An End of an era

An end of an era

I write this with a broken heart, that only time can heal My beautiful, wonderful wifelet Shaz (Silverwolf) passed away peacefully in the ea...