A warm welcome to all my visitors,

Thank you for taking the time to come and look at my blog, I really do appreciate it. I would love you to leave me a comment, even if it’s just to say Hi. It means I can come visit you!

All my designs are original, so copyrighted to me. If I have been inspired by someone elses work, I have named them in the post, and where able, I have provided a link.

Please feel free to use my designs for inspiration, I just ask you to credit me, and provide a link back to my blog.

Thanks, Shaz XX

Thursday 29 September 2016

Honey Doo Cards #2

The second half of the batch started the other day.

   No step by step, as I covered that in the post HERE.  The only slight difference is the Black & White card, which uses a different stamp-called 'Butterflies & Flowers Large Corner.'


 The sentiment is Scribbled sentiments from Phill Martin, and two sets of black half pearls were added for balance.
 All three panels fit onto an A4 folded cardstock base.


This blue one has a Ribbon & Bow die cut, Filligree Bow along the bottom, and to balance, a Phill Martin Decadant Damask Sentiment matted along the top. I masked off the Damask centrepiece again.


Finally, the Plum coloured one, and again another Ribbon & Bow die cut, this time Lattice. I left the Plum coloured cardstock matt a little longer than the image, and added the ribbon on top.
 In each case, I've added a few half pearls to some of the circles of the design.

Wednesday 28 September 2016

WOYWW # 382

Well I don't know about anyone else, but I think it's suddenly got mighty chilly! Straight after the first day of Autumn too. Still, a good reason to stay in the warm and craft, I reckon. Desks from around the world, in all their glory, can be seen by linking up at Julia's place, The Stamping Ground, and joining in the fun.


My desk, in all it's cluttered splendour this week. I've been making some Birthday cards, in the post below, and still have the makings for 3 more from the same stamp, bottom centre. In front of them, boxes with acrylic pearls and gems in. Just behind that, a Really Useful Box with pre cut ribbon & bow die cuts in, and next to them, another batch of Birthday card fronts waiting to get made up.
 Ink pads, DST, Glue dots and Pop dots here and there. Reading glasses, vellum flowers, ruler and tweezer scissors. A bow maker- subject of the post before the Birthday Cards- pot of paintbrushes and a few other odds & sods at the far end.
 My UFO box at the back is getting over full, I really should see what I can make with what's in there.

The most eagle eyed will have noticed a new tab at the top of my pages- Christmas Cards Gallery. I've been on a real roll this year, and there are some new ones in posts lower down. I've put all my Christmas Cards on this page, each has a link to the post about them. Just means people can browse the images without having to go through loads of posts.


This is the most recent batch of cards born from that jumble on the desk.


Well, still not had any appointments through, but I did phone up on Friday and chase it, so hopefully won't be long. But it does mean that we can get to The Happy Stampers Festival this weekend, which I'm really chuffed about!
 We've booked a Premier Inn room for Friday night, same place we used last time which is only 5 minutes away from Hulme Hall. So we'll travel up Friday afternoon, then come back after the show on Saturday.
 It's about 2 1/2 hours drive from us, so means Doug doesn't have to do it twice in one day this way.
 As far as I know, other WOYWWers going are Helen (H), Neet (Hickydorums), Chris (Pearshapedcrafting) and Lisa ( Lisa's Craft Garden). Will be great fun to meet and catch up with all these lovely ladies. And of course, stuff will be purchased, which I''ll share next week, :)
 Have a lovely week everyone, and I'll catch up in a while.
And finally, a funny for the day.

Tuesday 27 September 2016

Honey Doo Crafts Birthday Cards.

Well, as there's been such a lot of Christmas Cards lately, I thought it was time for a break, and a change. Birthday Cards it is then.
The stamp used in these is from Honey Doo Crafts, and is called Flower Fountain.


I stamped out a couple in each colour, using Archival ink in Plum, Cobalt and Jet Black.


I stamped two on each sheet of A4, then cut down roughly, so I could decide on the card size later.


Next step was to sort out some coloured vellum, and again stamped each image twice. As the Archival ink was on vellum, it stayed wet long enough for me to heat emboss with clear powder.
 I only want the flowers out of these images, to layer onto the original stamped piece.


Cue the fussy cutting. Not my favourite pastime, I admit, although these curved tweezer scissors I found in a drawer- yes, I was looking for something else entirely- did make it much easier.


Next step was embossing some lines on the reverse of the flowers, roughly following the stamped detail, to give some shape & texture to the petals.


First colour completed.

I used a white vellum with coloured dots in, and a vellum colour to match the flowers too. Love how the black vellum flowers came out, they look sort of pinstriped.


I did give them a blast of Crafters Companion Silver Glitter spray, and when dry, created centres with some Glossy Accents and matching seed bead mixes.
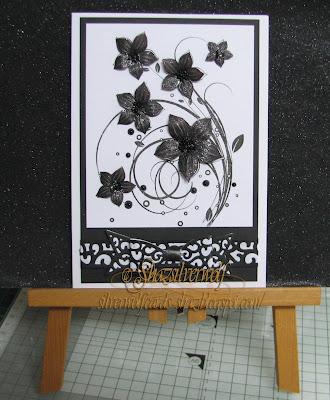
 The Black stamped piece was trimmed down o that it would fit a 5" x7" card base once it was matted onto black cardstock.
 I left the black matt longer than the image, and wrapped around it a ribbon & bow made with a Sue Wilson die, called Filigree Bow. Once it was stuck to the card front, I added the Vellum flowers, with small Pop Dots to give a little dimension.
This one I left without a greeting, which I tend to do with a % of the cards I make, so I can use it for whatever I need at the time.


 The process was similar with the Blue card, although this time I cut a narrow panel to attach another Ribbon bow to, this time using a Lattice Bow die, also by Sue Wilson.


 I also stamped a Birthday Greeting on this one, a Phill Martin Scribbled Corner Sentiments stamp.

This one is an A4 sheet folded sized card.


For the final in this set of three, I first matted the image onto a plum coloured card, trimmed to fit another A4 folded card.
This time I used another Phill Martin sentiment,  from a set called Decadent Damask Sentiment Borders. There is a damask accent in the top centre of the stamps, but I didn't want that, so I just masked it off while I inked the stamp, then removed the masking tape before stamping it in Plum Archival along the base of the card.


In each case I also added a few half pearls to some of the circles in the design.

Sunday 25 September 2016

Die Cut Baubles Christmas Cards #2

I posted some cards the other day, made with the 'negative' space from die cutting baubles. This half a dozen cards here use the 'positive' image that was cut out.
It made for some very easy cards, and also made a dent in the Christmas backing papers I have so much of. Just  a sheet of said backing paper onto the card base, and Baubles placed on top with Pop dots, and a ribbon bow added to each one. I'd also jazzed up the baubles a bit by adding some bling.


 First one on a 5"x5" square base, the card pack in use here is an Anita's one. Don't ask how many years old it is!


Then I switched to 5"x 7" bases.


The backing papers on these come from an old Dovecrafts pack called 'Christmas Blues'.


 On the left, the paper was from a sale pack in Hobbycrafts earlier in the year.


Final one, and this time I used some  printed vellum, attached with star brads in the corners.
 Two batches of cards from one die cutting session. What I call a win-win!


Bowmakers- Useful gadget or not?

 I've acquired a couple of these over recent years, and I have to admit, they've been largely unused. Mainly because I couldn't get the knack, and hadn't bothered to go to the source of all instruction, You Tube. On the left, the plastic one is from Papermania and comes with 4 pegs, and cost about  £5. It also comes with instructions on the back, but I've either thrown that out, or put it in a safe place!
 On the right, the wooden one was an E-Bay buy, cost a couple of quid, and there are plenty on there for sale. To be honest, you could make this one yourself- or ask a friendly Hubby- just drilling a few holes in a block of wood, and buying some dowelling of a suitable size.
 The position of the holes themselves will determine the size of the bow- literally the width across two pegs is how wide your finished bow will be.
 The Papermania one will let you tie a bow from 3/4" to 2 3/4". If you have the pegs adjacent, you get a 3/4" bow. One hole apart, just over1", 2 holes between posts gives us a 1 1/2"" bow. 3 holes apart, a 2" bow, 4 holes gives you a bow just over 2 1/4", and finally 5 holes apart gives you a 2 3/4" bow.

 The wooden one is slightly different. Using the narrow pegs you can tie a bow from 3/4" to 1 3/4". The wider pegs are spaced a little differently. You have a block of 3 together, from which you can make either a 3/4" or 1 1/4" bow.  The two separate holes will also give you a 1 1/4" bow, then if you leave one peg in the left hand hole, and move the other one hole across you can tie a 2 1/4" bow. Move the peg to the right once more, and you can tie a 2 3/4" bow. Move to the end hole and you get a 3 1/4" bow.
 In reality,  the width of your ribbon would dictate which size of bow you make- the narrower the ribbon, the closer together you will want the pegs, in order for it to look pleasing.
The bows here were all made using the pegs either adjacent, or one hole spacing. I've left longer tails, as I haven't yet decided what I will use them on, so I can trim them later.
 There are, as I said, good videos on You Tube, and I will link to the three  I found most helpful, HERE, HERE and HERE. 
 Once you've done a few, the knack is easy, and you can produce bows in about 15 seconds. So very useful if you need a lot- Christmas Cards, or Wedding Invitations maybe.
 It's just a case of choose your spacing,
Wrap your ribbon round, and cross over at the back.

One important point- make sure the front of your bow, which will be the side facing away from you, stays nice and flat, and doesn't get twisted.


Hold the left hand piece still, that doesn't move. Poke the right hand end straight through between the posts, underneath the ribbon.


Now bring that end back over the top of the ribbon wound around the posts.

Then tie in a knot with the left hand end.


Pull tightly, making sure the front stays smooth, and that you centre the knot between the posts. Then slide the bow off.


 It is quick and easy and produces a very nice bow. Some of the videos I've linked also show you how to make a 2,3 or more stranded bow which do look very pretty.

So mine will be getting more use in the future. I prefer the bows made with this to my normal method of creating two loops, then tying them into a knot to make the bow.

Friday 23 September 2016

Die Cut Baubles Christmas Cards #1

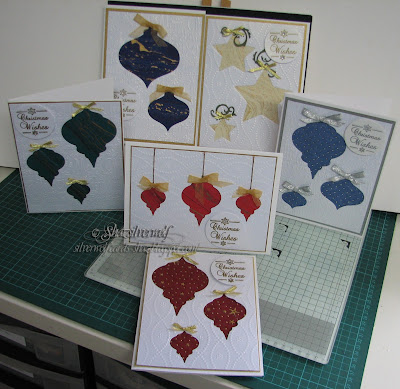
As the title implies, there are a few cards made with these Bauble die cuts.
 In fact, these particular ones came about  as a result of me  die cutting baubles for another card. I saw the 'negative' shape left behind, and thought 'hmm, I can work with that idea'.


And so I have another 6 cards for my Christmas stash.

Eagle eyed readers may also see that there is a new page in my links at the top- a Christmas Card Gallery. I thought I'd make use of another of the 10 pages Blogger says we can have, and put the pictures all in one
place. Each set of cards does have a link to the original blog post, so if a browser wants more info about products used, they can just go to the post, but otherwise you can just look at the images.

For starters, I wanted to use an embossed background to die cut from, so I needed a big enough folder to give me room. These two- I've put some black card in them so the design shows better- are a recent purchase.
 They are Crafts Too folders, bought from The Art Of Craft. Called 'Seamless Circle' and 'Happy Christmas' respectively, they measure  5 3/4" x 7 1/2"(14.6x 19cm), which means they will cover the front of an A4 sheet folded card.


I selected my first 3 dies, this set is called Heirloom Ornaments 2010 from Spellbinders. I used the middle 3 dies- there is one larger and one smaller.


I also had an idea of the paper I wanted to use. I use the word paper loosely here, as they are almost fabric like, and have a raised printed design on them.


 The die cut front,from the 'Seamless Circles' folder, and the sheet I'd decided to use with it.


Double sided tape used to stick them together, them matted onto some gold card.


Some small ribbons added with a glue dot to the top of the baubles.


Next up I used some of the marbled paper- the design on this one fitted the baubles perfectly. This ones cut from the Merry Christmas folder.


A different die for this one- an X-Cut 'Stars' die set. 5 dies in this set and again, I used the middle three.


Backed again with one of the marbled paper sheets, and I added a small flourish to the top of the bauble, along with a ribbon bow.
 The Flourish comes from the Tim Holtz strip die 'Winter Foliage'.


Back to the baubles for this one, and I changed it up a little, making it a landscape orientation, and just using two dies. I added a 'string' with some gold thread secured at the back with DST, then matted onto gold card again.


 Still making changes, the card on the left uses Spellbinders Heirloom Ornaments 2011, and I used a mix of the two sets for the card on the right, both using the Merry Christmas folder.


 The dark blue has a gold matt and bows, and as the lighter blue one has silver dots on it, it's matted onto silver card, with silver bows added.


The sentiment is from the Phill Martin set 'Snowflake Sentiments',stamped in Gold and heated with Gold Detail EP, added with pop dots. I've also added a small acrylic gem to the centre of the snowflakes in the sentiment.


I stamped and embossed a sentiment in silver to match the pale blue one.


I've also got all the 'positive' shapes left over, which will make another batch of cards, mounted onto a Christmas Paper backing, So 12 cards from one batch of die cutting.


Die Sets used:

 Heirloom Ornaments 2010,(left)


Heirloom Ornaments 2011(Right)
 both Spellbinders.


     X-Cut Star


An End of an era

An end of an era

I write this with a broken heart, that only time can heal My beautiful, wonderful wifelet Shaz (Silverwolf) passed away peacefully in the ea...