A warm welcome to all my visitors,

Thank you for taking the time to come and look at my blog, I really do appreciate it. I would love you to leave me a comment, even if it’s just to say Hi. It means I can come visit you!

All my designs are original, so copyrighted to me. If I have been inspired by someone elses work, I have named them in the post, and where able, I have provided a link.

Please feel free to use my designs for inspiration, I just ask you to credit me, and provide a link back to my blog.

Thanks, Shaz XX

Showing posts with label X-Cut. Show all posts

Friday, 23 November 2018

Lots of quick die cut cards!


Right, lots of cards here, all using die cuts, some as a frame, some as the main focal point.
 The top three use frame dies, and a Happy Birthday sentiment die from Quietfire/ Creative Expressions.They're all backed onto glitter cardstock, and the sentiment layered with black craft foam.

These four used up some scenic stamping images I'd done in the past that were in my UFO box,
The leaf shape is a Sizzix Framelits die called Birch Leaf.
 The star is from a set I think I picked up in The Works.
 The circle one is a die that was gifted to me, so I'm not sure exactly what it is. The die is white in colour, and I'm afraid I don't know who makes those, if anyone does, I'd love to know.


 All the cards use a C5 card base.


The embossing folders I used are ( far left) Ocean Waves, Creative Expressions, and on the right, Swallow Pattern, from X-Cut.


These use a die by Memory Box, called Large Circle Burst.
 In each case I've backed them with glitter card, and then added a
Tim Holtz Butterfly die cut.
 I'll leave adding sentiments to these, so I can use them for many different occasions.


Not sure where the medallion die came from, may have been gifted. It's backed with a glitter paper with a shiny coating.


These use the Circle burst die again, and a die cut birthday sentiment.  The card bases are 5" square.

 The tree outline die I think came from Aliexpress, as I was trying to find the Memory Box version, but it seems to have been discontinued.
 The Chinese Lanterns is a stencil by Sweet Poppy, and was done in Bronze stencil paste.


Again, leaving the sentiment until I need them for something.


One of the cards from the first picture, the die is from Paper Trey Ink, called Quatrefoil.
 I matted it onto some rainbow glitter card, then added the sentiment layering it with black craft foam for dimension.
Here I've used a sable brown glitter card for the top one, and gold for the bottom. The sentiment done the same as before.I think a lot of these would make great cards for men, even with the glitter!

Final card is for a relatives birthday in December .
 I cut the panel from some metallic blue cardstock, and then cut the number from another scrap of it. It's backed with blue glitter paper. The TODAY word is a die I was gifted, and I think it was from a Stephanie Weightman set.


Wednesday, 14 February 2018

WOYWW #454

And a Happy Valentines Day to everyone!  Our mid-week desk-fest begins again, over at  Julias, the Mistress of the Desks,at The Stamping ground.
So, what do i have for you this week? Well, I took myself out to town for a walk around yesterday, and popped into The Works, as you do. Snagged a couple of bargains,some Black acrylic paint, and some clear Banner stamps.

 Made some Stampscapes cards, in the post below.
 Then I was working on Beloved Hubbys Valentines card, and picked up one of my pairs of scissors, when I remembered something I saw on a TH video from Creativation, on some Tonic scissors.
 He said as well as being non stick the pair of blades had one that was serrated, and one plain. So you could flip them over and either cut a tiny serrated edge, or a plain one. Now, rather like the other Tonic releases, these looked exactly like my X-Cut ones I've had for quite a few years. I kept meaning to check mine, as the main reason I rarely use them is I don't always like the serrated edge if I cut something out with them.
 And guess what? Yep, mine too have the same pair of blades. Leaving me with two questions- how have I never noticed this? and How come EVERY single time I've used them, I've always picked them up the same way?


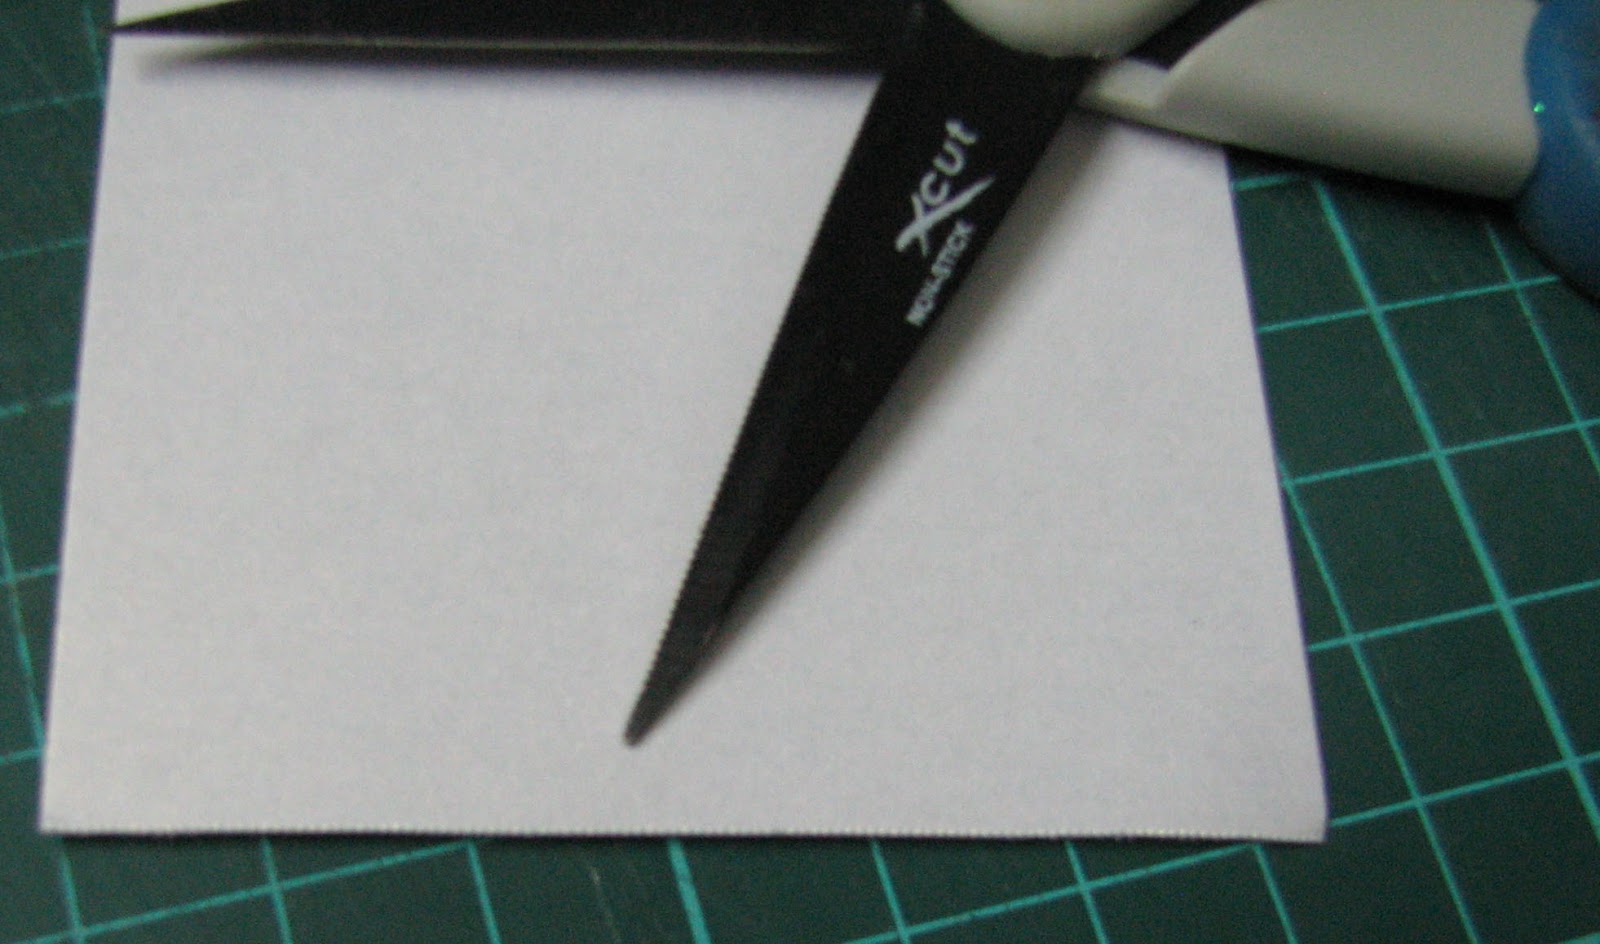
Not sure how well these pics will show it, but  this way up you will get a smooth cut . I cut a piece off the card its lay on to show a smooth cut.
 Serrated blade at the top, smooth one at the bottom.


This way up- serrated blade at the bottom- you get a serrated edge, hopefully you can see it on the cardstock.

 So, apart from this exciting discovery, it convinces me even more that Tonic manufacture X-Cut.


And posted at the bottom so it won't appear on our FB feed, Beloved Hubbys card. I've never made a shaker card before, and I'll blog it in a few days, as it wasn't so much a learning curve, as a learning Ski slope, and I can't ski!


And Finally....................


Speaking for most of us, I think.😏


Wednesday, 7 February 2018

WOYWW #453

Good Morning everyone, and welcome to our tour of the desks, courtesy of our leader, Julia, over at The Stamping Ground.
 Been doing some reorganising and tidying this week, and had a change around on the desk-behind-the-desk. I've probably just given myself more room to pile stuff, but it's the thought that counts.😁
 There were Christmas cards made at the weekend, in the post below this one.

 Three of the new Oxide colours bought- I'm only buying the colours that really appeal to me in the Oxides, I have enough inkpads to stock a shop, and that's not an exaggeration.


Speaking of new releases, did you see the new TH/Tonic Guillotine? Whilst the colour may be different, it is identical to my X-Cut one, which I've had for probably 10 or so years. Even down to the extension ruler which fits underneath. Leading me to wonder if Tonic & X-Cut are the same company?


Whatever, if the Tonic one is as reliable as this one, which cuts as well now as it did the day I bought it, it'll be a good purchase when you need one.
 I also have a smaller X-Cut Guillotine, and that too looks identical to the small Tonic/TH one.


Beloved Hubby bought a music CD/DVD which arrived from France back last week. Just look at all these fab stamps that were on the envelope! Mind you, if that was genuinely the cost of the postage, and they are Euros and cents, that's almost £40 worth of stamps!  Shan't complain about postage costs over here ever again.


Some playtime with Brusho's onto smooth watercolour cardstock earlier today. Ready for some images to be stamped on top.


And finally.....................


Monday, 20 March 2017

Christmas Card Club, Challenge #6

Right, I'm finally back in the game with this fortnights challenge. I'd like to say a huge thank you to all the ladies in the club, both for their patience while I got better & found my mojo,😃, and for the get well cards & good wishes.
 So, onto this challenge, set by Granmargaret, which was to use two, or more, patterned papers. To be truthful, I could do with following this particular theme a lot more- I have so much patterned Christmas paper, it's embarrassing!
Well, here we are- two patterned papers, plus I also managed to use an image I must have stamped years ago. I spotted it in my ' oddments' folder😯when I opened the box I store all my paper pads in. I have to admit, I have no idea who made that stamp, and I'm not sure I still have it, but this is definitely the first time it's appeared on anything.
It had been stamped in black and heat embossed onto a pale cream paper, so I decide to use some of the Imagination Crafts Starlights paints on it. I did two, as I wasn't sure what colour papers I'd end up using.
Before and after. I did two completely different colourways, and if you haven't seen the Starlights yet, they are gorgeous jewel shades filled with gilding flake dust, which gives them a gorgeous sheen. They spread for a very long way, and mix together easily too- I mixed the green and Pearl white to make the pale green for the one tags background.


Here I'd backed them with some cardstock,  as the paper was curling a little.
 Two shots, hoping you will be able to see how lovely the paints are.


I now had a search through the paper pads, and found this one. I'm not at all sure where I got it, but it was either The Works, Happy Stampers or the NEC!
It does have some nice co-ordinating papers in traditional Christmas colours.


I chose these two, and covered the front of a 5" square card base. Across the join I placed a border peel-off. They are rarely long enough to do a diagonal on a card, but when I have a focal piece to add, I just cut it in half, and have a gap under the focal image.


I picked this tag, as the colours seemed a good fit for the patterned papers.


  You can see I have punched the hole in the tag. I used a tool I bought a while ago, but hadn't actually  tried out till now. Its a Japanese Screw Punch, and this one is by X-Cut. I have to say it's a great little tool- punching holes in stuff has never been so easy! Lovely clean cut hole too. It comes with 3 different sizes of hole punch, which just screw in, and they are stored in the handle when not in use.

Fab clean hole, in one totally effortless operation.
 You just push down the handle, and job done.


 Next a selection of thread to tie through the hole. One is red/gold, one gold, and one red/green/gold.


And that's it. I mounted the tag with foam pads, and added a peel off sentiment to finish.

Saturday, 25 February 2017

Card for a New Home.

Right,I made this card a few weeks ago, and with waiting for it to arrive, then going into hospital, I've just realised that I hadn't blogged it.

The main stamp is by Hobby Art, from a set called 'Hares'. We spotted this at The Happy Stampers Festival last year, and as Doug pointed out, it would be perfect for anything for LLJ, as she is known for her love of Hares. So when Jan announced they were moving to Wales, and that they had a date for moving in, I remembered this stamp set.
This is the journal I was trying out some scenes using Card-io stamps in a while back, and I can't figure why I've never done this before, instead of winging it and hoping for the best. I've always got a stack of scrap paper under my work, and have occasionally done a test imprint on that, but never tried figuring out placement and colour.
 Anyhow, first off I stamped him in black, then built up the grasses around him using an assortment of green dye inkpads, and some stamps from an Inkylicious set called 'Essential Grasses'. Which it is, I think. A great selection of types of grass.


I didn't think I liked the black version, so instead tried it in Archival Rich Cocoa, which is what I went with for the card.
 When I stamped him onto the card base, I also stamped another onto Post-its, so I could mask him when I wanted to add the sky.
 The hare was coloured with Distress Markers in Antique Linen, and Walnut stain, using a waterbrush to drag the colour.
Bit of a jump here to the finished scene, when I realised I'd forgotten to take any 'in the process' pictures!
 I stamped the hare in Archival Rich Cocoa, then the grasses surrounding him in Adirondack Meadow and Lettuce.
 Tearing some scrap paper into hill shapes, I used a soft brush to create the hills with the Adirondack greens again.
Using Adirondack Sunshine Yellow and Sunset Orange, along with a dry baby wipe, I created a sunrise behind the hills, then put the mask over the hare.
Again using a soft brush I applied Adirondack Stonewashed all over the sky area, then added Sailboat Blue onto the upper portion of the sky, to get a sort of mottled look.
 A portion of fencing from another Hobby Art set was stamped in Archival Black onto one hilltop, then an Inkylicious Flock of Birds, and a butterfly added.


 The corners were rounded off- this little rounder from X-Cut is actually really good, better than other cheap ones I've had. I do have the Corner Chompers, but this one was handy.

 I matted the image onto dark blue cardstock, then rounded those corners too.
 Next it needed a sentiment, and one of the Phill Martin sets I've bought recently, Mini Baroque Occasions Set, has a New Home one in it.
 That was stamped in Archival Cobalt in the upper left of the scene.
I mounted the image onto a 7" square card base, then tied a blue and white spotted chiffon ribbon along the bottom.
 And then it was done.

Stamps Used:
 Hobby Art, March Hares
Hobby Art, Woodland Glade( Hillside fence)
Inkylicious, Essential Grasses
Inkylicious Take Flight( lots of bird flocks)
Inkylicious Playful Cats ( Butterfly)
 Phill Martin Mini Baroque Occasions Sentiment Set.


Tuesday, 1 November 2016

More Birthday Cards!

Right, this is the last batch of Memory Box cards for a while.
 When I was doing the earlier ones, using some pre-embossed cardstock, I said it gave me another idea.


What I've done here is to divide the die cut in two, and emboss the plain half with various embossing folders.


This one uses an X-Cut folder called Cable Knit, on a background taken from a paper pack of Christmas Papers recently bought from The Works. They don't all have a Christmas image on them, this one is just a mottled blue .


This one used a Cuttlebug folder,Cogs & Wheels. No backing paper, and I think this is a sort of masculine looking card.


The next one has a sheet of backing paper from a pad called Far East, and the folder is Craft Concepts Weaving Blocks.
This had another sheet from the Far east Paper Stack, just a marbled green paper. The Folder is a Quickutz one, Diamonds and Dots.

 Next one in white, and the folder is called 'Lines & Dots', by Indentz. I backed it onto some circuit board looking backing paper. Another possible masculine card.


Final one isn't too easy to see the embossing, but I scored a straight line under the greeting, then diagonal lines using the Stampin' Up board below that.

Monday, 31 October 2016

Memory Box Grand Happy Birthday Take Two.

 Larger cards this time, 6"x6" square. No backing paper either, just the die cut straight onto white card base. For a bit of a pop, I did add die cut balloons, from an X-Cut die set.It gives you, I think, 6 different balloon shapes and sizes, and options for strings and bows too.
 The largest balloon was stuck straight down onto the card base, then I layered the next one slightly raised, by adding a couple of squares of card to the back before sticking it down. Then for the final one I added a square of card to the back, then a couple of pop-dots. The reason I stuck the card to the back was that I die cut them from foil paper, so I wanted to make sure they didn't get flattened.
 And that was literally all there was to it. Really fast cards, which is always a bonus.


An End of an era

An end of an era

I write this with a broken heart, that only time can heal My beautiful, wonderful wifelet Shaz (Silverwolf) passed away peacefully in the ea...