A warm welcome to all my visitors,

Thank you for taking the time to come and look at my blog, I really do appreciate it. I would love you to leave me a comment, even if it’s just to say Hi. It means I can come visit you!

All my designs are original, so copyrighted to me. If I have been inspired by someone elses work, I have named them in the post, and where able, I have provided a link.

Please feel free to use my designs for inspiration, I just ask you to credit me, and provide a link back to my blog.

Thanks, Shaz XX

Wednesday 27 February 2019

WOYWW #508- The Scraps Edition.

 Yes, made a batch of pieces from strips of card again. Mainly want to make some more general & birthday cards, but also had an idea to use them with some Memory Box dies I've had forever, and never used.
 It's a Hanging Ornaments die, and the backing dies for the Baubles.
 As always, Wednesday means it's link up time at Julias place, The Stamping Ground.


 Came out well, but would have been easier to die cut if I'd made the pieces with card strips onto paper, or really thin card. I'd used leftovers from matt layers, so it was quite a heavy cardstock.


So that's pretty much all I've been up to, apart from drooling over a dress! Popped up in an advert on FB for a company we buy from, Rebels Market.


Now, I've been saying I need to lose some weight, I have too much stuff I can't fit into, and my Diabetes would no doubt improve from it too. So this is my motivation! I absolutely have to fit into that dress.


Which brings me round to.....And Finally.......


Think that pretty much covers it!

Wednesday 20 February 2019

WOYWW #507- or the getting my act together edition.

Yep, because that's a thing. Of course, maybe if I did all the stamping/ putting in inserts to my cards
 and sorted out the envelopes, and  bagged them up when I made them, instead of putting them to one side ' to do later on', I wouldn't have found myself with a card mountain that needed sorting.Mainly a general assortment of cards, but also a decent- or indecent, depending on your point of view- amount of Christmas cards too. So that's been my job for the last couple of days.

 
 Last ones on my desk now are all the Christmas ones.
 It would of course make my job easier if I didn't do so many different sizes of cards, or in so many orientations.Or if I did it when I made them.๐Ÿ˜Ž
 Maybe next time. Most likely not, though. Know your limits, I say.

You may also spot a storage tin on the left, with the new Archival pads in Distress colours. Because yes, I'm a TH fan girl.

I'd asked my local craft store, Amelias, if they'd be getting them, and she said yes, so I'd asked- on FB- if I could pre-order the set, and a storage tin. She replied that I could, and about 3 other people had seen the message and replied to her  Me Too, lol. Anyway, she messaged me Friday to say they were in, so we popped up to collect them. And stamps may have fallen into my basket as well.๐Ÿ˜Ž And a dragonfly die too.
 The Paper Artsy one with the elephant is super cool, and sort of a pre release. They got them when they went to the Frankfurt show, and can sell them, just not allowed to put them for sale on their website till the launch in a week or so. In other good news for them, Nikki (owner) posted yesterday that Amelias won Best Independent Craft Store 2019 in the Craft Business Awards. Really pleased for them, they've worked so hard to build the business, as they took it over when the previous one was failing, and they've really turned it around.


In other shopping news, lol, came across this tube of glittered washi tape in The Range. I admit I've never got into washi tape, just doesn't do it for me, but I *may* have been attracted by the glitter๐Ÿ˜Ž.


The general card mountain, all with inserts ready for bagging. I tend to bag them just to keep them clean till I need them.

And I'm going to need a bigger storage box, lol. It's so full, it's pips are squeaking. And I've still got a million UFO's to make up, and a lot of ideas for more too.
 So I think I'll be bringing the whole box to Junes Crop10, and any sales will go to the days charity.


Hubbys Valentine card is in this post HERE.
Last weekends Christmas cards HERE,
 So, I think I'm done, oh in reply to those who asked about the colouring last week, no I don't intend using them on cards or anything, the books are really just practice for me to get better at colouring so I can colour images for cards without getting the heeby jeebies! And in a statement I never ever thought I'd make, colouring with pencils is so relaxing! I can easily lose a couple of hours doing it.
 I'll be leaving my link as always with our Beloved Leader Julia, over at The Stamping Ground, and I'll be round to see what everyones been up to later on.
Which brings us round to......And Finally........

 So apt for this week!

Sunday 17 February 2019

Christmas Card Club Challenge #4- Birds

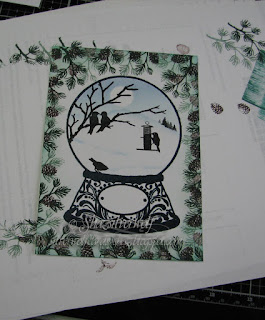
Our fourth Challenge of the year, and this one has been chosen by a new member, Gwen, who asked for Birds. I've chosen to use Card-io and Rubber Stamp Tapestry stamps to create mine.


Two are very similar, using mostly the same stamps.
 I did two, as the first one I did, the darker edged one, I thought may be a little too dark and busy.

I started in both cases by stamping the Snow Globe, Card-io Crystal Globe, then stamping a mask to cover the outside of the Globe. I added the tree after sponging in a skyline and some snow drifts.
 The tree comes from the Christmas Breeze set, the Bird Feeder, pair of birds and bird from Birdsong 1. A few small trees are multiple part stampings from one small tree in Mini Tall Trees .


Then I reversed the masking to stamp around the outside. This Pine Branch & Pinecone are by Rubber Stamp Tapestry.
 I added Distress Pine Needles around the edge.


 Because I thought it a little too dark, I repeated the process, this time stamping the branch & pinecone in second generation stamping, and adding less inking around the edge.


 I also used Rubber Stamp Tapestry stamps for the third card, from a set called Cardinal in Holly.

 I drew a circle in pencil as a guide, then stamped the Holly branch in first & second generation imprints around that, then added the berry sprig using Versafine Clair in Glamorous. Edged the card with Pine Needles again. After I'd assembled the card, I added dots of Liquid Pearls in Garnet to the berries.
 The Bird & Branch comes from Card-io Christmas Scenery 2.
 The sentiment is a Phill Martin one.

Friday 15 February 2019

Valentines Day Card

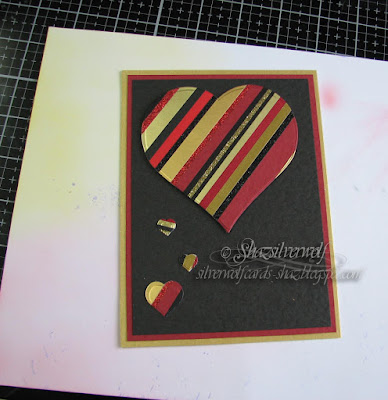
This is the Valentines Card I couldn't show on Wednesday, for obvious reasons! The base card is an 8" square, which as I've said before, actually means the envelope is 8" square, the card is 7¾".
 The main focal point for the card was the hearts, die cut from a piece made with red, gold & black strips, a technique done back HERE.
 I layered the black card onto dark red, then gold cardstock. The large heart is attached with foam pads, the smaller ones added with Multi Medium Matte.


Next I created a duplicate matted layer for the whole card front, using the same cardstock. I started with the gold layer at roughly 7¼", and came down a quarter inch at a time for the red and black.


 All three pieces have some texture to them, the red & black being a hammered finish, and the gold has a cross hatch pattern.


I layered up both with DST, then added the focal piece to the Matt layer.


I didn't add it to the card front yet, as I wanted to add a die cut ribbon, and wasn't sure exactly how this would fit, so decided to wait till after I'd done this bit.


 Normally, I'd die cut these ribbon parts from paper, but I wanted it to match the rest of the card, so used some scraps of the red & black card. This did make the bow a bit thicker, but I found that if I curled it around a stencil brush handle, I could get the bow to curve, without it getting a crease.


 The dies for this bow are both Sue Wilson dies, Classic Bow, and Lattice Bow. The Classic, on the left, is used as a base for the Lattice on the right.
The ends of the bow were stuck down with glue dots, which I also used to attach the bow to the 'tails', and then onto the ribbon.
 I matted the whole thing onto an offcut of the gold card, then added it to the card front, before adding the whole panel to my card base with DST again.

Now all I needed was a sentiment, and chose one from Inkylicious, Today, Tomorrow, Always & Forever. This comes in two sizes, and the smaller one (approx 1¾" square) is used here. Stamped onto an offcut of the black hammer card with Versamark, then heat embossed with gold EP.
 Trimmed it down to fit the space, then matted it on red & gold again.


Stamping was done on the Tim Holtz Platform, as the cardstock surface is quite heavily textured, but this gives a nice solid print.

Wednesday 13 February 2019

WOYWW #506-The Cheat Edition

Yes, I have to admit that this weeks desk for WOYWW over at The Stamping Ground, is a bit of a cheat. Staged, you see. Because what's actually on it, is Hubbys Valentines card, and as he reads my blog, I can't show it yet.
So this is a throwback to Sunday, when I stamped onto some of the Bleeding Art Tissue pieces.


These two I added some extra colour to the butterflies with the Prismacolor pencils.


 There's a post about the whole process below this one. Another to come as I make them up into cards.


Something I actually got last week, and forgot to include, was this colouring book. Got it in Tesco. I've since seen it in WHSmiths too.


Full of awesome images,including some in Greyscale.


Only worked on one image so far, I'll photograph it when I've finished.

Then Doug spotted another cool one on Amazon, and that arrived yesterday. 4 different books in one- Mermaids, Fairies, Vampires & Dragons. What's not to like?
Reckon those will keep me occupied for a while. ๐Ÿ˜


And so, that just leaves
................................................
And Finally........................................................


It's on the Internet, so it must be true!

Monday 11 February 2019

Bleeding Art Tissue Fun

  Had a play with this stuff again last week, mainly as I had it in my head that they'd make good backgrounds for my Woodware Quirky Birds stamps.


The Bleeding Art Tissue is different to ordinary coloured tissue paper, as generally the ordinary sort doesn't  do this, although I've heard some of the really cheap stuff will, but the pack of the proper stuff I bought was from Amazon- where else?- and cost £5.62 for 20  50x76 cm assorted colour sheets.
 Which gives you loads to experiment and play with. There's a wide colour range, with lights to darks in each colour.

The process is really simple. Just add  tissue to a cardstock background, spritz well with water, and leave to dry. How less complicated could a thing be?

The cardstock I've used is just a regular white cardstock, nothing fancy. I had some A3 sheets, so used them.
 I just tore up my tissue, but you can die cut it too, if you wanted circles/squares/ diamonds/hexagons etc. Depends how regular you wanted the background to be. Also, depending how carefully you lay the tissue down and spray will give assorted results. You can see white gaps in my areas of colour, which is from creases in the paper.


You can allow it to overlap, or leave spaces. You can spray the cardstock with water first to help the tissue stay in place whilst you spray it properly.
 The tissue needs to be wet through, but you don't need water running off the cardstock.


 On some sheets I gave a light spritz with spray inks first, before adding tissue, others I just left white.


These took about an hour or so to dry, then I peeled off the tissue. Don't discard this tissue- it's good for at least a couple of uses at full colour, and further uses after that the colours will gradually get paler.


Mine all went into a document wallet for next time.


All the tissue peeled off, and if there were any that you felt needed more, you could place more tissue and respray.


In order to find the best placings for my stamps, I stamped them onto OHP film, with Staz-on.


These were the 4 images I started with, but I added some more afterwards.


Now, I've read that it isn't Staz-on Ink that is harmful to Photopolymer stamps, but the Staz-on Cleaner. I'd also heard that you can use hand sanitiser to remove it from stamps, so gave it a go.


And after. It definitely does do the job.
 And while we're on the subject of cleaning, the colour from the tissue will come off on your fingers, and I can tell you that Imperial Leather soap is ace for removing ink from your skin.


These were all the images I stamped out, after they'd been trimmed down.


These two butterfly ones I've added some colour with Prismacolor pencils.

There'll be a part two to this as I get them all made up into cards.


An End of an era

An end of an era

I write this with a broken heart, that only time can heal My beautiful, wonderful wifelet Shaz (Silverwolf) passed away peacefully in the ea...