A warm welcome to all my visitors,

Thank you for taking the time to come and look at my blog, I really do appreciate it. I would love you to leave me a comment, even if it’s just to say Hi. It means I can come visit you!

All my designs are original, so copyrighted to me. If I have been inspired by someone elses work, I have named them in the post, and where able, I have provided a link.

Please feel free to use my designs for inspiration, I just ask you to credit me, and provide a link back to my blog.

Thanks, Shaz XX

Tuesday 31 December 2013

Scrapjourney: favourite 5 (or so) of 2013

http://debby4000.blogspot.co.uk/
I visited ShazinOz this morning, and she had linked to  A Scrapjourney, a blog by Debby, where crafters are invited to list their favourite 5 projects they made in 2013. She's not being picky over the number, lol, just that they are made in 2013. Which is good, because I had an extra couple I couldn't decide between. I actually found a few I enjoyed for different reasons- trying something new, came out better than I expected (always a bonus), or ones I really enjoyed doing.
 So, in no particular order, here are my 2013 favourites:


This is one of the simple, came out better than expected cards. Just a brayered background and silhouette style stamps in black.


This was a ' I wonder if this will work/came out better than I expected' card, using the SU Swallowtail Butterfly in a triple stamping format, with colour just sponged over & around the image, after it had been stamped in Versamark & heat embossed with white powder.


I really enjoyed making this one, for my eldest sons birthday,as we are both huge Edgar Allen Poe fans. It was a couple of new techniques tried, lemon juice heated to age the paper, and a Stampbord removable fridge magnet.


 This one was a real experiment, and definitely falls into the 'came out better than expected' category. I wanted to try using artists pastels, as I have loads, so really can't justify Pan Pastels as well. I stamped all the images in Versamark, onto a background of sponged Distress inks. For each image I grated artist pastels over it, using a nutmeg grater, then buffed off with cotton wool balls.


I was pleased with how this one came out, as I was CASEing a card seen on Pinterest, using an Indigo Blu stamp. I don't have the stamp, but had a fairly similar one, and was hopeful it would produce a similar effect, which it did.


 I loved the dramatic gothic imagery of this stamp, and simple black stamping on a background of various sponged reds really did it justice, I thought.


 Last, but definitely not least, as its probably my favourite, is the card I made for my Beloved Hubby this Christmas. The image, Snowy Postcard, by Stampendous, was stamped onto white pearl card then cut out with the Spellbinders Heirloom Ornaments 2nd to largest die.The white backing was cut from the largest. I stamped the image again on a post-it, and masked the buildings & snow, then sponged an assortment of blues for the sky. Then it was sprayed with Crafters Companion Iridescent Spray & Sparkle, which is hard to see, but gives the snowy areas a lovely sparkle.To get the black matt for the bauble, I drew around the outside of the die, and cut by hand. The Poinsettias are a Le Crea die, which is smaller than most Poinsettia dies, and works well on cards. The two hearts are triple embossed, using UTEE over Anitas Blue Glass embossing powder- the one heart then having a texture stamp inked in silver pressed to it while still molten.So my Favourite 5 is actually a Favourite 7- but what's a couple of extras between friends?

Sunday 29 December 2013

The post Christmas clean up

I always find myself doing this at this time of year. While I'm putting all the Christmas crafting stuff away, I get into tidy & organise mode. Last year I unmounted almost all my wood mount stamps- the only ones not done are some really large ones, and my Christmas stamps, as they were still packed in their box.So doing the Christmas stamps was something I intended for this year.
Here they all are, off their mounts, and labelled with post-its, so I can add the info to the catalogue pages. Not something I bothered with years ago, before blogging, but I do like to be able to include that info when I use a stamp, although, to be truthful, many of these stamps I've had for years, and most are probably discontinued now.
 This time I have not added cushion foam to them, leaving them as bare rubber. I've bought  a few packs of Tack n Peel, which I've applied to some acrylic blocks, and I'm going down that route now. Takes up even less storage space. As the Tack n Peel only goes on one side, and is completely clear, I can still use the opposite side of the block for foam mounted stamps.Now theres a thing- I had a look at a few with foam on, and wondered how difficult it would be to strip them all back to bare rubber. I discovered that a number of my older stamps actually separated from the foam cleanly with complete ease.
Stamp on the right, mounting foam on the left. No residue at all. I also found any dried on sticky residue can be removed with a pan scourer- saves on the fingerprints, lol.
 Not all of the foam would come off easily, some was still well adhered, so I'm leaving those. Clearly, over the years the adhesive loses its stick, and I can live with unmounting from the foam as a gradual process.


So after this it was time for a bit of a clean up. Especially since Beloved Hubby has been renovating my old craft room for him to do all his computer repairs in, there is enough dust about to carve your name in, even with closed doors.Removed everything from my desk and gave it a good clean. Thats the last time it'll be that clean and tidy!


                                      Told you it wouldn't be long.

Anyway, while I was tidying, I set up my Silhouette for a couple of projects I had in mind. A few weeks ago, I saw some stencils in use that looked really useful- one was letters & numbers, another was circles.I considered browsing the net to see where they were on sale, when I saw my Silhouette out of the corner of my eye, and thought ' don't be daft, cut your own'. So I spent an hour or so making them up, and I stored the files till I got round to them. Today seemed the perfect opportunity.

 First one, the letters & numbers.With some patches of circles to break it up & fill up the spaces. Bonus is I also have all the letters & numbers it cut out to make little masks.


 Next one was some circles- just made this a half page size- I got bored making circles, lol.

 Final one I cut was some stencil font numbers.


Wednesday 25 December 2013

Christmas WOYWW

So here it is, Merry Christmas.......and so on. A huge Merry Christmas to all WOYWWers, I hope you are all having a wonderful day wherever you are. Thanks to each and every one of you for all the fun friendship and inspiration throughout the last year, and an especially ginormous  thank you to our Wonderful Julia over at The Stamping Ground, for hosting this blog hop every week. Here's to you, Julia.
 Bought myself a little pressie the other day, I've been very taken with the scalloped edge cards I bought, but they only seem to come in white or cream. then I saw this Spellbinders Edgeabilities die.


Now I can cut my own! And I love the two inserts, I think the one looks very much like Broderie Anglais lacework.


 We had a nice night out on Saturday, our works do, then we all went up town. We don't usually do nightclubs, but I can cope with it once a year, lol.


Final pic of the day is Beloved Hubbys Christmas card:

I used the Stampendous 'Snowy Postcard' stamp onto a bauble shape cut with the Spellbinders Heirloom Ornaments set, and then cut the next size up for the white backing bauble. To get the black bauble for the layer, I drew around the outside of the die for the stamped bauble, and cut that out, as the two baubles you see are the two that follow in size, which gave too big a border. I also used the scallop die for the papers, and edge of the card. Oh, and the poinsettias, of course.
So thats my Christmas Day WOYWW, and I'm actually writing this at 1.00 in the morning. We went to my eldest son, Ants, last night for dinner, along with my youngest son Mikey & his girlfriend, KT. Its a bit of a Christmas tradition, Christmas Eve dinner with Ant & Beck & the kids. Anyway, came home, watched a bit of TV and went to bed. I found myself still wide awake an hour or so later,so here I am at the computer.

Wednesday 18 December 2013

WOYWW #237

Yes, I missed another week, I know. We've been having odd nights off lately, to use up the last of our holiday hours from work (we get x number of hours over a year, as opposed to a set number of days, due to the shift patterns), plus after 10 years you get an extra 2 days a year, and we got to the end of November with the equivalent of almost a week to book off, and only 3 weeks in which to do it. Anyway, long story short (not really, but the thought was there), I get completely lost as to what day of the week it is anyway, and with nights off I was completely thrown. So, are you all nearly ready? Tree up? Lights & decorations? Pressies bought & wrapped? Cards made & sent? I'm so far ahead of myself this year, I think I may have been swapped by Bodysnatchers, lol.
 Over at The Stamping Ground, our lovely Fairy Godmother of Desks, Julia, is waiting to see what we've got, so, click the link and join in!


 I was trying out the die I bought at the NEC, the Le Creatif  Poinsttia.Its actually a really nice die, and makes a smashingly useful size of flower.


 Cool thing too, if cut out in different colours, it still works as a great flower, without necessarily looking like a Poinsettia. These are Black, White & Silver, a mix of pearl papers & vellums, with beaded centres.


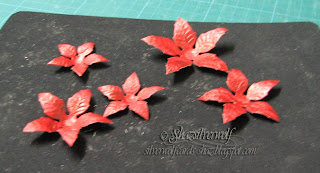
 While mooching about in drawers, I came across a scrap of some dark red leather effect paper, quite thick, and thought it would make a really nice Poinsettia.


The texture of the paper works really well, and the colouring is perfect.


I cut 1 large, 2 medium and 2 small flowers to build them, but ended up only using 1 small one, as the paper is quite bulky.


Thats the camera setting, they aren't that bright!

 Here they are all layered up, I also got a couple of smaller ones, using up the layers I didn't include. This is closer to the true colour of them too. Really need to learn about my camera settings!


Visited B&Q at the weekend (Hubby needed some Laminate for the other room), and a smashing set of Christmas star lights jumped into my arms. Well, what are you to do in such a situation? They had to come home, and look great in my craft room window.
Another case of the camera getting the colour 'off'- they are more purple than they look here. Have a great Wednesday, will link & catch up later. Off to Tesco on the way home, to get most of our shopping. Working on the theory that it won't be TOO bad at 6.30am!


Tuesday 17 December 2013

18th Birthday Card

A return to my favourite colour scheme here: Black & White. So predictable!
 And another card using The Tied Together embossing folder, it really has become my goto one lately.
 The base is a 6x6 scalloped edge card , and I cut a sheet of white pearl card at about 5 1/4" square.

Embossed it with the folder, then matted onto a sheet of black, trimmed down to leave a narrow border.


Next it was embellished with black and white 3mm half pearls, using Pinflair Glue gel.
 The space at the bottom is where the ribbon will go, so no pearls needed.


Black and White Tartan style ribbon in place.

For the numbers, I tried a couple of templates I have, but they were either too tall, or too small. Why is that always the case?
 As I wanted to use glitter card for them, I couldn't cut them with my Silhouette- the usual option- as the blades don't like glitter card.
What I did, was just print the numbers in a word document, finding a nice font, and the right size for the card, onto a reasonably stiff paper.


 Cut them out & traced around them onto the back of the glitter card. They were then cut out with a scalpel, and I ran around the cut edges with a black Promarker.
 Mounted to the front using silicone glue, for dimension.
Before I matted it to the card front, I added a narrower black organza ribbon bow on top of the tartan one. I thought it needed something else.


Supplies:
 6x6 Scalloped card base
White pearl card
Black card
Black glitter card
Black & white half pearls
Tied Together embossing folder
Black Tartan ribbon
Narrow Black organza ribbon
Pinflair glue gel
Silicone glue
 DST

Wednesday 4 December 2013

WOYWW #235

Okay, so I lost a whole week somewhere.Someone must know where all the time goes- can you believe how close Christmas is?
 I must admit to being very pleased with myself this year- all my Christmas gifts bought online, just waiting for one final one to arrive. Said pressies are also all wrapped, as of last night.  Christmas cards, both batches, all made and stamped, just have to be written out. And its barely December. I'm usually just about starting! So, on to the reason we are all here, our Fairy Godmother of Desks, Julia, over at The Stamping Ground, requests the (dubious) pleasure of our desk pictures again.
 So here it is, in all its glory.
 Glittered cats waiting for the next stage (see previous post), Post it masks for the cats. Assorted ink pads, reading glasses,hole punch, shaving brushes- they were a real bargain from Poundland a couple of years ago, 6 for a quid! Make ace blending brushes, even if they do shed a bit. Heat gun, and a plastic and a wire pan scrubby.  Useful idea- if you are removing stamps from a wooden base, and some of the foam stays on the stamp, the wire scrubby takes it off fairly easily. Certainly easier on your fingers. I had a couple of Christmas sentiments I wanted to unmount before I used them- they have quite a lot of redundant rubber around the wording, and I always get ink smudges. Unmounting my remaining Christmas stamps is another job for the Christmas holiday. Now the box is down, I shall get them done.
Lots of other bits & pieces you can poke around in, if you feel inclined. One final pic, as I have managed to get so far ahead of myself this year, I thought I'd have a go at making some tags.
Love this owl stamp, he's from a set of clear stamps by Inkadinkado, called Winter Birds.Which is a couple of years old, lol.


He's stamped in Encore Metallic Blue, heat embossed with stardust powder again. I left them under an acrylic block with a weight on it overnight to flatten out after the heat embossing, and they came out fine. Hole punch the corner, and they'll be good to go.

Oh, and Julia, the cotton wool balls- dusting on/off chalks & micas, cleaning up icky stuff ,and cleaning scissors etc with Sticky Stuff Remover :)

Tuesday 3 December 2013

Return of the Glitter Cats

A couple of weeks ago I was making up some images using a Sweet Poppy stencil of a cat sat on a wall, in This Post,if you missed it. At the time I had an idea of how I intended to proceed with them, and this weekend I finally got the time to have a go.
 My plan was to have the cats silhouetted against a moon, and I achieved this with a post it note mask cut level with the top of the wall, a few shades of Blue Distress ink pads and my shaving brush blender brushes.


As well as masking for the moon, I cut a Post it in half to protect the level of the wall, although I've had an idea for that now, so it wont matter.


Post its in place, I chose 3 colours of Distress ink, Stormy Sky, Faded Jeans and Chipped Sapphire.

Stormy Sky, as the lightest of the three went on first................


followed by Faded Jeans.


          Chipped Sapphire went on last.

Then I thought some bare tree branches outlined against the moon would look good, and for this I'm using one of a set from Chocolate Baroque,
called  Design a tree, which is four A6 size stamps of different shaped trees, along with leaf & blossom stamps for each one.
 This particular tree is the Woodland one. Its stamped in Versafine Onyx Black, and word of caution here- on this card, Double sided Silk coated, by Clarity Cards, the Versafine doesn't dry very quickly, so handle with care, or give it a blast with the heat gun.


I have a bit of a pale patch in the sky on this one, I think I had some baby wipe liquid on my finger. I shall be trying to hide it with  the tree!
Not hidden completely, but I placed the branches so that if the worst comes to the worst, maybe I can stamp a small owl, sitting on the branch! I have a Lavinia stamps one that should do it nicely.


I've got three done so far, and I'm thinking about adding some shrubbery along the base & sides of the wall. That sounds very Monty Python,lol. Probably add some  DI's in Old Paper & Tea Dye to the area first to tone down the white.

Wednesday 20 November 2013

WOYWW #233

Well our Mistress of the Desks has been redecorating- a nice shiny new blog over at The Stamping Ground, although you may need your sunnies this dreary November morning, lol.
Not a huge amount going on on the desk, so you have 2 shots for the price of one visit today. My usual working desk:
Odds & ends abound- a dead babywipe scrunched up, a piece of kitchen roll (can you tell I didn't tidy for the photo?) a couple of acrylic blocks. Some stamps and a Versafine pad. A try-out for some scene building on scrap paper, seeing if I could mix Stampscapes & a Lavinia stamps cat. I've got a bit of a cats theme on the go this week.( Post below for glittered cats)- no not poor Ambrose, he escaped the glitter storm this time. The two black photo albums at the back hold brass stencils, 5x7, they hold larger ones easily, and I just stapled down the middle of pages to hold thinner/tall ones.


Cheap storage solution, and stops them getting bent.


The 'desk behind the desk'- the long table thats behind me, something I wanted when I put my room together, somewhere to put stamp folders when I got them out, put stuff to dry etc.
Of course, its got all sorts of other stuff on there too- glittered cats, bottom right,  easel,  Indigo Blu Christmas cards from earlier post, Distress Markers, a tub of cotton wool balls, and those little sets of plastic drawers, full of 'stuff' thats too small to store anywhere else, without losing it forever. Underneath are some 4 drawer storage ( from B&Q/Instore), they come with wheels, but I didn't put them on, that have all sorts of stuff (do you notice I have a lot of 'stuff'') I wanted close to where I work in the hope that would mean a) less searching for it and
b) it might actually get used!
 So thats all for this week folks, I'm back on my much loved night shift, so I'll be seeing you all later in the day.

Monday 18 November 2013

Glitter cats & embossing paste

Wow, two posts in two days! I've had Embossing paste for a while, and more Brass embossing stencils than I know what to do with. Which didn't stop me buying another, back last year. Its a Sweet Poppy stencil of a cat sat on a wall, which they had a nice sample of on display, with the cat & wall done in glitter, using Embossing paste. I've been meaning to try this out for a while, so yesterday I finally got round to it. This is a work in progress, as I have the glittered cats done, now I need to do a background on them, and mount them onto cards. I've used the 'True Snow' type embossing paste before, and recall it being an unholy mess- so I was hoping a bit of practice might perfect the technique. I'll share what I learned about it as I go, pitfalls and hopefully, helpful bits too.
 Anyway, for starters you will need:

 Embossing paste, which comes in array of colours, I've got Black & White here. A stencil, stencil tape, spreader(s), glitter and of course a piece of cardstock. I used Clarity Theuva card to do these on, and found it worked beautifully. I also discovered that because the card has a shiny surface, if you wait until the paste is dry, you can scrape off any overspill with a scalpel.
 The spreader tools I've got here were bought from The Works, a set for working with oil paints, but they are perfect for this technique, as you get a set of various sized blades. You will find it best to work with the largest spatula on a stencil this size-you get less problems with covering the image that way.

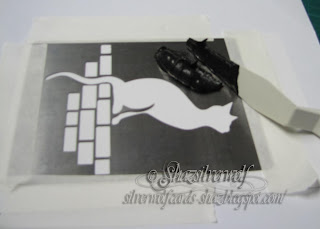
 Placing your stencil onto the card, add some stencil tape to all four sides- I actually used tape the length of the sides at first, to stop me getting any paste onto the card where I didn't want it. Once you get a bit more practiced at it, you could use less.
 Scoop out a dollop of paste, and drop it onto the stencil. Its better to put it on part of the stencil that isn't part of the design, rather than onto the design. You will find that trying to spread it  from the open areas will result in pushing it under the edges of the design, giving you a blurred image.


Spread the paste- a bit like buttering a piece of bread. Couple of tips here; I found it easier to work from the top down trying to keep the sweeps smooth. Use a light touch- don't press down. Use the edge of the spatula- a bit like you'd use an edge of a blending tool. Don't overwork it! Thats when it will all go horribly wrong. A little bit of texture won't hurt, don't keep trying to smooth it out, you'll end up with the paste being pushed under the stencil. Scrape any excess off the metal part of the stencil and return to the pot.

 To remove the stencil, peel off three sides of the tape, leaving a fourth as a 'hinge'. I found for me the easiest one to leave was the bottom one, choose whichever suits you best- top, bottom or one side. Carefully lift up one edge of the stencil and tilt it towards the hinge, then peel away the whole thing. If you leave a hinge, it prevents the stencil slipping or sliding.

Now- getting your stencil clean. I have seen a lot of people recommend you have a dish of water handy to drop your stencil into- I found that messy, time consuming, and hard to be certain you have the stencil flat while cleaning.
 What I found works perfectly is to have a baby wipe lay on your desk, and to place the stencil onto it as soon as you peel it off. Then fold the baby wipe over it, to stop the paste starting to dry on the stencil.


Now you can leave your stencil while you do the glitter bit.


 I started off doing black cats, so tipped a pile of black glitter onto the paste.
 Tip the glitter off, and hey presto! one glittered black cat. Put aside to dry, and I left mine overnight to be sure.
 Now, back to the icky bit, cleaning the stencil. By the way, as soon as I'd returned the excess paste to the jar, I wiped my spatulas clean too on a baby wipe.And keep checking your fingers- this stuff gets everywhere! One of the dangers of cleaning stencils is bending them accidentally while scrubbing- and this cat stencil also has a little piece that sticks up that separate his front legs from his body- very easy to bend out of shape.  By opening out the baby wipe again, because its lay flat on your table, you can rub over it with another wipe, and it stays flat. Just make sure to wipe away from any awkward bits, so you don't catch them with the wipe.

After I'd wiped off the goo, I lay it flat again on a piece of kitchen roll, and just rubbed my had over it to dry it off.

I found this to be the easiest way to clean them, and the least likely to cause a bend in your stencil. If you do get a bent stencil, I have heard it recommended to run them through a die cutting machine to re-flatten, but I haven't tried it personally, although it ought to do the job.


All clean and ready for use again.
 What I liked about this stencil too, is that I can flip it and have the cat facing the other way!


Now I decided I'd try some other colour combos- so I switched to white embossing paste, and brought out some Crystal glitter and a few shades of orange and brown. It worked better than I expected, to be honest, and I have some nice black & white cats, some tortoiseshell and whites, and a rather fetching Ginger tom!He came out much better than I anticipated. If you are using a mixture of glitter colours, always tip the excess away from your image, and if you want patches in the middle of the image, turn it upside down quickly, so the glitter doesn't spread over onto other areas of paste.I used the tip of one of the thin spatulas to add this glitter.  I tried a mix of browns for the wall on these ones.

   Supplies:
 Sweet Poppy Stencil, Stargazing
 Embossing Paste,
White card
 Glitter
 Spatula(s)
 Stencil, or low tack, tape. Mine is Woodware, its very low-tack,bought at the NEC, its about £2 a roll. DO NOT buy this from Amazon- they want a fiver a roll for the same item!

An End of an era

An end of an era

I write this with a broken heart, that only time can heal My beautiful, wonderful wifelet Shaz (Silverwolf) passed away peacefully in the ea...