A warm welcome to all my visitors,

Thank you for taking the time to come and look at my blog, I really do appreciate it. I would love you to leave me a comment, even if it’s just to say Hi. It means I can come visit you!

All my designs are original, so copyrighted to me. If I have been inspired by someone elses work, I have named them in the post, and where able, I have provided a link.

Please feel free to use my designs for inspiration, I just ask you to credit me, and provide a link back to my blog.

Thanks, Shaz XX

Showing posts with label Birthday cards. Show all posts

Monday, 13 April 2020

Some Gorjuss Girl cards.

So, I have quite a few Gorjuss girl stamps, and they've rarely seen any use mainly because I'm not a confident colourer, and because I've never really been happy with what I've done, I've avoided it all the more, I think because I find it stressful rather than relaxing.
 Most of my colouring in the past has been done with Promarkers, and it's only very occasionally I produce something I'm happy with. However, I finally invested in some coloured pencils, and I bought the Prismacolor ones, as they were mid-range price wise, and supposed to be quite good, and also because I'd bought, and been bought, some colouring books, and the Promarkers usually tend to bleed through, where pencils won't do that. So anyway, I've been stamping out some images, and using them for practice over the last few months.
 I watched a few You Tube videos on using them, and gradually a few things dawned on me that have helped me be less critical of what I've done. I'll list them here, in case they help someone else.
 The first, and probably the most obvious is You are NOT going to be an expert the first time you pick up a pencil! Sounds obvious, but watching videos, and seeing examples of work others have done, and not being able to duplicate what I was seeing was making it stressful, until it finally clicked with me that they've been doing this for a long time, and probably struggled in the beginning too. It's all that practice helps them make it look so easy.
Second- I try to work too fast. I forget that the videos I'm watching have probably been sped up somewhat. So, slowing down is a key factor.
Third, it really is all down to trial & error, and practice, practice, practice! Just keep reminding myself it's only cardstock & ink.
 Finally- lightness of hand! This is a biggie. Not to try to lay down a solid patch of heavy colour in one go. Take time, and layer colour to get the depth you want. And don't worry too much about shadow at the start. So I selected some cardstock to matt them on, and die cut the images with either oval or rectangle dies. A couple have some stamping on the base card, and another three have backing paper from various pads. When they were mounted, I added some acrylic gems for a bit of bling.


I die cut some small strips for the sentiment, using a die set meant for cutting slider strips on cards. That's a tip I picked up from Jennifer McGuire.  You get quite an assortment of lengths, and is by Honey Bee Stamps, called  Straight Interactive Sliders. I got them from Bumbleberry Papercrafts.


The strips I cut from the same card as the matt.

I used some small Peel Off sentiments on them, they're something else I'm gradually trying to use up. Back when I started making cards & stamping, everything was wood mounted, Barbara Gray was just about introducing the concept of clear stamps. Anyway, that meant that a single sentiment stamp was quite an expensive thing, so I bought a lot of peel offs to cover all the sentiments I'd want to be able to use. Of course now it's much easier, we can buy some great selections of sentiment clear stamps, and I do now have a lot, so the peel off stash hasn't had much use in recent years.
 I  know that the Gorjuss Girls, with their lack of nose & mouth are not everyones taste, but they are weird enough to please me,lol.

Thursday, 19 March 2020

Invading the UFO box!

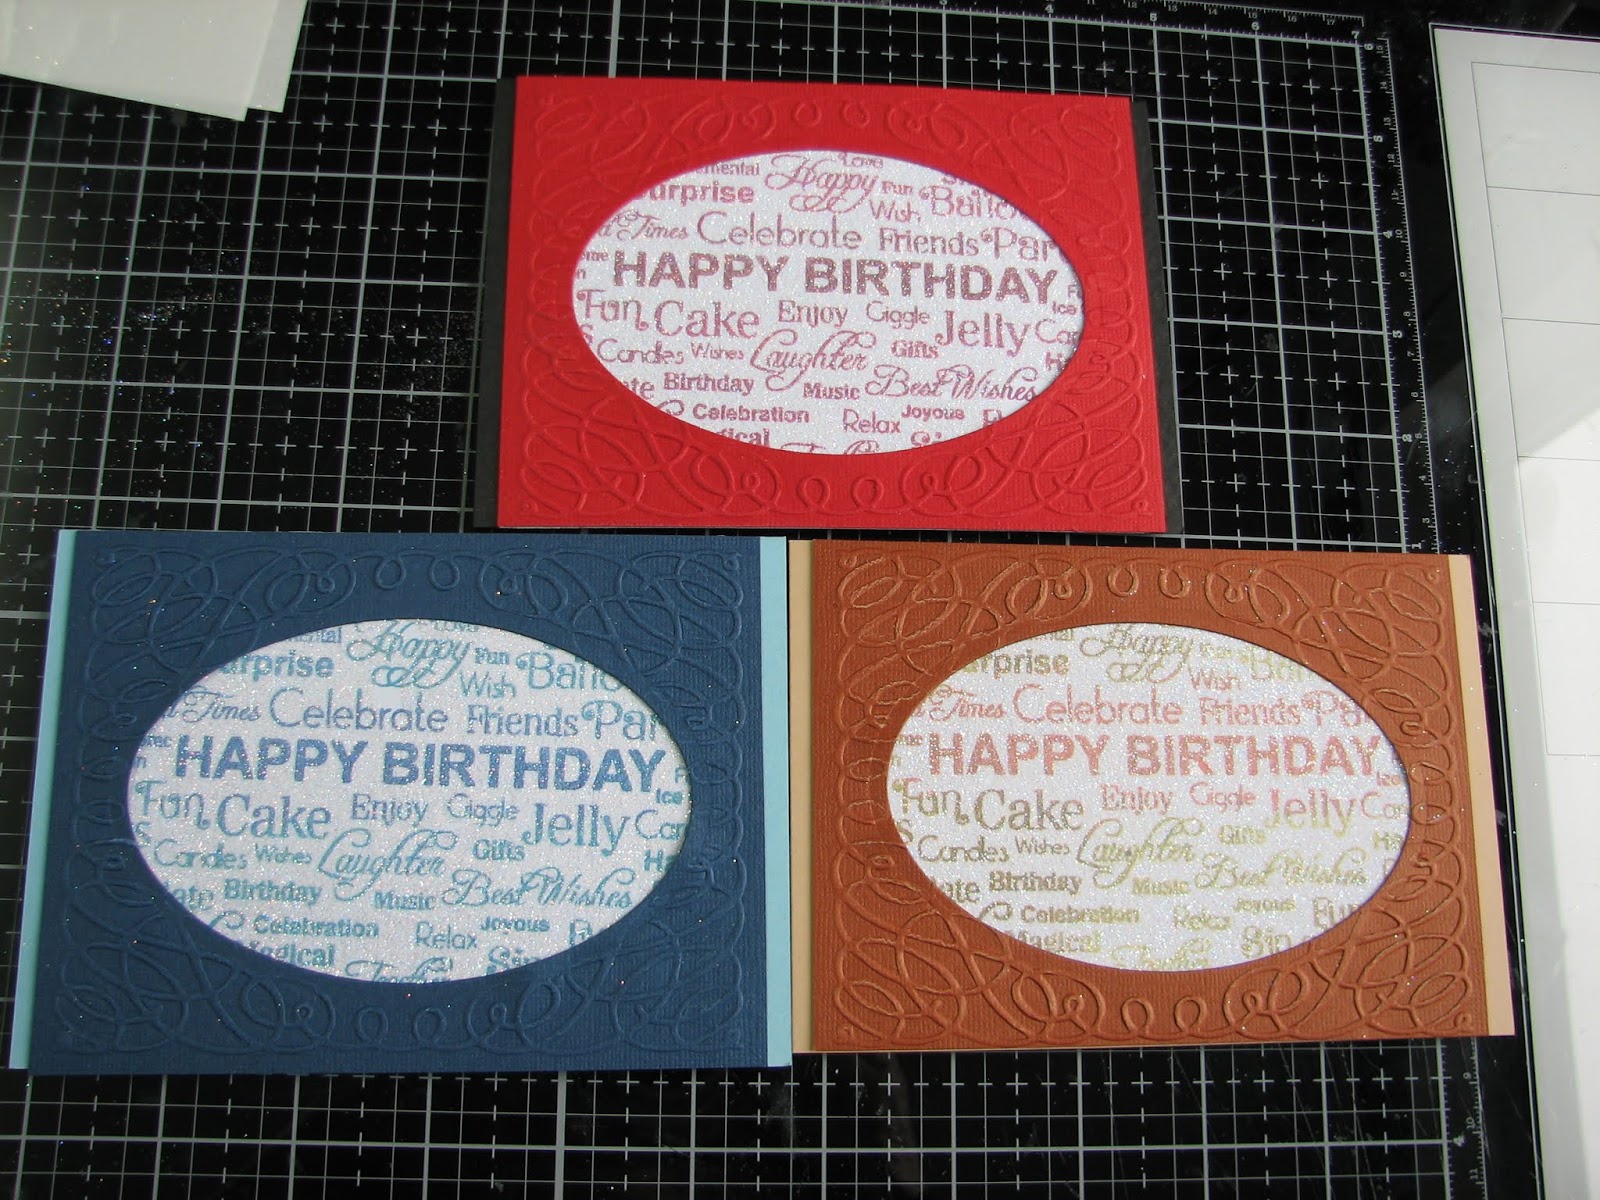
So, five cards made so far from the UFO's. The first two are both Eclipse cards.
I used Happy as one Eclipse, and Birthday for the second card. Die cut a small sentiment to complete them.
 The stamp is by Phill Martin, called Birthday Cloud, and is roughly A5 in size.
The Alpha dies are by X-Cut, called Wedding Alpha & Numbers. 1⅜" or 3.5cm high.


The other three use the same stamp. I had stamped a number of these in different colourways, when I made some into Shaker cards.


 For these, I added some double sided adhesive sheets, then sprinkled that with Glamourdust. Because the Glamourdust is so fine, it doesn't hide what's behind it, just gives a little sparkle.
 The cover frame is an old Cuttlebug Embossing folder, Scrollwork Frame.
 Then I cut out the blank oval in the middle with an oval die. The Embossing folder is slightly too small to cover the front of the card, so I trimmed it down to leave a contrasting border, from the base card, on each side.

Wednesday, 12 February 2020

WOYWW #558- The Organising Edition.

 Anyone see where January went? Crazy that we are almost half way through Feb already. Which means almost Valentines day, so that card will be my next project. Yes, I know I need to get a move on, but I have a plan. Not that that always helps! It's also youngest sons birthday that day, so that card goes in the post tomorrow. He moans like mad about his birthday being that day, but I just point out that that's his own fault, had he arrived on time, and not 13 weeks early, it would have been different. I also occasionally point out it could have been much, much worse. His one Gran kept saying we should name him Valentine! Over my dead body, lol. Anyway, Wednesday it is, so desks are being bared around the world as always, you can visit them over at Julias place, The Stamping Ground. Do pop in, we'd love to meet you.
 Organising, then.

 Been making use of Beloved Hubbys labelling gadget, as I'd bought another of the Tim Holtz Alcohol Ink storage tins. They hold all sorts of reinkers too- Archival for instance, but not the DI ones, as they have a dropper top.
 They also hold Stickles, and Liquid pearls, and as I picked up a few of those at the NEC last year, I needed another tin.

The one on it's side holds the newer AI Pearls, as they're supposed to be stored on their side, as they have a little mixing ball in them.


Also sorted and labelled my WOW embossing powders- please don't laugh!

  Bottom shelf next to them is the Distress Oxide sprays, also on their side.


And so, I'm all done. No enabling this week!


Which brings us round to ......And Finally.......


Saturday, 22 June 2019

Cards using Paperbox cardstock.

So, full disclosure. A few weeks ago I had an email from the people at  Paperbox.They wanted to know if I'd be willing to make some cards from their cardstock, and blog about them. I've bought their cardstock before and always been happy with the quality, so I was ok to do that.


They sent me some cardstock and paper, in mainly pastel shades.


There was also a sheet of non shed glitter card in silver.


The first card I chose to make used a cover die featuring hearts, which I die cut from a sheet of Pale Pink Pearl card. It looks a little paler here than it actually is, I'm finding the contrast from the TH mat does that to colours. I also cut a matching sized sheet from the Silver Non -Shed Glitter card to go behind it.

I matted the two sheets together, and mounted them on to a topfold base card, notecard size, which is roughly 5¾x 4¼. I create that by cutting an A4 sheet of cardstock straight down the centre, lengthways.

 To finish it off I die cut an Anniversary sentiment from the Pale Coral Pearl card. I cut it 3 times, and layered them up for some extra impact.


This card would be great for Weddings & Engagements too, as well as Valentines day, and you could change up the colours for the occasion.

Next up I made a simple Birthday card, again using die cuts, and these are great for a fast card when you need one quickly.

  Again this uses a cover die- I *think* this may have been from Papertrey- but I've had it a long time. There are many similar dies available though.
 I cut it from the Non Shed Glitter card, and it cuts really easily.
 One tip here, I've used non shed glitter card before, and it seems like the glitter is a plastic type of coating on the cardstock. Now what we call 'cutting dies' don't really cut, as they have no sharp edge. They sort of 'crush' their way through cardstock, but with any sort of acetate/plastic/ plastic coating, in places they can stretch it rather than cut. I've found that when you have pieces to poke out, it's better to push them through from the front, then if any parts are still attached, it won't pull the parts that remain away, leaving bare cardstock. Go gently, and it's all good.
 Back to the card, and I found a piece of alcohol ink background in my stash, so I added the die cut- for this I use Multi Medium Matte applied with a fine tip nozzle- then cut it down to the same size as the die cut.
 To the back of this I added a piece of fun foam to give the card a little dimension. I mounted it onto a card blank made from Pale Blue cardstock.
 The sentiment is from Elizabeth Designs, and is a nice big sentiment that works well on this type of card. I cut it 3 times from pale blue card and layered them up using the Matte Medium, which I also used to add the sentiment to the card front.


For the last two cards in this segment, I switched to Baby cards.

 All the small die cuts were cut from the Glitter card, then colour added with Promarkers. This is a great way to make your embellishments match your card, as the Non Shed Glitter Card takes colour from Alcohol Markers, Alcohol inks, even your Distress inkpads really easily.


You do need to give it a little drying time though.

All the dies were bought from The Range, they have a huge selection of small dies, all priced at £1, so they are well worth a look next time you visit.


Starting with the boy card, I took a 5" square card blank, and covered it with some Gingham Vellum from my stash.
 Next I used the  Pastel Blue Matte card and the Aquamarine Pearl card to die cut two sizes of Stitched Squares, (The Works).


 I layered them up using double sided tape.
To the backs I added a small square of fun foam to add some dimension.
I mounted them to the card front with DST again.


Two shades of blue were added to each die cut, then I mounted them using Matte Medium.


For the girl card, I used a different patterned paper for the front, and as it had a heart design, I used some Stitched Heart dies to  cut the layers.


This time I used Pale Pink Pearl and Pale Coral Pearl.


The images were coloured the same way as the boy card.


I will do a few more soon, as I still have cardstock left, so look out for Part Two!


So, I can say that the cardstock has been lovely to work with. The colours are good, and the quality of the cardstock is excellent. It's a good weight, and suitable for folding into card blanks, or for matting and layering. They all die cut beautifully, even the Non Shed Glitter.
 I'd also add that they have a huge range of finishes and colours, and also do swatch books of the various cardstock groups, which is a great way to see what you are ordering before you buy.

Sunday, 10 March 2019

A Final batch of strip cards for a while.

 So, giving these a break now. I've made a couple of dozen or so over the last few days, and I'm all done for a while.

A few Birthday cards in an assortment of styles.


 Then I moved on to some Get Well cards,all made the same as others, this time using a set of heart dies from Nellie Snellen.  I also swapped to some corrugated cardstock instead of glitter. Like the Star cards made before, I die cut a smaller heart from Fun Foam to give the heart some dimension.
The Get Well Soon die is by Crealies.


And then I switched again, and made a Happy Anniversary, word die by Crealies, and a Thinking of You card. It looks a lot clearer in real life, the glitter really seems to confuse the camera lens!
This time I layered a background die cut over a panel of striped card for a change.


Thursday, 7 March 2019

Strip Birthday Cards

I'd already made the pink version- go me- then I made the gold/brown version, and that's when it crossed my mind that these would be good male cards, so made half a dozen in suitable colours.
 Apologies in advance for some photos appearing a little blurry, but glitter and camera lenses do not play well together!


 All were made exactly the same way. First I cut a strip for the card front, they were roughly half the width of the panels I'd made, so about 2" or 5cm.
These were attached with DST, then I found two strips of glitter card that I'd used in the panel, and edged the striped panel with them, using Matte Medium.


 To apply the Matte Medium, I have some little bottles with a very fine nozzle.

They were bought from E-Bay, £1.62 for 10, and are perfect for giving a very fine line of glue. The bottles are quite soft, so easy to squeeze, and so far I've not had any issues with the nozzle blocking. All I do is poke a pin down the nozzle to make sure it's clear, wipe it clean, then replace the little stopper over it. Ive been using them for about 6 months now, and have refilled a couple of times,so I can highly recommend them.
The little stoppers actually come attached to the bottle with a ring that goes round the neck, but I found it got in the way, so just snipped it through.


Next I die cut a star from glitter card, and using the next star size down, cut a star from Fun Foam. Stitched Star dies were bought from The Works.

The Fun Foam gives  the star some dimension. I also die cut my sentiment once from  a glitter card that tied in with my strip panel, and 3 times from matching cardstock, so I could stack them up. Again, that fine tip nozzle is perfect for this.


Final step is to add the star to the card front, then the sentiment to the star.

These were so quick and easy to do, in fact the longest part of the process is making the strip panels in the first place!


It's easy to ring the changes with the colours, and you could also swap the orientation too, having the panel widthways on the card, rather than top to bottom.


Wednesday, 20 February 2019

WOYWW #507- or the getting my act together edition.

Yep, because that's a thing. Of course, maybe if I did all the stamping/ putting in inserts to my cards
 and sorted out the envelopes, and  bagged them up when I made them, instead of putting them to one side ' to do later on', I wouldn't have found myself with a card mountain that needed sorting.Mainly a general assortment of cards, but also a decent- or indecent, depending on your point of view- amount of Christmas cards too. So that's been my job for the last couple of days.

 
 Last ones on my desk now are all the Christmas ones.
 It would of course make my job easier if I didn't do so many different sizes of cards, or in so many orientations.Or if I did it when I made them.😎
 Maybe next time. Most likely not, though. Know your limits, I say.

You may also spot a storage tin on the left, with the new Archival pads in Distress colours. Because yes, I'm a TH fan girl.

I'd asked my local craft store, Amelias, if they'd be getting them, and she said yes, so I'd asked- on FB- if I could pre-order the set, and a storage tin. She replied that I could, and about 3 other people had seen the message and replied to her  Me Too, lol. Anyway, she messaged me Friday to say they were in, so we popped up to collect them. And stamps may have fallen into my basket as well.😎 And a dragonfly die too.
 The Paper Artsy one with the elephant is super cool, and sort of a pre release. They got them when they went to the Frankfurt show, and can sell them, just not allowed to put them for sale on their website till the launch in a week or so. In other good news for them, Nikki (owner) posted yesterday that Amelias won Best Independent Craft Store 2019 in the Craft Business Awards. Really pleased for them, they've worked so hard to build the business, as they took it over when the previous one was failing, and they've really turned it around.


In other shopping news, lol, came across this tube of glittered washi tape in The Range. I admit I've never got into washi tape, just doesn't do it for me, but I *may* have been attracted by the glitter😎.


The general card mountain, all with inserts ready for bagging. I tend to bag them just to keep them clean till I need them.

And I'm going to need a bigger storage box, lol. It's so full, it's pips are squeaking. And I've still got a million UFO's to make up, and a lot of ideas for more too.
 So I think I'll be bringing the whole box to Junes Crop10, and any sales will go to the days charity.


Hubbys Valentine card is in this post HERE.
Last weekends Christmas cards HERE,
 So, I think I'm done, oh in reply to those who asked about the colouring last week, no I don't intend using them on cards or anything, the books are really just practice for me to get better at colouring so I can colour images for cards without getting the heeby jeebies! And in a statement I never ever thought I'd make, colouring with pencils is so relaxing! I can easily lose a couple of hours doing it.
 I'll be leaving my link as always with our Beloved Leader Julia, over at The Stamping Ground, and I'll be round to see what everyones been up to later on.
Which brings us round to......And Finally........

 So apt for this week!

An End of an era

An end of an era

I write this with a broken heart, that only time can heal My beautiful, wonderful wifelet Shaz (Silverwolf) passed away peacefully in the ea...