A warm welcome to all my visitors,

Thank you for taking the time to come and look at my blog, I really do appreciate it. I would love you to leave me a comment, even if it’s just to say Hi. It means I can come visit you!

All my designs are original, so copyrighted to me. If I have been inspired by someone elses work, I have named them in the post, and where able, I have provided a link.

Please feel free to use my designs for inspiration, I just ask you to credit me, and provide a link back to my blog.

Thanks, Shaz XX

Showing posts with label Glitter. Show all posts

Sunday, 26 April 2020

Christmas Card Club #9- Bauble/baubles

Back with more Christmas Cards, this fortnights theme has been chosen by Kate, and she'd like to see a Bauble or Baubles on our cards.
 I pulled out quite a few on the theme from my Christmas UFO's, and ended up with another 18 cards for my box.


This is the collection of UFO's, some, like the glittered pieces, I did last year, others are leftovers from a couple of years ago.


In the end, not all of them got used, so they're back in the UFO folder.


I also did some pieces run through Bauble EF's, to use as backings.
 I have 3 folders with Baubles on, the blue one is by Creative, called Baubles, The one on the top right is an old Papermania one, and the one below it is another oldie, from Cuttlebug.


These are glittered baubles, the stamp was by Great Impressions, bought many years ago at the NEC.

I think I was most surprised to find matching glitter card in my stash for all of them!
 Die cut banner and small sentiment peel off added, along with a couple of acrylic gems. I'd added the Cuttlebug folder backgrounds to the card base.


These four were done with a Sweet Poppy stencil & paste, with a small sprinkling of glitter added. The stencil is called Damask Baubles.


 These four use the Papermania EF, and I've just added a few acrylic gems for a little bling. Added a die cut banner and peel off sentiment again. Also used up some Christmas paper from my stash to cover the card bases.


Final four  are again Sweet Poppy stencils and paste, this time with foil added. The stencil for the two on the left is called Christmas Season, The top right is Snowflake Bauble, and the bottom right is Holly Baubles. All were matted onto some holo/metallic foil card, then the card bases had some Christmas stash paper on them.

 So thats it, my cards for this fortnights challenge all done.

Wednesday, 22 April 2020

WOYWW #568- The Bauble Edition

Christmas stuff on my desk again, this fortnights theme is Baubles, and I have a few leftover stencil paste & foil ones, as well as quite a pile of glittered images. No actual design ideas yet, but thought that getting them out ready on my desk might cause inspiration to strike. We can but hope. 😀 Nothing else much changed, deskwise, stack of cards waiting for inserts at the back on the left, the wallets at the front have other Christmassy bits in that may, or may not, get used.
 No enabling this week either, all I've bought is a pencil case for those Zenacolor pencils, as it was getting to be a nuisance keep taking the trays out to find what I wanted. Then I thought it actually made more sense to combine both lots so I'd have all the available colours together. So that's what I did yesterday. Should work better, as strange as it may seem, the cheaper Zenacolor ones had a lot more reds, yellows and blues than the Prismacolors, although that's partly explained by the sheer quantity of greys in the Prismacolor ones, something like 20 of them whilst the Zenacolor only have half a dozen. Which means it's short and sweet from me this week. Hoping everyone is keeping well and staying safe. All good here at the moment.
 And so, I shall be leaving my link over at Julias place, The Stamping Ground, as always, and I'll see you there later in the day.
Which brings us round to this weeks And Finally....................................


Pretty sure many of us will have heard a few of these in our childhood!

Sunday, 1 March 2020

Christmas Card Club #5- Post Box/Mail Box

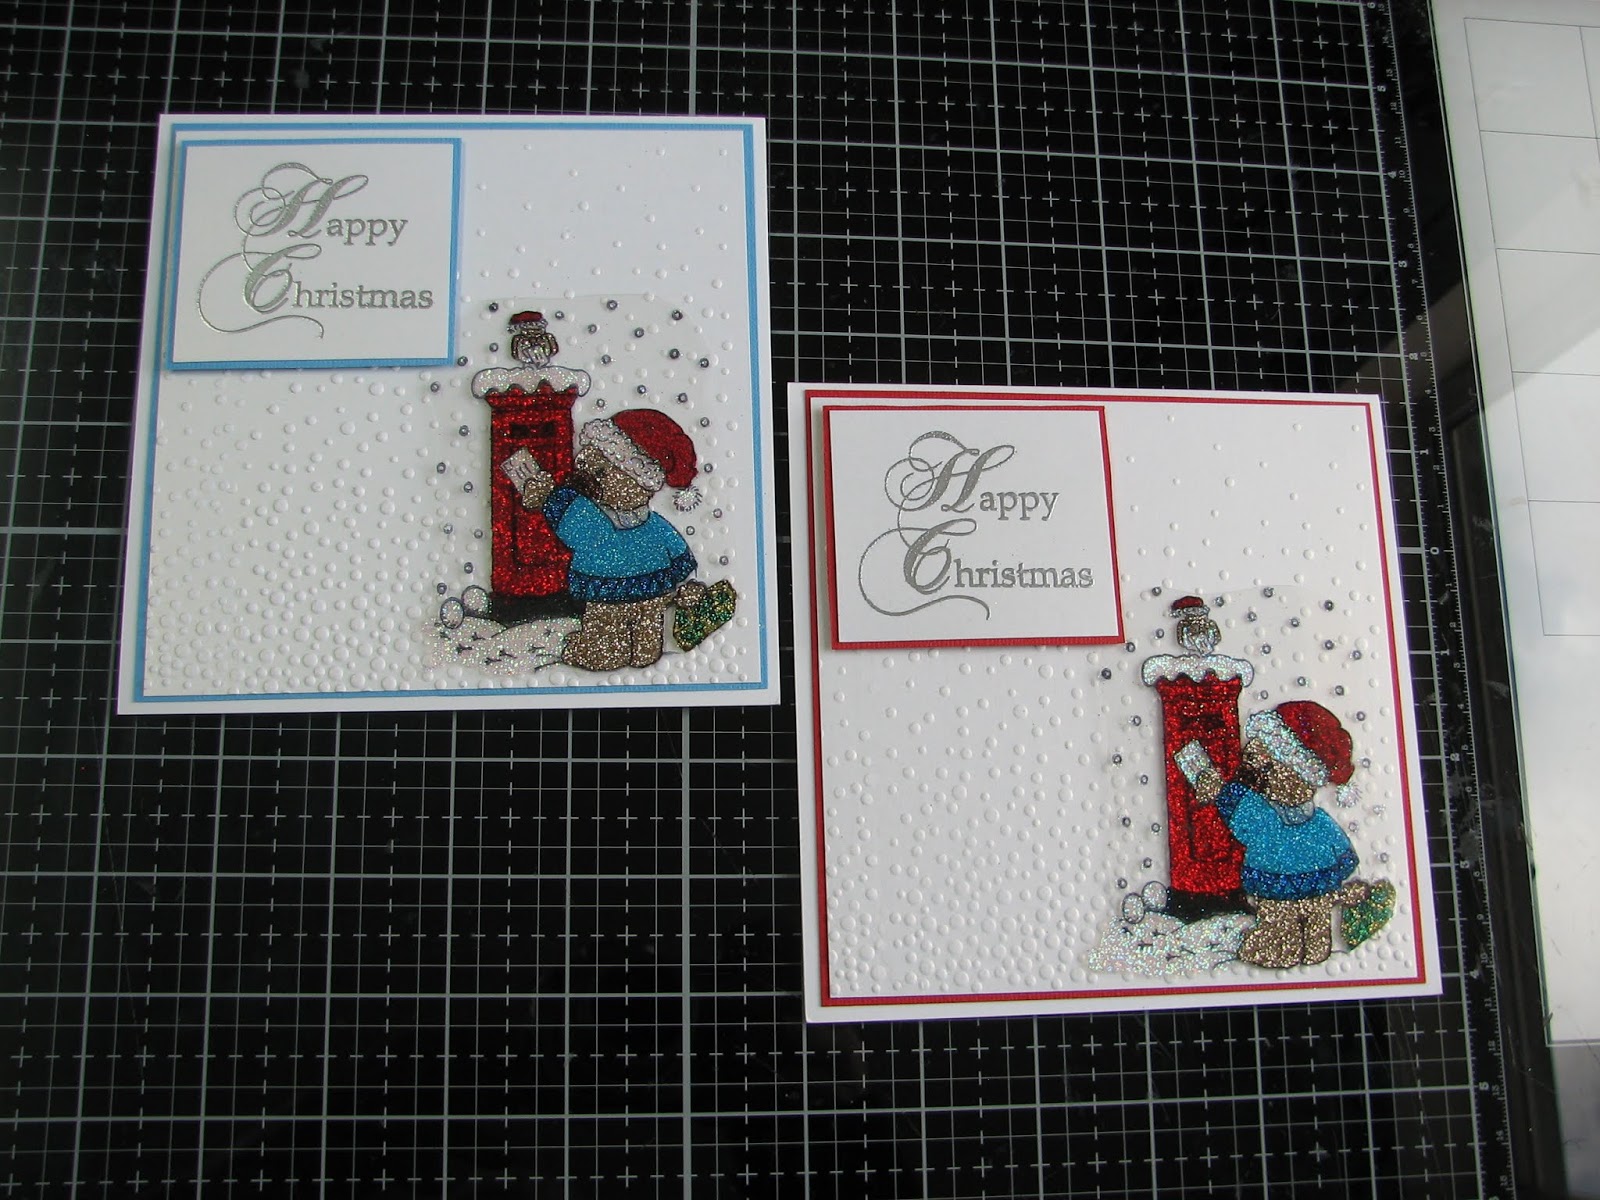
Two cards from me for this fortnights challenge, this time set by Valery Anne, who wanted us to feature post or mail boxes.
 What came to mind were the Christmas images I was glittering last year, and I recalled a Teddy Bear posting a letter image, which would be perfect.
 I embossed some pearl white card with an Embossing Folder from Crafters Companion, called Elegant Snowfall.
I cut a matt for each card, which are 6" square by the way, then matted the trimmed down embossed cardstock onto that.


I added the image with a few dots of silicone glue.

I've no idea who made the Bear stamp, I *think* it's from some sheets of clear stamps I bought a couple of years ago, when our local craft store was having a big sale.


I heat embossed with Silver Detail EP the chosen sentiment, and again matted onto matching cardstock.


The sentiment comes from a Phill Martin set called Stately Christmas Sentiments, which is a lovely font, with some great sentiments.  I originally thought that ' From our House to yours at Christmas' would be ideal for these cards, but it was too large for the card! Available still from Honeypot Crafts.

Sunday, 19 January 2020

Christmas Card Club 2020- #2 Holly and/or Ivy

This fortnights challenge has been chosen by Elizabeth, and she'd like to see Holly and/or Ivy on our cards. We also are welcoming a new member to the group, Linda, so we are all looking forward to seeing what she creates.
I've made 4 cards for this challenge, all pretty much identical.
I've taken Holly as my theme. The holly background in 3 of them is a Sweet Poppy Large background stencil, and I covered the paste in glitter while it was wet. The two on the left are two-tone, top one a mix of green & silver, the bottom one copper and green.  On the right, the top one is green glitter, and the bottom one is stamped with a 'cover a card' stamp from Impression Obsession.


 Here you can see the details of them a little better.


I matted them onto dark green card, then mounted them onto my card base, which are just under 6" square.


Next I stamped an old Chocolate Baroque stamp, Holly Script, in gold and heat embossed with Gold detail powder, then cut them down to a tag shape. I cut the same size tags in dark red, and ran through an Embossing Folder from Creative Expressions, called Festive Greetings. I layered them together, slightly offset, and added a small ribbon detail.
 I mounted them to the card front with some foam tape, for a little dimension.


The final addition was a glittered holly bough, taken from the CB stamp. I'd stamped onto acetate, then glittered and finally cut out. A few small spots of silicone glue adhered them over the holly image on the tags.

A peel off sentiment finished them off. I only wanted a small sentiment, and this helps use up some of my peel off mountain! I stuck the peel off onto scraps of the green card, then matted onto scraps of the red.

Wednesday, 18 September 2019

WOYWW #537- The Still Sparkly Edition!

Mainly because, despite the whole house being vacuumed, I seem to have shed a light coating of glitter- or Fairy Dust as I'm now referring to it-everywhere.
This is the result so far though- a whole stack of glittered images. I'll show you some in close up in a bit. They're now all dry, and trimmed down. In most cases, what I'll be doing is stamping the image again onto cardstock, and heat embossing in Gold or Silver, before adding the glittered piece with silicone glue.


Some images, like this assortment of Poinsettias,Christmas Roses, Holly & Mistletoe, have a script background to them, which has been cut away. All these stamps are from Chocolate Baroque, and are quite a few years old now, but are still available.


You can buy them singly, or as a set of four. The sets are DL size.


These are some other really old stamps, I bought them dunno how many years ago now, from The Stamp Man, they were part of their own range, Aspects of Design, and were discontinued after one Christmas. I think one size of this is available as a Woodware Clear stamp, from back last year.


I trimmed away the words from the glittered ones, and again I'll stamp & heat emboss.


This 3 Wise men stamp is another oldie, so old it's discontinued. It was from Elusive Images, which eventually became Chocolate Baroque.


The one thing I may do is stamp some more snowmen, I only have a few, and they are so sweet.

And that brings this weeks desk to a close, except for linking up at Julias place, The Stamping Ground, and popping round to visit everyone.
 So far, so good on the chemo. Definitely more tired, but not breathless like before, so it's looking like this might be ok.
 Which just brings us round to .........And Finally........
This really made me laugh when someone posted it to FB yesterday!


Wednesday, 11 September 2019

WOYWW #536- The Sparkly Edition

 Yep, sparkly because there has been glitter involved this week, quite by accident, although normally glitter and accident are not words you want to see in the same sentence😱. It all came about when I was putting the felt away till I'm ready to use it, and found a plastic wallet in the box full of complete or half complete glittered images.


 I also found a bunch of stamped images I hadn't started yet, so as I'm way behind with my Christmas cards, these are going to be really useful.


 Glasses, more stamped images and an assortment of glue bottles.

 
Glitter in all sorts of colours, mostly bought cheaply either from E-Bay, or loose at Hobbycrafts shows.


 Speaking of which, although it's not called Hobbycrafts any longer, its called The Creative Craft Show, we've booked tickets for that on 2nd November at the NEC. I'm not booking for Happy Stampers this year, as that's 5th October, and as I'll still be having chemo then, I'm avoiding crowded places, in the hopes of not picking up any infections! As long as there's no further breaks, I'll be finished before November. So it'll be interesting to see what this show is like, and if the Exhibitor numbers are improving.


 Finally finished off the house cards!
And so, time once again for leaving our link at Julias place, The Stamping Ground, and visiting desks of all sizes, shapes and state of chaos.


  So tomorrow is the restart of Chemo, and I think I forgot to say last week it will be at 80% of the original dosage, in the hopes that it's more acceptable to my immune system and body in general.


Which just leaves us with.....And Finally.........

Never a truer word spoken!


Friday, 12 April 2019

Glittered Medallion cards

 Well, this is the first half of the Glittered Medallions that I've been working on.
 One beauty of them is they can be used for almost any occasion, and because there is so much detail in the stamping and glittering, you need do very little to the card base.
 In all of these, the only thing added was some embossed lines using a scoreboard.

I'll add some close up pictures further on, so you can see what was added to each.


These three had more embossing added, but still simply done with a scoreboard.


This is the stamp I was using, and I stamped it onto OHP film, first off using Staz-on, and then I did a second batch with Archival Black to see how that did. It took longer to dry than Staz-on, but I was leaving them overnight anyway, and by next day they were fine.


 It's an old stamp, used to be wood mounted, probably bought about 15 years ago. The image stamps out to roughly 3" square, and the majority of the card bases are 5" square.
Looking back at a post from where I used them before, it's called Striped Jewel, as was by Hobby Art.


 Glue and glitter should be added to the back, and a few tips here.
 1.  First off, take your glue partly on to the lines in the section you are working on. It won't be seen from the front when you are done. It does have a slight tendency to shrinkage, and this help to prevent too many gaps.
2.  Next, when you add glitter, add plenty and give it a moment or two to sit and settle into the glue. That helps you get good coverage. If you tip it straight off, very little glitter will sink into the glue.

 3.  Also, don't add glue to too many areas before adding glitter. It won't dry, but it will form a skin, then the glitter won't sink in as well.
4.   It's best not to try and do the whole thing at once, you'll probably end up leaning on a glittered area while it's wet. Doing a couple of colours at a time, then leaving to dry is probably best.
5.  When each batch of glittering is dry, it helps to clean off any loose glitter before continuing. First time I did it, I tried a Swiffer cloth. DO NOT DO THAT!!!!  The glitter grabs fibres from the cloth, and that gets stuck in any glue you're adding next. Best solution I found was a small stiff brush, like a stencil brush or a toothbrush.

Give it a brush over, then flick it over the bin to get rid of any loose glitter left behind.

You can just toss this, or you can save it all into a pot. I've done that with lots of glitter leftovers from bags when I've bought it, so I added the brushings off to that.  You end up with a pot of  a totally unique mixed glitter. I actually used it on one or two of the medallions too.


It took a few days, but eventually they were all done.

 It's a good idea, by the way, to leave yourself a good margin of film all around your stamped piece to make it easier to move & handle when it's wet. Once they're completely finished and dry, then you can trim them down.


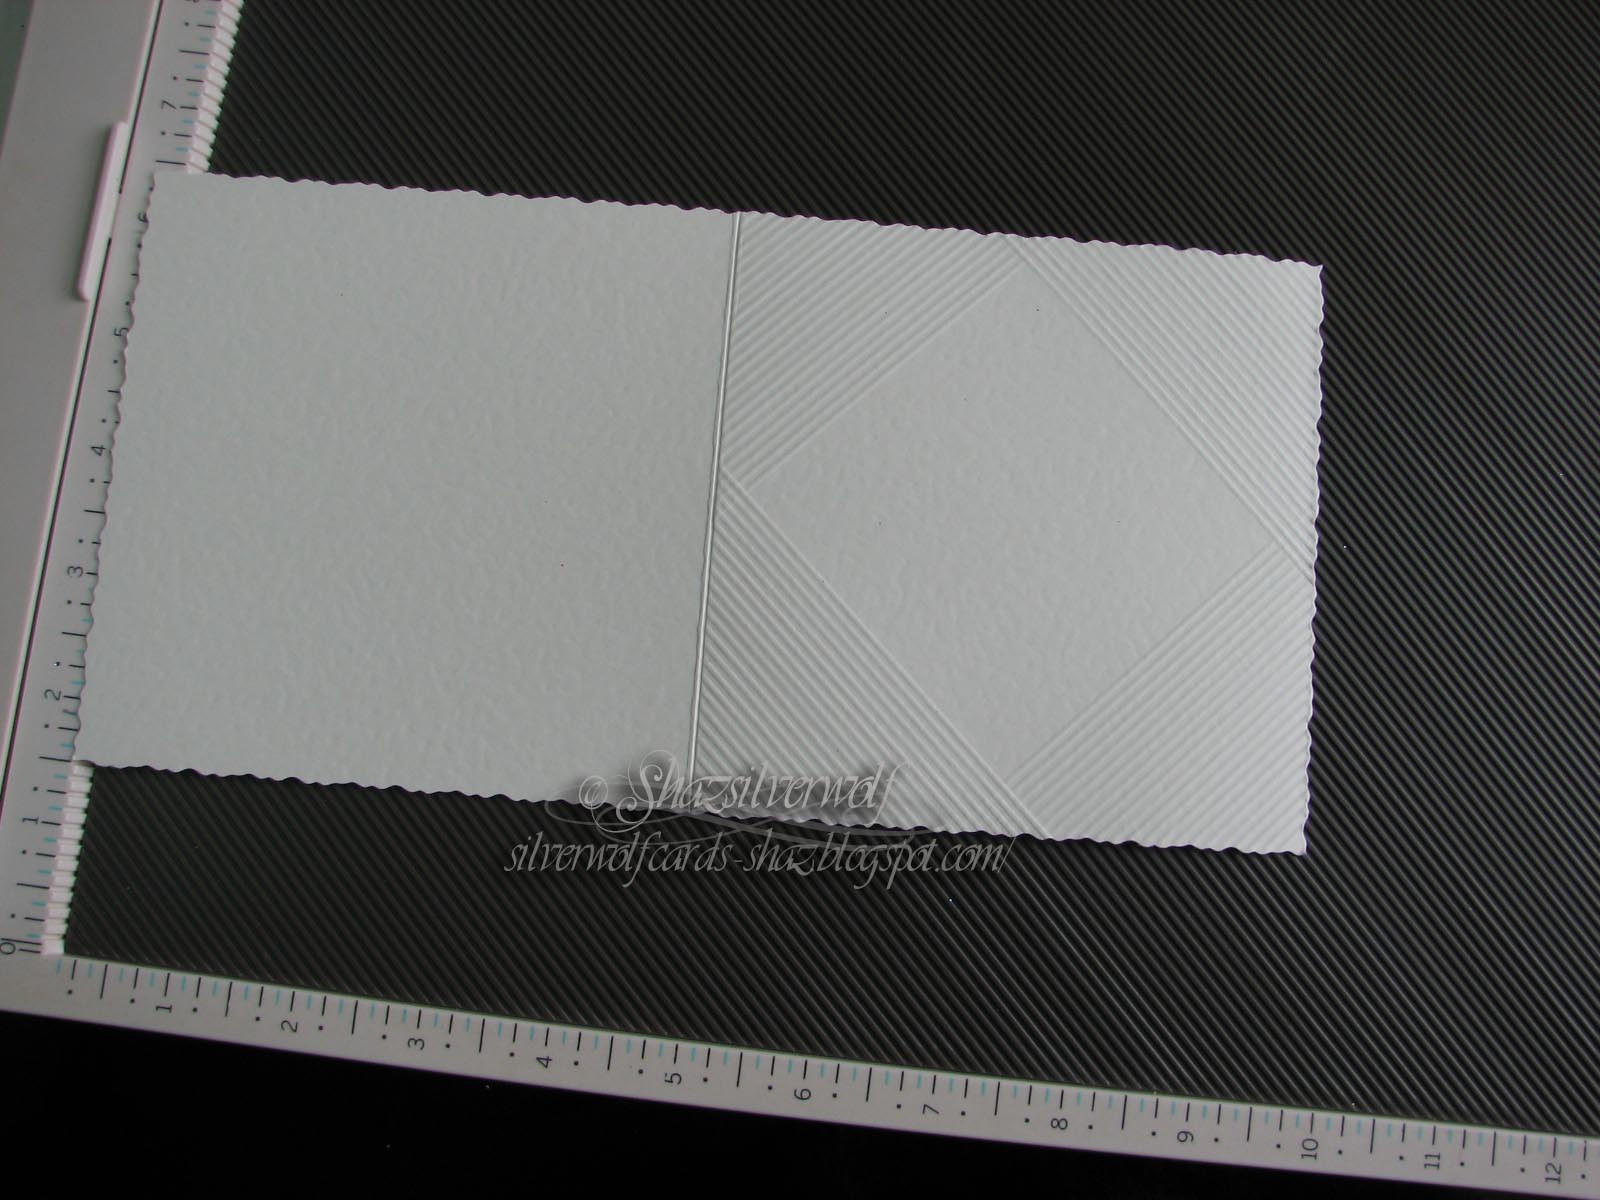
 I added a little interest to the base card with a scoreboard. To do these, I lightly marked out the square on the inside front of the card, then used a stylus & scoreboard to mark out the shape, making sure I was slightly larger than the design. When I was done, I erased the pencil lines inside the card. On the left it's just a simple square around the image. On the right, I added another score line from the corners of the image to the corners of the card.


  I've taken close ups of these so you can see what I did.


This is just a basic square around the focal image.


As the images are a symmetrical pattern, you can  turn it a quarter turn, and have it placed on end.


The pieces were added to the bases with some Pinflair Glue gel, I've found a silicone type glue works best for doing this.


I got a little fancier with these two, adding lots of diagonal lines in each of the four corners. I have a diagonal scoreboard, but you could do it with a straight line one, just taping your base in place on a diagonal on your board.


This one I did by starting with a square around the image, then added a line to each corner. Then I just filled in with straight score lines.


The lines add just enough interest to the card base, without fighting with the strong central image.


Finally adding a selection of sentiments to them, cut 3 times from a plain matching cardstock, then once from glitter cardstock to match, and layering up for some extra dimension.


 This is the diagonal scoreboard. I believe it was a Stampin Up product that was being discontinued when I bought it. I don't have an SU scoreboard, but by luck- or maybe they make it too- it fits a Martha Stewart board I was gifted.


An End of an era

An end of an era

I write this with a broken heart, that only time can heal My beautiful, wonderful wifelet Shaz (Silverwolf) passed away peacefully in the ea...