A warm welcome to all my visitors,

Thank you for taking the time to come and look at my blog, I really do appreciate it. I would love you to leave me a comment, even if it’s just to say Hi. It means I can come visit you!

All my designs are original, so copyrighted to me. If I have been inspired by someone elses work, I have named them in the post, and where able, I have provided a link.

Please feel free to use my designs for inspiration, I just ask you to credit me, and provide a link back to my blog.

Thanks, Shaz XX

Showing posts with label Rubber Stamp Tapestry. Show all posts

Sunday, 17 February 2019

Christmas Card Club Challenge #4- Birds

Our fourth Challenge of the year, and this one has been chosen by a new member, Gwen, who asked for Birds. I've chosen to use Card-io and Rubber Stamp Tapestry stamps to create mine.


Two are very similar, using mostly the same stamps.
 I did two, as the first one I did, the darker edged one, I thought may be a little too dark and busy.

I started in both cases by stamping the Snow Globe, Card-io Crystal Globe, then stamping a mask to cover the outside of the Globe. I added the tree after sponging in a skyline and some snow drifts.
 The tree comes from the Christmas Breeze set, the Bird Feeder, pair of birds and bird from Birdsong 1. A few small trees are multiple part stampings from one small tree in Mini Tall Trees .


Then I reversed the masking to stamp around the outside. This Pine Branch & Pinecone are by Rubber Stamp Tapestry.
 I added Distress Pine Needles around the edge.


 Because I thought it a little too dark, I repeated the process, this time stamping the branch & pinecone in second generation stamping, and adding less inking around the edge.


 I also used Rubber Stamp Tapestry stamps for the third card, from a set called Cardinal in Holly.

 I drew a circle in pencil as a guide, then stamped the Holly branch in first & second generation imprints around that, then added the berry sprig using Versafine Clair in Glamorous. Edged the card with Pine Needles again. After I'd assembled the card, I added dots of Liquid Pearls in Garnet to the berries.
 The Bird & Branch comes from Card-io Christmas Scenery 2.
 The sentiment is a Phill Martin one.

Sunday, 11 December 2016

Christmas card Club- A Snow Scene.

This fortnights challenge theme was set by Rita, and is titled 'A Snow Scene'.
I thought this was time to have a go at a Card-io scene, and I'm fairly happy with how it turned out, but I need more practice, as I can see a few things I could improve on. The robins, for instance, could have done with being a little darker, they sort of get lost in with the pinecones. And some of trees could have stood a little straighter. So I shall keep practising scenes in my notebook for a while.  Speaking of notebook, this was inspired by a scene I stamped in there a while back.


I think I actually prefer my practice one,πŸ˜€.


I got so engrossed I didn't take as many pictures during the process, but I will list the stamps I used at the end.


Wendy, from Card-io does some awesome scenes with her stamps, and I intend to keep practising. She makes it look far easier than it is!
I started as I've seen her do, by placing the four sides first, then filling in to get your shape, I went oval instead of round with mine.
 The image is stamped multiple times, all from the same inking,so you get a variety of shades.


 I stamped the twiggy branch from the Oriental Blossom set, in Versafine Spanish Moss.


It was now I realised I'd not taken any in between photos, but I added some Holly Sprigs in Archival Fern Green, and Holly Berries in Memento Ladybug,along with some Pine cones, which were all from Rubber Stamp tapestry Peg stamp sets.
 I punched out a small circle from a Post-it for the moon, and tore paper to create the hills. The sky was done in Memento Summer Sky and Adirondack Stonewashed. I used the Memento again to just sponge very lightly over the edges of the torn paper mask for the hills. The trees and stag are stamped in Archival Black. Robins were added to the wreath, and I used a marker to give them a red breasts, after inking in brown.
 I've matted the panel onto red, then green card, and it all fits onto a folded sheet of A4 pearl cardstock.
After it was mounted, I used Stickles in Frosted Lace to follow the shape of the hills, and Liquid Pearls in Garnet onto the Holly Berries.

Stamp sets used:
 Rubber Stamp Tapestry:
Pine Branch Border( Pine Cone)
 Cardinal in Holly( Holly branch & Berries)
Card-io
Oriental Blossom( Twiggy branch)
Christmas scenery 2( Tees and Stag)
Winter Tweets( Robins).
 There are similar stamps to the Rubber stamp Tapestry ones in the Card-io range as well.
 I'm going to add here a card I did a few years ago, as it's a snowy scene, I think I love it the most because it was almost the worst disaster ever!

  I was on a DT for a site called Craft A Scene, which doesn't exist now, but as you can guess was all about scenic stamping, a big love of mine.
Well, being my usual organised self,😱, I was doing this the day before I needed to post it up.  It had all gone well, then close to the end, I decided to stamp a reflection of the moon in the water. HUGE mistake! It looked awful!
So, I tried to retrieve it by wiping the ink off with a baby wipe. Which removed the white ink, and also took some of the other colour off around it. So I wiped over the whole thing, trying to even it out. Panic is not the word for it!
Especially when the whole piece just curled up into a roll😰.
 So, in desperation, I flattened it out, and put it under some books , hoping it would flatten out overnight. Imagine my amazement the next day, not only had it flattened out, wiping it with the baby wipe had turned it into a misty, icy scene, which was exactly the brief!
Some white gel pen  highlights, then held my breath as I added some wavy lines in the water for the moons reflection, and it was finished.
I embossed some white cardstock with a Cuttlebug Snowflakes folder, mounted it and breathed an enormous sigh of relief.😲,
 I still have the card, I've kept it as a reminder that sometimes, what seems to be a disaster can be retrieved. Happy Christmas ladies, and I'll see you all again in January.xx

Sunday, 23 October 2016

Birthday Card-io for a change!

Following on from yesterdays Christmas Card-io cards, I thought the same design would make some useful birthday cards too.


So now I have 6 birthday cards to add to my stash.


A number of different Card-io/Majestix stamps were used to make these, but they all started out with some foliage being stamped first in an assortment of Adirondack and Versafine Greens.


I made sure to use plain stamping card this time around, and it worked as I wanted.

In the main, the foliage stamps are from these sets: Greenery 1, Summer Wreath and Oriental Blossom.
 I made sure to leave plenty of white space too.


The flowers on this one are from a set called Summer Meadow. Stamped in Adirondack Red Pepper and Cranberry.
All the floral elements in the cards were heat embossed with Clear Detail Powder, and the greenery had dried out so no powder stuck to it.


The same flower set used here, this time in Versafine Blue Lagoon and Adirondack Sail Boat Blue.


Here we have Gerbera Garden, using Adirondack Purple Twilight and Eggplant.The little bee is also part of the set, and was stamped in Archival Coffee, then I added a little pale orange with a Promarker.


The stamp set in this one is called Oopsy Daisy, with the two sizes of daisy stamped in both Adirondack Sunshine Yellow and Sunset Orange.
 The little blue dragonfly is from an RST set called Dragonflies at Dusk.


This one has stamps from another RST set called Triple Floral Dragonfly and a butterfly from Begonia garden. Inks used were Adirondack Mountain Rose, Pink Sherbet and Purple Twilight.


 Final card is stamped using Seasonal Rose, in Adirondack Red Pepper and Purple Twilight.


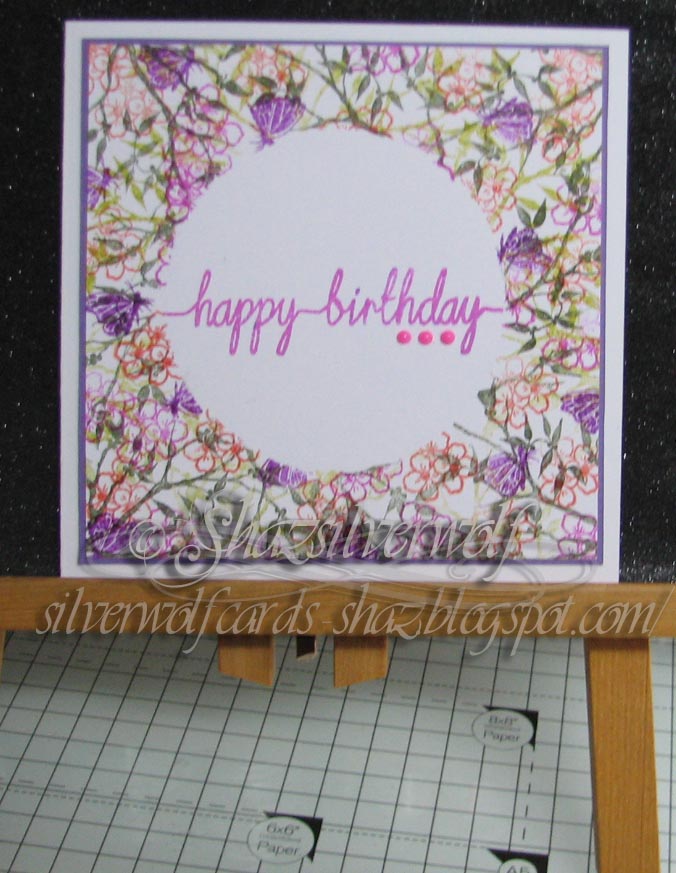
The birthday greeting is a Clarity stamp, from the set called Line Sentiments No.1. I used a matching ink from the flower colours to stamp it in, and placed the outer mask left from cutting out the circle to protect the design.


The selection of inkpads I was working from.


All six fronts mounted onto card bases, 5"x5".

Finishing touch was three half pearls in toning colours just below the sentiment.


Saturday, 22 October 2016

Card-io Christmas take two.

So, as promised the second batch of cards, this time with some heat embossing thrown in.
One thing I learnt in this try out, is don't use a pearl coated card base!
 As I was using up off-cuts to do these - go me!- there was a variety of cardstock used. Some plain stamping card, and some pearlescent.
 The background stamping on the plain card dried out just fine, and I got the effect I wanted. The stamping on the pearl card however just flatly refused to dry. Despite being left overnight, and getting a blast with the heat gun for good measure, the greenery still picked up the EP.


 I'd used dye based inks, along with some Versafine, so fully expected no problems. Oh well.

So some have heat embossed greenery as well as the accent stamp.


As you can see, I did one with some Poinsettias, one with Baubles, one with a mix of the two. Another had Pine cones, and the last two had holly berries.


Versafine Crimson Poinsettias and Imperial Purple Baubles.


Baubles in Versafine Habanero,Imperial Purple and Majestic Blue.


Versafine Crimson on the small Poinsettia, and Ranger Dye ink Classic Cherry on the large one.


Crimson Versafine for the holly berries on this one
 on the right, and Classic Cherry for the one on the left.


Archival Coffee for the pine cones, two different ones from two sets.


It occurs to me that I could use this to make some Birthday Cards with, using different sets. And I will use plain stamping card next time, so I can repeat the heat embossing elements.

There are a number of sets of these stamps in the Card-io/Majestix line which are very close to the RST stamps I used, such as the Poinsettias, the Baubles and the Holly & Berries. I actually prefer working with the transparent Card-io stamps to the red rubber on wooden pegs of the RST.

Christmas and Card-io.

Well, these turned out to be quite quick and easy to do. Not actually what I had in my head originally, I was thinking along the lines of stamping a wreath of sorts.
 So, I die cut a circle from copy paper, and was going to stamp a wreath inside the circle cut out.
I decided the circle was too small for this to work, so swapped it around, and used the circle to mask off the centre of the cardstock, and stamped around it.


The first one I made was one of the snowflake cards, and that one, on the right, does include a Clarity snowflake, in the corners. All the other stamps I've used on all the cards are from Cardio/Majestix, or Rubber Stamp Tapestry (RST).
 I was surprised recently to see some Rubber Stamp Tapestry  sets in Hobbycrafts, I didn't think they existed anymore. The sets I have are a few (!) years old now, possibly 10 or more.
For anyone not familiar with them, they are very small stamps- very similar to Cardio/Majestix, but on wooden 'pegs', so you may have heard them referred to as Peg Stamps.


  They came in a pack like this, containing however many stamps were needed for the image. This one, Poinsettia Wreath, has four stamps in the set.
    The black line you can see on the pegs denotes which way up the image goes, to help with alignment.
 However,unlike the Card-io/Majestix stamps, these don't build up into scenes, as the sets don't contain the right sort of images.

I'd added a few lines of removable adhesive to the back of the mask, and, having decided I was going to use 5" square card bases, I cut a sheet of card to 4 1/2" square to stamp on.
 There's no reason why you couldn't stamp straight onto your card front, I'm just not that brave yet!
In the main, the inks I used on all the cards were Adirondacks, Versafine & Archival. A few Distress inks also came into play, mainly for the purples.
 The snowflakes used Adirondacks in Stonewashed, Denim and Sail Boat Blue, Versafine Majestic Blue and Deep Lagoon, and Archival Cobalt Blue. The purples were Distress Wilted Violet and Dusty Concord.I used the Cardio set called Winter Flurry, which has 6 stamps of assorted sizes. In the corner is a Clarity snowflake, from their 'Snowflakes' set, and it's the smallest of the set.


The mask removed to give a nice clean centre where I can stamp a greeting.
 I went back to the Phill Martin 'Snowflake Sentiments' set,as they are a good size for this.


I used the Archival Cobalt to stamp the greeting.

 I matted this onto a sheet of dark blue card, then onto my card base. Final touch is an acrylic gem in the centre of the snowflakes in the Greeting stamp.


All the other cards followed a similar pattern. I'm not totally happy with the second one I made,using holly sprigs and Poinsettias, I think I stamped far too much background greenery, too many flower heads, and it now looks a bit busy. But, lesson learnt, and I left more white space in future ones.


This one has a greenery sprig stamped in just two different greens, Versafine Spanish Moss and Adirondack Meadow, and I also used second generation stamping to get some variety.
 The Pine Cone is stamped in DI Gathered Twigs, and Archival Coffee.


Archival Coffee for the sentiment, a brown cardstock matt, and amber acrylic gems.


I decided to have another try with the Poinsettia set up, and was far more restrained with my stamping this time! Much happier with this one.


This was the second snowflake card, and again, less images. If I'd done some practice ones of this in my book, it would have been a good idea!
The baubles card uses stamps from RST and Cardio sets.


 Again, I think I may have got a bit too enthusiastic with the baubles. But I get told the same thing about decorating the Christmas Tree, so maybe it's a good job there isn't a tinsel stamp too, lol.


Well, having finished these, I had a thought for a second batch, which I will blog when they're done. I thought it may look good if I had embossed accents onto an unembossed background, so I've stamped up six more  backgrounds, and am leaving them to dry overnight.
 By the way, the 4 1/2" on the circle is not the size of the mask, it's just to remind me what size background I intended it to be used on. The actual size of the mask is 3".

Materials:
 3" circle mask
4 1/2" cardstock to stamp on.
 4 3/4" contasting matt.
 5" square card base.
 Card-io/Majestix/RST stamps
Dye inks in suitable colours.

An End of an era

An end of an era

I write this with a broken heart, that only time can heal My beautiful, wonderful wifelet Shaz (Silverwolf) passed away peacefully in the ea...