A warm welcome to all my visitors,

Thank you for taking the time to come and look at my blog, I really do appreciate it. I would love you to leave me a comment, even if it’s just to say Hi. It means I can come visit you!

All my designs are original, so copyrighted to me. If I have been inspired by someone elses work, I have named them in the post, and where able, I have provided a link.

Please feel free to use my designs for inspiration, I just ask you to credit me, and provide a link back to my blog.

Thanks, Shaz XX

Showing posts with label Crafters Companion. Show all posts

Wednesday, 4 December 2019

WOYWW #548- The Getting Tidier Edition.

Exhibit A- the desk where my die cutting is done. As you can see, my Big Shot is barely visible below all the stuff thats got dumped on there. So clearing this was the start.


   Not perfect yet, but much better!
And I have a plan for making it better- thanks to Hobbycrafts Black Friday deals.  I'd considered getting another rolling cart to put all my dies in, thus clearing two boxes off the surface. Only real issue was it was a bit too tall to go under the desk, which was what my plan was. But decided to go with it anyway, I could always roll it to one side, over by the big unit.


 So I went online and ordered one. Great deal, they were £15, instead of £30. Still available till midnight tonight! 
The larger ones are £25.


Big surprise when it arrived, it wasn't the same as the one I already had- it was smaller! Result. Now it will go under the desk.Still plenty big enough to take all my dies, main ones at the top, alphas in the middle and Christmas stuff in the bottom. For once, pleased something turned out smaller than I expected.😁


OK, let the Black Friday Enabling commence!

Some Honey Doo stamps to start with.


This Christmas die from the Paper Edgers line. Should help with some fast Christmas Cards.


These word die & stamp sets from Crafters Companion.


And finally some stamps from Visible Image, including the fab Erikas Maple.


And that's about it. Still plodding along slowly, I recall last time this happened it took me weeks to fully get back to normal, so it's slow but sure. Little bit of tidying and sorting each day at the moment.


  Which just leaves us with .........And Finally.........

Ain't that the truth!

Wednesday, 31 October 2018

WOYWW #491- The Halloween Edition. :)

Tell me I'm not alone in wondering where on earth the weeks are going! Feels like I did this yesterday, not a week ago.Time again to leave our links over at Julia's place, The Stamping Ground, and also at #WOYWW on Instagram too now.
As you can see, I've been cutting up paper strips again.Been through my scraps folders, and reckon I've got every colour sorted now. Still got lots of ideas for designs using them.
 These are the two most recent ones.
No, you are not seeing things. Yes, I did Pink!

The fancy edges were a set of dies from Aliexpress.

 I bought another couple of sets of line/edge cutting dies that arrived Tuesday.


The top set are 5" long, cost £1.70.
The bottom set are just a bit shy of 6", cost £1.30.


I also bought a star frame set of 2 dies.

 The square is just about 5" and the circle 3½". £2.82.


 I'm careful not to buy anything I know is a copy of something else on sale, but I've not seen any of these anywhere, and the edger ones are just basic lines.


The project I couldn't show last week, my DIL's Birthday Card.
 The Fairy House is Crafters Companion, bought at Happy Stampers. All the others are Lavinia stamps. Most of the colour done with Prismacolor pencils, I'm really loving those. The sky and grass are Distress inks applied with a brush.


So, short and sweet this week. Makes a change, lol. Which just leaves .........................And Finally...........................................


Sounds like a plan to me. 😁😁😁


👻👻👻👻👻👻👻👻👻👻

Saturday, 27 October 2018

Fairy Easel Birthday Card

The project I was working on earlier in the week. A birthday card for my Daughter in Law, Becky.
 I turned it into an easel card, as I'd made quite a large scene.


Starting to write this post, I've realised I didn't actually take any in process photos!

The image itself is done on an A5 sheet of cardstock, added to an A4 folded card base.

The fairy house is from Crafters Companion, called Fairy Wishes.
The house, drying wings, fairy path and small fairy were stamped in Versafine Clair Nocturne.
Apart from the house, most of  the other stamps used are by Lavinia Stamps. The little dragonfly is from a Crafty Individuals stamp sheet. There is also a random grass stamp used at the bottom, from an Inkylicious set.
 Colour was added to the house, path and wings using Prismacolour pencils.
 The sky and grass area is Distress inks, brushed on with a Clarity brush. They are really good for getting a light coating of ink on a background. I have one set only, as I don't use them that often, and just wash them when I'm done. The blues used in order, were Tumbled Glass, Faded Jeans and Chipped Sapphire, the greens were Mowed Lawn, Shabby Shutters and Lucky Clover.


I used a couple of older Versafine Greens to stamp the top foliage,  Olympia Green and Spanish Moss, which is all second/3rd generation stamping.
These are Leafy Trail, Whimsical Wisps,and just the Ivy part of Creeping Vine.

 Foliage at the bottom is Fairy Buttercups, Meadow Grass, Willow, and an Inkylicious grass. Same inkpads.
 The Tiny Mushrooms were stamped using a couple of Distress Markers- a brown for the stem, and Festive Berries for the tops.
Versafine Clair Paradise was used to stamp the dragonflies. Their wings, and the wings on the washing line all got a coat of Wink of Stella in Clear Glitter.
 Liquid Pearls in White Opal was used for the spots on the tiny Mushrooms, and for the mushrooms on the fairy house. Tiny spots of Stickles in Crystal added for the fairy dust being scattered by the small fairy.


The base and the piece to hold the greeting were covered with some TH backing paper, I thought the colour worked well with the image, all the better for being plain. The greeting is a Tonic die, cut from a sheet of foil laminated cardstock. I also cut 3 from dark green cardstock and layered them all together to make the greeting pop up. Matted it onto black, then attached with some foam tape, using 1 layer at the front, and 3 at the back.

Wednesday, 10 October 2018

WOYWW #488

These Wednesdays seem to get here faster every week! Back to leaving our link at Julias place, The Stamping Ground, for this weeks Desk Fest.
 Had a great time at Happy Stampers, as always so much to buy, lol.
This was my desk on Sunday, ready to start the mammoth task of cataloguing in One Note, then putting it all away. Love One Note, as I have it on my PC and on my phone, so can check whether I have something before I end up buying it again. Yeah, that's a thing.
 Favourite purchases of the day?
Has to be these three stamps from Crafty Individuals.
 Love that fluffy, scruffy Raven on the end.


A few more Lavinia stamps.


And some fab ones from Hobby Art. Love the Round Penguins, far left, and the super cute Polar Bears.


There's a great Indigo Blu stamp called Batty, and a cool Fairy Castle, a steampunk Dragonfly and a couple of Halloween stamps.


 A great Halloween die cut, and a small Poinsettia die too, something I've been on the look out for.  Another Fairy House stamp, and some snowflake dies, reduced. You can never have too many snowflakes!


Good job, as I found a set at The Works this morning, too.

Along with some small wood shapes, angels & Trees, great bargain at 32 for a Quid.


These were on my desk on Tuesday morning, fussy cutting some stamped flowers from Honey Doo to go on the stamped bases. Had to shift them for now, as I needed to make an Anniversary card for Hubby. Married 9 years today, but I can't share it yet as he's on earlies this week, so he won't have it till this afternoon.


I'll blog it later in the week.

Along with the flower cards when I get back to them.


And I'm all done, apart from.........
  .......................... and Finally

 yeah, that's a thing too!


Wednesday, 15 August 2018

WOYWW #480

Good Morning folks, hope you are having a good day today.  Our local craft store, Amelias, had a sale day on Saturday, so of course it would have been rude not to visit.😀
 Snagged a few bargains- I love the Impression Obsession Cover a card stamps, and got a fab snowflake one, along with a Crafters Companion Birthday sentiment one, and a couple of House Mouse Christmas ones.


Not that I need any paper pads, but the Christmas 6x6 one was only a couple of quid.
Some Yupo paper which I've been meaning to try out with alcohol inks for a while, and a great set of TH Snowflake dies.


And then of course, Doug spotted some stamps he really liked! The Crow one got my vote too, as well as the Parrot in the set on the far right. Poor thing looks like he's missing a few feathers, lol. So feather stamps went in the basket too. I also picked up another Encore Metallic pad in a colour called Honeydew, and a Brusho colour that wasn't in the sets I bought, called Sunburst Yellow.


I finally got around to doing all the inserts for those Christmas cards on last weeks desk,the big Snowflake stamp is from Chloe.

The sentiment is an Inkylicious stamp.


Used it across the inside of the inserts, and on others I used a Santa & Sleigh stamp from a  Visible Image set.


This sentiment is from a Phill Martin set, called Snowflake Borders.


Hubbys birthday card, as yesterday was our birthday.

 Stamps from Visible Image.


And a 40th card for my daughter, who's birthday is on Friday.
The card front was cut out with the Silhouette.


And that's pretty much me done, I think.
All that remains is for me to add my link over at Julias place, The Stamping Ground.
And finally..............................

Monday, 5 September 2016

Christmas Bauble Cards & Visible Image stamps.

Two cards in this post, mainly because I forgot to photograph some of the steps for the one card, so it'd be a bit of a short post!
 Anyway, we'll start with the Blue Bauble card first.


 First off I die cut a bauble shape, using Spellbinders Heirloom Ornaments 2010, and using the largest die.


 To get the blue bauble matt for it, I drew around the outside edge of the largest bauble, then cut it out by hand.


Next, the stamp. I used Visible Images Winter Scene stamp, and inked it up in a blue pigment ink.
 This is the image:


I did mask off the one set of border lines with some sellotape before I inked it, then removed it before I stamped.


This is how the image stamped out, and now I wanted to continue the image a little, so I added some more ink with a brush to the top and bottom, and extended the night sky on both sides too.


You can see a difference in the ink, but that won't show at all when it's finished.I put this aside to dry for a while, and started on the second bauble. this is the one I forgot to photograph.


The  Bauble was cut using Spellbinders Heirloom Ornaments 2011, which is a longer bauble than the 2010 version.
I created the matt for it in exactly the same way as for the previous one.This one uses a new stamp set released a few weeks ago,Winter Wonderland Set.
 I stamped the treeline stamp twice across roughly the widest part of the bauble, then stamped Santa & Sleigh above them. using the smallest of the trees, I scattered them lower on the bauble. All were stamped In Versafine Onyx Black. I also added a little shadow below the treeline with a dry baby wipe & some black ink.
Both baubles were now covered in double sided adhesive film, and sprinkled with Glamour Dust.


Now for the card bases. I've used 6x6" bases, and embossed a panel for the front of each one. Behind the Blue bauble I used the Crafters Companion  'Sunbeams' folder, centering the card in the middle of the sunburst. For the other card, I used an older Cuttlebug folder, called Snowflakes. The Crafters Companion one is an 8x8" folder, but the Cuttlebug one is much smaller, I'm guessing A5, so I had to do it multiple times to cover the sheet, but it worked just fine. I found if I used a different sandwich, replacing the top 'B'plate with sheets of card, it was still enough to emboss, but not enough to leave edge lines.

 The embossed pieces were added with DST,then the baubles with Pinflair Glue Gel, which should hold better on the uneven embossed surface. I stamped another Visible Image stamp,Miracle Of Christmas, onto a scrap of white card, then added that to the bottom right with some more silicone glue. Final touch on both cards was a ribbon bow, white for the one and pale blue for the other.


Recipe:
Stamps, all Visible Image:
Winter Wonderland Set
 Winter Scene
 Miracle of Christmas
 Verafine Onyx Black
 Blue inkpad
Glamour Dust
 Double Sided Adhesive Sheets
 Embossing folders of choice.

Monday, 18 April 2016

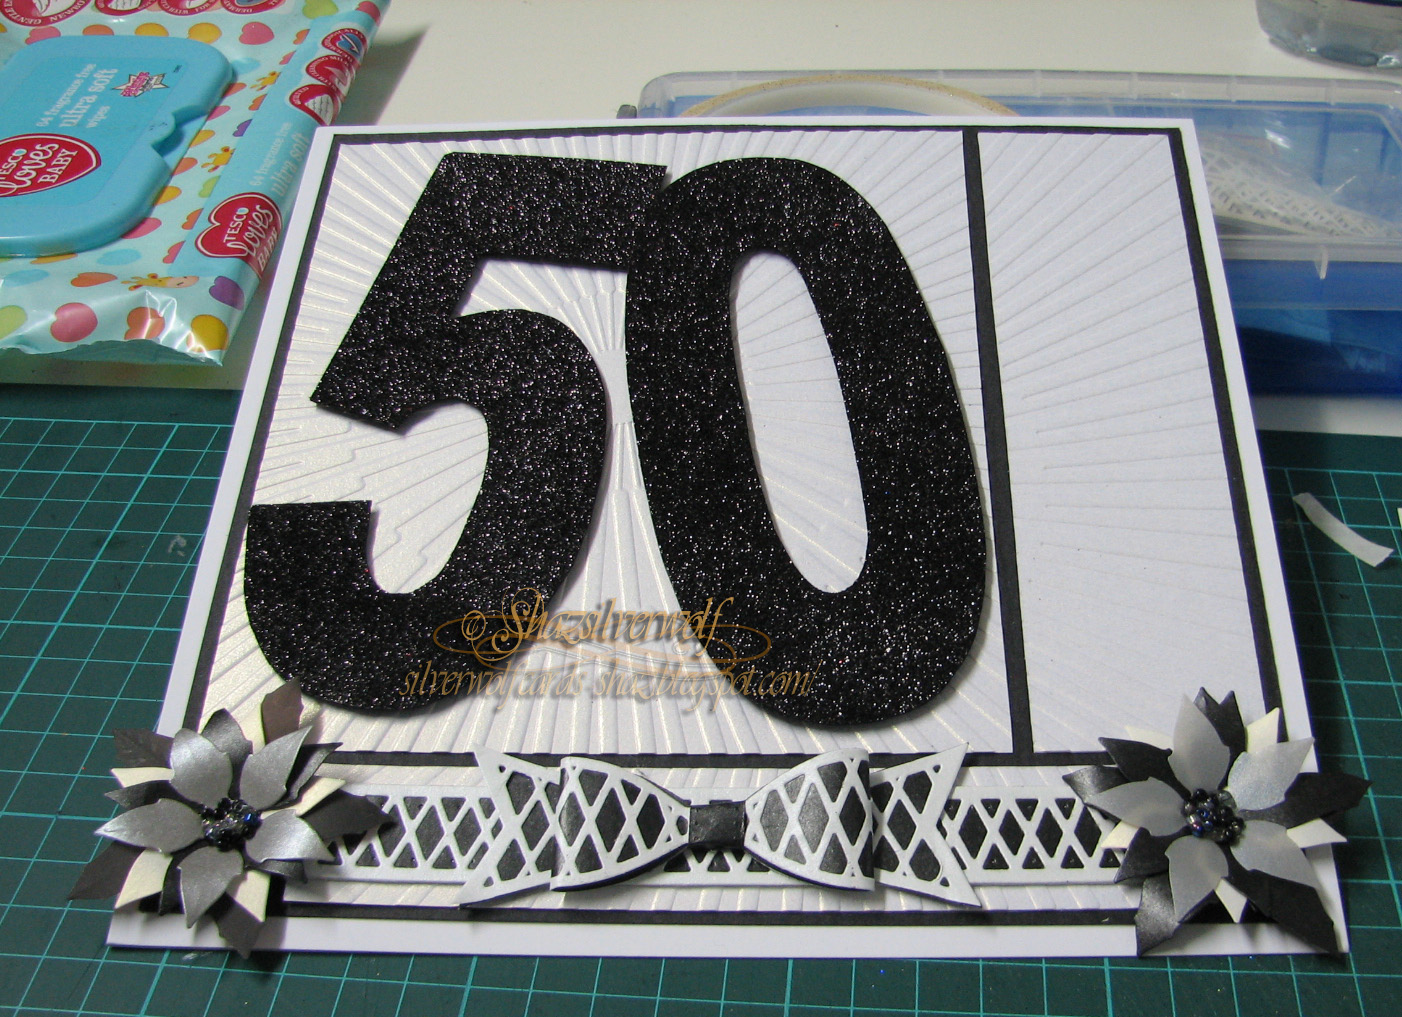
50th Birthday Card


Right, this was the card I was working on last week, but couldn't show as it was for a Birthday at the weekend. Visitors last Wednesday will remember seeing the embossed background, and the letter templates on my desk.
 The templates  are still available, from Clevercut, but I know they are having website problems at the moment,as something on their site has fallen foul of Virgin Media's' Virusafe, which has blocked the page. Just had a look on the FB page, and Ali has posted THIS LINK, which goes straight to the site.
 For making a special card, these templates are ace, as they measure 5 1/2" tall,and approximately 2 1/2" wide, so they can make a great impact.


Mine were cut from a black glitter paper, a pad I picked up once in Hobbycrafts.


Although it's a paper pad, the paper is more like lightweight card.


I already had a vague plan of what I wanted to do- you can see my notes on measurements, as I wanted to have different sized white blocks matted onto black card, which would all be mounted onto a white 8x8" card base.

With my 3 pieces of base card cut. I proceeded to emboss them with a new folder I bought from Crafters Companion, called Sunburst. Of course, had I actually measured the folder first, I would have realised it was 8x8", so could have just embossed one sheet of card, then cut it to size.


 I was quite impressed with how well the folder embossed to be honest. It came out lovely and crisp, with nice detail. No squishing or distortion of the embossing at all.

My next detail involved the use of two of the Sue Wilson Finishing Touches dies, the Classic Ribbon & Bow, and the Lattice Ribbon & Bow.
 These dies are the 'normal' sized ones, as it's worth mentioning they come in a second smaller size called 'Bitty Bows'.


I cut the Classic, which is a solid shape, from black paper, and the Lattice from white paper, to layer over it.


As my card was wider than the ribbon die length, I cut two pieces of each, and joined them together. This turned out to be a mistake, and something I should have remembered from the first time I did this.
Because of the orientation of the bow, you can see the join in the middle- I need to remember that I must remove the 'ends' of the Lattice ribbon, and join by the Lattices in future.


  I made a quick adjustment to my card, trimming down the bottom panel so that it was just long enough to allow one ribbon to wrap over the ends. Then the bow and tails, which again had the Lattice portion layered over it, were attached with a glue dot.


 I added a couple of black/white/silver layered flowers, which are cut with the Spellbinders Layered Poinsettia Dies, to fill the corners.
 Final touch was to add the greeting, a Happy Birthday cut with Poppystamps Dies Vintage Happy Birthday, and that's it.


An End of an era

An end of an era

I write this with a broken heart, that only time can heal My beautiful, wonderful wifelet Shaz (Silverwolf) passed away peacefully in the ea...