A warm welcome to all my visitors,

Thank you for taking the time to come and look at my blog, I really do appreciate it. I would love you to leave me a comment, even if it’s just to say Hi. It means I can come visit you!

All my designs are original, so copyrighted to me. If I have been inspired by someone elses work, I have named them in the post, and where able, I have provided a link.

Please feel free to use my designs for inspiration, I just ask you to credit me, and provide a link back to my blog.

Thanks, Shaz XX

Showing posts with label peel off. Show all posts

Monday, 13 April 2020

Some Gorjuss Girl cards.

So, I have quite a few Gorjuss girl stamps, and they've rarely seen any use mainly because I'm not a confident colourer, and because I've never really been happy with what I've done, I've avoided it all the more, I think because I find it stressful rather than relaxing.
 Most of my colouring in the past has been done with Promarkers, and it's only very occasionally I produce something I'm happy with. However, I finally invested in some coloured pencils, and I bought the Prismacolor ones, as they were mid-range price wise, and supposed to be quite good, and also because I'd bought, and been bought, some colouring books, and the Promarkers usually tend to bleed through, where pencils won't do that. So anyway, I've been stamping out some images, and using them for practice over the last few months.
 I watched a few You Tube videos on using them, and gradually a few things dawned on me that have helped me be less critical of what I've done. I'll list them here, in case they help someone else.
 The first, and probably the most obvious is You are NOT going to be an expert the first time you pick up a pencil! Sounds obvious, but watching videos, and seeing examples of work others have done, and not being able to duplicate what I was seeing was making it stressful, until it finally clicked with me that they've been doing this for a long time, and probably struggled in the beginning too. It's all that practice helps them make it look so easy.
Second- I try to work too fast. I forget that the videos I'm watching have probably been sped up somewhat. So, slowing down is a key factor.
Third, it really is all down to trial & error, and practice, practice, practice! Just keep reminding myself it's only cardstock & ink.
 Finally- lightness of hand! This is a biggie. Not to try to lay down a solid patch of heavy colour in one go. Take time, and layer colour to get the depth you want. And don't worry too much about shadow at the start. So I selected some cardstock to matt them on, and die cut the images with either oval or rectangle dies. A couple have some stamping on the base card, and another three have backing paper from various pads. When they were mounted, I added some acrylic gems for a bit of bling.


I die cut some small strips for the sentiment, using a die set meant for cutting slider strips on cards. That's a tip I picked up from Jennifer McGuire.  You get quite an assortment of lengths, and is by Honey Bee Stamps, called  Straight Interactive Sliders. I got them from Bumbleberry Papercrafts.


The strips I cut from the same card as the matt.

I used some small Peel Off sentiments on them, they're something else I'm gradually trying to use up. Back when I started making cards & stamping, everything was wood mounted, Barbara Gray was just about introducing the concept of clear stamps. Anyway, that meant that a single sentiment stamp was quite an expensive thing, so I bought a lot of peel offs to cover all the sentiments I'd want to be able to use. Of course now it's much easier, we can buy some great selections of sentiment clear stamps, and I do now have a lot, so the peel off stash hasn't had much use in recent years.
 I  know that the Gorjuss Girls, with their lack of nose & mouth are not everyones taste, but they are weird enough to please me,lol.

Monday, 16 March 2020

Christmas Card Club #6- Wreaths/Garlands

Well, a day late, but finally here. Silly thing is, I looked at the list I have pinned up a few days ago, and thought 'That's OK, I've got a week yet!' So where my lost week went, I have no idea. Lorraine chose our theme this time, which is for Wreaths or Garlands, and fortunately, I have some wreaths amongst my UFO's/Left overs, so catching up was a bit easier than it might have been!

 I managed 5 cards,the top three using a Sweet Poppy stencil and stencil paste, from my UFO's.

I cut them out, added to card fronts with some foam pads, then added a few acrylic gems to each one. The backing papers are all from my off-cuts folder, and the peel off sentiments also helping to stash bust.


These next two use an Imagination Crafts Poinsettia stencil as the background,from my UFO's, and the wreath is a Penny Black stamp, called Adornment, from my left overs. Stamped in silver and heat embossed with glitter EP, then a few small acrylic gems added and a small silver ribbon, which is hard to see in the photo, to finish off.

 I'd made a batch of the Poinsettia backgrounds back last year, some just using plain stencil paste, some with glitter.
 I had a couple of small pots of Glitter stencil paste from amongst some craft stuff I was gifted, but they are really small pots, and for their size, I thought them expensive. For mine I used some Translucent Sweet Poppy stencil paste, and mixed in some glitter. It works really well, and is a much cheaper way of doing this. Once dry, the glitter is totally non shed. You don't have to use translucent paste, you can mix Gold glitter into Gold paste, and so on.
This was the Wreath stencil before I cut them out, it's called Bubble Wreath. The two multi colour ones were done by adding small blobs of two or three colours of paste to one side of the stencil, then just pulling it across with the spreader. You can get the paste in various colours, or you can add reinker to either translucent or white paste. Both pastes will make the colours slightly lighter, so if you do this, pick a slightly darker colour ink to mix in, as you don't want to have to add too much ink and make the paste runny.

Tuesday, 25 September 2018

Mixed Media & Stencil Paste Baby & Wedding cards


Been having a play with some stencil paste and Tim Holtz Layering stencils today. I thought this flourish design lends itself to so many useful cards, it all depends on the colour paste you use. I coloured white paste with pink and blue  Memento inks to make the baby cards, and left it white for the two wedding ones.In all cases, I gave the wet paste a very light sprinkling of Glamour dust, just to add a gentle sparkle.


 Useful things to know about this technique:
  When colouring your paste- and you can colour white or Translucent- you can use a variety of mediums. Inkpads, reinkers and acrylic paints all work fine, and subtler shades can be achieved with mica powders. You can also add mica powders along with your inks/paints, for a pearly sheen. You can also add glitter, for sparkle that doesn't shed!

One thing to remember when using liquid colours to colour your paste is that the liquid will alter the consistency of the paste, so this is one case where you do not want to start with a little, and add till you've got the colour required. Acrylic paint will not be too bad, as it's not so liquid as ink, but with reinkers especially, go for a fairly dark colour, just adding a drop or two. You can always add a little more paste if you want to lighten it.Remember also, when adding to white paste it will lighten the colour anyway, and it will usually dry slightly lighter as well. Also, don't skimp on mixing up your custom colours. If you run out before finishing, you'll never mix exactly the same shade!Any leftover paste can be stored in small screwtop pots, and will last for a few months. If there is not enough to make that worthwhile, you can spread the excess onto a scrap of cardstock, using that to add all your waste paste to. Then, when dry, just cover with a sheet of hot foil, run through your laminator or foiling machine-you can even just iron it on- and you have a sheet of foiled card you can die cut sentiments from.
Use a fairly good thick cardstock to work on, as the moisture from the paste will cause thinner cardstock to buckle.
Here are some I've done in the past.

 Also, Mylar stencils such as these are not going to lay as totally flat on your cardstock as metal ones, so more care needs to be taken when adding paste, so that it doesn't  start to seep under the edges of the design. Try to add enough paste, and use a wide enough spreader to cover the design in one sweep.  Too many spreading motions will increase the likelihood of the paste going under the lines. Sweet Poppy have a fab wide spreader for this, and Lucy Ellis of Sweet Poppy has some cool videos on You Tube showing how to get the best results.
 Finally- cleaning your stencils. You want to do this as quickly as possible, and I take a sandwich box with warm soapy water  in up to my craft room to drop them in, to save going up and downstairs to a sink every time I've used a stencil. Make sure you have a bowl/tub large enough to lay the stencils flat in. Keeping them flat while washing & drying is really critical to keeping them in good condition. The paste comes off easily if you do it straight away. I have found that the Cosmic Shimmer glitter pastes are really difficult to remove if they start to dry on your stencil,so speedily dropping into water is important. I have an old towel on a work surface, and stand the tub on that. A small nailbrush is ideal for removing the paste, then I lay it onto the towel, and PAT dry. That's important, especially if the stencil has unattached parts, like the Flourish one does. If you bend parts through rubbing, they will always let paste/ink etc seep under the design. This applies to metal ones with unattached parts too, not just Mylar.
So, back to the cards. The card bases are topfold, half A4 sheets, which end up as 5¾ x 4⅛. The cardstock I used for the stencilling was 6 x 4 so I had a little to trim down to tidy it up. I finally trimmed the panels to 5¾ x 3⅜.
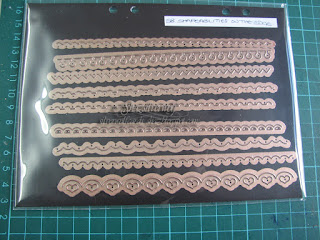
 As the panels were narrower than my base card, I decided to die cut some borders, you could also use border punches, of course.
 I made some choices from this set by Spellbinders, called Shapeabilities On The Edge. They are just a hair longer than my panels,but these dies are fully repeatable, so you can make a border as long as you need.

I chose pearl papers and cut the edges twice for each card, then split down the middle. The pink one, which was the second up from the bottom in the dies, actually gives you two for one- you could easily use the offcut as a border too.
The pearl papers came from some paper blocks I bought years ago at the NEC, from a company called Craftwork Cards, who sadly no longer exist.They are really useful for borders, or for punching from.


The strips were attached to the back of each panel, along the edges, with dst, then trimmed down to fit.


All four done.
 Now they just need mounting onto the card fronts, and again I used DST for this. Remember to add tape to all 4 sides, as there will always be a little warping of the cardstock from the paste. If you are a wet glue user, I'd recommend laying them down with a weight on top for half an hour or so.


Now to add a sentiment, and I chose to use these Crealies Text dies for the baby cards. They are a small die, but the perfect size for these cards. there is quite a selection of sentiments available too. The 'A New Baby' sentiment is one die, but the three words are all separate, which I love as that gives you freedom of placement. I cut  the die 4 times from white scrap card, then once each from the pink & blue pearl paper I used for the borders. This was so I could layer up the white die cuts twice, then add the
colour on top, for a little dimension.


 I have some stitched banner dies, from Aliexpress, and used the smallest size from the long set for this. It was actually a little longer than I wanted, but the bottom set was a little too short. I sorted that by just replacing the banner in the die, matching up the stitched lines, then trimming it shorter.
A simple fix. You may notice than I am cutting down into my bottom plate in my 'Bug. I saw a few crafters switching the order of their plates, putting the 'B' plate on the bottom, and the 'C' plate on the top. This is great, as you can see exactly what you are cutting, so makes precise placing easy. I'd lain my words on the banner first to decide how much shorter it needed to be.
A ZIG glue pen- in fact any glue pen- is ideal for layering up the words, and for attaching to the banner. Again, laying them down under a couple of acrylic blocks for  a few minutes helps them set.
To add them to the card front, I used a few foam pads. Because the surface is uneven, and glittery, both of which can cause problems with adhering stuff, I added a small dab of Pinflair Glue Gel to the top of each foam pad. This helps to make sure it will stick to the awkward surface, and also gives you a little wriggle room to position it straight.


I decided the banners needed a little something else, so added an acrylic heart to each. I used a clear one for the blue card, as the only blue hearts I had were not close enough in colour to the blue used in the card.

For the wedding cards, I used the same banner die, but added the sentiment with peel offs, as there currently isn't a wedding die in the Crealies line. I have emailed to ask her about the possibility,though. 😀 A small white half pearl was added with some Glossy Accents.


Sunday, 16 April 2017

We Three Gnomes- CCC #8

So, this fortnights challenge at The Christmas Card Club is chosen by Valery, and calls for something Humorous. Follow the link to find the list of ladies taking part, and the blog links to their take on the
subject.
It just so happens, that at the last Happy Stampers, Beloved Hubby pointed out a couple of stamp sets that filled this criteria. One was called 'Daryl the Quirky Turkey,', by Hobby Art, and the second '  Make Gnome Mistake', by Creative Expressions.
 Not being certain which images I was going to go with, I stamped out a bunch from each one.


Assortment from 'Make Gnome Mistake'.....


....and from Daryl the Quirky Turkey.


I sat and coloured some,but in the end it was the group of gnomes that stuck with me. It is a single image, the first one stamped then masked with a post it mask, then the image stamped again either side. I was sort of thinking of a gnome choir, when 'We Three Kings' popped into my head, and I ran with that!
 They were stamped with Memento Luxe Tuxedo Black, and heat embossed with clear powder, then coloured using Promarkers.
Although I have quite a range of Promarkers, my one issue with them is that their pale, or pastel colours are all so dark! Certainly not what I'd call pale or pastel, and I find make blending and shading so much harder.


Anyway, moan over, on with the card. For the bobbles on their hats, I started with some 'Puffy' embossing powder by Stampendous. Either it doesn't really puff much- I thought it looked little different to regular white EP- or I need to investigate how to use it, not sure which.So I found some small white cotton balls, I think they were sold as for use with chalks, using one of those crocodile clip thingys, but anyway I have a whole bundle of them. Stuck them down as is, and didn't like the effect, so I took them back off, and cut about a third off, so they had a flat back, and restuck them down. Looked much better.


I mounted the image at an angle onto some red card, then matted that onto a dull gold cardstock.Now I needed the title. Looked through my stamps, but have nothing with We Three Kings on,so decided to hand write it onto a scrap of white card, which was matted to match the image.
The whole panel is mounted onto a 6" square card base, with a peel off Happy Christmas, and acrylic flatback gems in the corners.


   The two stamps sets.

Monday, 25 April 2016

Butterfly Tree, times 2.

This card is using the Butterfly tree from Sweet Poppy Stencils. It was done using white Glossy embossing paste and a selection of glitters. I added the Copper Glitter for the trunk first, and it's just a matter of being careful where you sprinkle it, and then tip it off away from the butterflies. A little going on them won't matter, especially if you are going to do an assortment of butterfly colours as I have here. I think in all I used 4 colours for the butterflies.
 I punched some spare butterflies from glitter paper, and added them atop the image with some Pinflair gel glue.
 It was matted onto  a copper coloured glitter paper, and I find when attaching any card to glitter paper, it is better to use a glue such as the Pinflair glue gel. You can put DST on the back first, but smear some glue gel on top of that. It will stick well to the glittery surface, and also give you some slide-ability when matting.
 Next I matted it onto a sheet of purple glitter paper that had had one edge punched with an X-cut border punch, called Doily Dots.
 All mounted onto a 7x7 card base.
The second card is similar, but I used a paler almost Champagne coloured glitter for the trunk, and pale pink and lilac glitter for the butterflies. I matted this one onto silver glitter paper, then purple again. The purple this time was punched with another X-cut border punch called Looped Fringe.The base is an A4 cardstock sheet folded in half.
 Both have copper coloured peel offs used for the Birthday greeting.
 I may end up adding a ribbon to these, as they seem to be missing something, I think.

Sunday, 6 March 2016

Mothers Day and Indigo Blu


Mothers Day. or more correctly, Mothering Sunday cards handed out, so now I can post them up. These were the Indigo Blu, Blazing Poppies panels that I stamped and coloured. The Poppies themselves are coloured with Promarkers, and the shading around them with Distress Inks.
 The centres of each poppy were given some definition with Black Diamond Stickles.
 After the shading, each was matted onto a matching cardstock, and then a medallion was punched, using the punch shown. This was cut out leaving a narrow border, then trimmed diagonally in half, to give a couple of ornate photo corners for each one.


Next up the embossed lines were created for the panel to sit inside.The base card is an A4 sheet of white pearlescent folded in half.


The long panels are added between the lines, and the main panel slightly overlaps this.

Fortunately,I'd used foam tape to add the panel, as it was only checking how well the photo had come out that I realised I had placed the pink cards panel upside down!  But it peeled off with out any damage, and re- stuck down.

As the only Mothers Day stamp I have is too large for the front of this card, I again used up some peel-offs for the sentiment.

Friday, 4 March 2016

Masterboard Mosaic #1


Another card using some of the same masterboard as the previous card, but in a mosaic format this time. This is actually the sixth, or maybe seventh pic I've taken, as they keep looking blurred, but I've come to the conclusion it's the way the light is reflecting off the peel offs I've coloured for the sentiment.


I started by punching out a number of squares from the masterboard sheet I had left. The punch is supposed to be a 1" punch, a Woodware one, but it's actually an inch and a quarter.
 It was as soon as I'd punched these out and lay them out, that I had an idea. The sort of idea I should have had before the punching, to be honest. But now I had it in my head, so it was going to get done.
 I'd thought it would look good with some gold embossing on the pieces.
 Clever, aren't I ?


So, I found some flourish stamps, and a gold inkpad. I laid out the stamps so one impression would get all the pieces.


Then of course, because they all stuck to the stamp, I had to peel them off. Covered them with powder, then used tweezers to shake it back off.
 It was a really good idea at the time, lol.

Anyway, heat set them, and job done.


Now to start laying them out, and to help with this, I'd cut some strips of card to keep the spaces even. The first row is lined up against a ruler, and a strip of card between each square. Then a strip down the side of the first 3, held in place with some low tack tape, and the next 3 laid down, and so on.


The image is trimmed down to leave a narrow border, then matted onto orange then pink card.
The flowers are a Spellbinders/Heartfelt Creations dies set called Delicate Aster.  I used the 2 smaller flowers, and cut them from a pink and orange-ish vellum.
 They were stacked up, and an orange mixture seed beads added to the centre with Glossy Accents.
To finish it off, I went again to the peel-offs, using a very small silver 'Happy Birthday', and colouring it with an orange permanent marker. Then I sorted out a very narrow line peel off, and coloured that the same. Both were arranged around the outside of the mosaic panel, and the flowers added to the bottom corner.

Sunday, 17 May 2015

A Black & White Wedding card

So, this did get a mention a couple of weeks ago on the WOYWW post, and I promised a photo step by step guide, along with a How-to, after the card had been given. Well, the Wedding was yesterday, so here is the card.
 The base is an A4 sheet of White Stardream card, scored and folded in half.
 A sheet of black card was cut to fit the front of the card, then another piece of Stardream white was cut to fit onto the black, just leaving a very narrow border.


The white sheet was embossed with the Couture Creations folder, Tied Together, then the shaped edge was cut using one of the Spellbinders Borderabilities, Curved Borders 2.


I've enlarged that image here, you can see you get 3 fancy borders, then two which have a sort of 'stitched' line of embossing, one has a dotted line, and one is plain.They also have notches on them, so you can line up to cut a longer piece. I used the scalloped one to cut the top half of the card.
 I wanted a different embossing on the bottom half, and had a metal stencil I wanted to use for this. So for this one we are going 'old school'! I could no doubt of looked up online, or figured out myself what plates/shims etc I needed to do it with my BS Pro, but in the time that took, I could have done it by hand. So out came the old lightbox.
Two tips for these, if you still have one. First, DON'T use it directly on top of a craft mat- the heat from the bulb will warp it. Yes, been there, done that, got the ruined mat to prove it.
Second, if the light is not as bright as you'd like, put a small mirror, or mirror tile, underneath it.


This was the stencil, and it was only the lines at the bottom I wanted, so it was an easy thing to emboss by hand.


Another piece of Stardream card, and two different embossing tools used- a wider one for the wide lines and a narrow one for the thinner ones. I also needed to make the piece slightly bigger than the lines on the stencil, to allow for cutting it at an angle, so I just moved the cardstock down, and lengthened them. Tip here, don't go all the way to the end of the stencil lines if you are doing this- you tend to get a harsh line that its hard to emboss out. If you go half or two thirds of the way, you can then carry on easily.


 To cut the curve on this one, I used the plain curve in the Borderabilities set. You do need to check your curve against the top one you've already cut, to get a balanced gap between them, and position your edge cutting die accordingly. You will probably also need to extend it a little too, but that's easy to do with the lining up notches.
This was the embossed sheet, which now needed to be cut to fit with the top piece.

Laid out on the black card to make sure they fit, and match.
 Then foam tape added to the back, so they would have dimension against the black card.
And then stuck in place.

Next step was to cut the hearts for the front, and originally I had been going to use the X-Cut set of hearts I have.
Then I realised I didn't like how big the gap was from one size to the next, so instead I used a Nellie Snellen set I have, which has a lot more dies, with a narrower graduation of sizes.

I used the central two dies in the top batch for my topper. The larger one cut from some scrap black, and the smaller from a piece of the Stardream white. The white heart was run through the Cuttlebug in the Swiss Dots embossing folder.
 I matted them together, and mounted them on the card with more foam tape.
 Once that was in place, I used white and black half pearls to decorate the joins in the Tied Together embossed piece, attaching them with Pinflair Glue Gel.


Last but one touch was wrapping black and white ribbon around the card front, and tying in a bow. Final bit was cutting a small piece of card, using the plain border again, and adding the couples names with some small silver peel off letters. Again, foam dots used to add this to the bottom right of the card.
Final pic: the Happy Couple.

An End of an era

An end of an era

I write this with a broken heart, that only time can heal My beautiful, wonderful wifelet Shaz (Silverwolf) passed away peacefully in the ea...