A warm welcome to all my visitors,

Thank you for taking the time to come and look at my blog, I really do appreciate it. I would love you to leave me a comment, even if it’s just to say Hi. It means I can come visit you!

All my designs are original, so copyrighted to me. If I have been inspired by someone elses work, I have named them in the post, and where able, I have provided a link.

Please feel free to use my designs for inspiration, I just ask you to credit me, and provide a link back to my blog.

Thanks, Shaz XX

Showing posts with label Green. Show all posts

Monday, 1 February 2016

NOEL

Well, these cards are not exactly how I intended to make them, I had a number of embellishments to add, but once I'd attached the glittered NOEL to the front, adding anything else seemed like overkill.


Two colourways, one red, one green, both going really well with the chosen background.


This was a Kay & Co vellum I bought quite a few years ago now, I think it was being retired- don't you just love how 'retired' has replaced 'discontinued'? Anyway, it's a very thick embossed vellum, and is gorgeous. I think I bought half a dozen sheets and decided it was about time I used some, instead of hoarding it. Isn't it funny how we do that? Buy something really nice, then save it 'for a special project'.


This is what it looks like as a full sheet, the NOEL and the reindeer are embossed, as well as the holly and a few other bits.


The NOEL die cuts I did from chipboard weight cardboard,this was covered in PVA glue and sprinkled with glitter. I gave the glitter plenty of time to settle, then patted it down well.

They were left to dry thoroughly for a few days, then I covered the fronts of four  6"x6" card bases with the embossed vellum.


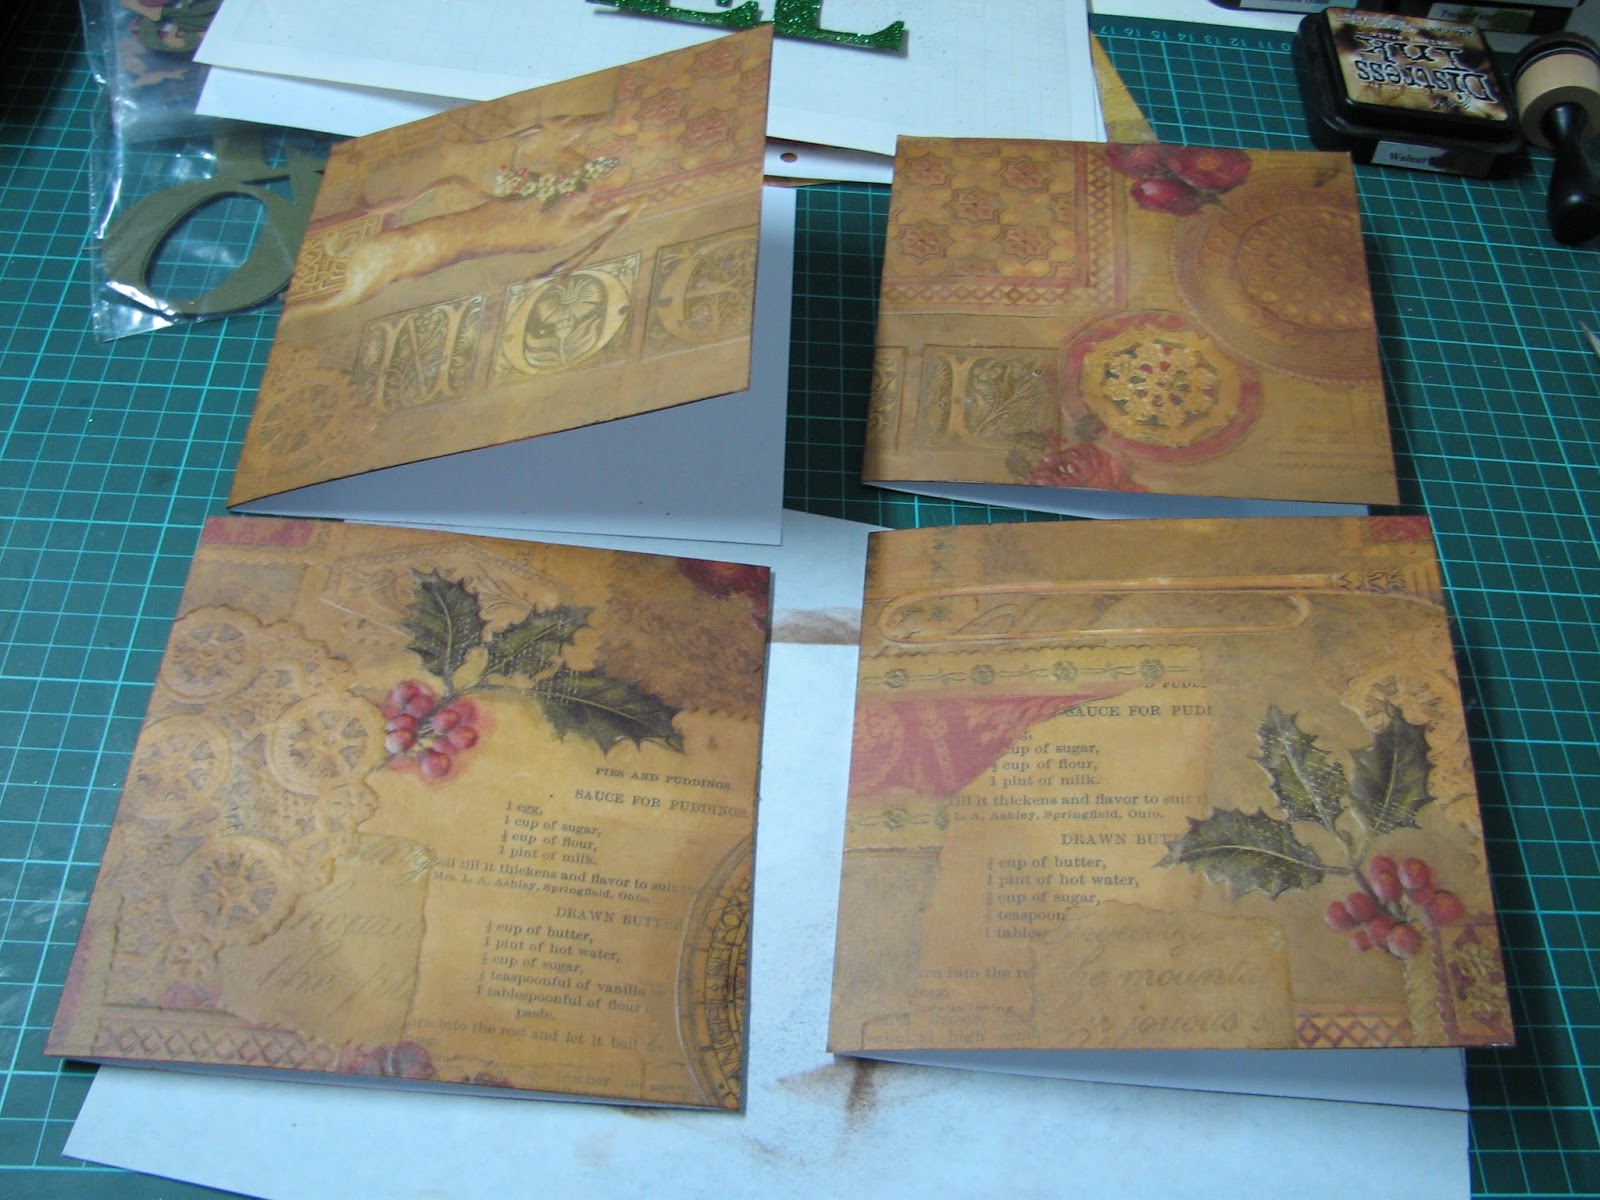
I sponged some Walnut Stain DI around the edges, and built it up a little in the corners.


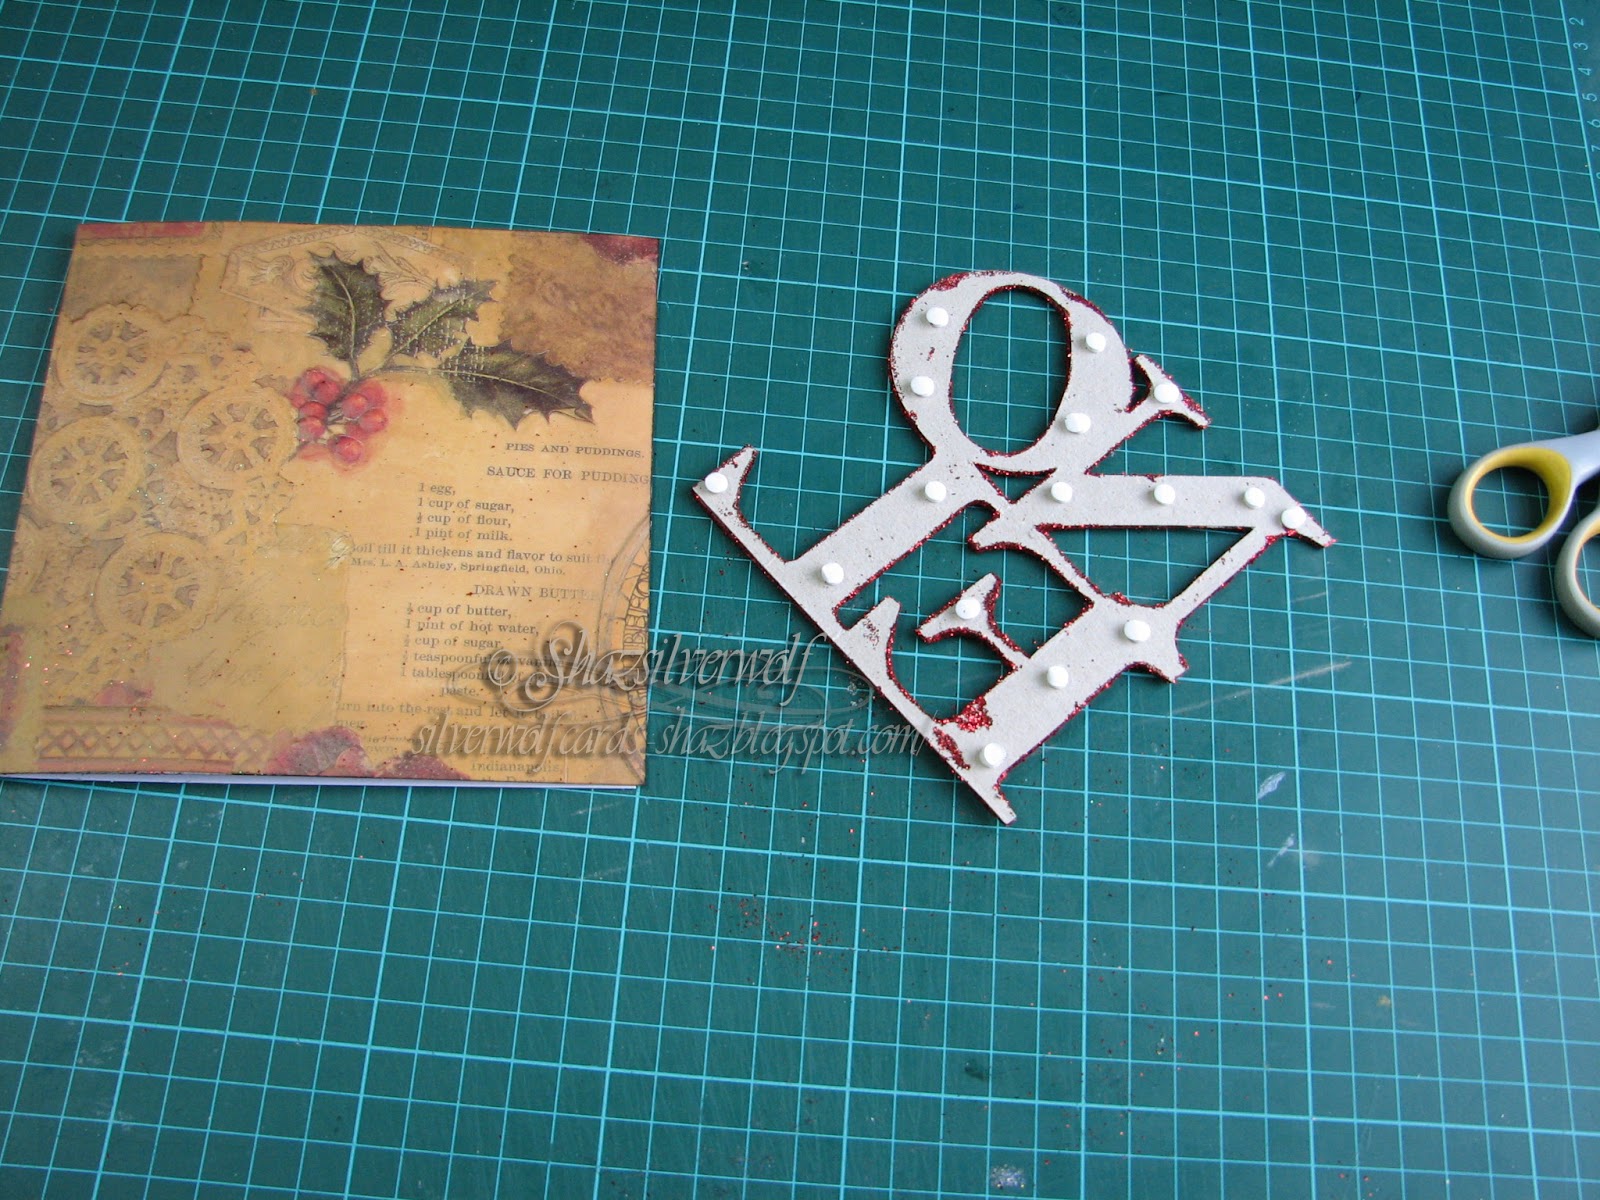
 To attach the NOEL to the card front I used foam dots.


 This was the point I realised adding anything else in the way of embellishments was going to go horribly wrong, but I realised it did still need something, just not too much.


For the greeting, I turned again to my Peel-offs, and coloured two with a red marker, and two green.


I had a browse in my ribbons, and sure enough, there was a green that matched nicely, with some gold woven through it. So, the peel off went on the right hand side, and the ribbon was wrapped around the front next to the spine, and the ends overlapped inside with a glue dot.
 By some stroke of luck, and I'm guessing I bought these ribbons with Christmas in mind, I had a red ribbon of the same pattern.


So, job done.


Saturday, 1 March 2014

Ladybirds everywhere............

Earlier in the week, when I made the Butterfly/Dragonfly cards with the Papermainia Urban stamps, I mentioned I'd seen a Ladybird stamp- well I had to, didn't I? The Andy Skinner ones just happened to fall into my E-bay basket during the week, too. I'd been keeping my eye on that for a while, and found it at a good price. Anyhow, back to the Ladybirds. The plan was to do some similar cards to the others, but I didn't think white embossing would really work for them, so I stamped these in black. I did one strip with just stamped images, and one strip was heat embossed. Both used Versafine Onyx Black. I cut the stamp down again into separate Ladybirds.


The ones I stamped and heat embossed in black I used an embossing pen to colour the bodies, then coated them in red embossing powder so I had nice shiny Ladybirds. In hindsight, it would have been quicker and simpler to have used a red pen and clear powder!


The embossing pen goes on blue so you can see what you are doing.


Heat embossing them completely did mean I didn't need to mask them for the inking bit. Started off with DI Tumbled Glass.

 Added a little texture to the background with a piece of sponge and DI Broken China.


Then I used the Water Droplets stamp again- I love this stamp, can you tell-in DI Salty Ocean. I also love this colour- so bright and vibrant.


A quick wipe over with kitchen towel removed any stray ink from the Ladybirds.


Now for the un-embossed strip- this meant masking off the Ladybirds.


Again, I stamp one on the top post-it, peel off half a dozen post-its together, then cut out a whole bunch in one go.


Being small images, they pretty much fit entirely on the glue strip.


First inking was Shabby Shutters DI, with a colour duster brush. Followed by Mowed Lawn, and finally Peeled Paint.


Then the Water droplets stamp again, in Mowed Lawn. Love how it works as a tone-on-tone stamp.


The Ladybirds un-masked!


 I coloured the Ladybirds this time with Distress Marker Festive Berries.


Mounted, and the greeting stamped in Versafine Majestic Blue.


This one was stamped in Versafine Olympia Green.

Supplies:
 Papermania Urban stamp, Ladybirds
Water Droplets stamp, Designs by Ryn
DI in Shabby shutters, Mowed Lawn, Peeled Paint, Tumbled Glass, Broken China and Salty Ocean
 Versafine inkpads, Black, Olympia green and Majestic Blue
 Black or clear embossing powder
 DI Marker, Festive Berries
 Embossing pen & Red embossing powder, or Red marker and clear powder


Thursday, 24 January 2013

Guess What? Yes, More Birthday Cards!


So, two more cards. The blue one uses a stamp called 'Graffiti', from Kaisercraft, which was stamped in Adirondack Denim, on top of a background sponged with a variety of blues. The sentiment is also stamped in Denim. The Eiffel tower image is a Tim Holtz clear stamp, from the set 'Urban Grunge'.


The green card is a strip sponged in a variety of greens, and an assortment of modes of transport randomly stamped in black. The hot air balloon was stamped onto another piece of sponged green card, then mounted with foam tabs, as was the Happy Birthday, which I cut into a banner shape.


Sunday, 30 September 2012

Another Easel Birthday

Easel cards have been a bit of a theme, as the person ordering cards off me lately really likes them and asks for them particularly.
Cards for men are never the easiest, so many stamp companies really don't cater for male images, so usually my go-to stamps are the Stampscapes scenics.
 This one features stamps from Nature Sheet 6, stamped onto a pale grey brayered background in Black Versafine. I matted that onto two colours of green card. The background paper is Shamrocks, downloaded off the net a while ago, and you can see I used a leftover piece as the sentiment background and also cut out a couple of Shamrocks and mounted them with silicone glue.
 I wrapped dark green ribbon around the card and created a folded bow, and finally added a green & gold flower.

Easel Birthdays


All three of these were for the same person, so it was hard work making them all as different as possible! Two feature the Tim Holtz Tattered Florals,and I love the fact that they will cut pretty much any material- I've been using up a lot of fancy papers that I have collected, and some of the flowers I really love- the green & gold in the bottom card is a particular favourite. That one also has a four panel image of the Penny Black stamp 'Aspire', matted onto gold & wrapped with a narrow gold organza ribbon. Nesties Labels 7 was used for the sentiment here.
 The top left card features a Chocolate Baroque stamp, Harlequin Rose, which is part of an A4 sheet.The image was stamped in black, mica powders smudged onto the background and chalks & micas used to colour the Rose & leaves.The background is an embossing folder, Creative Expressions' Lattice'. Wrapped with silver & black ribbon and embellished with Black & White Tattered Florals. I have to say that Black & White really is my favourite go-to theme. Nesties Labels 4 was used on this one.
 Top right, the background is another sheet of fancy paper, a vellum panel punched with Doily Dots and some Tim Holtz Rosettes, cut from black & white vellum. The Butterfly panel was made with Fusible Fibres, and I cut out a second set of butterflies to mount on top with silicone glue. the stamp itself is available from two places, Tanda Stamps, Far East Set 1, either as a plate along with other oriental themed stamps, or individually. It is also available from  De Stempelwinkel, as a Non Sequiteur Plate, Samurai Plate. The sentiment is on Nesties Petite Scalloped Ovals Large. On all the cards, the foil printed background paper on the bottom is from Craft Creations.

Sunday, 1 May 2011

Flower Tiles

Started out at a bit of a loss for what to do with these tiles I had on my desk from the WOYWW 99 post- I have done so many square cards this week, and of course, that was the first thing to mind, looking at the image. So instead I went with a vertical strip, matted first onto black. Decided I didn't like that, so un-matted them, and went with dark green instead. Then I had trouble finding the right backing paper- everything seemed too busy for these images. Finally came across a pad of papers, Laura Ashley Traditional,and the very pale green with the white flower seemed to work, and also made me think of lace- so went digging in my box of lace pieces, and added a strip of this to the front.
I've enlarged & cropped the picture here, the lace is a little difficult to make out against the pale background. I used spray glue to attach the lace. I lay anything I need to spray in my bin, on top of a scrap piece of paper, then spray it. No mess anywhere else,lol.
While digging around for the lace (which prompted me to find it a box of its own), I spotted a roll of pearl string, which I bought from a discount warehouse in Birmingham, from their florists dept.
     By the way, thats a good place to visit if you have one of these places near you- you'd be amazed at what you can find, especially the floristry part- lots of Bridal stuff, which is what this pearl string was for, masses of paper flowers, petals, ribbons, all a lot cheaper than you will get  anywhere else.
Anyway, back to the card! I wrapped the pearl string round a couple of times and knotted it towards the top.

Now the top right looked empty!
This card was really starting to feel like a battle of wills- I was determined to finish it, and it was fighting me every step of the way- normally I would put a project to one side when it feels like this, but I really think that if I had, I would keep putting off going back to it- besides, I refuse to be beaten by a piece of paper, (I was in a stubborn mood). I probably needed coffee, lol.
Off on an embellishment hunt then. Didn't want too big, or too fussy, and finally I came across these little pearl hearts. I bought these a few years ago, at one of the Hobbycrafts shows at the NEC, thinking ' ideal for Wedding cards' , and I think I have only ever used a couple. So, I attached these with a little silicone glue. I also used silicone glue to attach the stamped panel to the front, because of the lace.
Final bit was a sentiment, and I used a Whispers Words stamp, by Docrafts, 49701 Birthday Wishes. The Ink I chose was a ColorBox Catseye Pigment Pad, in Verdigris and stamped this along the front edge of the card.
At Last! Finished. Yay!!!

Monday, 3 January 2011

'Mappy' Birthday?

This map stamp I have had for so long, I have no idea where I got it from, only that it came on a sheet with half a dozen maps and some sea/sailing -related stamps.The ship & compass collage stamp design is from The Stamp Man, and was stamped onto inkjet film that had the Crystal technique applied to it,and I cut the two parts of the image out and layered them separately, with a few dabs of silicone glue. The map was stamped onto a brayered green/blue background, then cut into three panels and matted onto blue/grey cardstock, then white. The sentiment was treated the same way. Black Staz-on was used for all the stamping. A small piece of white netting was smudged with Adirondack Latte & Espresso then scrumpled up. Held down with some silicone glue, which was also used to attach the Lighthouse charm and the sea shell. I filled the back of the seashell with the silicone to help protect it.
***  Update to this post, the map set of stamps comes from Stamp & Go.

Monday, 13 December 2010

More Christmas cards

 These are cards ordered by a work colleague for Christmas, this first one will be for his wife.The backing paper is from Craft Creations, and the Rubber stamp is from Elusive Images,Mistletoe Script .Stamped first onto a silvery blue card, then onto inkjet film with Stazon Black, then glittered. I cut out the glittered image and mounted on top of the stamped image with silicone glue. The heart is made with triple embossing, as I did on my Anniversary card.
 This card is for his son, and teen boys are not easy to make for!This image was stamped on inkjet film with Black stazon again and glittered. I trimmed it square and mounted onto a piece of holographic card with brads.It doesn't show well scanned, but the colours change on the background, almost like reflections of the candle flame. This stamp was from The Stamp Man, unfortunately I think it is retired now. I have scanned the image with white paper behind it so you can see the wording.
Add caption

This one is for his daughter, who is much younger, again stamped on inkjet film and mounted onto holographic card with silicone glue behind the glitter. This backing paper is also from Craft Creations, and I used a scoring board from The Glitter Girls for the 3 squares, and snowflake table confetti in pairs, one silver & one holograhic, joined with a brad The snowman stamp is by Funstamps, Scribble Snowman, F-M131..

Sunday, 12 December 2010

Christmas 2010

These are the cards I have been working on lately. My mass produced batch for friends, workmates & my Beloved Husbands forum friends.The Stamp used is Santa Collage, by Rubber Stampede,3408F, and the vellums were stamped with a large u/m snowflakes stamp,origin unknown, sorry.It was stamped in clear embossing ink then embossed with Stampendous 'Stardust' powder.I used a mix of inks to stamp with: Encore silver, gold & metallic blue and Distress Cracked Sapphire, Aged Mahogany and Forest Moss.Each image was matted onto a matching foil paper, then onto white card embossed with the Snowflake Cuttlebug folder, then onto foil paper again. A matching narrow ribbon was wrapped around this, then a bow added.The sentiment was stamped in matching colours and matted onto foil.  All elements were stuck down with silicone glue, due to the glittery vellum. Normal tabs don't always hold very well on this surface, but silicone glue will.

  I trimmed the card front with a fancy edged blade, then stuck a matching strip of foil onto the rear of the card with DST.       

                     The insert is from a CD, called Thomas Kinkade, from Joanna Sheen  
 
                                                                                    
       I will be posting some pictures on how to batch-produce cards on my Tips & Techniques page during the Christmas break.     

Sunday, 31 October 2010

Faerie Birthday

A piece of white card was brayered with Adirondack Lemonade, Sunshine Yellow & Citrus. Lavinia Stamps Faery House was stamped in Black Versafine then heat embossed with a black sparkle powder. 
I also stamped off onto a post-it note, then cut out the mask. I put the mask in place then overstamped with the Faery words plate ( Lavinia stamps) in Plum Archival ink. Leaf Trail ( Lavinia Stamps) was stamped in Olympia Green Versafine, using first & second impressions, and a variety of small foliage stamps stamped along the bottom. 
A small dragonfly stamp was added in a couple of places. This was trimmed down to size and matted onto dark green card. I took a square card blank and covered it with a sheet from the Dovecraft 8x8 designer pack 'Fantasy'. 
The stamped image was then mounted onto the front with sticky fixer pads. A wide black and a narrow green organza ribbon were wrapped around the spine and tied in a bow. 
The sentiment tag was made from an offcut of the brayered sheet. I overstamped it with Artifacts Darting Dragonflies u/m stamp, from The Stamp Bug, using Versafine Frost. Sentiment was stamped in Olympia Green Versafine, then an eyelet added to thread some twine through. 
A small dragonfly embellishment was added to the tag.

Sunday, 4 July 2010

Backgrounds

Four different backgrounds for the same stamp, 4 Birds, ( Crafty Individuals).
Top (L to R) Brayered dye ink on glossy photopaper, Oil pastels on matt paper.
Bottom(L to R) Mica powders on matt paper treated with Versamark, Alcohol Inks on glossy card.

An End of an era

An end of an era

I write this with a broken heart, that only time can heal My beautiful, wonderful wifelet Shaz (Silverwolf) passed away peacefully in the ea...