A warm welcome to all my visitors,

Thank you for taking the time to come and look at my blog, I really do appreciate it. I would love you to leave me a comment, even if it’s just to say Hi. It means I can come visit you!

All my designs are original, so copyrighted to me. If I have been inspired by someone elses work, I have named them in the post, and where able, I have provided a link.

Please feel free to use my designs for inspiration, I just ask you to credit me, and provide a link back to my blog.

Thanks, Shaz XX

Wednesday 24 June 2020

WOYWW #577- The Inking again Edition.

Hello all, and a Happy Wednesday to you all. Our regular desk share, thanks to our lovely leader, Julia, over at The Stamping Ground.
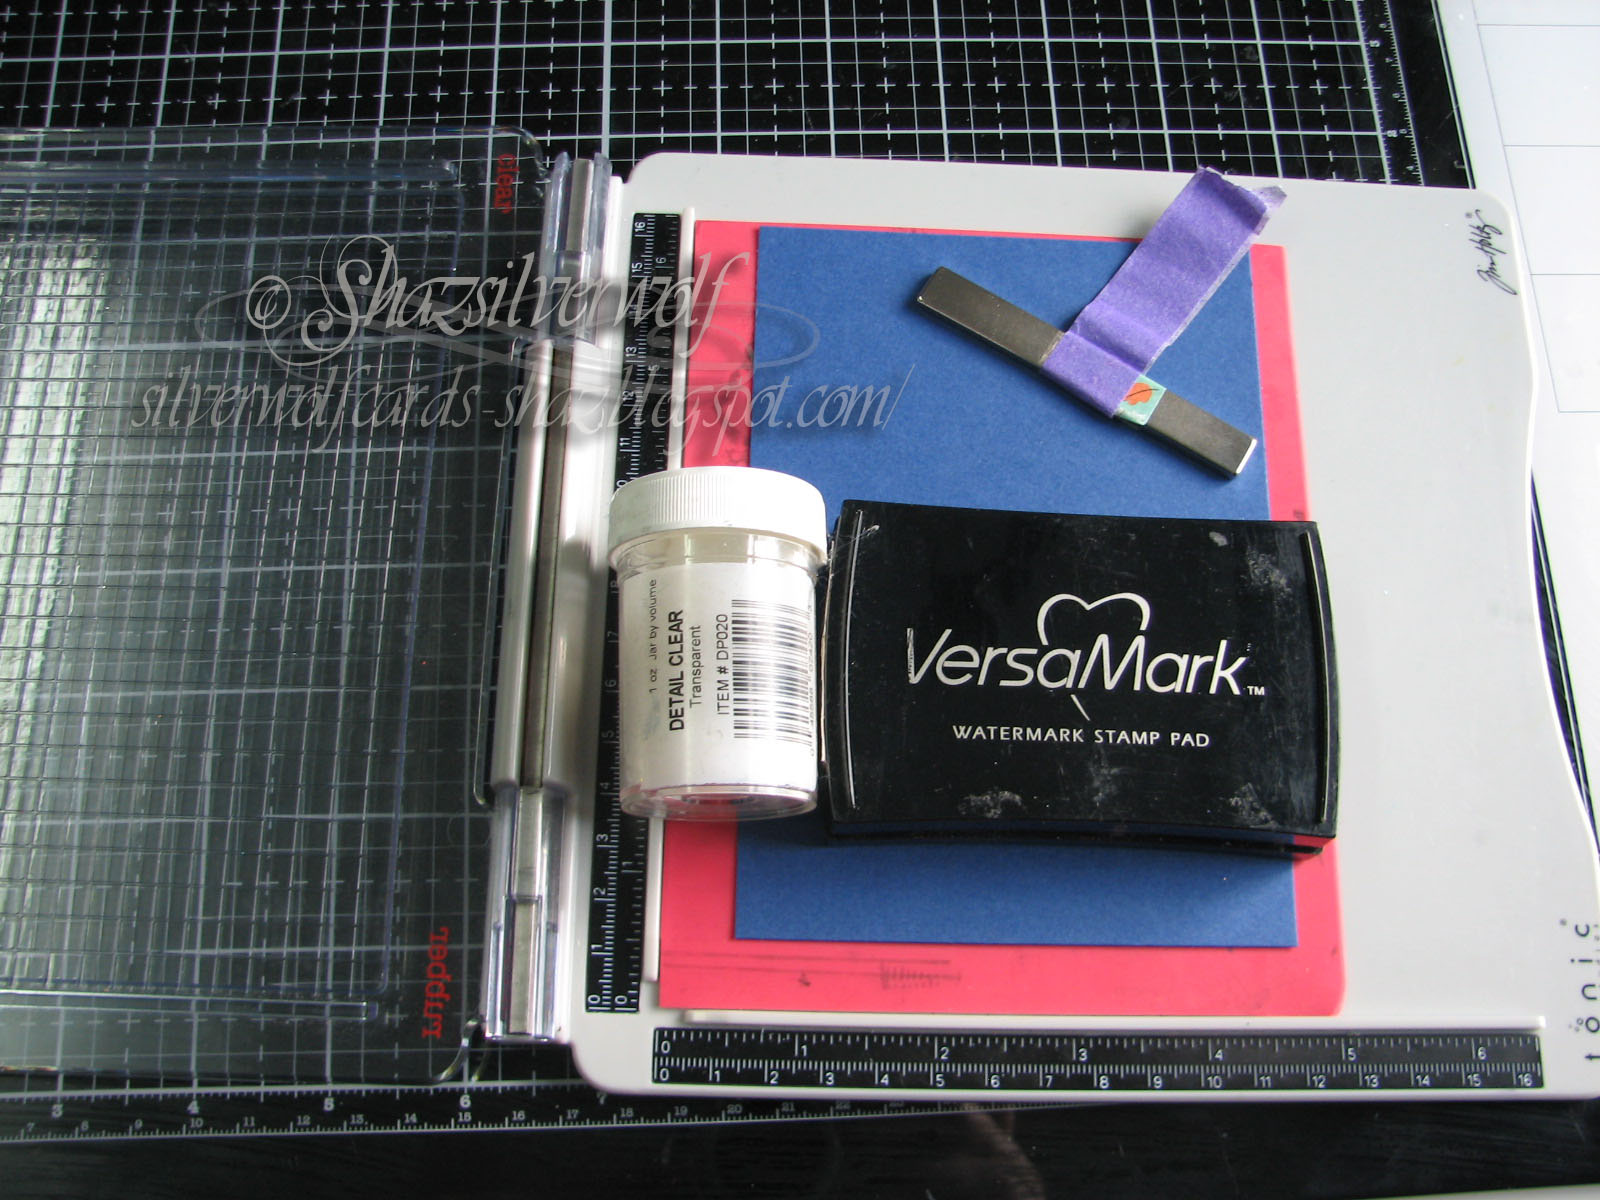
 Yes, I'm inking up a load more of those panels, as there are going to be a mountain of thank you cards needed in the near future, and I thought those would be an ideal starting point, but more of that later.


I've also pulled out my Adirondacks to use this time round, couldn't tell you how many years I've had them, and as soon as I heard they were being discontinued a few years ago, I bought re-inkers for them all. They have lots of lovely pale colours as well as some nice bright ones.


Cutting a stack of panels, I'm using up some packs of Matt cardstock I bought from Lavinia, also a few years ago.
Brushes at the ready!


Something arrived from Max, (Tilly Tea Dance) today, part of my eldest sons birthday present, a needle felted bookmark.


Quick shot of the Christmas Cards made from the dies I had out last week.


And so I come to the reason for needing so many Thank You cards.
The house you see here is Dougs  youngest brothers families home. In the early hours of Sunday the 14th, there was a really fierce house fire, the house is completely gutted, but the good news is they escaped with their lives, even though it meant jumping from upstairs windows, so there are a number of burns and broken bones between them. It's going to be a long haul back for them, but the wider  family have pulled together, and have been helped by many friends. Those of you who know us on Facebook will have seen the GoFundMe, to which I know some have you have donated, and shared,you have no idea how appreciative we are. If anyone would like to share it on their pages, the link is HERE.
 I know the family, as well as Tim & Lyndsay, are going to want to say a Thank you to so many people, friends of theirs who have reacted by buying clothes, made offers of furniture, to hospital staff who are caring for them, and so many others. 


And so I'm at the end of my post for today, which brings us to....And Finally......


Sunday 21 June 2020

Christmas Card Club #13- Sentiment, no Image.

Back again with our regular Christmas Card Challenge, and this weeks theme has been chosen by Christine, who wants to see the Sentiment as the focal point, no image.
I've put together 6 cards, all using dies- and in the case of the JOY card, stamps- that I bought last year and never got around to using.
These are made with a Sue Wilson Die called Stacked Layering Noel Die, you get both types of NOEL, plus a 'shadow' die. The idea is that you can stack the cutaway Noel on top of the solid one, but I thought I'd get two cards out of it instead! They have both been mounted onto a piece of cardstock run through an embossing folder, in fact all six cards got that treatment, just using an assortment of folders. I used the same cardstock for the shadow as I used for the matt layer.
You also get a bauble and snowflake die in the set.


This one I did in gold & silver, and I *think* it may have been a Memory Box die, but I'm not certain. I didn't always used to keep the packaging.


The final two use a stamp and die set from Pretty Pink Posh, called Joy. I saw Jennifer McGuire use it back last year, and thought it was fab, so I broke my habit of not buying stamp/die sets. The reason I very rarely do that is that I don't like the white border that is usually left around the image when it's die cut, but with this it wasn't going to matter, and to be fair, it cuts almost exactly on the image anyway.


 The stamp is lots of tiny Christmas images, and mine are stamped white on white. There are additional small Christmas images & matching dies, but I didn't use those.
 
I also die cut the letters from white fun foam, just to add a little dimension.

This tip here Jennifer gave in her video- to position your letters nicely, line them up to a straight edge- I used one of the lines on the glass mat- then lay a length of purple tape- or any low tack tape- over the top, and use that to lift & position your letters.
Works perfectly, and the tape isn't wasted, it can be reused for something else.

Wednesday 17 June 2020

WOYWW #576- The die cutting Edition.

Mainly die cutting about to happen, with a bit of stamping. This weekends Christmas Card Club is to use a sentiment, no image.
 As you can see, the desk has a number of things on the go-the pink envelope holds lots of inserts I've cut, and a whole pile of Versafine Clair inks for the stamping bit. The travel size platform is in evidence, complete with the Sizzix sticky sheet on, it really works incredibly well. Some coloured cardstock for some matting I was either about to do, or intend to do, can't recall which now. Dies of the Christmas sentiment variety, the blue envelope is part pieces of various Christmas themed paper which may, or may not, find themselves being used. Blue microfibre cloth for stamp cleaning, and the spray bottle with blue water in is homemade stamp cleaner. Really easy, and costs pennies per bottle. Baby bath/shampoo, water, and a couple of drops of glycerine. Into that bottle I put maybe 2 teaspoons-ish of baby bath, fill up to the top with water and then add a couple of drops of glycerine.

These are mainly the dies I'm going to work from, there is also a stamp and die set I saw JM using last year, and I bought it, and just remembered it.
It's the word JOY which stamps out with lots of tiny little images to form the letters, so a bit off from the brief, but still. I'm going to stamp it white on white, so it won't stand out too much. Made by Pretty Pink Posh.


 And thats my round up for the week, so I'll see you all over at Julias place, The Stamping Ground, where the Usual Suspects will be showing their desks to the world.
  So that just leaves us with........And Finally.......

Yep, remember every single one, and used most of 'em too! (Apart from Number 3, that would have been a waste of time)

Wednesday 10 June 2020

WOYWW #575- The Actually Finishing Stuff Edition.

I am, finally getting this batch finished. These ones had needed a bit of colour adding, and one needs fixing, as I stamped the quote, realised it needing stamping again. Didn't check my cardstock hadn't moved, so got a blurred repeat.


By the way, using the new Blogger update this week, so we'll see how that goes.


The one bottom left. So, how do we fix the unfixable? We just restamp on a separate piece, and matt it on top,lol.


Not totally happy, I think I should have just binned it, to be honest. But I expect in a couple of days and I'll be ok with it.


Made another batch, as I have more ideas. And there's always the UFO box.

For Belinda, I didn't use watercolour paper, it's just ordinary white card for stamping on.


Christmas cards using a Jennifer McGuire technique, Distress Oxide resist, in the post below.


Regarding the issue I had with my cardstock being lifted and moved out of place on my stamping platform- I have bought a bigger bar magnet off Amazon- just a rare earth magnet, not a special 'crafting' brand one-and that does help,most of the time. But, the absolute best solution I have for you, I came across on I think, SCS. Sizzix brought out some Sticky Grid Sheets, to use on Big Shot plates to hold dies in place, saves using tape. Well, some ladies had started using them in their stamping platform. I had a pack, so gave it a try.


You get 5 in a pack, they're the same size each as a Big Shot plate, so I'd guess roughly A5. On the Sizzix UK site, £7. Beware if you Google for them, as their are specific ones for the Sidekick too, which are much smaller. They really do work, they are tacky, rather than sticky, and hold your cardstock completely still and in place.


And so I'm done for this week, I'll be adding my link at Julias place, The Stamping Ground and popping round to see you all later.


Which just leaves.....And Finally......

Sunday 7 June 2020

Christmas Card Club #12- Snowflakes.

Hi ladies, back with another Christmas Card Challenge, this weeks theme has been chosen by Gwen, who wanted to see Snowflakes.
 I was really pleased to see this theme, as I'd watched a Jennifer McGuire video a few weeks back, called Distress Oxide Resist, and had put it on my list of things to try. I even bought some Oxide sprays for doing it, lol. I've linked to her videos You Tube page.


The beauty- and what really grabbed me about Oxides- is that the colour shows even on dark or black cardstock- these are sprayed onto a navy blue cardstock. 


These are the colours I used, the Wilted Violet only in very small amounts.

The base cards are 'notecard' size-which is roughly 10½ x 14½cm, or 5¾ x 4⅛", so I cut 4 pieces of navy cardstock to fit.


To do this, you will also need a Versamark, or Embossing inkpad, Clear Detail Embossing Powder, and some Snowflake stamps.


  Mine are the Tim Holtz ones, which come in two sets, one with large snowflakes, and the second with the same snowflakes in medium and small. 

I stamped 2 large snowflakes on one, and 2 medium, then switched to 2 large and 1 medium. Heat embossed them with the Clear EP. 


Now comes the somewhat messy bit, but you can help keep the mess under control by having a box to work in. Mines got some newspaper and heavy duty paper towel in the bottom too.


 Starting with the lightest colour, Tumbled Glass, I sprayed from the bottom up, concentrating the colour at the bottom. Then dried it before the next colour, as if you do it with the first colour wet, they'll just mix together.


 Next came Broken China, dry, then Mermaid Lagoon, dry, then a little of either Chipped Sapphire or Wilted Violet.


I also flicked a few droplets by undoing the top and just flicking colour from the end of the spray tube.

Dried that, then followed by flicking a few drops of water to give a bit more background texture. I also had a bottle of Cosmic Shimmer Pearl White mist, which I used right at the end, but more about that later.


Tilted them to the light in the hope the Pearl Shimmer shows up!


Next comes the fun bit- ironing off the heat embossing.


 Any iron will do- just hottest setting and no steam.
 You need some copy paper to place over your stamped piece, and run the iron over it a couple of times to melt the EP and soak it into the paper.


And you end up with the snowflakes revealing the colour of the cardstock underneath, any ink that was on the snowflakes comes off with the ironing, so they look nice and crisp.
 The Cosmic Shimmer spray had me a bit worried- handling these pieces my fingers were covered in the mica from it! I gave them a buff over with a cloth, and that seems to have fixed it, but I will be checking them a few times before I use it again!


All four ironed off, and then I decided I was going to stamp a sentiment on them, so used Phill Martins Stately Christmas sentiments, love this set as it has  lots of really great sentiments, in a gorgeous font.


 Stamped it in Versafine- I used the Happy Christmas in the bottom right-and heat embossed with Silver Detail EP.

 Added them to the card bases with DST, and I'm done.
Two things I must mention- first, I'm sorry but I only realised yesterday I've missed one weeks Challenge!
 And second, I have no idea if my font is a bit too small- please let me know if it is, or if it's OK. This new Blogger update is playing games!

Wednesday 3 June 2020

WOYWW #574-The More Stamping Edition.

I have indeed done some more stamping of those inked panels from last week. Actually, a few weeks ago, but only started using them last week. As always on Wednesdays, we share our desk with the world at large, courtesy of the The Stamping Ground, home of our lovely leader, Julia.


The desk of Untidiness-working on the 'push to one side' method of crafting today.


One thing I did discover, apart from how brilliant these are for making a lot of cards really easily, is that I have a shameful amount of quote stamps that have never seen the light of day, let alone ink.

All the image stamps- apart from the large butterfly, are Lavinia stamps, the butterfly being an old Papermania one.
All the stamps have had a little colour added with pencils, then matted onto a toning cardstock. Still not brave enough to stamp directly onto a card base, lol.


The actual panel idea I saw done by Eileen Godwin, she posts lots of really easy, but stunning, technique videos on her Facebook page, well worth a look.


I'll be stamping an insert for these with 'Thinking of you', so they'll be useful for a lot of occasions.


 I'm also making another batch, so I can do a 'How to', and have more to join my UFO's!


All use Distress Oxides, and the make up brushes.


 A few I've tried flicking water on and blotting, for a bit of added oomph.
 Doing 3 different sizes again, two for 5" &  6" square, and one for 'notecard' sized cards.


Talking of Eileen, she's responsible for this weeks enabling from me. I saw her making a couple of 'age' cards, using a fab numbers stamp set from Bee Crafty stamps.

You get the TH etc, to go with them in the set.
The stamps are a good size, which was what appealed to me,they are 1¾"(4½cm) high, and , apart from the number 1, they are 1¼" (3cm) wide. All the number stamps I have are much smaller.

Shoulder seems to be improving, today it actually feels normal, but I've had that happen before, then the next day I've woken up and it's back, so not getting overly excited about it yet.


So that brings us round to this weeks.....And Finally.........


Shockingly true, both of them!


Sad to think we'd have been preparing to haul our stash along to the crop this Saturday, but hopefully maybe later in the year when it's deemed safe.


 One other thing I'll mention for those who like to go, or may be interested. The Spring Happy Stampers was cancelled for obvious reasons, and at the moment, is tentatively pencilled in for Saturday 3rd of October. All details are on the site, and if it's going ahead, that will be confirmed in August.  This is potentially the last one, I know when we've chatted with the organisers in the past, they were finding it a struggle, but they do say there may be a possibility of it continuing, so that would be great, as it's a fabulous show.

An End of an era

An end of an era

I write this with a broken heart, that only time can heal My beautiful, wonderful wifelet Shaz (Silverwolf) passed away peacefully in the ea...