A warm welcome to all my visitors,

Thank you for taking the time to come and look at my blog, I really do appreciate it. I would love you to leave me a comment, even if it’s just to say Hi. It means I can come visit you!

All my designs are original, so copyrighted to me. If I have been inspired by someone elses work, I have named them in the post, and where able, I have provided a link.

Please feel free to use my designs for inspiration, I just ask you to credit me, and provide a link back to my blog.

Thanks, Shaz XX

Wednesday 20 November 2013

WOYWW #233

Well our Mistress of the Desks has been redecorating- a nice shiny new blog over at The Stamping Ground, although you may need your sunnies this dreary November morning, lol.
Not a huge amount going on on the desk, so you have 2 shots for the price of one visit today. My usual working desk:
Odds & ends abound- a dead babywipe scrunched up, a piece of kitchen roll (can you tell I didn't tidy for the photo?) a couple of acrylic blocks. Some stamps and a Versafine pad. A try-out for some scene building on scrap paper, seeing if I could mix Stampscapes & a Lavinia stamps cat. I've got a bit of a cats theme on the go this week.( Post below for glittered cats)- no not poor Ambrose, he escaped the glitter storm this time. The two black photo albums at the back hold brass stencils, 5x7, they hold larger ones easily, and I just stapled down the middle of pages to hold thinner/tall ones.


Cheap storage solution, and stops them getting bent.


The 'desk behind the desk'- the long table thats behind me, something I wanted when I put my room together, somewhere to put stamp folders when I got them out, put stuff to dry etc.
Of course, its got all sorts of other stuff on there too- glittered cats, bottom right,  easel,  Indigo Blu Christmas cards from earlier post, Distress Markers, a tub of cotton wool balls, and those little sets of plastic drawers, full of 'stuff' thats too small to store anywhere else, without losing it forever. Underneath are some 4 drawer storage ( from B&Q/Instore), they come with wheels, but I didn't put them on, that have all sorts of stuff (do you notice I have a lot of 'stuff'') I wanted close to where I work in the hope that would mean a) less searching for it and
b) it might actually get used!
 So thats all for this week folks, I'm back on my much loved night shift, so I'll be seeing you all later in the day.

Monday 18 November 2013

Glitter cats & embossing paste

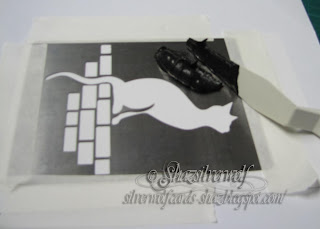
Wow, two posts in two days! I've had Embossing paste for a while, and more Brass embossing stencils than I know what to do with. Which didn't stop me buying another, back last year. Its a Sweet Poppy stencil of a cat sat on a wall, which they had a nice sample of on display, with the cat & wall done in glitter, using Embossing paste. I've been meaning to try this out for a while, so yesterday I finally got round to it. This is a work in progress, as I have the glittered cats done, now I need to do a background on them, and mount them onto cards. I've used the 'True Snow' type embossing paste before, and recall it being an unholy mess- so I was hoping a bit of practice might perfect the technique. I'll share what I learned about it as I go, pitfalls and hopefully, helpful bits too.
 Anyway, for starters you will need:

 Embossing paste, which comes in array of colours, I've got Black & White here. A stencil, stencil tape, spreader(s), glitter and of course a piece of cardstock. I used Clarity Theuva card to do these on, and found it worked beautifully. I also discovered that because the card has a shiny surface, if you wait until the paste is dry, you can scrape off any overspill with a scalpel.
 The spreader tools I've got here were bought from The Works, a set for working with oil paints, but they are perfect for this technique, as you get a set of various sized blades. You will find it best to work with the largest spatula on a stencil this size-you get less problems with covering the image that way.

 Placing your stencil onto the card, add some stencil tape to all four sides- I actually used tape the length of the sides at first, to stop me getting any paste onto the card where I didn't want it. Once you get a bit more practiced at it, you could use less.
 Scoop out a dollop of paste, and drop it onto the stencil. Its better to put it on part of the stencil that isn't part of the design, rather than onto the design. You will find that trying to spread it  from the open areas will result in pushing it under the edges of the design, giving you a blurred image.


Spread the paste- a bit like buttering a piece of bread. Couple of tips here; I found it easier to work from the top down trying to keep the sweeps smooth. Use a light touch- don't press down. Use the edge of the spatula- a bit like you'd use an edge of a blending tool. Don't overwork it! Thats when it will all go horribly wrong. A little bit of texture won't hurt, don't keep trying to smooth it out, you'll end up with the paste being pushed under the stencil. Scrape any excess off the metal part of the stencil and return to the pot.

 To remove the stencil, peel off three sides of the tape, leaving a fourth as a 'hinge'. I found for me the easiest one to leave was the bottom one, choose whichever suits you best- top, bottom or one side. Carefully lift up one edge of the stencil and tilt it towards the hinge, then peel away the whole thing. If you leave a hinge, it prevents the stencil slipping or sliding.

Now- getting your stencil clean. I have seen a lot of people recommend you have a dish of water handy to drop your stencil into- I found that messy, time consuming, and hard to be certain you have the stencil flat while cleaning.
 What I found works perfectly is to have a baby wipe lay on your desk, and to place the stencil onto it as soon as you peel it off. Then fold the baby wipe over it, to stop the paste starting to dry on the stencil.


Now you can leave your stencil while you do the glitter bit.


 I started off doing black cats, so tipped a pile of black glitter onto the paste.
 Tip the glitter off, and hey presto! one glittered black cat. Put aside to dry, and I left mine overnight to be sure.
 Now, back to the icky bit, cleaning the stencil. By the way, as soon as I'd returned the excess paste to the jar, I wiped my spatulas clean too on a baby wipe.And keep checking your fingers- this stuff gets everywhere! One of the dangers of cleaning stencils is bending them accidentally while scrubbing- and this cat stencil also has a little piece that sticks up that separate his front legs from his body- very easy to bend out of shape.  By opening out the baby wipe again, because its lay flat on your table, you can rub over it with another wipe, and it stays flat. Just make sure to wipe away from any awkward bits, so you don't catch them with the wipe.

After I'd wiped off the goo, I lay it flat again on a piece of kitchen roll, and just rubbed my had over it to dry it off.

I found this to be the easiest way to clean them, and the least likely to cause a bend in your stencil. If you do get a bent stencil, I have heard it recommended to run them through a die cutting machine to re-flatten, but I haven't tried it personally, although it ought to do the job.


All clean and ready for use again.
 What I liked about this stencil too, is that I can flip it and have the cat facing the other way!


Now I decided I'd try some other colour combos- so I switched to white embossing paste, and brought out some Crystal glitter and a few shades of orange and brown. It worked better than I expected, to be honest, and I have some nice black & white cats, some tortoiseshell and whites, and a rather fetching Ginger tom!He came out much better than I anticipated. If you are using a mixture of glitter colours, always tip the excess away from your image, and if you want patches in the middle of the image, turn it upside down quickly, so the glitter doesn't spread over onto other areas of paste.I used the tip of one of the thin spatulas to add this glitter.  I tried a mix of browns for the wall on these ones.

   Supplies:
 Sweet Poppy Stencil, Stargazing
 Embossing Paste,
White card
 Glitter
 Spatula(s)
 Stencil, or low tack, tape. Mine is Woodware, its very low-tack,bought at the NEC, its about £2 a roll. DO NOT buy this from Amazon- they want a fiver a roll for the same item!

Sunday 17 November 2013

Christmas Cards- Indigo Blu style

I must admit that I've amazed myself this year- barely the third week of November, and my Christmas cards are finished! I haven't usually even settled on a design yet, let alone started.I do two batches, smaller ones for work colleagues etc, and a larger design for family.
 The smaller ones are back a few posts, but this is the family card. You may remember a couple of weeks ago I posted my purchases at the NEC, and amongst them was this stamp from Indigo Blu.


Called Baubles Flourish, its quite a large stamp, the design is 5 1/2" wide, by 5" deep.


I stamped the flourish onto white card with Black Versafine, and then heat embossed with Stardust embossing powder. After all the flourishes were done, I repeated the stamping with a Christmas Greeting.


          I had already cut the black matt layer, so it would fit on my card blank, which is 6x6.


The black layer is roughly 5 1/2" square, and the stamped white layer 5 1/4", so the image goes off the left hand side just a little.


 The image matted onto the black layer with DST.


Red ribbon wrapped across the card front, and the ends stuck down on the back with a little DST, then a small bow added with a glue dot.


Next some acrylic gems were added for a bit of sparkle.


 Green on the bauble centres,clear in the centre of the snowflakes, red ones for the holly berries, and a dark one on the bauble string.


This is the original Indigo Blu version. on display at the NEC.


                                          .......and this is my version of the design


Supplies:
White scalloped card blank, 6x6
Baubles Flourish, Indigo Blu
White Cardstock
Black Cardstock
Ribbon
Sentiment stamp
Versafine Onyx Black inkpad
Stampendous Stardust embossing powder
Acrylic gems, e-bay
Heat gun
 Pinflair glue gel, or silicone glue for the gems

Wednesday 13 November 2013

WOYWW 232

Not enough days between Wednesdays- these weeks just fly past. Almost finished all my friends/work colleagues Christmas cards, I just have to stamp the inside sentiment. They're in the post below, by the way. Doing this up on Tuesday night to schedule, so my desk has some of my purchases from the NEC, where I did indeed meet up with Andrea, we had coffee and a chat.  Love meeting WOYWWers, so nice to speak in the flesh to our friends online. Completely forgot I had my camera in my bag, so no pics, sorry! Waffling away here, so pop over to our Head of Desks, Julia, at The Stamping Ground, and come see the desks of the world in all their glory.
 So what did I get?
Mainly stamps, what a surprise! A couple of Indigo Blu ones, a couple of Lavinia stamps, some Inkylicious, but my absolute favourites- a company called Visible Image were there. I've seen them lately in Craft Stamper, and they have some delicious Gothic stamps.


The set on the left in the picture below I fell in love with when I first saw it.
 
You can also see a Poinsettia die in the first picture, I  have the Spellbinders  Layered Poinsettia, which is fine for larger cards, but a bit overwhelming on smaller ones. This one makes a lovely sized small flower, (Nellie Snellen, btw).


This one came from Inkwell stamps, which will be great for simple Wedding cards, and the coolest thing is they also have a 'Mrs & Mrs', and a 'Mr & Mr' stamp for civil weddings.


Indigo Blu- you can see the Ella Bella stamp in the top picture, and this one I bought to use for family/friend cards this year. They had a gorgeous sample on display, which was what sold me on the stamp.


Apart from a few odds & ends- a set of square dies which had 14 squares in it, some tape,a couple of ink pads and a couple of embossing folders on sale,the only other thing I bought was some packs of pre cut & scored cards. I usually cut & score my own, but liked the scalloped shape on these, and cutting square cards from A4 limits the size somewhat, and they were reasonable, the largest, which fold to 6x6, were £4.99 for a pack of 50, with envelopes. And they'll be the perfect size for the bauble stamp.
I have to say that overall, I thought the Hobbycrafts show was not as good as previous years, although that does somewhat depend on your area of crafting. It seemed this year that well over half the show was beading or fabric retailers, this seems to go in cycles, I've noticed. Each year there is a heavy leaning to one particular craft. Last year it seemed every other stall was beads. I also noticed a number of regulars absent - Paper Artsy for one. Also missing were Crafters Companion, who I don't buy from very often, but they usually have a big stand, and some good bargains.And a lot of others had far smaller stalls than they usually do. So do have a lovely Wednesday, I'll be catching up with you later.
 Quick PS-For anyone with bent 'bug plates- a couple of posts down is a method to flatten out your warped Cuttlebug plates- I've done it and it does work.

Monday 11 November 2013

First batch of Christmas cards finished.


I started these a few weeks ago, and finally got them finished today. well, almost, I just have to stamp a greeting inside them.
The stamp is by Penny Black, called Adornment. I stamped it in Silver Encore pigment ink, and heat embossed with Stampendous 'Stardust' embossing powder, after trying out a few others.
 The Merry Christmas sentiment was done in the same way.
 After cutting out the squares with the image on, the corners were rounded with a Corner Chomper.
 I have the one that cuts in 1/4" and 1/2"


 I used the 1/4" side for the main image, then later used the 1/2" side to round the top corner of the cards. It does a lovely job, and much more tidily than the other corner punches I've had over the years.Doesn't need any real effort to punch either, certainly less than a normal punch.I matted the image onto silver card and rounded the corners again. I used a mix of 2mm and 3mm acrylic gems, added with Pinflair glue gel.


 When I came to mount the image, I thought the base card just TOO plain, so browsed my box of embossing folders. I have a couple with snowflakes etc on, but they seemed too busy. Then I came across this recent purchase, called 'Tied Together', by Couture Creations.


 What I really liked about this folder was that the back part is slightly narrower than the front, which makes it easy to emboss the front of a card, right up to the fold. So I embossed all the card fronts, then rounded the corners.


The image is mounted with DST, and the sentiment with a couple of blobs of silicone glue.


The main image mounted on the card front, waiting for the sentiment & ribbon.


By the way, I used up all the scrap pieces of card from cutting out my images to stamp the sentiments onto, then trimmed them down and matted onto silver again.


Ribbon now in place, waiting for the glue to dry. Some are silver, some have a splash of red. OK, I admit it, I ran out of silver ribbon, lol.


Supplies:
Stamp, Penny Black Adornment
Silver Encore Pigment ink
Stampendous Stardust embossing powder
Acrylic gems, e-bay
Tied Together Embossing folder
White pearl card base
Red/silver narrow ribbon
Sentiment stamp
Corner chomper/rounder punch

Fixing warped Cuttlebug plates!

I take no credit for this discovery, a lady posted this on Pinterest HERE.Like any of us, I hate having to spend money on 'consumables', and new 'bug plates are not cheap, are they? As one of my 'B' plates was quite warped, and full of bits of paper stuck in the cutting marks, I thought I'd give it a try.
This was my 'B' plate before:
I don't think the bend in the plate shows up at all, but it was quite bent, despite keep flipping it when I used it.

What she did was wrap it in tinfoil, put it on a baking tray, put some weight on top of it, and then cooked it at 170C,325, or gas mark 3, for half an hour.


So I wrapped it up, and I used a good quality thick foil for it,and put it on  a tray, with 2  pyrex dishes and a stone lasagne dish on top.

She doesn't say if she had a fan assisted oven, so to be on the safe side, I knocked 10 minutes off the cooking time. When it came out, I left it to cool, then unwrapped it. The result was pretty flat, although the heat had got to a couple of the corners.
 So I wrapped it in a second coat of foil, and as I was about to cook Toad in the Hole for dinner, I waited till that had finished, then put the tray back in the oven after I had turned it off, and just used the residual heat of the oven.


And this is my 'B' plate now- nice and flat, and all the bits of paper have dropped out.


Bit easier to see against a white background- you can see the top two corners felt the heat a little too much. I'd recommend putting two tin-foil coats on it, more if its a cheaper thin foil, (which is what I normally buy from Poundland, lol, only got the Bacofoil 'cos Tesco had it going cheap!) and maybe some extra on the corners too. But it really does work! Makes them nice and flat again, and pops out all the paper. You still have the cutting marks, but that doesn't affect how they cut.


Before & After


An End of an era

An end of an era

I write this with a broken heart, that only time can heal My beautiful, wonderful wifelet Shaz (Silverwolf) passed away peacefully in the ea...