A warm welcome to all my visitors,

Thank you for taking the time to come and look at my blog, I really do appreciate it. I would love you to leave me a comment, even if it’s just to say Hi. It means I can come visit you!

All my designs are original, so copyrighted to me. If I have been inspired by someone elses work, I have named them in the post, and where able, I have provided a link.

Please feel free to use my designs for inspiration, I just ask you to credit me, and provide a link back to my blog.

Thanks, Shaz XX

Showing posts with label Chloes Creative Cards. Show all posts

Friday, 28 September 2018

C.C.C. Eclipse Christmas Cards.

I've seen this technique a lot on Pinterest, and thought it was time I gave it a go, as it looks really good. Simple too, and depending on your die sizes, can be made to fit pretty much any size card.
This fortnights Christmas Card Club entry too, as I don't think I have anything that fits the Challenge- Turkeys, Camels or Sheep.

These cards are an A4 sheet folded, and the top pair were made  using letters from an ICraft alpha die set, which are quite large letters.
 I had wanted to have the word  SNOW on the front,as I was using snowflake stamps, but the letter W was too wide to allow the word to fit, so I settled for NOEL.


To get round the letter size problem, I cut the word SNOW out with my Silhouette Portrait, using 2 different fonts, as the first font was a little difficult to work with. I hadn't considered how thin some of the lines on the words were!


So you can make sure your word is centred, you do need to cut your cardbase and panel to size before you start. I often trim them to size when I'm done, but that won't work here. I trim my card base about a ¼" from the width, as I find a full sized sheet makes it too tight a fit when putting into the envelope, even if the card is totally flat. Any embellishments/raised areas make it impossible. It also gets rid of any misaligned edges from folding, or damaged corners.
 I stamped a selection of snowflake stamps of varying sizes in Brilliance  Pearlescent Blue pigment ink.


 The letters were 'dryfit' first, to get the spacing right, then held in place with a little stencil tape.
 Making sure your letters are level can be awkward, but a 'T' Ruler helps here. Butted up to the edge of the card, you can be sure all the letters are placed the same.

To die cut, I have the plates in my 'Bug swapped around, with the 'B' cutting plate on the bottom, instead of the 'C' plate. That goes on top. This way, you can just lay your card & dies straight down, without needing to flip it over, and potentially having your dies move. Not my idea, I saw a few You Tube crafters doing it, and realised it was a great idea.

The letters die cut out. Make sure to retain any centre pieces from letters, such as the 'O' here, as you'll need to replace it to fill in the letter on the card.


I also die cut the same letters from some fun foam, to give the dimension. You don't need the centre from the O for this.You can use a few layers of cardstock layered up if you don't have any fun foam to hand.


To add the letters on top of the fun foam, I used a ZIG glue pen. Any glue pen will do the job,as will glue with a fine tip applicator, or you could put a sheet of  double sided adhesive on the front of the fun foam before die cutting.


This Zig pen has a chisel tip, and makes adding glue easy. It comes in different nib types too- there is a rollerball version, and a pointed tip version. The glue starts out blue, and turns clear as it dries.


One thing worth mentioning- 'dry fit' letters like the O before you add glue. I was surprised that although they LOOK symmetrical, they are not exact.Even the ones I cut on the Silhouette. Obviously, this depends on your dies- some may be perfect, others, not so much.


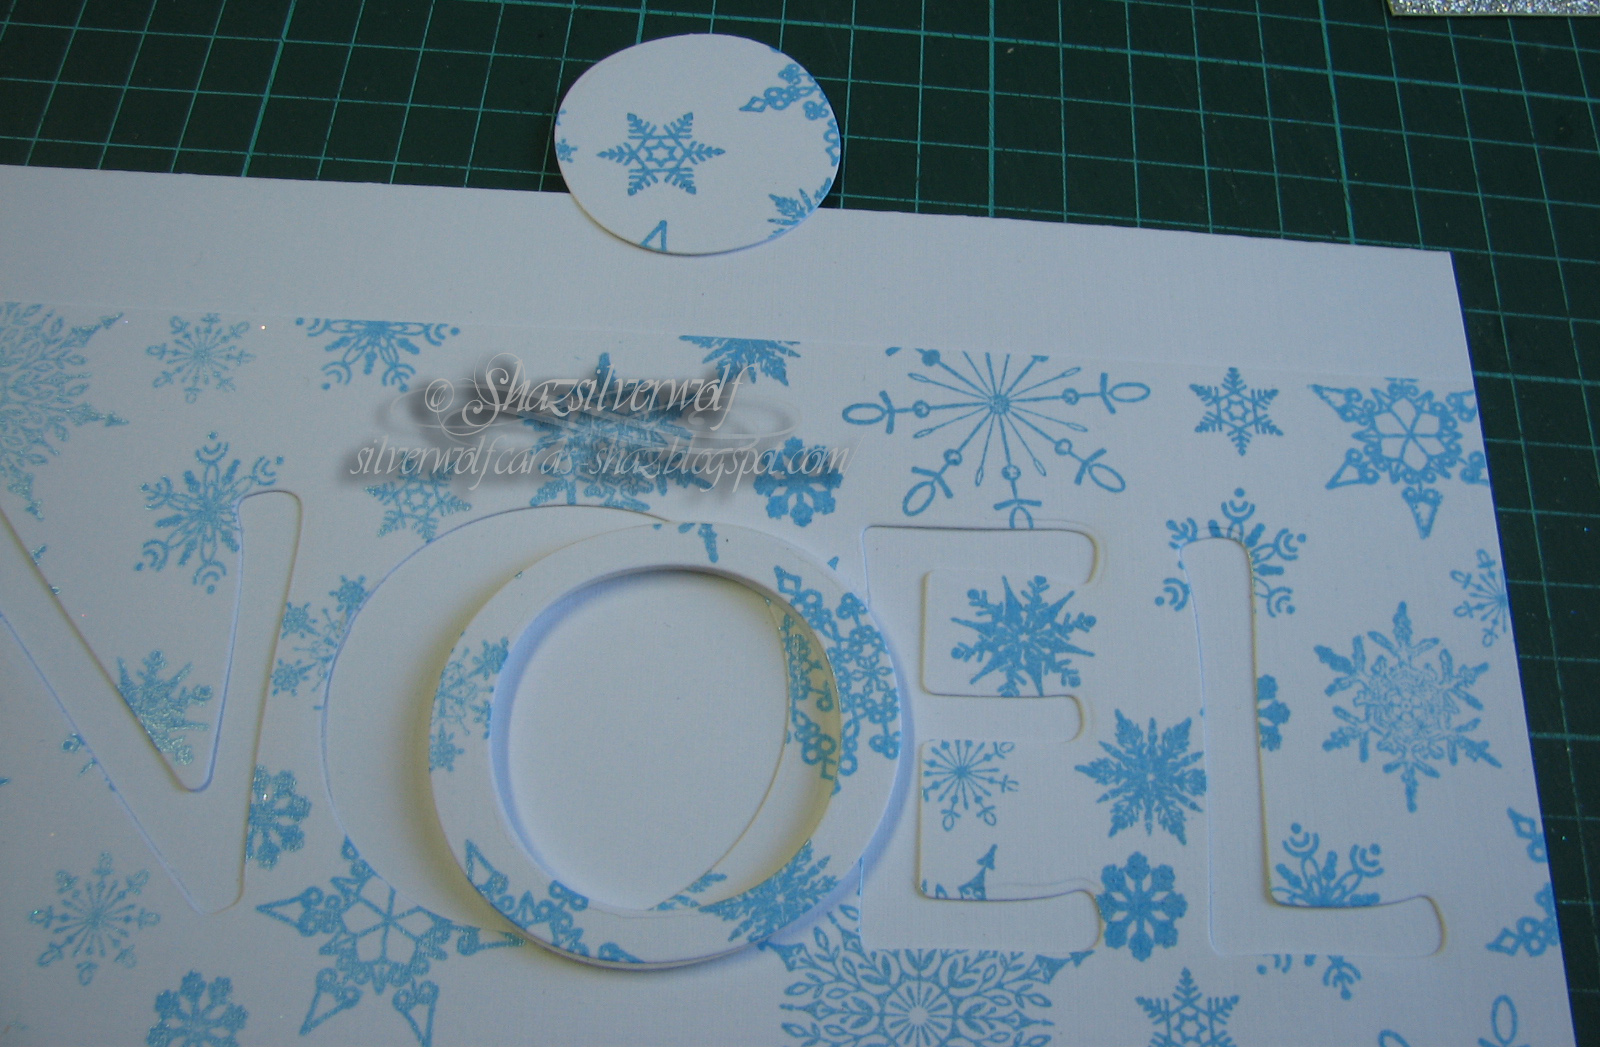


Next add the stamped panel to your card front,and I found it helpful to add tape runner to the parts of the letters remaining as well, such as the pointy bits of the N, and the parts of the E, to keep them flat.
You need to replace the centre of the O, and I recommend popping the letter back in place to make sure you get the pattern orientation right. Then just add a little tape runner/glue to the back of the centre, and place it inside the letter and press down.
 Now you can add your other letters.
 The fun foam gives a nice dimension, not too much even for mailing.
 I'd suggest at least 4 layers of cardstock, plus the stamped layer if you do it that way, as I used 3 plus the stamped layer on one of the next cards, but it wasn't as dimensional as I'd have liked. The thickness of your cardstock will have a bearing on this, of course.

 To finish this off, I added a peeloff border either side of the stamped panel and stamped a greeting along the bottom. It comes from a Phill Martin set called Christmas Holly Sentiment Borders. I just masked the Holly embellishment at either end before I inked the stamp, so I just had the sentiment.


The SNOW eclipse cards were done by cutting the word SNOW on the Silhouette, and for my first one I cut the word a total of 4 times, leaving enough room above & below the first one for me to trim the panel down.  I left the cardstock on the  Cutting Mat to do the stamping, for which I used a stamp by Chloe, called Wavy Snowflake Border.
I twisted & turned the stamp to cover the panel completely.


This was the one I used the thin lined font on, and you can see the other words for the layers below the stamped over area.


I decided to make the next version more dimensional, so cut the words again from a second sheet of cardstock.


 I used Silver Encore Pigment ink here, and a silver sparkle embossing powder from WOW! called Blizzard.


 The sentiment for this one is also a Phill Martin one, from another set called  Snowflake Sentiment Borders.


This is the finished four cards.


These are really easy to make, and could also be done using a Patterned paper, so no stamping required! The fun foam makes it faster, as there is no building up layers involved.
 As for dimension, that is totally up to you. From one or two layers of cardstock to keep it low, to a couple of layers of fun foam or chipboard for a real WOW factor, if you are not going to be mailing the card.

Wednesday, 20 December 2017

WOYWW #446- The almost Christmas Edition!

Indeed, a huge Merry Christmas to all my WOYWW buddies, wishing everyone a Happy and Peaceful Christmas. Last but one link up of this year, over at Julias Grotto, The Stamping Ground. 
MIA last week, for which I will mainly blame Beloved Hubby having Monday off!  Made me think Tuesday was Monday, and so on. He had yesterday off too, so I've been reminding myself all day that it is Tuesday, not Monday.
 Not a huge amount on the desk, to be honest. A few purchases, the Pram stamp I bought- and ended up using- from Stamps by Chloe, as the Clarity set only turned up last weekend.
The TH stamp set was from Country View Crafts, and in her Advent sale.


I did make another purchase from Clarity- that 'Groovi Grip'. I saw it mentioned on Barbara's blog- you  attach it to the back of a ruler, and when you press down, it stops the ruler sliding. It's transparent when you peel the backing off. Thought it was worth a try out, as slipping rulers really annoy me.
 Two A4 size sheets for £4.16. I often prefer to trim my cardstock & borders after stamping, rather than cut to size first, and depending on what size of border I want, usually prefer a ruler & scalpel.
These stencils came with the original Baby stamp order, I thought the Bell & Bauble would look good with Christmas scenes in. The Holly one was a special being added to orders in the Gray Friday sale, I expect it will get a general release next year.


And finally, the completed Baby card, I'll do a post with it over Christmas.

So, I'm done.Only a couple of presents left to buy, and all the cards are posted.
Which reminds me, a huge thank you to everyone who has sent us a card, we really appreciate them.
 Doug breaks up on Friday until the 2nd of Jan, and being on earlies this week, means he finishes at 10.40.
 Have the rest of a lovely week,and I'll see you next week for the Nearly New Year Edition. 🎄🎄🎅🎅🎄🎄

And finally......

Wednesday, 9 November 2016

WOYWW #388

Hello, my friends, here we are as usual on Wednesdays, all huddled in our Julia's place, The Stamping Ground, for our regular coffee morning.


 Pic on the left is me and Jackie Mackay, just about to brave the exhibit halls after a coffee to  get us in the right mood for it. We had a drink and a chat with Jackie and her two friends before making our assault on the crafting goodies.


No crafting on my desk today, as I've been putting my new stash away.


Some stamps and stencils from Inkylicious.


The cloudy moon stamp comes with a moon mask & stencil in the pack. The tiny winter cottages, bunnies and fairies will go well with Card-io stamp scenes, I think.


Speaking of Card-io, some stamps to add to my Christmas stash from them.


Some fab glittery embossing powders from WOW!


And while we're on the subject of glittery things......also a couple of red inkpads.

 A Clarity stencil, a Sweet Poppy stencil, and a stamp from  Stamposaurus. ' I love you to the moon and back'. I've seen that sentiment in a Tim Holtz set, but at £20 a time, I didn't think I'd really use the other stamps in the set enough to justify it.


A few more Honey Doo stamps.


Stamps by Chloe next, gorgeous Christmas florals.
Back to Inkylicious for some MDF Fairies. Then some awesome Metallic paints from Imagination Crafts. They have gilding flake in them, and the colours and sparkle are amazing.


Finally, a couple of embossing folders and paper pads, all really cheap.
 A few thoughts on the show- parking is a disgraceful £12 a time, and with tickets £10-£12, thats £25 spent before you've bought anything. I also must say the show was much smaller this November than any previous one, they had about a third of the hall sectioned off  with a barrier, usually the show has taken the whole hall. Also, the aisles were wider this time, which made getting around easier, but I'm pretty sure was as much a ruse to make the show look bigger than it was. A lot of big names missing this year too- Indigo Blu, Paper Artsy, Crafters Companion, Visible Image, Lili of the Valley, to name a few.It definitely felt as though there were less visitors too. So, no, not very impressed. I doubt I will bother with it again, there are much better shows about, at far more reasonable prices.
                                                                                 

Final shot is the latest two die sets from China to arrive. Stitched Squares and Stitched Circles.£1.79 and £2.39 respectively. And they cut just fine.     

Friday, 14 October 2016

Simple stencilled Christmas Cards.

 A total of 9 new cards, using two different stencils, and one Greeting stamp.


The stamp is from Honey Doo crafts, called Mini Happy Christmas. It measures 2 1/4" x 4", so it's actually quite a good size.


The two stencils are ST Poinsettia Multi from Imagination Crafts, and one called Snow Flurry by That Special Touch,from Creative Expressions.


 Both measure approximately 6" square.


I stamped up a batch of the greetings, to give me some choice, using a Clear Embossing pad, and an assortment of WOW! embossing powders I bought from Chloes Creative Cards at the Happy Stampers last week. Looking at the labels, it says they are inspired by Chloe Endean, and the set is called Festive Collection. I also used a couple of my own mix of sparkly embossing powders.
It's simple to mix your own, just remember to have more EP than glitter in your mix, I'd say no more than a quarter glitter to EP.

These little boxes of tiny tubs are ideal for doing this and storing them in- from E-bay, they are empty nail art pots.
So, on to the cards.


This one with the blue snowflakes, I'd done in White Stencil Paste, then sprinkled with a blue glitter before it dried.
It's matted onto some shiny textured blue paper I had. As the paper was quite thin, I mounted it onto some spare cardstock first, then trimmed it down to size.
 The greeting for this one was embossed with an EP called 'Arctic Blue'. I matted the greeting onto the same paper, and as it was being attached to a glittery and uneven surface, I used Pinflair Glue to do this.
Just a few blobs is all you need.


I debated whether to put it straight, or at an angle. The angle won!
All the cards use a 7"x7" square card base.


This gold one had one of my own mix EP's on it. It's a mix of gold Ultrafine Glitter & Stampendous Embossing Powder in Gold Detail.
 The Poinsettia  background was done with Gold Sparkle Stencil paste this time.


Silver Sparkle Stencil paste used here, and my own Silver Glitter embossing powder.


Silver Paste again, and the same Embossing powder. Just silver ultrafine glitter and Stampendous Silver Detail EP.


This one had white Stencil Paste sprinkled with Crystal glitter, and the EP is called  'Jingle Bells'.


Three red Poinsettia stencils, two done with Red Sparkle stencil paste, and one with white paste, sprinkled with red glitter. The EP is called 'Sparkling Poinsettia'.
 They are backed onto gold glitter card, as I discovered I had no red glitter card at all.


Final card is using Green Sparkle Stencil Paste, and the Greeting is embossed with 'Golden Pine' EP.


Final touch was to add some acrylic gems to the centre of the snowflakes, and on the dot above the 'i' in Christmas.


   The same thing with the centre of the poinsettias, two have clear gems, and one has red ones.


Red gems used on the silver, gold and green ones.

An End of an era

An end of an era

I write this with a broken heart, that only time can heal My beautiful, wonderful wifelet Shaz (Silverwolf) passed away peacefully in the ea...