
So I found this in the drafts area of blogger, an unfinished post I figured I would convert into a page.
I have no idea if Sharon was ready to publish and forgot about it (too much work gone into it) or if she had published it as a post somewhere and this just needed to be deleted.

So, you've decided you'd like to make handmade cards- maybe you've decided you need a new hobby, maybe you do other artistic or crafty things already. Perhaps you've received hand made cards, or seen other peoples creations. However you've come to it, there are a number of basic items you'll need, and a number of things, whilst not vital, will make things easier, or allow you to do a wider range. That said, if you haven't already, you will need to have a good idea of the sort of cards you will want to make, because some of your needs will vary, depending on your choice. Because there are so many different types of cardmaking, from CAS- Clean & Simple, to the Mixed Media creations, such as Tim Holtz style. My first recommendation, if you are a bit unsure,would be Pinterest. Just search Handmade Cards/Cardmaking and see what shows up. If you see styles you like, have a look at how that style is made on You Tube, or in Blog posts.I have no idea if Sharon was ready to publish and forgot about it (too much work gone into it) or if she had published it as a post somewhere and this just needed to be deleted.

Anyway here is the post
I will talk about equipment either from the view of what I use now, or have in the past, and if I don't use it anymore, I'll say why. There are many brands I haven't used, but I'd suggest you visit You Tube for videos on that item, as I don't have the knowledge to advise. Although it appears I have a lot of tools and kit, I've been doing this for well over 20 years now, so it's been collected over a long time.
So we'll start with real basics, and my first basic area is going to be:
Cutting.

A craft knife with replaceable blades will be essential, and here we to need to be clever, and careful. There are many, many brands of Craft knife out there, most of them reasonably priced when first bought, because they make their money on all the replacement blades you need to buy. Often they're sold in packs of 5, which will not last you long. You do not want to be cutting with a dull blade, as that will give a ragged edge, and spoil the look of your project.
So that is something to take into account when making your choice. My personal choice is a scalpel handle and blades, because I can get a box of 100 blades for a little under £14, whereas the average cost of a pack of 5 'craft knife' blades is £2, meaning 100 of those is going to cost you £40ish. Plus, you may eventually find your particular knife/blades have been discontinued, so you have to start all over again, finding one you like. Blades are just one of a number of 'consumables', and expensive blades can lead you to use one far longer than you ought to- as an example I can easily use 2 or 3 blades a week.
 This is just one area where it pays to look at other options, not just 'Craft Branded' products, you will discover that being a 'Craft' product tends to increase the price, sometimes considerably.

Moving on from knives, and we come to Scissors. Realistically, you are probably going to want 3 or 4 different pairs, in different sizes. But you can get by at first with just one medium sized pair, although a search on somewhere like Amazon will often throw up a set of them for a really good price. The 3 pack I have here doesn't seem to come as a 3 pack anymore, but HERE is a set of 4 for £8- stainless steel blades, and soft grip handles.A large pair, for general cutting, a medium size, and a smaller fine pointed pair for 'fussy cutting'- hand cutting out images. If your choice of cards to make is going to be mainly Decoupage, then the tweezer like ultra pointed ones are really great for fine detail, plus they don't dig into your fingers- comfort is something to consider with scissors if you will use them a lot.

Now we'll move up a scale, and get to Paper Trimmers and Guillotines. I bought a 12" X-Cut guillotine about 15 years ago. I sort of think that maybe they were manufactured by Tonic, as it's identical to the Tonic/Tim Holtz guillotine. It has good clear markings moulded into the platform, an important point, as markings printed on can fade and wear off over time.

All I can say is that it cuts as well today as it did the day I bought it.The beauty with a guillotine is that they are self sharpening, so no blade replacement, ever. The actual platform is about 6" wide, but does have a detachable extension ruler to take it to 12".This is stored in the underneath of the body, out of the way.

I also have a smaller 6" one, which I was gifted, and again, that's pushing 10 years old, and cuts easily and cleanly. They are my go to for neat clean cuts.
 I also have a rotary paper trimmer, I got a good deal on a Carl one with an assortment of fancy blades, which is great for cutting various fancy edges on card & paper, but again, this has consumables. There are also many brands of fancy edged scissors to do this job, I'm just terrible at cutting straight lines😀. Not just the blades, although they do last a long time, but also a thin strip 'cutting mat', which wears out quite regularly. You get a groove cut into it from the blade, and then the cuts cease to be as clean as you'd want.
 This is just one area where it pays to look at other options, not just 'Craft Branded' products, you will discover that being a 'Craft' product tends to increase the price, sometimes considerably.

Now we'll move up a scale, and get to Paper Trimmers and Guillotines. I bought a 12" X-Cut guillotine about 15 years ago. I sort of think that maybe they were manufactured by Tonic, as it's identical to the Tonic/Tim Holtz guillotine. It has good clear markings moulded into the platform, an important point, as markings printed on can fade and wear off over time.

All I can say is that it cuts as well today as it did the day I bought it.The beauty with a guillotine is that they are self sharpening, so no blade replacement, ever. The actual platform is about 6" wide, but does have a detachable extension ruler to take it to 12".This is stored in the underneath of the body, out of the way.

I also have a smaller 6" one, which I was gifted, and again, that's pushing 10 years old, and cuts easily and cleanly. They are my go to for neat clean cuts.
 I also have a rotary paper trimmer, I got a good deal on a Carl one with an assortment of fancy blades, which is great for cutting various fancy edges on card & paper, but again, this has consumables. There are also many brands of fancy edged scissors to do this job, I'm just terrible at cutting straight lines😀. Not just the blades, although they do last a long time, but also a thin strip 'cutting mat', which wears out quite regularly. You get a groove cut into it from the blade, and then the cuts cease to be as clean as you'd want.

So, thats knives, scissors and guillotines covered.
You will also need a ruler- one with a steel edge so you can cut against it and the blade won't cut into it.
 A T ruler is also a useful thing to have, as it can help a lot in getting things lined up straight and square, and also for checking cardstock/card blanks are square- you'll be surprised how often they're not!
The clear ruler on the left is the Tim Holtz one to go with the glass mat, really not a necessity at all. The T ruler is in the middle, you'll get them at any good stationers, or Amazon, and on the right my steel edged Tim Holtz ruler. It is marked in inches, which may be a problem for you, but there are plenty of clear rulers, with a steel edge, in metric form from various craft companies. I'm old enough to be used to Imperial, so find it no problem, and I also like that as well as the standard linear 1-12 inches, it's also marked from the centre out in both directions, which is often useful. It also has a line of holes along one edge, for piercing holes, or making marks to line up embellishments. Whichever ruler you get, just make sure it's a clear one, not coloured. Made that mistake once, was almost impossible to see what I was doing with it.
You will also need a ruler- one with a steel edge so you can cut against it and the blade won't cut into it.

The clear ruler on the left is the Tim Holtz one to go with the glass mat, really not a necessity at all. The T ruler is in the middle, you'll get them at any good stationers, or Amazon, and on the right my steel edged Tim Holtz ruler. It is marked in inches, which may be a problem for you, but there are plenty of clear rulers, with a steel edge, in metric form from various craft companies. I'm old enough to be used to Imperial, so find it no problem, and I also like that as well as the standard linear 1-12 inches, it's also marked from the centre out in both directions, which is often useful. It also has a line of holes along one edge, for piercing holes, or making marks to line up embellishments. Whichever ruler you get, just make sure it's a clear one, not coloured. Made that mistake once, was almost impossible to see what I was doing with it.
Erasers.

A pencil and sharpener, and then we come to erasers. A standard pencil eraser, and another great one to have is a Tombow Sand Eraser. They are really good at removing accidental ink marks, and also stray flecks of embossing powder after it's been heated. An Adhesive eraser can be a life saver at times, just let the adhesive dry first.
 The one benefit of using liquid glue over dst or tape runners is that you have some margin for sliding wet glues into place, to get things straight. DST & tape runners are not forgiving, so unless you're good at eyeballing straight, or use a T ruler to line up, this is where liquid glues have the edge.
Glue dots can be very useful for attaching heavy or oddly shaped embellishments, or for joining the ends of ribbon together, or for attaching ribbon bows.
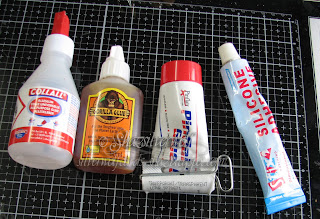
Pinflair glue, or silicone glue I use for that reason too, and also for when I am matting and layering onto glitter cardstock. Because the surface is uneven, DST wont work here, so I find a thin layer of this holds nicely. It is also great if, for instance, you want to layer up a flower, and for decoupage, as you can adjust the height easily with this. Foam pads are also used for this, but you have no ability to adjust the height.

Then we come to a few speciality adhesives. Ranger Matte Medium is one such, and my go to. It holds practically anything, and dries clear, so any leaks around the edge of something don't show.
Collall Photo glue is a good one for sticking collage pieces together, although it tends to be a bit stringy- like bostick- for me to use it too often. As I mentioned at the beginning of this bit, everyone has their own favourite, so I'd really suggest getting a roll of DST, maybe a snail runner, and a small bottle of a good wet glue, and seeing which you prefer. Don't buy huge amounts- even to save money in the long run- until you know which you prefer to work with.
And now we come to one of the most basic of all the basics you will need-

The reason I mainly buy A4 cardstock is that I can cut my own card bases, in a variety of colours, and also in 4 different orientations, depending on the way it's cut.I have a drawer I keep stocked with 'notecard' sized card blanks in an assortment of colours and orientations.


A Scoreboard will be a need if you wish to make your own card bases, and there are many, many brands on the market. I'd suggest looking at them carefully, and choosing one that will give you a lot of options. Here I'm showing you my Hougie board, which I sort of think has been discontinued, as they seem to be out of stock everywhere, although there are some real bargains on E-Bay.
 This one I liked as it was double sided- Imperial one side and metric the other. The one thing you want to look for is a board with something similar to the metric side, shown here. Lots of scoring lines to choose from, giving you plenty of choice for making different folds, and can also be used decoratively on your card base.

These often come with what is known as a Bone Folder- they aren't made from bone any longer, usually plastic, but can be used for scoring your card, then running over the creased fold to make it nice and crisp. Personally, I prefer to use an Embossing stylus, and I have a plastic piece from a clay working set for the folds.

Paper can either be solid coloured, or with images/patterns on, known as Designer Paper pads (DP).
Once you've made your card(s), you will need to store them, and cellophane bags for this can be purchased, in a huge variety of sizes. Even if they are just for your own personal use, popping them into a bag is a good idea, as it helps to protect them and keep them clean.
 Finally,a pair of tweezers and a pokey tool can both be invaluable. Tweezers come in many styles, I just bought fine pointed medical ones, but many people like 'reverse' tweezers- you squeeze them to release what you are holding, and just hold normally to pick things up.The pokey tool to make holes for decorative purposes, or to thread decorative yarn through.
This has run to quite a long post, so I'm going to end it here, as we have covered all the real basics.

A pencil and sharpener, and then we come to erasers. A standard pencil eraser, and another great one to have is a Tombow Sand Eraser. They are really good at removing accidental ink marks, and also stray flecks of embossing powder after it's been heated. An Adhesive eraser can be a life saver at times, just let the adhesive dry first.
Adhesives
So, your next biggest need, and another consumable is adhesive. There are probably as many types, and preferences, as there are crafters. There are 'wet' liquid glues, in a variety of types.
 There are tape runners, from the small 'snail' type ones, to larger, and certainly more cost effective, ATG, (Advanced Tape Glider) guns. Then you have DST, (Double sided Tape), glue dots, silicone glue such as Pinflair, foam DST and foam pads. Each has their uses, and in most cases are the best for a particular job.
Starting with 'wet' liquid glues most are a PVA type, like the old school glue. Definitely a must have, and preferably one that dries clear. I have collected a few over the years- Honey Doo, Indigo Blu, Cosmic Shimmer, Tombow Mono Multi all work extremely well. Many people use these to attach layers on their cards, and get on fine with them, it just needs some practice to get it close the the edges and corners to hold everything securely, without oozing out and ruining your project. I rarely use wet glues for this reason, and in general, the only thing I use them for is adding glitter to the reverse of images stamped on acetate. I hate seeing any peeling up corners or edges, so my preference has been to use DST.
This comes in quite a variety of widths, and a roll goes a long way. You can also usually get good deals on them at Craft shows too.
However, I have recently bought myself an ATG. I used to use tape runner- snail adhesive- for attaching inserts into my cards, but realised this was an expensive way of doing it. Plus I can use it in place of the dst for attaching layers.An ATG gun takes a much bigger roll of this adhesive, so works out much better. I'm just currently getting to the end of my DST mountain!

Glue dots can be very useful for attaching heavy or oddly shaped embellishments, or for joining the ends of ribbon together, or for attaching ribbon bows.

Pinflair glue, or silicone glue I use for that reason too, and also for when I am matting and layering onto glitter cardstock. Because the surface is uneven, DST wont work here, so I find a thin layer of this holds nicely. It is also great if, for instance, you want to layer up a flower, and for decoupage, as you can adjust the height easily with this. Foam pads are also used for this, but you have no ability to adjust the height.

I also like it for layering up die cuts.
I'll often layer 3 or 4 sentiments on top of each other to give a card a little extra pop with some dimension, and some of this, decanted into a soft plastic bottle with a really fine nib is excellent for this.
Ranger Glossy Accents is good for this reason too, as well as it's usual use as a sort of glaze, either over stamped images, or in embellishments.
Collall Photo glue is a good one for sticking collage pieces together, although it tends to be a bit stringy- like bostick- for me to use it too often. As I mentioned at the beginning of this bit, everyone has their own favourite, so I'd really suggest getting a roll of DST, maybe a snail runner, and a small bottle of a good wet glue, and seeing which you prefer. Don't buy huge amounts- even to save money in the long run- until you know which you prefer to work with.
And now we come to one of the most basic of all the basics you will need-
Cardstock & paper.
Cardstock is defined by weight, here in the UK it's known as GSM, or Grams per Square Metre.
In this, the lower the number, the lighter it's weight, for instance copy/printer paper is usually around 80 gsm. For making cards, especially card bases,you want a cardstock that is at least 210gsm, ideally 240gsm and above. The greater the weight of your card for the base, the sturdier your card will be. It will take embellishments well, and stand up properly, no matter what orientation you are using.
You can use cardstock of 150gsm and above for the matting layers on a card.

Card bases can be bought pre made & scored, ready for you to fold. My first advice here is only buy one pack of your choice, and see what you think about the look, feel and most importantly, quality. Pretty much the only pre- made card bases I buy are 6,7 & 8 inch square, as I can't make those from A4 cardstock.
 I'm perfectly happy with them, they feel quite sturdy and stand up well, even when layers are added. From the same brand, I also bought some basic 5x7" cards, and I don't like them at all. The cardstock used is a much lighter weight, and at best, will only get used for stamping done straight onto the card base, as I'm pretty sure they will overbalance with layers added.
Cardstock is defined by weight, here in the UK it's known as GSM, or Grams per Square Metre.
In this, the lower the number, the lighter it's weight, for instance copy/printer paper is usually around 80 gsm. For making cards, especially card bases,you want a cardstock that is at least 210gsm, ideally 240gsm and above. The greater the weight of your card for the base, the sturdier your card will be. It will take embellishments well, and stand up properly, no matter what orientation you are using.
You can use cardstock of 150gsm and above for the matting layers on a card.

Card bases can be bought pre made & scored, ready for you to fold. My first advice here is only buy one pack of your choice, and see what you think about the look, feel and most importantly, quality. Pretty much the only pre- made card bases I buy are 6,7 & 8 inch square, as I can't make those from A4 cardstock.

This brand is available from many online stores, as well as Hobbycraft stores in the UK.
As you can see, they come in a variety of edge finishes, plain, scalloped and Deckle edged. They are also available in Cream, some sizes in black and also in Kraft.
I buy much of my cardstock from online companies, both coloured and white. Some companies in my list also sell card blanks, in a variety of sizes and colours.


Cut widthways, you can have a typical side fold card, or a top-fold landscape one.
Cut lengthways, you can either have a top fold portrait orientation, or a side-fold landscape one. I just like the variety I can achieve.


These often come with what is known as a Bone Folder- they aren't made from bone any longer, usually plastic, but can be used for scoring your card, then running over the creased fold to make it nice and crisp. Personally, I prefer to use an Embossing stylus, and I have a plastic piece from a clay working set for the folds.

Paper can either be solid coloured, or with images/patterns on, known as Designer Paper pads (DP).
These generally have a theme to them, for instance Christmas, and can be very useful, but these are something I'd really recommend that you can see 'in real life' in a craft store or a craft show, as they may all look very enticing, but on closer inspection maybe some of the designs don't really appeal to you-maybe the overall design on a sheet is too large a scale for the size of card you want to make, or perhaps it's just too fussy, or just plain not you!
 If I'm not sure I'll use at least 3/4 of the pad, I don't buy it anymore! Often they come in a variety of pad sizes, 6x6, 8x8 and 12 x12, if so, the 6" or 8" are far more likely to work for cards than the 12", which work better for scrapbooking, as the designs get scaled down for the smaller pads.
If you are buying ready made card bases, they usually come with envelopes, but if you are making your own card bases, then envelopes are something you will need to purchase. They can usually be purchased from the same companies as your cardstock, and you generally have a wide range of both colours and sizes to choose from.

If you are buying ready made card bases, they usually come with envelopes, but if you are making your own card bases, then envelopes are something you will need to purchase. They can usually be purchased from the same companies as your cardstock, and you generally have a wide range of both colours and sizes to choose from.
One thing to think about; you may well be writing a name and address on the front, should you buy dark coloured envelopes, you are going to need to attach a white label on the front of the envelope, or maybe use a silver or good white pen to write the addy.
If you intend to sell your cards, or even donate them for fund raising, the label on the envelope is probably the better solution.
Once you've made your card(s), you will need to store them, and cellophane bags for this can be purchased, in a huge variety of sizes. Even if they are just for your own personal use, popping them into a bag is a good idea, as it helps to protect them and keep them clean.
 Finally,a pair of tweezers and a pokey tool can both be invaluable. Tweezers come in many styles, I just bought fine pointed medical ones, but many people like 'reverse' tweezers- you squeeze them to release what you are holding, and just hold normally to pick things up.The pokey tool to make holes for decorative purposes, or to thread decorative yarn through.
This has run to quite a long post, so I'm going to end it here, as we have covered all the real basics.
I'm going to follow this up with a post on the tools & kit you need for stamping, die cutting and stencilling, as these will be in addition to the general basics you will need.
You can find me on my own blog, here;https://silverwolfcards-shaz.blogspot.com/
You can find me on my own blog, here;https://silverwolfcards-shaz.blogspot.com/


