A warm welcome to all my visitors,

Thank you for taking the time to come and look at my blog, I really do appreciate it. I would love you to leave me a comment, even if it’s just to say Hi. It means I can come visit you!

All my designs are original, so copyrighted to me. If I have been inspired by someone elses work, I have named them in the post, and where able, I have provided a link.

Please feel free to use my designs for inspiration, I just ask you to credit me, and provide a link back to my blog.

Thanks, Shaz XX

Showing posts with label Dry Embossing. Show all posts

Sunday, 26 August 2018

A Mixed Media die Wedding Card

I didn't actually take a huge number of pictures for this make, mainly as I had a whole envelope full of various Mixed Media die cuts waiting for the right card to be made with them.
 The Mixed Media die is the Flourish one, MM set #2, from Tim Holtz/Sizzix.

The card base is a sheet of Pearl White, scored & folded in half.
 I'd cut the die from a slightly less than A5 size pearl card, and I trimmed it further to give me some space for some embossed details on the card front.

After I'd trimmed it down, I used a piece of cardstock I'd coloured with oil pastels in Pinks, blues & purples, and fixed that behind the die cut area.
 On the inside of the card, I marked where the panel would go, and then scored two lines either side of that with a scoreboard & stylus tool.
 To add a little more interest, I used a different scoreboard to make the chevron pattern above & below the score lines.
 For this I used a board that has diagonal score lines on it.

The bottom board is a Martha Stewart one, and the dark brown one with the diagonal lines is an 'add on' board,from Stampin Up. I believe it was being retired when I bought it, as it was reduced. Hard to see in the pic, but the score lines in fact match up perfectly with the lines and markings on the MS board.


I stamped the sentiment, from a Phill Martin set called Baroque Sentiments 2, in silver Encore pigment ink, and heat embossed using Silver detail powder. Final addition was three silk flowers, in colours to match the background paper. The Mixed Media dies are so useful for making fast, but good looking cards for any occasion, and have been a good investment.

Sunday, 6 March 2016

Mothers Day and Indigo Blu


Mothers Day. or more correctly, Mothering Sunday cards handed out, so now I can post them up. These were the Indigo Blu, Blazing Poppies panels that I stamped and coloured. The Poppies themselves are coloured with Promarkers, and the shading around them with Distress Inks.
 The centres of each poppy were given some definition with Black Diamond Stickles.
 After the shading, each was matted onto a matching cardstock, and then a medallion was punched, using the punch shown. This was cut out leaving a narrow border, then trimmed diagonally in half, to give a couple of ornate photo corners for each one.


Next up the embossed lines were created for the panel to sit inside.The base card is an A4 sheet of white pearlescent folded in half.


The long panels are added between the lines, and the main panel slightly overlaps this.

Fortunately,I'd used foam tape to add the panel, as it was only checking how well the photo had come out that I realised I had placed the pink cards panel upside down!  But it peeled off with out any damage, and re- stuck down.

As the only Mothers Day stamp I have is too large for the front of this card, I again used up some peel-offs for the sentiment.

Sunday, 10 January 2016

Visible Image Christmas Cards (2)

Two more Christmas cards using Visible Image stamps, actually 4 cards, as I made two in each colourway.
This one came about whilst I was putting away some white card scraps, and came across the white pearlescent strips that I've used here. I've used this basic design of resist embossing before, and it seemed like a good way to get at least 4 off-cuts out of the way.


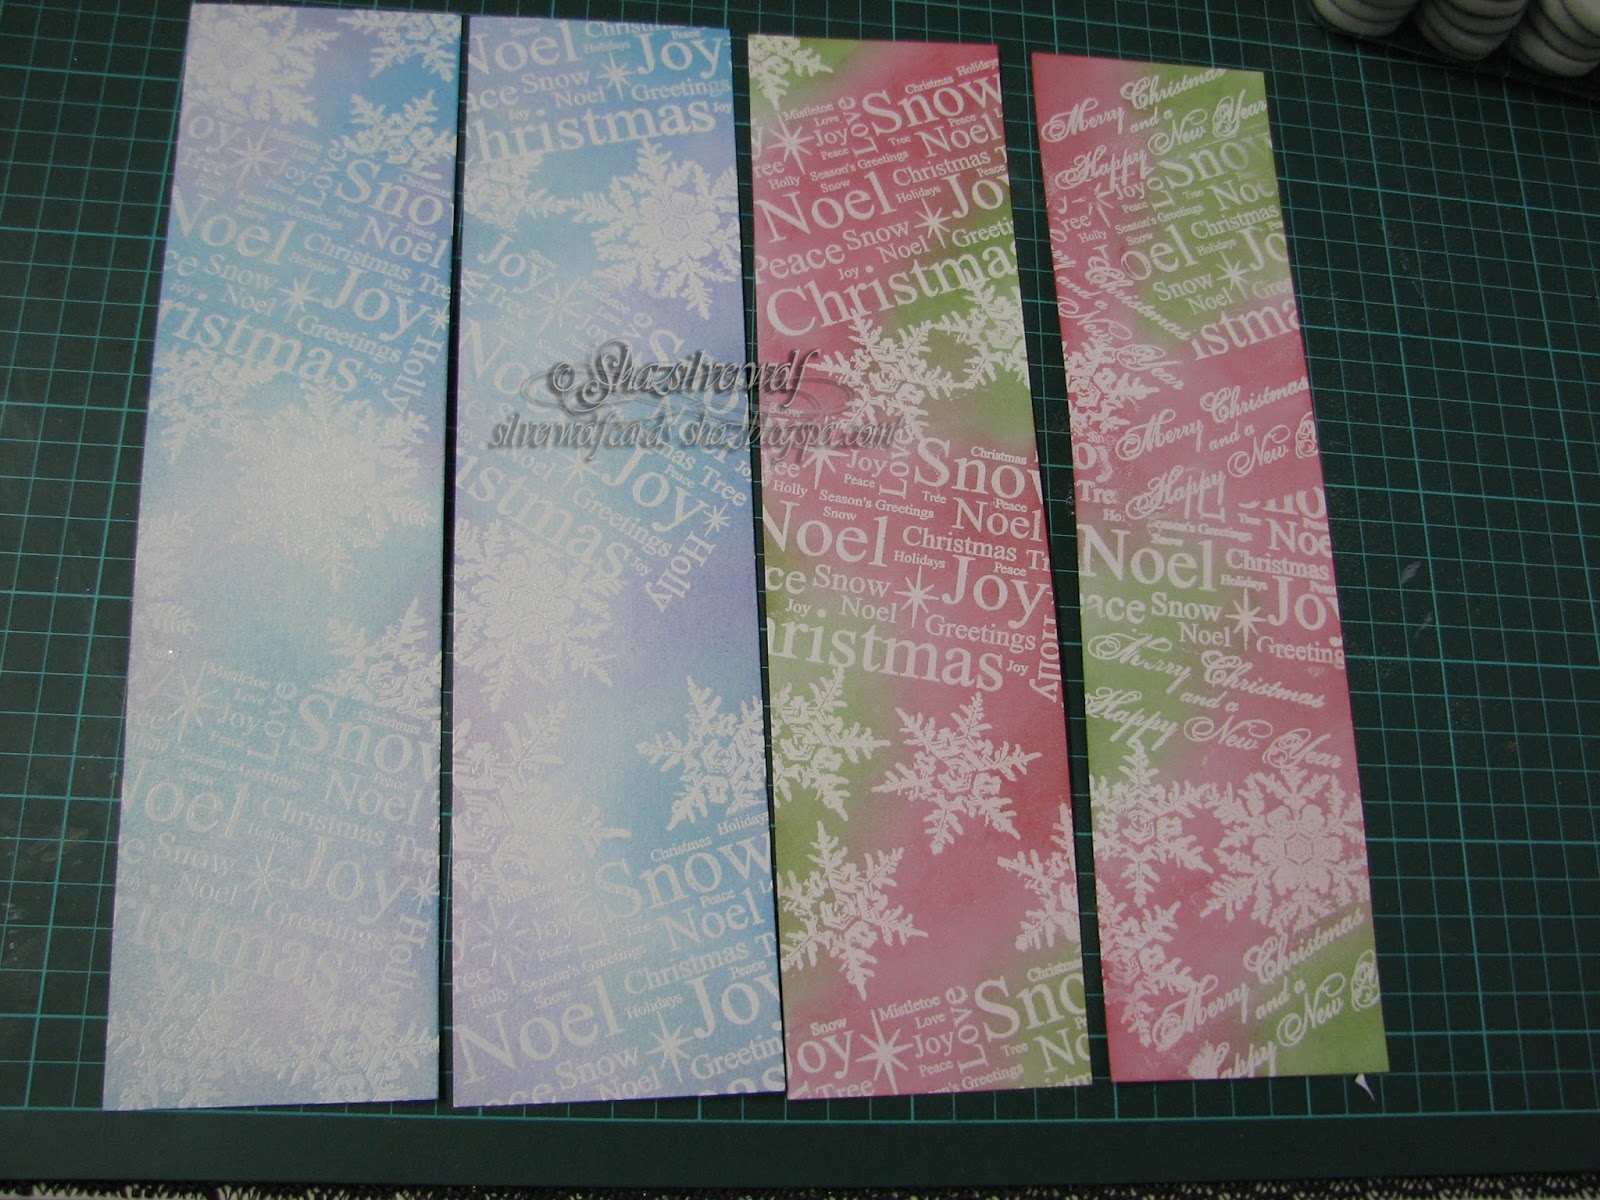
 I began by stamping randomly the Christmas Words stamp and then coating with White embossing powder. My powder  of choice is the WOW! Embossing Powders Opaque Detail White, as it really is a proper white. I used Versamark ink for the stamping, and the pad I was using was the Versamark Dazzles pad in Frost. Yes, I fell for the hype when they came out, but frankly, I really don't see any difference between them and the original, so I just use any.
Heat set, then added Some imprints of the Merry Christmas and a  Happy New Year stamp.


I heat set these, then just roughly masked those areas with Post-Its, so I could stamp various sizes of the Snowflake Set.


When I decided I had enough stamping on there, I took a selection of Distress Inks in blues and purples for one set, and reds and greens for the second.


 I used Broken China, Tumbled Glass and Mermaid Lagoon blues, Shaded Lilac and Dusty Concord purples. The Reds were Fired Brick and Festive Berries, the greens Peeled Paint and Mowed Lawn. I gave them all a buff up with a piece of kitchen towel to take any ink off the embossing.


My card bases for these were A4 sheets of Pearlescent white card, scored and folded in half. I also wanted to create a little extra textural interest by having an embossed line down either side of my stamped and inked strip. For this, I simply lay my strip on the INSIDE of the front of the card, and made a faint line either side of it. Then I lay the card base on my scoring board, in this case the Hougie, as it has more lines to choose from.


I scored down the lines nearest to my mark, in both cases just outside my pencil line to give me room to place the strip on the outside.


The strip was attached with dst, and the Sentiment stamped in Memento Bamboo Stalk ink on the red/green combo.
The strips were longer than the card, so I trimmed off the excess and put to one side, as I have a way to use these too.


The blue/purple combo had the sentiment stamped in Archival Ink Cobalt Blue. The green one wasn't stamped in Archival, as I realised I don't have a green or red Archival pad. But Memento works just as well for clear imprint/drying time etc.


With the stamped strip and sentiment in place, it sort of seemed like it still needed something. Then I remembered this die set I was enabled into by a WOYWWer!


6 different sizes of snowflake, and all different. I wasn't sure which I wanted to use, but the largest flake was definitely too big, so I cut out the 3 middle sized ones a few times. Glad I cut out more than I needed, as the extras came in useful on the first VI card I posted below.


In the end I used one of each of the snowflakes on each card, using a Zig glue pen to attach them, and placing an acrylic block on top to make sure they stuck.
Final touch was the addition of some clear acrylic gems in the centre of the snowflakes, and around the greeting.


So I'm now up to 8 cards blogged, and I still have a few more to show and tell.

Card Recipe:
 A4 sheet of Pearlescent white card
Strip of pearlescent white card
 Stamps: Christmas Words, Snowflake set and Christmas Greeting
Die cut snowflakes,3 sizes
Acrylic gems
Distress ( or other Dye ink) in blues, purples, reds and greens
 Versamark, or other clear embossing ink.
 WOW! opaque white embossing powder

Monday, 13 January 2014

Quick Birthday cards

So, I finished last weeks Documented life pages, in the post below.  Giving this weeks a miss- use something from your mailbox. As mine will be mainly junk mail- isn't it always?- I can't say the idea inspires me. And I'm not getting hung up on doing each week, just the ones that grab me. So I had some stamping time yesterday, and the stamps that came out I was reminded of in a roundabout way. I saw a post on Facebook, where someone was commenting about a bunch of the new release stamp sets from Stampers Anonymous/Tim Holtz Classics, and how they did not credit the original artists- SA seem to claim they don't know who the original artists were.Tim does make it clear he is not the original designer,just that he has chosen his favourite 'classic' images from SA's back catalogue. Having looked at the images, I realised I had a few of the originals, which were red rubber on wood mount. The artist who puts her name to these is Michelle Ward, by the way.


 The first image is called Artful Mosaic, and I love it because you can stamp it then colour it, stamp it onto an inked background, or as I have, stamp & heat emboss and it always looks great.
 Guess you can see why its called a classic!
 Anyway, stamped in black onto White pearl card, then heat embossed with clear powder.

 
 Trimmed the image down, then matted onto black.I cut and folded a card blank from White pearl card, to roughly 8 x 4 1/4".


Decided I would 'frame ' the image with an embossed line on the front. To do this I opened out the card, and on the inside I drew lightly in pencil around the corners of the image. Then I drew a box all around where the image would be, about a 1/4" out from the original size.


 Lined this up on my Hougie board, and embossed the four sides,being very careful at the corners.
I didn't put it exactly central, as I wanted room at the bottom for the sentiment.


 DST on the back of the image, and mounted it into the 'frame'.


 The Birthday sentiment is a clear stamp from one of Debbie Moores stamp sets.
Stamped in black onto a scrap of the white pearl card.


The second card I made was pretty much identical, except this time used a stamp called Moon Collage.
I also used a black base card this time. All the techniques were the same though.


Supplies:
Stamps: Moon Collage,Artful Mosaic, now released as SA Classics. Moon Collage is on the newest sheets released this year at CHA.
Black inkpad
Clear embossing powder.
White pearl card.
Black card
Embossing board & stylus
Sentiment- Debbie Moore Twilight Stamp 1
Heat Gun

Tuesday, 15 October 2013

Weddings and Anniversary

A couple of recent cards for this post, One made for a couples Civil Wedding, and  a card for my Beloved Hubby for our Wedding Anniversary.
 Hubbies card is based on the design for our Wedding Invites, using the same colours and fold.
Instead of our initials, I stamped and heat embossed the number 4 , as its our fourth anniversary.


The second card was asked for by a friend at work, for a gay couple of her friends getting married, as she couldn't find anything suitable in the shops.

 I used a Chocolate baroque stamp, Harlequin Rose, that had been stamped onto Transparency film, then glittered. I layered it over some gold card embossed with hearts. Some Wedding vellum and white ribbon on the left, and dry embossing from a Glitter Girls Embossing board on the right. Finally added a few half pearls to the embossing, and a couple of satin hearts to the image.

Sunday, 13 October 2013

Batch cards with those 'filler' stamps

So, in my WOYWW post I had a lot of small stamped images.  I'd pinned a number of cards onto this Pinterest board, which had given me an idea how to make some use of those little 'filler' stamps that every set seems to include. Usually, most of my cards are made with a folded sheet of A4 card, so they always seem too tiny for me, and just hang around never getting used.


All of these were done by double stamping the image. I used a pale and bright version of each colour, but you'd get the same effect by stamping the image, then stamping again with the ink left on the stamp.


  For this one, the grasses in the bottom card were stamped in Versamark, then heat embossed with White detail embossing powder. The shades of yellow & orange Distress Inks were sponged over the top, then the white image wiped over with some kitchen towel to take off any ink.


These three are done the same way, mounted onto a smaller card base- A5 folded.In the top two, I punched out parts of the images, using a Woodware punch, which measures about an inch & a quarter. I added some dry embossing detail to two of them, and the Dandelion heads have Diamond Stickles added.
Some have stamped sentiments, others have peel-offs, coloured with markers to match.Something else I have loads of, as I bought a lot of sentiment peeloffs in the days before I had many sentiment stamps!
 Its given me a dozen cards, and I have images left to do another half a dozen. All bright & cheerful, and I really like the Versamark & White Embossing powder technique.


Wednesday, 10 April 2013

WOYWW #201


Well its show & tell with Auntie Julia again, over at The Stamping Ground.
I  haven't been up to a lot this week, so this is how my desk has been looking since Saturday. Those glittered medallions finally getting used. As they were so fancy, I decided just to use plain white base cards, square ones, and to emboss around them.
All laying on my Hougie Board.


A close up here so you can see what I mean. I will just stamp a simple Happy Birthday onto them later this week. I used blobs of silicone glue on the backs, as I find that, or Pinflair glue gel, holds onto the glitter surface best.
 I like these a lot, and have a feeling that I will be doing some more of these. I did find the putting down the glue part very relaxing, a bit Zen-like, lol. There is still plenty of glitter around the house- I spotted Ambrose sparkling a little last night. Shows up really well on a black cat! Which made me think that a black & white version of these would be cool. He's not just a pretty, furry face.

This one was made for a work colleague who wanted  a card for a friends birthday soon. I get some mileage out of those Tattered Florals, you know. To be fair, those dies have been a good investment. I like the way you can mix them all together. The background is an MBossabilities folder, Asian. Also Nestabilites, Labels 8 for the sentiment.  Just a bit of proof I can do Pink, if I really have to!
 We popped in to see Maggie ( Silvercrafter) tonight (Tuesday), on the way home, she is well. As you know, my eldest Son is married to her Daughter. We  spent Sunday afternoon looking after Merlin & Mortimer- well Mort looked after himself, to be fair. Another gamer in the family, *sighs*- a COD fan, so Beloved Hubby approves!
Beloved Hubby also spent the afternoon turning Merlin into a nerd- teaching her all about customising her laptop, shortcuts etc.  I'm on earlies- I LOATHE them with a passion, have I ever said? Five o'clock in the morning is when you should be GOING to bed, not getting out of it. Its nice coming home at 2 o'clock, but it doesn't compensate for getting out of bed in the middle of the night! I'd never have made a farmers wife, thats for sure. So I will be speaking with you all later, have a great WOYWW.


I'm adding this part a little later in the week-  many of you know Silvercrafter, Maggie.This picture is from our wedding, and shows Ant, Geoff, Becky & Marg, with Merlin & Mortimer in front.

Tragically, Margs husband  Geoff died suddenly on Sunday morning. We are fortunate in having Marg & Geoff as co-inlaws. We have been friends for 20 odd years, which is not always the case with in-laws, is it? I know Marg has contacted some people to let them know, and just wanted to let those who she frequently gets around to, that she will probably be missing for a few weeks. We see her quite regularly, so I will let you know how she is.

Wednesday, 13 April 2011

WOYWW #97 - Baptism card

Hi everyone on WOYWW,on my desk this week is this baptism card, which has been ordered by a work colleague, who is Polish, hence the spelling of the name!
I've missed the last couple of weeks- life keeps getting in the way, blast it! lol.
The Cross image is from Creative Expressions, Kildare Cross,HH1217L.  There are a number of different crosses on their site, all wood-mounted, although my stamp is an unmounted version.They are medallion images, with means they can be stamped multiple times and then layered. I stamped the image twice in silver, onto silver paper and heat embossed them. It was also stamped once onto white vellum, and onto white silk effect card, in Brilliance Moonlight White , sprinkled with Stamp'n'stuff White Pearl embossing powder. From the two silver images, the whole image was cut out, and from the second stamped image just the centre was cut out.The vellum image was trimmed next, following the curves of the next set of lines, and also including the centre. The white stamped image was cut down to the smaller cross. Each layer was added with silicone glue, and finally an acrylic gem was added to the centre. Diamond Stickles were drawn around the base cross and the central circle.A sheet of A4  white pearl card was scored & folded, and the bottom half covered with white embossed card, and the top half with a glittered vellum.The join was concealed with a strip of ornate sticky back ribbon.
I used Nesties Labels 4 to cut one white & one silver label. The sentiment & name were added with peeloffs in silver. A length of Organza ribbon was wrapped around the spine & tied in a knot.

The rest of my desk looks like this:


The tags on the left have been inked with various Distress inks, and the stamped tags have been cut from the pastel card sheets I made a few weeks ago.


And I have been busily cutting tags of assorted sizes, from a manilla coloured card, and from white.

Monday, 13 December 2010

More Christmas cards

 These are cards ordered by a work colleague for Christmas, this first one will be for his wife.The backing paper is from Craft Creations, and the Rubber stamp is from Elusive Images,Mistletoe Script .Stamped first onto a silvery blue card, then onto inkjet film with Stazon Black, then glittered. I cut out the glittered image and mounted on top of the stamped image with silicone glue. The heart is made with triple embossing, as I did on my Anniversary card.
 This card is for his son, and teen boys are not easy to make for!This image was stamped on inkjet film with Black stazon again and glittered. I trimmed it square and mounted onto a piece of holographic card with brads.It doesn't show well scanned, but the colours change on the background, almost like reflections of the candle flame. This stamp was from The Stamp Man, unfortunately I think it is retired now. I have scanned the image with white paper behind it so you can see the wording.
Add caption

This one is for his daughter, who is much younger, again stamped on inkjet film and mounted onto holographic card with silicone glue behind the glitter. This backing paper is also from Craft Creations, and I used a scoring board from The Glitter Girls for the 3 squares, and snowflake table confetti in pairs, one silver & one holograhic, joined with a brad The snowman stamp is by Funstamps, Scribble Snowman, F-M131..

Sunday, 25 April 2010

Ophelia


The image is called Ophelia, by Stampsmith. She is available facing left or right. I bought both versions, from Blue Moon Crafts in Stratford on Avon. She is stamped on an Alcohol ink background, made with Denim & Stream, with Silver Mixative.Stamped in Stazon Black. Trimmed down and mounted onto silver then pale blue card. Base card is an A4 sheet of pearl white card (PDA card & paper) scored and folded in half, then the front scored and folded in half again. One edge is dry embossed with the Emboss to Impress board and blue & clear flatback acrylic gems stuck into the circles with a little silicone glue. The left hand side of the card is covered with blue handmade paper with a glittered surface decoration. Two layers of ribbon are wrapped around the folded back front half of the card and secured in the middle, under where the main image will be placed. The image is then mounted, stuck down only to the folded back portion of the card.

An End of an era

An end of an era

I write this with a broken heart, that only time can heal My beautiful, wonderful wifelet Shaz (Silverwolf) passed away peacefully in the ea...