These are on another desk drying out. Some Holly Wreath stencils, and some Mistletoe Wreath ones. The Holly ones have had red acrylic gems added, the Mistletoe ones have half pearls. When I blog them, I will try to get better pictures! Well, that's me for this week, I'll see you all later.
Pages
A warm welcome to all my visitors,
Thank you for taking the time to come and look at my blog, I really do appreciate it. I would love you to leave me a comment, even if it’s just to say Hi. It means I can come visit you!
All my designs are original, so copyrighted to me. If I have been inspired by someone elses work, I have named them in the post, and where able, I have provided a link.
Please feel free to use my designs for inspiration, I just ask you to credit me, and provide a link back to my blog.
Thanks, Shaz XX
Showing posts with label Brass Stencil. Show all posts
Wednesday, 16 March 2016
WOYWW #354
Good Morning all. I hope everyone is having a good start to the day. As usual, Wednesday means time for our Show & Tell, Meet & Greet over at Julias place, The Stamping Ground. Today finds me doing things with some of the pieces I stencilled on Sunday & Monday. I'd been punching out some butterflies, from glitter paper, to go on the butterfly tree stencil. Sunday I went to a local craft store, Pink Tulip, along with Marg, Silvercrafter, to see a demo by Lucy Ellis of Sweet Poppy Stencils. It was a most enjoyable couple of hours, and much was spent, and much was learnt. I've done a post about it below this one, and if you have stencils, and get any problems, it's well worth you popping back when you get time, to read it, as I've included all the excellent tips and advice Lucy shared with us.
Something I forgot last week, was that the week previous to that, I'd had my first CT scan since my surgery. Last Thursday we had a meeting with the surgeon, Mr Patel, and the good news is that the scan was all clear. I get a scan every 6 months, for two years, then every 12 months for three years, before they declare me totally clear. But for now, all is good.
These are on another desk drying out. Some Holly Wreath stencils, and some Mistletoe Wreath ones. The Holly ones have had red acrylic gems added, the Mistletoe ones have half pearls. When I blog them, I will try to get better pictures! Well, that's me for this week, I'll see you all later.
Sunday, 17 May 2015
A Black & White Wedding card
So, this did get a mention a couple of weeks ago on the WOYWW post, and I promised a photo step by step guide, along with a How-to, after the card had been given. Well, the Wedding was yesterday, so here is the card.
The base is an A4 sheet of White Stardream card, scored and folded in half.
A sheet of black card was cut to fit the front of the card, then another piece of Stardream white was cut to fit onto the black, just leaving a very narrow border.

The white sheet was embossed with the Couture Creations folder, Tied Together, then the shaped edge was cut using one of the Spellbinders Borderabilities, Curved Borders 2.


I've enlarged that image here, you can see you get 3 fancy borders, then two which have a sort of 'stitched' line of embossing, one has a dotted line, and one is plain.They also have notches on them, so you can line up to cut a longer piece. I used the scalloped one to cut the top half of the card.
I wanted a different embossing on the bottom half, and had a metal stencil I wanted to use for this. So for this one we are going 'old school'! I could no doubt of looked up online, or figured out myself what plates/shims etc I needed to do it with my BS Pro, but in the time that took, I could have done it by hand. So out came the old lightbox.
Two tips for these, if you still have one. First, DON'T use it directly on top of a craft mat- the heat from the bulb will warp it. Yes, been there, done that, got the ruined mat to prove it.
Second, if the light is not as bright as you'd like, put a small mirror, or mirror tile, underneath it.

This was the stencil, and it was only the lines at the bottom I wanted, so it was an easy thing to emboss by hand.
Another piece of Stardream card, and two different embossing tools used- a wider one for the wide lines and a narrow one for the thinner ones. I also needed to make the piece slightly bigger than the lines on the stencil, to allow for cutting it at an angle, so I just moved the cardstock down, and lengthened them. Tip here, don't go all the way to the end of the stencil lines if you are doing this- you tend to get a harsh line that its hard to emboss out. If you go half or two thirds of the way, you can then carry on easily.

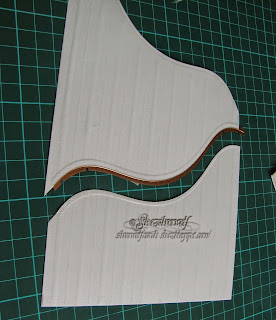
To cut the curve on this one, I used the plain curve in the Borderabilities set. You do need to check your curve against the top one you've already cut, to get a balanced gap between them, and position your edge cutting die accordingly. You will probably also need to extend it a little too, but that's easy to do with the lining up notches.
This was the embossed sheet, which now needed to be cut to fit with the top piece.

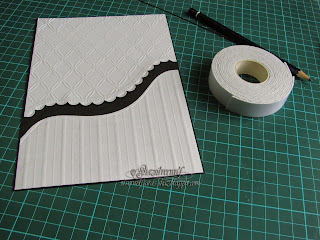
Laid out on the black card to make sure they fit, and match.
Then foam tape added to the back, so they would have dimension against the black card.
And then stuck in place.

Next step was to cut the hearts for the front, and originally I had been going to use the X-Cut set of hearts I have.
Then I realised I didn't like how big the gap was from one size to the next, so instead I used a Nellie Snellen set I have, which has a lot more dies, with a narrower graduation of sizes.
I used the central two dies in the top batch for my topper. The larger one cut from some scrap black, and the smaller from a piece of the Stardream white. The white heart was run through the Cuttlebug in the Swiss Dots embossing folder.
I matted them together, and mounted them on the card with more foam tape.
Once that was in place, I used white and black half pearls to decorate the joins in the Tied Together embossed piece, attaching them with Pinflair Glue Gel.


Last but one touch was wrapping black and white ribbon around the card front, and tying in a bow. Final bit was cutting a small piece of card, using the plain border again, and adding the couples names with some small silver peel off letters. Again, foam dots used to add this to the bottom right of the card.
Final pic: the Happy Couple.
The base is an A4 sheet of White Stardream card, scored and folded in half.
The white sheet was embossed with the Couture Creations folder, Tied Together, then the shaped edge was cut using one of the Spellbinders Borderabilities, Curved Borders 2.
I've enlarged that image here, you can see you get 3 fancy borders, then two which have a sort of 'stitched' line of embossing, one has a dotted line, and one is plain.They also have notches on them, so you can line up to cut a longer piece. I used the scalloped one to cut the top half of the card.
I wanted a different embossing on the bottom half, and had a metal stencil I wanted to use for this. So for this one we are going 'old school'! I could no doubt of looked up online, or figured out myself what plates/shims etc I needed to do it with my BS Pro, but in the time that took, I could have done it by hand. So out came the old lightbox.
Two tips for these, if you still have one. First, DON'T use it directly on top of a craft mat- the heat from the bulb will warp it. Yes, been there, done that, got the ruined mat to prove it.
Second, if the light is not as bright as you'd like, put a small mirror, or mirror tile, underneath it.
This was the stencil, and it was only the lines at the bottom I wanted, so it was an easy thing to emboss by hand.
Another piece of Stardream card, and two different embossing tools used- a wider one for the wide lines and a narrow one for the thinner ones. I also needed to make the piece slightly bigger than the lines on the stencil, to allow for cutting it at an angle, so I just moved the cardstock down, and lengthened them. Tip here, don't go all the way to the end of the stencil lines if you are doing this- you tend to get a harsh line that its hard to emboss out. If you go half or two thirds of the way, you can then carry on easily.
To cut the curve on this one, I used the plain curve in the Borderabilities set. You do need to check your curve against the top one you've already cut, to get a balanced gap between them, and position your edge cutting die accordingly. You will probably also need to extend it a little too, but that's easy to do with the lining up notches.
This was the embossed sheet, which now needed to be cut to fit with the top piece.
Laid out on the black card to make sure they fit, and match.
Then foam tape added to the back, so they would have dimension against the black card.
And then stuck in place.
Next step was to cut the hearts for the front, and originally I had been going to use the X-Cut set of hearts I have.
Then I realised I didn't like how big the gap was from one size to the next, so instead I used a Nellie Snellen set I have, which has a lot more dies, with a narrower graduation of sizes.
I used the central two dies in the top batch for my topper. The larger one cut from some scrap black, and the smaller from a piece of the Stardream white. The white heart was run through the Cuttlebug in the Swiss Dots embossing folder.
I matted them together, and mounted them on the card with more foam tape.
Once that was in place, I used white and black half pearls to decorate the joins in the Tied Together embossed piece, attaching them with Pinflair Glue Gel.

Last but one touch was wrapping black and white ribbon around the card front, and tying in a bow. Final bit was cutting a small piece of card, using the plain border again, and adding the couples names with some small silver peel off letters. Again, foam dots used to add this to the bottom right of the card.
Final pic: the Happy Couple.
Wednesday, 15 October 2014
WOYWW #280
Morning all, and yet another Wednesday is here. Scary how fast this year is vanishing, isn't it? This is my desk shot for the week, joining up with our (freshly holidayed) Julia at The Stamping Ground.
Still plodding along with the Christmas cards, I've trimmed all the stencilled toppers now, trees, Noels and some baubles. Next up will be some stamped ones, using the tree stamp, from Inkylicious, just about visible on the right.
By the way, the stencils I've been using are all Dreamweaver ones.
One thing I have done, is quickly go over the top of them with a stiff stencil brush, or a toothbrush, which removed any loose glitter. So should be less shedding when I make them up. I do sparkle quite nicely though!
And an update on the Gold embossing paste- don't know whether it was the daylight in my room, or my eyesight, but the new pot turned up this week, and it dries out exactly the same, and they both now look like gold! Go figure.
A card I made last week, for my Beloved Hubby, as last Friday was our 5th Wedding Anniversary.
The hearts are a Visible Image stamp, the one stamped and heat embossed in silver also had a little silver glitter added. The words are a stamp from Inkylicious. I added various red shades with a colour duster brush, and by swirling a darker red over the hearts, I achieved a nice shadow effect.
I managed to pick up a chest infection last week- started Wednesday with a bit of a sore throat, that had gone Thursday, and it felt like I was getting a stinking cold, or flu. Unfortunately, that really went downhill on Thursday night, and I ended up having a couple of asthma attacks in the night. Never, ever had one before, and I don't think I've ever known anything so scary. Ended up at the docs on Friday morning, he put me on a nebuliser in the surgery, as I was struggling to breathe, and I have antibiotics, a course of steroids I finished this morning, and an inhaler.So we didn't go anywhere over the weekend, Hubby had intended us to have a day around Stratford, but as I couldn't walk the length of the room without gasping for breath, that didn't happen.Seems to be clearing up now, fortunately, as next Tuesday I'm due to start my Chemo/radiotherapy. At least it happened before that, rather than during.Went for blood tests on Monday, ready for the start, and on Wednesday I have to go see the Occupational Health Nurse at work, prior to starting back, which I intend to do on the 27th, just doing half shifts for a couple of weeks to see how it goes. Just a case of trial and error, really, as I have no idea how I'm going to feel once the chemo/radio starts.I shall make adjustments if necessary- doing less, or even being signed off again, if its too much. We shall see.

Finally, a cause for some celebration.My youngest son, Mikey and his girlfriend, KT announced they are engaged! Apparently, they got engaged on 14th August (our Birthday), but have only just told everyone.
This pic was taken when they were having a day around the Bull Ring Centre in Birmingham, Mikey is the one on the right- wonder who he gets his dress style from? The guy in the pic was some promo thing going on. And yes, that's the closest Mikey ever gets to smiling in a photo, lol.
I would dearly love to go to the Hobbycrafts at the NEC in November, 6th -9th, which is in four weeks, but I shall wait till closer to make a definite decision on that, again depending how I feel. It may be a 'decide on the day' sort of thing.
And one final AAARRRGH! Slipknot and Korn have announced they will be touring in January, they will be in Birmingham at the end of January, (27th) and we can't book tickets! My main surgery should be at the beginning of the new year,so have no idea what the date will be, or how I will be by the end of the month. But short of needing to drag a drip with me, I shall be doing my damnedest to get there, lol.
Tuesday, 7 October 2014
Still at the Christmas Cards.
Still plodding along here, and I'm swapping between two stencils at the moment. I moved over to doing some sparkly trees, using another Dreamweaver stencil, as I wanted to sprinkle them with glitter, and that meant I could use the 'off-gold' paste!
Both are done with the gold paste,and the glitter hides it nicely.

I shall be adding some acrylic flat back gems as 'decorations' eventually.
I'd swapped to doing the trees, as I was having trouble getting the NOEL stencil to come out cleanly. I kept getting paste go under one edge of the 'L'.

Anyway, I went back to it after a while, and tried again. I discovered the trick to this particular stencil is to drag the paste down from the top, rather than spreading across the stencil from left to right/right to left.
Once I figured that out, it went much better. I also decided to leave the glittering of the snowflake till after the paste had dried, and go back to that bit. As you can see, no nasty smudged line anymore.


When the paste was dry, and I left them overnight by the way, I lay the stencil back over the design, and using a small piece of Cut'n'Dry foam, patted a little Flitterglue over the snowflake. Removed the stencil and sprinkled the glitter over it.
This made it much easier to apply, without having to be so careful about it sticking to the edges of the letters either side.
I've also done some white, using the Aileenes Glitter Snow paste, crystal glitter and silver glitter again for the snowflake. These were easy to glitter all in one, as I did the crystal glitter first, then the silver.
Monday, 6 October 2014
I Started the Christmas Cards!
Finally, after a few weeks of 'getting around to it', I finally started them. I ordered some card blanks from PDA Card & Paper, and went for a Landscape folded C5, as most of the stamps/stencils I planned to use fit that shape better. Stuck with C5 size as I have loads of envelopes to use in that size.I've also decided that this years will be a mix of designs- usually for all my smaller cards I use one design, but I end up getting sick of doing 100 or so cards all the same. So I have a few designs this year, probably amount to 20 or so of each, and we'll see how that goes.
For the first batch, I've been using a Dreamweaver NOEL stencil.
I started by doing some in Silver paste, and adding silver glitter to the snowflake. All going well. Then I switched to Gold. It seems that the Gold paste has gone 'off', as when I put it on, the colour did not look right. I've used it before, and it definitely looks Gold. This is almost a pinky/brassy sort of colour, so they are on hold for a day or two, while some fresh paste arrives! I can still go ahead and do my Gold Christmas tree stencil with it though, as I plan to sprinkle glitter over the whole tree, so the colour of the paste won't be seen. With the NOEL stencil, I'm sprinkling silver glitter over the snowflake, leaving the letters silver.

The stencil taped in place using low tack artist masking tape. I cut each strip in half, to make it easier to place the stencil without touching the previously pasted word, and to make the tape go a bit further. You can't really re-use it on the next stencil, as it will have paste on it.
Its best to tape all four sides, as this can get messy, and its far too easy to have paste go over the edge of the stencil.
Its rather like buttering a piece of toast! Keep your spreader (Mine is from a cheap pack of Artist tools from The Works) at a slight angle to the stencil, and try to spread across in one sweep, if possible. Too many sweeps across can tend to push the paste under the edges of the letters. Smooth across, then sweep off any excess and return to the jar.
Next start peeling off the masking tape, leaving one side still attached to act as a hinge. It doesn't matter which, just whichever you find easiest to work with, or, if you are like me, whichever one is left when you remember not to peel them all off!
Now gently lift the stencil, folding it back on the 'hinge'.
Peel away from the card.
And if all went well, leaving you with a stencilled design on your cardstock.
At this stage, the advice is drop the stencil in a bowl of water, so the paste does not set, and then clean it up. I found this not very user-friendly, to be honest.
You get water dripping everywhere when you lift the stencil out, and it is far too easy to accidentally bend the stencil whilst cleaning it.
My choice is to have a baby wipe lay on my desk, drop the stencil on that, and fold the wipe over it. I leave it like that while I do the glittering step, then come back to cleaning it. For that, I use a second baby wipe to wipe all over both sides, while it is still flat on the table. Then I move it onto a piece of kitchen towel and dry it over with either another piece of kitchen roll, or a towel.
This way you are highly unlikely to do any damage to your stencil. Do be aware of the various parts to your stencil though. This one is quite good, with no parts of the design that are only connected at one end. Those parts are very easy to bend by accident, so always just pat those clean and dry, rather than rubbing.

The cat stencil here is a perfect example of this problem- the piece that shapes his back haunch is very easy to bend out of shape, as its only attached at the bottom, which results in paint/paste going underneath it.
I have seen people suggest running it through a 'bug or big shot to flatten it if this happens, and I should imagine that would work well.
Now for the glitter, and I use an old teaspoon to place it fairly accurately, as the snowflake is quite close to the letters.I'm using a silver with rainbow sparkle.
When you come to tip off the excess, try to curve your cardstock slightly, to funnel the glitter straight down. Its not always possible to avoid a little going on to the edge of the letters, but most of the time it works ok.
The finished piece. I will make all my panels before starting to construct the cards. I found I can get 6 panels per A4 sheet of card.
Now to the Gold.
It looks ok with the glitter over it, as the colour does not show through, but the paste is not drying out to the right colour. It should be a nice, shiny Gold, this is dull, and most definitely not Gold.
So thats where I am so far. Today I shall mostly be doing the Gold trees, then some more Silver Noels, as well as some Silver Trees.
For the first batch, I've been using a Dreamweaver NOEL stencil.


The stencil taped in place using low tack artist masking tape. I cut each strip in half, to make it easier to place the stencil without touching the previously pasted word, and to make the tape go a bit further. You can't really re-use it on the next stencil, as it will have paste on it.
Its best to tape all four sides, as this can get messy, and its far too easy to have paste go over the edge of the stencil.
Its rather like buttering a piece of toast! Keep your spreader (Mine is from a cheap pack of Artist tools from The Works) at a slight angle to the stencil, and try to spread across in one sweep, if possible. Too many sweeps across can tend to push the paste under the edges of the letters. Smooth across, then sweep off any excess and return to the jar.
Next start peeling off the masking tape, leaving one side still attached to act as a hinge. It doesn't matter which, just whichever you find easiest to work with, or, if you are like me, whichever one is left when you remember not to peel them all off!
Now gently lift the stencil, folding it back on the 'hinge'.
Peel away from the card.
And if all went well, leaving you with a stencilled design on your cardstock.
At this stage, the advice is drop the stencil in a bowl of water, so the paste does not set, and then clean it up. I found this not very user-friendly, to be honest.
You get water dripping everywhere when you lift the stencil out, and it is far too easy to accidentally bend the stencil whilst cleaning it.
My choice is to have a baby wipe lay on my desk, drop the stencil on that, and fold the wipe over it. I leave it like that while I do the glittering step, then come back to cleaning it. For that, I use a second baby wipe to wipe all over both sides, while it is still flat on the table. Then I move it onto a piece of kitchen towel and dry it over with either another piece of kitchen roll, or a towel.
This way you are highly unlikely to do any damage to your stencil. Do be aware of the various parts to your stencil though. This one is quite good, with no parts of the design that are only connected at one end. Those parts are very easy to bend by accident, so always just pat those clean and dry, rather than rubbing.

The cat stencil here is a perfect example of this problem- the piece that shapes his back haunch is very easy to bend out of shape, as its only attached at the bottom, which results in paint/paste going underneath it.
I have seen people suggest running it through a 'bug or big shot to flatten it if this happens, and I should imagine that would work well.
Now for the glitter, and I use an old teaspoon to place it fairly accurately, as the snowflake is quite close to the letters.I'm using a silver with rainbow sparkle.
When you come to tip off the excess, try to curve your cardstock slightly, to funnel the glitter straight down. Its not always possible to avoid a little going on to the edge of the letters, but most of the time it works ok.
The finished piece. I will make all my panels before starting to construct the cards. I found I can get 6 panels per A4 sheet of card.
Now to the Gold.
It looks ok with the glitter over it, as the colour does not show through, but the paste is not drying out to the right colour. It should be a nice, shiny Gold, this is dull, and most definitely not Gold.
So thats where I am so far. Today I shall mostly be doing the Gold trees, then some more Silver Noels, as well as some Silver Trees.
Wednesday, 20 November 2013
WOYWW #233
Well our Mistress of the Desks has been redecorating- a nice shiny new blog over at The Stamping Ground, although you may need your sunnies this dreary November morning, lol.
Not a huge amount going on on the desk, so you have 2 shots for the price of one visit today. My usual working desk:
Odds & ends abound- a dead babywipe scrunched up, a piece of kitchen roll (can you tell I didn't tidy for the photo?) a couple of acrylic blocks. Some stamps and a Versafine pad. A try-out for some scene building on scrap paper, seeing if I could mix Stampscapes & a Lavinia stamps cat. I've got a bit of a cats theme on the go this week.( Post below for glittered cats)- no not poor Ambrose, he escaped the glitter storm this time. The two black photo albums at the back hold brass stencils, 5x7, they hold larger ones easily, and I just stapled down the middle of pages to hold thinner/tall ones.

Cheap storage solution, and stops them getting bent.
The 'desk behind the desk'- the long table thats behind me, something I wanted when I put my room together, somewhere to put stamp folders when I got them out, put stuff to dry etc.
Of course, its got all sorts of other stuff on there too- glittered cats, bottom right, easel, Indigo Blu Christmas cards from earlier post, Distress Markers, a tub of cotton wool balls, and those little sets of plastic drawers, full of 'stuff' thats too small to store anywhere else, without losing it forever. Underneath are some 4 drawer storage ( from B&Q/Instore), they come with wheels, but I didn't put them on, that have all sorts of stuff (do you notice I have a lot of 'stuff'') I wanted close to where I work in the hope that would mean a) less searching for it and
b) it might actually get used!
So thats all for this week folks, I'm back on my much loved night shift, so I'll be seeing you all later in the day.
Not a huge amount going on on the desk, so you have 2 shots for the price of one visit today. My usual working desk:


Cheap storage solution, and stops them getting bent.
The 'desk behind the desk'- the long table thats behind me, something I wanted when I put my room together, somewhere to put stamp folders when I got them out, put stuff to dry etc.
Of course, its got all sorts of other stuff on there too- glittered cats, bottom right, easel, Indigo Blu Christmas cards from earlier post, Distress Markers, a tub of cotton wool balls, and those little sets of plastic drawers, full of 'stuff' thats too small to store anywhere else, without losing it forever. Underneath are some 4 drawer storage ( from B&Q/Instore), they come with wheels, but I didn't put them on, that have all sorts of stuff (do you notice I have a lot of 'stuff'') I wanted close to where I work in the hope that would mean a) less searching for it and
b) it might actually get used!
So thats all for this week folks, I'm back on my much loved night shift, so I'll be seeing you all later in the day.
Subscribe to:
Posts (Atom)
An End of an era
An end of an era
I write this with a broken heart, that only time can heal My beautiful, wonderful wifelet Shaz (Silverwolf) passed away peacefully in the ea...
-
A couple of weeks ago I mentioned that I had bought these, the new Tim Holtz Embossing Diffusers. You have probably seen, like me, the...
-
I take no credit for this discovery, a lady posted this on Pinterest HERE .Like any of us, I hate having to spend money on 'consumables...
-
This is the first of the batch of seven cards I made, thanks to some Pinterest inspiration. Here is the card that caught my eye,...