A warm welcome to all my visitors,

Thank you for taking the time to come and look at my blog, I really do appreciate it. I would love you to leave me a comment, even if it’s just to say Hi. It means I can come visit you!

All my designs are original, so copyrighted to me. If I have been inspired by someone elses work, I have named them in the post, and where able, I have provided a link.

Please feel free to use my designs for inspiration, I just ask you to credit me, and provide a link back to my blog.

Thanks, Shaz XX

Wednesday 26 February 2020

WOYWW #560- The Inking & Stamping Edition

 A desk with crafting happening too, for this weeks WOYWW over at The Stamping Ground, as always overseen by our much loved Hostess, Julia.
 I used one of those stencils from last week to make a batch of backgrounds, to CASE some cards.
These were all done with Distress Inks, and the 'make up style' brushes.
 They really are rather good for softer blending, although you can make them darker by adding more ink of course.


I have a couple of sets, bought from Amazon, around £10 a set, compared to £50ish for the branded 'craft' version. This is a set of assorted sizes, you can also get sets of 5 of just the larger ones for about £8.
 Just search for Toothbrush Style Make up Brushes. And the beauty is, you don't need a huge number of them, as you can just scrub the brush onto a Micro Fibre cloth and it will remove all the ink, without needing to wash or change to a different brush between colours.
 

The yellow one was done after the purple ones, as you can see no ink contamination.

The mixed size sets are really good, as you can use the smaller ones to add colour to smaller areas, which I did with the darker colour at the edges.


I've started stamping on some using lights & baubles from Cardio,and the Memento Dew Drop pads. Just have to draw in the strings, then I'm going to add some Glossy Accents over them.


These are the Cardio sets I'll be mainly using stamps from.


I also forget to mention last week that you don't necessarily need a digital cutter to make your own mylar stencils, you can die cut from them too, so you can create any shape stencil you like from your dies.

And thats my desk for this week. Which just leaves.....And Finally......

Wednesday 19 February 2020

WOYWW #559- The Return to Normal Service Edition.

And of course, by that I mean a bit of enabling to share on this weeks desk sharing link up, hosted as always by our beloved Julia, over at The Stamping Ground.
 But the first thing on my desk this week is some home cut stencils/masks.


Cut on my Silhouette, using Mylar stencil sheets.I buy them off E-Bay, and they are a great price. I buy the 125 micron as that seems fine for my uses, which are mainly to ink through. I'd possibly say you may want the thicker 190 micron (also available on E-Bay) if you wanted them to put paint or stencil paste through.


I used  deckle edged cutting files for these, just for a bit of a change. I'm intending to do some more Christmas cards (and probably others) with these, based on a design I saw posted on FB, and the maker very kindly said it was fine to CASE them.


Last week being Valentines day, and here is Hubbys card. Also inspired by something similar I saw on Fb. That one used punched hearts, in 3 rows. I made some hearts using cardstock & UTEE. some of which had glitter sprinkled in, a couple have stamping on the cardstock, and one had the impression from a crackle stamp in silver impressed in it.

And now, the moment you've all been waiting for.....drum roll....the Enabling!


 A couple of new stamp sets from VI, there are more but these two were the ones that grabbed me.


And a 3-D embossing folder from Tim Holtz,called Mechanics. Gives a great impression of riveted metal pieces. Be cool for masculine type cards.


A bunch of Christmas cards made, based around the star one from a couple of weeks ago. I found a pad of vellum in with my Christmas stuff , have no idea how many years ago I bought it,but I'm trying to get stuff thats been here years used up! I just used bauble die cuts instead of stars. Post is below this one.


So thats me done, just leaves room for.....And Finally......


Tuesday 18 February 2020

Christmas Card Club #4- Christmas Carol/Anything Goes.

Righty ho, I'm finally here with my Christmas cards for this fortnights challenge.  Christine gave us Christmas Carol as our theme for this one, but I have to say I really have nothing that will fit that, so instead I've used our fall-back of Anything Goes.
I went back to one of the designs I did for the 'Stars' challenge, and made a slight change, this time using baubles instead of stars.
 In my box of Christmas papers, I came across a pad of vellum papers, most probably bought at a craft show some years ago. It has alternate vellum sheet and matching sheet of plain cardstock. I made the vellum panels exactly the same as I did before, using Double sided adhesive sheets, then edging with a sparkly peel off.
 I got three strips out of a half of the vellum sheets, and chose 3 card blanks for each to match.

By the way, the top right vellum with the small baubles I *think* came from a copy of Making Cards, probably a lot of years ago!
 
From the second half of the vellum, I die cut some Baubles. I used two different shapes,one is Spellbinders Heirloom Ornaments 2010-the other from a Memory Box die called Globe ornament.


 The Swirl overlay on them is a Memory Box die designed to go with it, called Chambray Ornament.


 I used two of the Heirloom Ornaments- the one on the right- taped together to make a frame for them.


 They were added to the front using a circle of Fun Foam to give a little dimension.


I used glue in a fine tipped nozzle bottle to add glue to the back of the swirl die cut, and added the little 'hanger' that is also part of the die set.


Two done in gold, and one in silver.

Finally I die cut some banners from matching cardstock, and set a peel off Christmas greeting on them.


That gave me another 15 cards for my Christmas box, and is also helping to use stuff that I've had for more years than I care to remember!

Wednesday 12 February 2020

WOYWW #558- The Organising Edition.

 Anyone see where January went? Crazy that we are almost half way through Feb already. Which means almost Valentines day, so that card will be my next project. Yes, I know I need to get a move on, but I have a plan. Not that that always helps! It's also youngest sons birthday that day, so that card goes in the post tomorrow. He moans like mad about his birthday being that day, but I just point out that that's his own fault, had he arrived on time, and not 13 weeks early, it would have been different. I also occasionally point out it could have been much, much worse. His one Gran kept saying we should name him Valentine! Over my dead body, lol. Anyway, Wednesday it is, so desks are being bared around the world as always, you can visit them over at Julias place, The Stamping Ground. Do pop in, we'd love to meet you.
 Organising, then.

 Been making use of Beloved Hubbys labelling gadget, as I'd bought another of the Tim Holtz Alcohol Ink storage tins. They hold all sorts of reinkers too- Archival for instance, but not the DI ones, as they have a dropper top.
 They also hold Stickles, and Liquid pearls, and as I picked up a few of those at the NEC last year, I needed another tin.

The one on it's side holds the newer AI Pearls, as they're supposed to be stored on their side, as they have a little mixing ball in them.


Also sorted and labelled my WOW embossing powders- please don't laugh!

  Bottom shelf next to them is the Distress Oxide sprays, also on their side.


And so, I'm all done. No enabling this week!


Which brings us round to ......And Finally.......


Wednesday 5 February 2020

WOYWW #557- The 'There's stuff on the desk' Edition

There is indeed, for this weeks link up of desks far and wide, courtesy of Julia at The Stamping Ground.
 Exhibit A, m'lud.
 The Lavinia stamps mentioned last week, a few Distress Oxide Sprays. Once again, enabled by Jennifer McGuire, doing some fab Christmas cards on dark cardstock using these. So, I will be CASE-ing what she did in the near future.
And a stamp set that I will lay at Dougs door. Not that he saw them until they arrived, but he started the whole 'Just Because' thing back last year. I have a small Just Because sentiment stamp, and a small die cut too, but this Altenew set, called Just Because Builder, seemed to be a must have. It's those two words in a variety of fonts, so you can mix and match as you like. It all came about when he mentioned that when he buys me flowers, which he does now and then, he usually gets comments like 'who's in trouble then?' to which he replies, 'No, they're Just Because', and he said cards with that on would be useful. So thats the reason for them. Bought from Bumbleberry Papercrafts, who stock quite a lot of US  brands.
This week its a ' two for one' scenario, this being the desk where I do my die cutting, and I have a number of dies to put away, from the making of last weekends Christmas cards, which are in the post below.


Last weeks desk showed the dies I planned on using, and some image printed vellum.
 Now I know that vellum can be a nightmare to attach with tape or glue, as it tends to be visible. However, here's a tip that works on white or light cardstock, but not on darker ones. Use Double Sided adhesive sheet over the whole back of the vellum rather than narrow tape or glue. Because the whole of the vellum is covered, there is no difference in it to show afterwards.


 So thats it for now, bringing us round to......And Finally.......


There is so much truth in that!

Sunday 2 February 2020

Christmas Card Club 2020- #3 Stars

My these weeks just seem to fly past! Back with another Challenge from the Christmas Card Club, this time the theme has been chosen by Sylvie, and she wants to see stars- in the nicest possible way, of course! I've made a total of 11 cards for this, 2 sets of four, and one of three that I'm not entirely sure about.

The first set of four use a die set by John Next Door, called Sams Starz. The card base is 7" square, the background die does not cut the outer edges, so you can cut to any dimension you need.


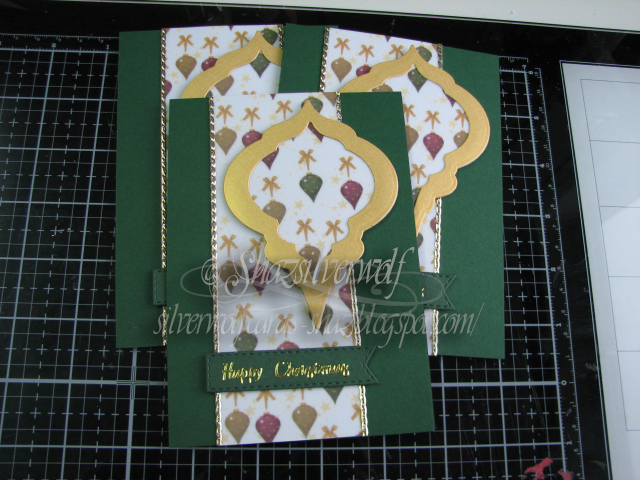
The second set features a printed vellum panel and a die cut star.


The third set, which I'm not sure about. I think maybe the foil card holly is a bit too much. I may try removing it, and see if it looks better with just plain green cardstock.


This shot was my starting point- some image printed vellum I've had for more years than I can recall, a Stitched Stars die set- possibly from The Works- a plain star set from X-Cut,The John Next Door set, which has 4 dies in it, and two star wreath dies. I also used some peel off borders, and sentiments. Still tackling that peel off mountain!


 I started by adding DST adhesive sheet to the back of the vellum. This is a great way- at least against light/white cardstock- to adhere vellum without any adhesive showing. Bought this roll at the NEC.


After that, I added it to a sheet of white card. I cut this, which was roughly A4 sized, into about half,  then cut that half into 4 panels.

The panel was added to the card front, a top fold card, with DST.
I ran some glittery peel offs down each edge.


 At first I planned on using some of the 'scrap strip' sheets I made for the star, but when I tried it over the panel, it looked too busy, so swapped to stars cut from the vellum.


I cut a star 'frame' by taping together the size die I cut the stars with, and the next size down.


Bonus, I have some gold stars for another project!


Added the frame with Matte Medium.


Next I added some smaller fun foam stars to the back, for a little extra dimension. Then added the stars to the card front with some more Matte Medium.


Next up is the Star background die, and as I said, it has 4 dies in it. The background, the star with the trees, a large Star shape, and a smaller die with the images of Deer on.
 These three were all cut from White pearl card, the Star shape from Glitter cardstock.


I'd already made the red one, so decided to switch up the colours for the other 3, gold, silver and Royal Blue.


Layered the background onto a sheet of glitter card. Then layered the 'tree star' onto a glitter star too. This one I added over the centre star with some foam squares. I added the  Deer scene on top, after cutting it out with the Star shape.
Final touch was a peel off greeting, onto a small die cut strip.


Sams Starz.


 The strip die cut is one of a big set of dies intended for use making slider cards. I don't make those, but saw Jennifer McGuire recommend these to use as sentiment strips.


This is the set, Honey Bee Straight Interactive Sliders. I got mine from Bumbleberry Papercrafts.


For the last three, I completely forgot to take photos! But I die cut the circular wreath from some dull gold card, and die cut an assorted bunch of stars, mainly using dies from the Tim Holtz Thinlits set called Swirling Stars.


I added some stars to the wreath, then decided to add some holly. It was die cut from green foil using a holly branch from another Tim Holtz die set, called  Winter Greens.


 I added a vellum panel, this time to the centre of the card, then placed the wreath on top.


An End of an era

An end of an era

I write this with a broken heart, that only time can heal My beautiful, wonderful wifelet Shaz (Silverwolf) passed away peacefully in the ea...