A warm welcome to all my visitors,

Thank you for taking the time to come and look at my blog, I really do appreciate it. I would love you to leave me a comment, even if it’s just to say Hi. It means I can come visit you!

All my designs are original, so copyrighted to me. If I have been inspired by someone elses work, I have named them in the post, and where able, I have provided a link.

Please feel free to use my designs for inspiration, I just ask you to credit me, and provide a link back to my blog.

Thanks, Shaz XX

Showing posts with label Distress Markers. Show all posts

Saturday, 27 October 2018

Fairy Easel Birthday Card

The project I was working on earlier in the week. A birthday card for my Daughter in Law, Becky.
 I turned it into an easel card, as I'd made quite a large scene.


Starting to write this post, I've realised I didn't actually take any in process photos!

The image itself is done on an A5 sheet of cardstock, added to an A4 folded card base.

The fairy house is from Crafters Companion, called Fairy Wishes.
The house, drying wings, fairy path and small fairy were stamped in Versafine Clair Nocturne.
Apart from the house, most of  the other stamps used are by Lavinia Stamps. The little dragonfly is from a Crafty Individuals stamp sheet. There is also a random grass stamp used at the bottom, from an Inkylicious set.
 Colour was added to the house, path and wings using Prismacolour pencils.
 The sky and grass area is Distress inks, brushed on with a Clarity brush. They are really good for getting a light coating of ink on a background. I have one set only, as I don't use them that often, and just wash them when I'm done. The blues used in order, were Tumbled Glass, Faded Jeans and Chipped Sapphire, the greens were Mowed Lawn, Shabby Shutters and Lucky Clover.


I used a couple of older Versafine Greens to stamp the top foliage,  Olympia Green and Spanish Moss, which is all second/3rd generation stamping.
These are Leafy Trail, Whimsical Wisps,and just the Ivy part of Creeping Vine.

 Foliage at the bottom is Fairy Buttercups, Meadow Grass, Willow, and an Inkylicious grass. Same inkpads.
 The Tiny Mushrooms were stamped using a couple of Distress Markers- a brown for the stem, and Festive Berries for the tops.
Versafine Clair Paradise was used to stamp the dragonflies. Their wings, and the wings on the washing line all got a coat of Wink of Stella in Clear Glitter.
 Liquid Pearls in White Opal was used for the spots on the tiny Mushrooms, and for the mushrooms on the fairy house. Tiny spots of Stickles in Crystal added for the fairy dust being scattered by the small fairy.


The base and the piece to hold the greeting were covered with some TH backing paper, I thought the colour worked well with the image, all the better for being plain. The greeting is a Tonic die, cut from a sheet of foil laminated cardstock. I also cut 3 from dark green cardstock and layered them all together to make the greeting pop up. Matted it onto black, then attached with some foam tape, using 1 layer at the front, and 3 at the back.

Saturday, 25 February 2017

Card for a New Home.

Right,I made this card a few weeks ago, and with waiting for it to arrive, then going into hospital, I've just realised that I hadn't blogged it.

The main stamp is by Hobby Art, from a set called 'Hares'. We spotted this at The Happy Stampers Festival last year, and as Doug pointed out, it would be perfect for anything for LLJ, as she is known for her love of Hares. So when Jan announced they were moving to Wales, and that they had a date for moving in, I remembered this stamp set.
This is the journal I was trying out some scenes using Card-io stamps in a while back, and I can't figure why I've never done this before, instead of winging it and hoping for the best. I've always got a stack of scrap paper under my work, and have occasionally done a test imprint on that, but never tried figuring out placement and colour.
 Anyhow, first off I stamped him in black, then built up the grasses around him using an assortment of green dye inkpads, and some stamps from an Inkylicious set called 'Essential Grasses'. Which it is, I think. A great selection of types of grass.


I didn't think I liked the black version, so instead tried it in Archival Rich Cocoa, which is what I went with for the card.
 When I stamped him onto the card base, I also stamped another onto Post-its, so I could mask him when I wanted to add the sky.
 The hare was coloured with Distress Markers in Antique Linen, and Walnut stain, using a waterbrush to drag the colour.
Bit of a jump here to the finished scene, when I realised I'd forgotten to take any 'in the process' pictures!
 I stamped the hare in Archival Rich Cocoa, then the grasses surrounding him in Adirondack Meadow and Lettuce.
 Tearing some scrap paper into hill shapes, I used a soft brush to create the hills with the Adirondack greens again.
Using Adirondack Sunshine Yellow and Sunset Orange, along with a dry baby wipe, I created a sunrise behind the hills, then put the mask over the hare.
Again using a soft brush I applied Adirondack Stonewashed all over the sky area, then added Sailboat Blue onto the upper portion of the sky, to get a sort of mottled look.
 A portion of fencing from another Hobby Art set was stamped in Archival Black onto one hilltop, then an Inkylicious Flock of Birds, and a butterfly added.


 The corners were rounded off- this little rounder from X-Cut is actually really good, better than other cheap ones I've had. I do have the Corner Chompers, but this one was handy.

 I matted the image onto dark blue cardstock, then rounded those corners too.
 Next it needed a sentiment, and one of the Phill Martin sets I've bought recently, Mini Baroque Occasions Set, has a New Home one in it.
 That was stamped in Archival Cobalt in the upper left of the scene.
I mounted the image onto a 7" square card base, then tied a blue and white spotted chiffon ribbon along the bottom.
 And then it was done.

Stamps Used:
 Hobby Art, March Hares
Hobby Art, Woodland Glade( Hillside fence)
Inkylicious, Essential Grasses
Inkylicious Take Flight( lots of bird flocks)
Inkylicious Playful Cats ( Butterfly)
 Phill Martin Mini Baroque Occasions Sentiment Set.


Friday, 30 December 2016

Favourite Christmas Cards of 2016

Now, normally this subject would not even arise, as up until this year, my Christmas Card making has involved panic-struck frantic card making of maybe 2 designs, usually starting mid-November.Then it gets packed away as fast as possible. For some unaccountable reason, last year I wasn't sick of the sight of Christmas stuff, and carried on making cards after Christmas. I also decided I'd do 4-6 of each design, no more. And that was mainly what allowed me to work on them all year- I wasn't done in by the mass production of 1 or 2 designs.
So again in no particular order, here are my favourites of the year.
This one used a sheet of copy paper torn as a mask to sponge ink through. When the ink was good & dry,I replaced the mask, and stamped the Christmas Word Background (Visible Image) through it, which I then heat embossed with Crystal EP. A Tim Holtz die cut tree, and a die cut white sentiment finished them off. I also did a pair in red & green.
The same Words Background stamp used here,then trimmed down to give me two squares. The image is also a VI stamp, and had double sided film added, then Glamourdust for a nice sparkle. The sentiment is also VI. A couple of die cut snowflakes finished them off


This was a sort of cheat, to be honest. I came across some sheets of these bears I must have stamped years ago, and forgotten about. I added some  Tumbled Glass & Faded Jeans ink with a soft brush for the sky, then used the same in markers to draw a line inside the images which I softened with a waterbrush.  Drew a line around the outside of the piece with a Versamark pen, and added Crystal EP and heat set. A few acrylic gems were added to the stars.As I used a different cardstock for the sentiment piece, the colours came out a little different. The sentiment is by Stamps Away.


  I've included these cards as one choice, as the creation of one gave me the pieces for the second. I'd die cut some baubles from a sheet of card, when I realised that if I embossed the cardstock first with an Embossing Folder, then arranged the die cuts carefully onto the cardstock, I could use the 'negative' version for one set of cards.


The 'positive' baubles made a second set. Which also helped make a small dent in my backing paper stash. A few scattered small acrylic gems added a bit of bling to the embossed ornaments.
 The dies are both by Spellbinders, Heirloom Ornaments 2010 for the long bauble, and 2011 for the flatter round one.


These cards came about from a card seen on Pinterest.
 Tim Holtz Mixed Media Dies,#1,and some patterned paper behind the cut out.


Added a die cut Poinsettia, and gold heat embossed sentiment, these were a lot quicker & easier than they look.


Final choice, and these were made using an Imagination Crafts stencil, Poinsettia Multi, and an assortment of Glitter Embossing Pastes.
 The sentiment is from Honey Doo, and was heat embossed with matching EP. Acrylic gems added to the centres of the flowers.
.

There were plenty more made, and an image of them all can be seen on the Christmas Card Gallery Page, and there is a link to the relevant blog post for each design, if anyone wants product info.

Wednesday, 24 February 2016

Lavinia Toadstools and SU Woodgrain.

So, this is the completed card that was knocking about on Wednesdays desk.
 To be honest, this wasn't exactly what I'd planned when I started. It sort of grew as I went along. I was going to say it mushroomed, but that would have been a terrible pun.


  It started out with the Stampin Up Woodgrain stamp, onto a sheet of white pearl card, using DI Gathered Twigs, and adding some extra markings along the plank lines & around the knots using the Ground Espresso marker.


 Next up some grasses along the bottom, and I used some stamps from an Inkylicious set called Essential Grasses, and a few shades of green from Adirondack.


Then I made a light mark across the top of the planks, about a half inch down, and cut the triangle peaked boards.


 I used a Vintage Photo Distress marker to colour all the edges, including the peaks. Tip here, if you are doing this sort of edging with a marker pen, work with the marker at the back. That way, if the marker slips- and I can pretty much guarantee it always does for me- the resulting line will be on the back of your piece, not the front.


Next I added some Lavinia Stamps Toadstools at the bottom, and also stamped out some Lavinia Spotty Toadstools to colour,both in Versafine Onyx Black. This is where it went off plan, as I hadn't intended to add cut out toadstools until now, but I'd sort of got the 'Fairies at the bottom of the garden' idea in my head.


First off I used a couple of H2O's, a purple and a blue, intending to do the toadstools in two colours and blend them in the middle.
Not too bad, but the blend didn't go as well as I'd hoped. I think it was the wrong type of card for the idea, to be fair. It sort of started to pill a bit. So I swapped to Distress Markers, and did a couple of different blends- a pink/red, and I've also tried a yellow/orange  which worked quite well.
The Spotty Toadstools is a pair of stamps, one large, one small. As much as possible I tried to leave the spots blank, but I think next time- and I've just realised this while typing- it would be easier to dot the spots with masking fluid first. My plan anyway was to cover the spots with Liquid Pearls in White Opal.


It does give a nice sheen to the spots, and afterwards I decided to add a little Diamond Stickles on top for a bit of shimmer.


With the toadstools stuck in place, I stamped the two small fairies, again Lavinia Stamps. You can't see it in the picture, but I also added some tiny dots of Diamond Stickles as fairy dust falling from their hands.
The whole panel was matted onto black, then red card, then mounted onto a  Black card blank.
Final touch was to stamp the Lavinia Stamps word stamp, 'Those who don't believe in magic will never find it', onto a scrap of white pearl card, then matt the same as for the main image.

WOYWW #351

A bit of a mess, to be honest with you. I had a few projects on the go at the same time, is my excuse.Partly the fault of getting stuff out of my UFO box. Plus I been trying to finish the Christmas Cards in the post below.I came across the Indigo Blu Blazing Poppies that I stamped out, possibly around this time last year.One set was coloured blue, which you can see on the right hand side. The other set only had a couple of flowers coloured, in shades of red. As you can see from the blue ones, I've also added some shading with Distress Inks.I'll do the same with the red ones, probably using brown shades.
 There are also some Toadstools, (Lavinia stamps), coloured with H2O's (blue & purple), and Distress Markers (red & yellow). A partly finished card at the back, the woodgrain  ( Stampin Up) with the toadstools.An assortment of inkpads, some Tombow Multi glue,acrylic blocks, (used for weighting down the toadstools), the blue parts of the card drying, after having Black Diamond Stickles added to the centres. The masks for the Poppies- I usually stamp on the top sheet, then peel off half a dozen sheets before cutting out, that way I always have spares. So that's mine, now lets all see yours. I'm off to join up with everyone at Julias, The Stamping Ground.


Monday, 15 February 2016

Bird Crazy Birthday

Another take on the Bird Crazy birthday card I made a while back.

 I used the same method of die cutting the birthday sentiment from a sheet of card, then for the colour behind it, I used one of the backgrounds I uncovered the other day.
I also cut some additional letters to form 'Happy' from white card


The balloons are stamped on an offcut of the coloured card, cut out and coated with Glossy Accents.
I trim down a strip for going behind the sentiment, and add it with dst. Then the whole thing was matted onto  purple card.
 Next, I stamped out one of the Crazy Birds,cut him out using the matching dies, and coloured him with daubers and DI's.


His beak and eyes are coated first with masking fluid- available from any art shop- so his eyes will remain white, and I can colour his beak orange.


As I had to wait for the Glossy Accents to dry, I put the bird aside as well, and finished the card the next day.


I rubbed off the dried masking fluid with my fingers, leaving him nice clear, white eyes. His beak was coloured with  Mustard Seed and Wild Honey Distress markers.
 I matted the card panel onto a card blank, as a top fold card.
The HAPPY was added above the BIRTHDAY cut out using a Blutack Glue Stick. Hubby bought me these an age ago, and I've not actually tried them. I liked them- they go on blue, but dry clear. They are a good 'mid point' between tape and wet glue. When dry they hold really well, but whilst wet give you plenty of manoeuvre time. I used the same glue to add the bird,then some Pinflair glue gel to raise the balloons alittle. A fine black pen added the balloon strings.
 For absolute certainty, I put the card aside with a couple of acrylic blocks on top of the letters and the bird, to make sure they stayed flat.

Wednesday, 9 December 2015

WOYWW # 340

Again it's Wednesday, and time to meet up at our Julia's, over at The Stamping Ground. Another week closer to Christmas, and it's officially ok now to panic.Don't know about anyone else, but despite all the stress and problems of the last year, it seems to have absolutely flown by.
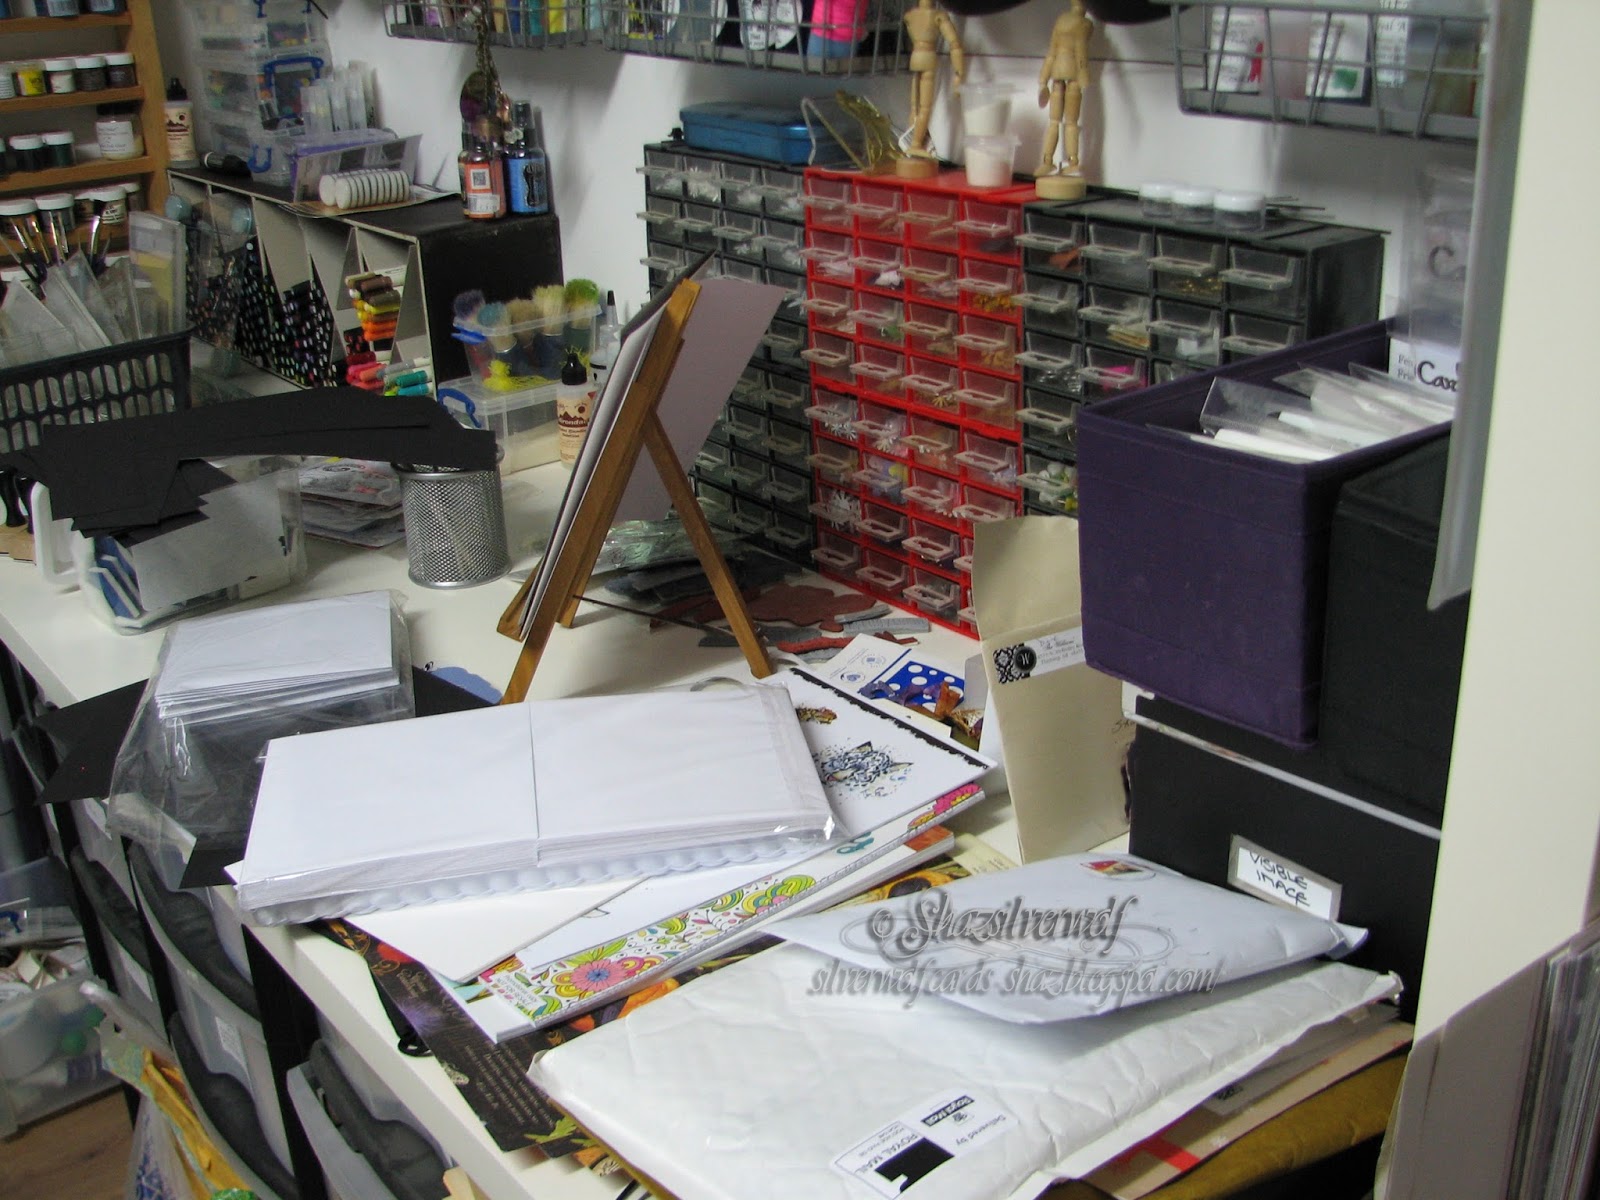
So, to the desk. Main desk is still in the process of the same Christmas card I showed you last week, so I thought I'd show the desk behind the desk, as it were. The plan was that it would keep some stuff close to hand, and that it would be useful for laying open folders of stamps on, stuff to dry, and so on.
Not exactly a pretty sight, is it? Dumping ground for all sorts of stuff. Envelopes in the front are waiting to be opened, some are stamps bought in the Black Friday sale that Visible Image and Indigo Blu had, the other holds last months Tim Holtz colour.Some colouring books,and a pack of cards and envelopes. The easel is the one I usually photograph my cards on, in front of that and a pack of envelopes to go with the cards I'm making. Offcuts of black card on top of a tub of foams for the blending tools.There is a basket with acrylic blocks for stamps in, and the wooden rack at the end holds embossing powders. Along the back, the DIY holder for my markers, which is now also home to my DI markers, as now they won't fit in the original tubs. A tub of mens shaving brushes, which double as duster brushes. A few stacks of mini drawers which hold all sorts of little odds and ends. The purple box holds my Card-io stamps, there is a black box next to it with my Gorjuss girl stamps in, and the black box underneath holds my Visible Image ones. Just visible at the top of the picture, some hanging trays from IKEA, which hold various sprays. And if you think that's bad, be grateful I'm not showing you the table I use for my cutting station! At the moment, it's buried under all the Christmas pressies bought online, and a few other odds and ends.All this will get put away, but probably after Christmas, as the one problem I have at the moment is needing to be in two places at once. I need to be in my craft room, getting stuff done, on the other hand, I also need to be downstairs to answer the door when said stuff ordered online arrives. Due to my surgery, I'm still walking with a stick, and it takes me a while to get downstairs if the doorbell goes, and usually by the time I've got down, they've given up and gone. So I've taken to staying downstairs until after Doug gets up, which isn't a problem, I'm just doing what I can manage in the time I've got. Nothing in my room is urgent, anyway, the Christmas cards are almost finished, the rest will get done when it gets done.
Thats me for today, just going to finish with a bit of enabling, lol. Country View Crafts are running an Advent Sale, every day from the beginning of December till Christmas, with different things on offer every day, so don't miss out.

Tuesday, 2 June 2015

Welcome Home card

My card was inspired by a Pinterest find the other day. About time I actually used some of that 'inspiration', lol.This is the card that I CASE'D, and the ladys blog is HERE.


 Made a slight alteration, this is a one layer card, but I did my panel on a separate piece of card.


I started by sponging on two shades of D I, Squeezed Lemonade and Mustard Seed.


 Then I added some of the new Fossilized Amber and Dried Marigold.
 I found out a mask, TCW (The Crafters Workshop) Mini Bricks.
 Through this I sponged Wild Honey and Spiced Marmalade D I.

Moved the stencil down and finished off the strip. Gave it a blast with the heat gun to dry it, so I could stamp.
The stamp I chose is called Agapanthus Cluster, by Stampendous, stamped in Versafine Onyx Black.


I stamped the first one about halfway up, and extended the stems with a stem from another stamp set. Re stamped it again lower down,then added a partial stamp over the left hand edge. The butterfly stamps are from an Inkylicious set.

I changed my card up a bit more, by adding some double sided adhesive sheet to the front, then sprinkling with Glamour Dust.
Once the adhesive sheet was in place, I brayered over it with a hard rubber roller, to make sure it was completely flat.
I also put the backing sheet back over the top and brayered it again, over the Glamour Dust to make sure it was stuck firmly.


Next step was to mark the width of the panel on the inside of the card, then score lines to border the panel.


It looked like it still needed something, so two butterflies were punched out of sparkly vellum, and coloured on the reverse with DI markers in matching colours.Folded up the wings, then stuck down with Pinflair glue.
 At this point I discovered that in all my stamps, I do not have a single 'Welcome' or 'Welcome Home' stamp! Neither do I have anything in my ageing peel off collection, so no other option but to hand write it. I added a small orange flat back gem to the exclamation mark. Some orange ribbon wrapped around the spine to finish.


I'm linking this to 'A Focused Journey' blogspot,
 for the 'Stop pinning and make something' party, which is Diane's idea to encourage us all to actually use some of those ideas we Pin for inspiration!


An End of an era

An end of an era

I write this with a broken heart, that only time can heal My beautiful, wonderful wifelet Shaz (Silverwolf) passed away peacefully in the ea...