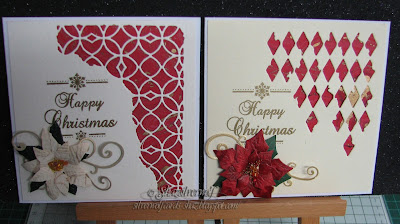
 This is the first of the batch of seven cards I made, thanks to some Pinterest inspiration.
Here is the card that caught my eye, and the creators blog, Mrs.B's Crafting Addiction, is here.

The Mixed Media dies I used are from this set, which I think is Number 1. I used the distressed harlequin die, and the sort of baroque looking one, far left. I'm assuming this is set No. 1, as it's the only one which doesn't seem to have a number, or the dies to have names!
What really grabbed me was Avrils use of the backing paper to the die. I know from her blog she sprayed the red paper to create hers, but it reminded me of some handmade paper I have in a file, bought ages ago at the NEC. They were in A1 sheets, so I'd cut them down to a more manageable A4.
 There is also a sheet or Orange/gold, but I didn't think that would work for this project.
I cut some cardstock with the Mixed Media Thinlits, using a mix of white and cream cardstock.
I next cut some of the handmade paper to back them with.
I had a total of 7 card bases now. I had a couple that had been left marked slightly by the masking tape I used to hold the dies straight, but I already had a plan to hide that.
So here are the bases with their respective backing papers.
I attached the backing paper with DST, and I found adding a couple of bits close to the edge of the cutout helped it to lay flat.
All mounted, and now for the sentiment. I admit at this point I realised I should really have done this step before attaching the backing paper, especially as I'd used DST, which can easily separate when heat is applied, and I intended to heat emboss the sentiment.

The sentiment comes from one of the Phill Martin sets, Snowflake Sentiments. I stamped it in Encore Metallic Gold Pigment ink, and covered with Gold Detail EP. They did warp a little, so I stacked them up, and put underneath an acrylic block with some weight on overnight.
Next day they are nice and flat, and attached on to 6"x6" card blanks.
Now for the Poinsettias.
I have two Poinsettia dies, one from Spellbinders,which has 4 sizes of flower die, and a slightly smaller flowered one from Le Creatif, which has 3 flower sizes, and also has a couple of small flourishes as part of the set.
I cut a number of each size of flower from both sets, using some red leather effect paper I have, which gives a great texture to the flowers, as well as some from the cream/gold paper.
I also cut some of the largest flower die in both sets from green card/paper, for leaves, as I prefer using that to the leaf die provided.
Each flower has its petals rolled over my pokey tool, then the centre embossed on a mat using a large ball embossing tool, to give the flowers shape.

They are then layered up, making sure to offset each layer a little to build up the flowers.
You can build the flower as large or as small as you like, depending how many layers you add.
Here are red and white/cream poinsettias, along with their leaves, stacked up using silicone glue.
Next the flowers need centres, and the die sets do provide an option, but I don't like it.
I poured some orange/yellow/gold seed beads into a small tub, along with some similarly coloured nail art caviar beads, and gave it a mix.
Each flower centre got a blob of Glossy Accents, and then a spoonful of beads.
All lay out on a spare Big Shot Pro plate to dry overnight.
While they were drying out I die cut some assorted small flourishes, and also the Tim Holtz strip die,Winter Foliage, but I ended up not using that this time around.
Next morning they are all set, time to add to the cards.
The flourish I wanted to use was not quite curved enough for where I wanted it to sit, so I cut it in half, as the join would be hidden under the flower.
First of the batch done, and put aside to dry.
Blue background, with red Poinsettias on white bases.
One using cream/gold paper, with a Red Poinsettia, on a white card base.
You can see a die cut snowflake on 3 of the cards- that was hiding the slightly damaged card from the die cutting!
Two with green/gold paper, and different Mixed Media dies.
Final pair, using red/gold backing paper.
This would be simple enough to recreate either by spraying or stamping a plain paper with gold/silver , and also using some of it to die cut your flowers from.
Huge thanks to Avril, for such an inspiring card, that's added another 7 cards to my Christmas stash.


