A warm welcome to all my visitors,

Thank you for taking the time to come and look at my blog, I really do appreciate it. I would love you to leave me a comment, even if it’s just to say Hi. It means I can come visit you!

All my designs are original, so copyrighted to me. If I have been inspired by someone elses work, I have named them in the post, and where able, I have provided a link.

Please feel free to use my designs for inspiration, I just ask you to credit me, and provide a link back to my blog.

Thanks, Shaz XX

Showing posts with label Sue Wilson Ribbon & Bow dies.. Show all posts

Sunday, 20 August 2017

Honey Doo Cards


 Finally getting some of those card fronts put together. All these images are from Honey Doo stamps, those on the left here are all a design called Butterflies & Flowers Large Corner. All the sentiments are from sets by Phill Martin.
 I've added some Sue Wilson Dies ribbon & bows to them, the Red one uses Lattice Bow over the Classic Bow, which is plain. The green ones use Filigree Bow over the Classic.


The sentiment on all three is from Butterfly Elegance sentiments, and the stamping was done in Brilliance Pearlescent scarlet, and heat embossed with WOW! Sparkling Poinsettia EP. I used the same ink & powder to stamp the image onto red vellum, after cutting them out, I shaped the petals using an embossing tool, the added tiny red seed beads to the centres with Glossy Accents.
 The greens were done in the same way, this time using Brilliance Pearlescent Jade, and WOW! Golden Pine EP. A corner rounder was used to add some interest, doing opposite corners in the left hand card.


Both these cards use the same stamp, Floral Corner Flourish, but in the black card I placed it centrally, and in the purple card, it's in the corner.   I added clear gems to the dots in the black card, and purple one to the purple card.Purple Glitz WOW! EP was used there, and on the black one, I used Clear Hologram Sparkle.
 The sentiments are from Scribbled Sentiments, and Scribbled Corner sentiments.
Again, I rounded opposite corners on all the layers, and also on the base card of the purple one.


This blue card is stamped with Shower Bouquet, In Brilliance Pearlescent Blue, embossed with Arctic Blue WOW! EP. Acrylic gems added to two opposite corners, and sentiment from Scribbled Sentiment Corners. The backing paper is from an old Papermania pad.


Back to Floral Corner Flourish for the pink card, stamped in Pearlescent Coral, and Clear Hologram Sparkle powder. Pink gems, a Scribbled Corner sentiment, and rounded corners finish it off.


So thats all the Honey Doo cards finished, next post will be some Emboss resist with Brushos, amongst others.


Friday, 18 November 2016

Honey Doo BIrthday Cards #2

Delving into my stack of images, and this one is up next. The stamp is called Falling Flowers, and I stamped this one in Versafine Onyx Black, and heat embossed with Stampendous Crystal Embossing Powder.
 The image was stamped and embossed again onto Black vellum, so I could cut out the flowers.
 I die cut the image using the largest die from Presscuts Scalloped Rectangle set.Matted it onto black paper, then onto a 7" square scalloped card base.
 I added a Sue Wilson Lattice ribbon & bow to the side, and a small peel off sentiment.
 A few acrylic gems were added to the spots on the design, along with some Black Diamond & Crystal Stickles for the centres of the flowers.


Second  card in this set is this gold one:


The stamp is called Butterflies & Flowers Large Corner, from Honey Doo again. This was stamped in Encore Metallic Gold, and heat embossed with a WOW Embossing Powder called Jingle Bells. Stamped as well onto Gold vellum, and I cut out the butterflies as well as the flowers. When I attached the butterflies, I cut away the rear wing, and placed them over the stamped version using a blob of Pinflair Silicone Glue for dimension. The flowers have gold mixed seed bead centres.
 I matted the image onto Gold glitter card, and repeated that with a smaller piece for the sentiment.

Thursday, 29 September 2016

Honey Doo Cards #2

The second half of the batch started the other day.

   No step by step, as I covered that in the post HERE.  The only slight difference is the Black & White card, which uses a different stamp-called 'Butterflies & Flowers Large Corner.'


 The sentiment is Scribbled sentiments from Phill Martin, and two sets of black half pearls were added for balance.
 All three panels fit onto an A4 folded cardstock base.


This blue one has a Ribbon & Bow die cut, Filligree Bow along the bottom, and to balance, a Phill Martin Decadant Damask Sentiment matted along the top. I masked off the Damask centrepiece again.


Finally, the Plum coloured one, and again another Ribbon & Bow die cut, this time Lattice. I left the Plum coloured cardstock matt a little longer than the image, and added the ribbon on top.
 In each case, I've added a few half pearls to some of the circles of the design.

Tuesday, 27 September 2016

Honey Doo Crafts Birthday Cards.

Well, as there's been such a lot of Christmas Cards lately, I thought it was time for a break, and a change. Birthday Cards it is then.
The stamp used in these is from Honey Doo Crafts, and is called Flower Fountain.


I stamped out a couple in each colour, using Archival ink in Plum, Cobalt and Jet Black.


I stamped two on each sheet of A4, then cut down roughly, so I could decide on the card size later.


Next step was to sort out some coloured vellum, and again stamped each image twice. As the Archival ink was on vellum, it stayed wet long enough for me to heat emboss with clear powder.
 I only want the flowers out of these images, to layer onto the original stamped piece.


Cue the fussy cutting. Not my favourite pastime, I admit, although these curved tweezer scissors I found in a drawer- yes, I was looking for something else entirely- did make it much easier.


Next step was embossing some lines on the reverse of the flowers, roughly following the stamped detail, to give some shape & texture to the petals.


First colour completed.

I used a white vellum with coloured dots in, and a vellum colour to match the flowers too. Love how the black vellum flowers came out, they look sort of pinstriped.


I did give them a blast of Crafters Companion Silver Glitter spray, and when dry, created centres with some Glossy Accents and matching seed bead mixes.
 The Black stamped piece was trimmed down o that it would fit a 5" x7" card base once it was matted onto black cardstock.
 I left the black matt longer than the image, and wrapped around it a ribbon & bow made with a Sue Wilson die, called Filigree Bow. Once it was stuck to the card front, I added the Vellum flowers, with small Pop Dots to give a little dimension.
This one I left without a greeting, which I tend to do with a % of the cards I make, so I can use it for whatever I need at the time.


 The process was similar with the Blue card, although this time I cut a narrow panel to attach another Ribbon bow to, this time using a Lattice Bow die, also by Sue Wilson.


 I also stamped a Birthday Greeting on this one, a Phill Martin Scribbled Corner Sentiments stamp.

This one is an A4 sheet folded sized card.


For the final in this set of three, I first matted the image onto a plum coloured card, trimmed to fit another A4 folded card.
This time I used another Phill Martin sentiment,  from a set called Decadent Damask Sentiment Borders. There is a damask accent in the top centre of the stamps, but I didn't want that, so I just masked it off while I inked the stamp, then removed the masking tape before stamping it in Plum Archival along the base of the card.


In each case I also added a few half pearls to some of the circles in the design.

Monday, 18 April 2016

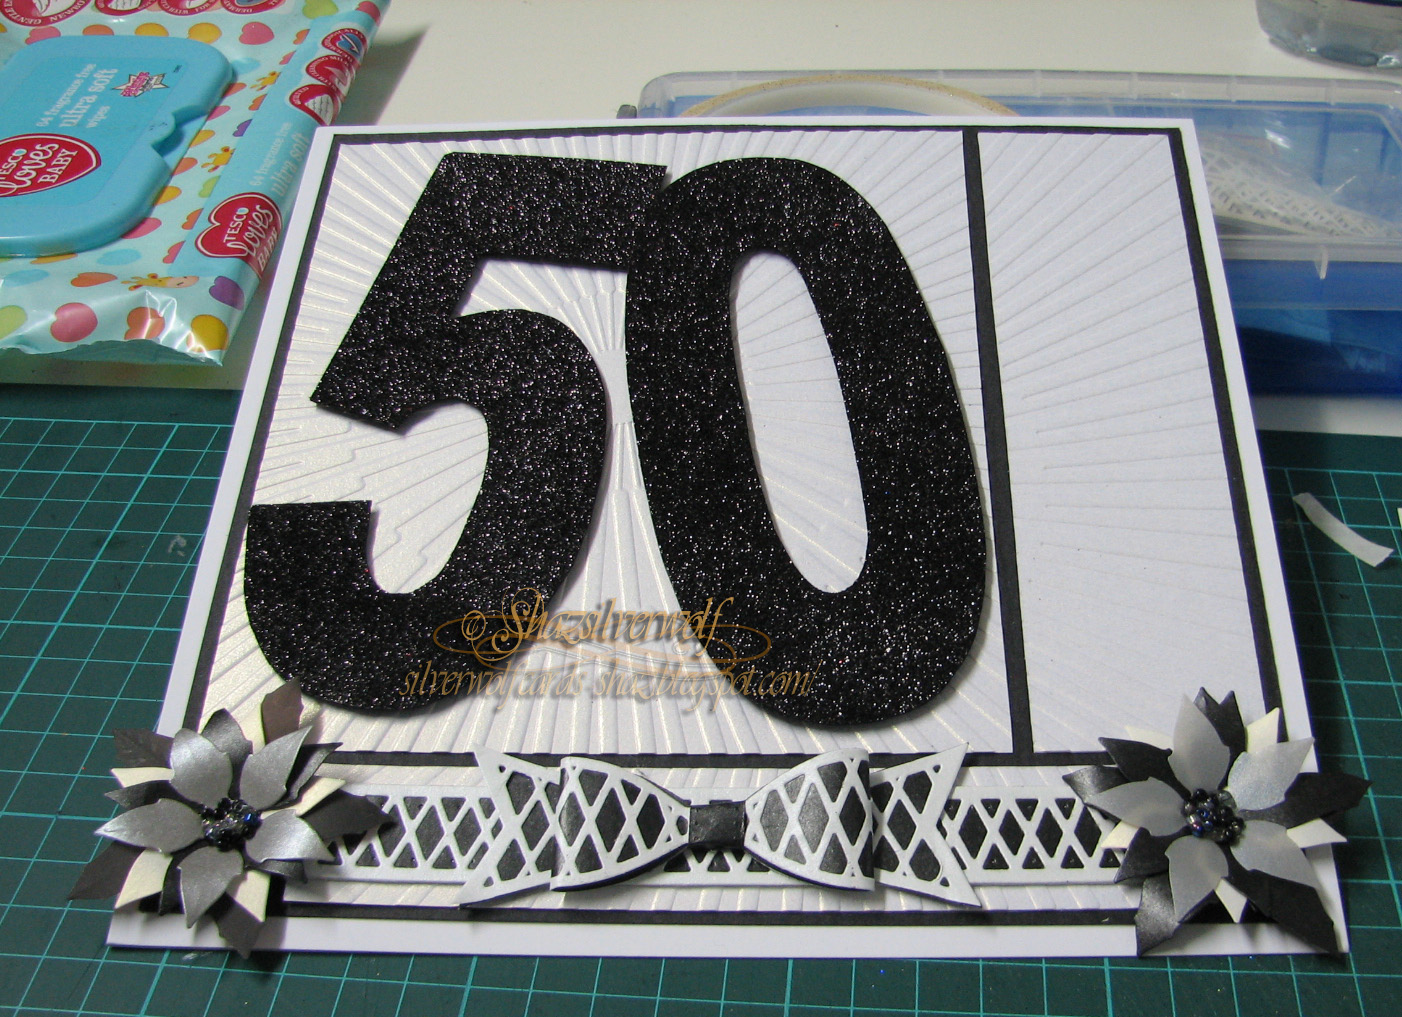
50th Birthday Card


Right, this was the card I was working on last week, but couldn't show as it was for a Birthday at the weekend. Visitors last Wednesday will remember seeing the embossed background, and the letter templates on my desk.
 The templates  are still available, from Clevercut, but I know they are having website problems at the moment,as something on their site has fallen foul of Virgin Media's' Virusafe, which has blocked the page. Just had a look on the FB page, and Ali has posted THIS LINK, which goes straight to the site.
 For making a special card, these templates are ace, as they measure 5 1/2" tall,and approximately 2 1/2" wide, so they can make a great impact.


Mine were cut from a black glitter paper, a pad I picked up once in Hobbycrafts.


Although it's a paper pad, the paper is more like lightweight card.


I already had a vague plan of what I wanted to do- you can see my notes on measurements, as I wanted to have different sized white blocks matted onto black card, which would all be mounted onto a white 8x8" card base.

With my 3 pieces of base card cut. I proceeded to emboss them with a new folder I bought from Crafters Companion, called Sunburst. Of course, had I actually measured the folder first, I would have realised it was 8x8", so could have just embossed one sheet of card, then cut it to size.


 I was quite impressed with how well the folder embossed to be honest. It came out lovely and crisp, with nice detail. No squishing or distortion of the embossing at all.

My next detail involved the use of two of the Sue Wilson Finishing Touches dies, the Classic Ribbon & Bow, and the Lattice Ribbon & Bow.
 These dies are the 'normal' sized ones, as it's worth mentioning they come in a second smaller size called 'Bitty Bows'.


I cut the Classic, which is a solid shape, from black paper, and the Lattice from white paper, to layer over it.


As my card was wider than the ribbon die length, I cut two pieces of each, and joined them together. This turned out to be a mistake, and something I should have remembered from the first time I did this.
Because of the orientation of the bow, you can see the join in the middle- I need to remember that I must remove the 'ends' of the Lattice ribbon, and join by the Lattices in future.


  I made a quick adjustment to my card, trimming down the bottom panel so that it was just long enough to allow one ribbon to wrap over the ends. Then the bow and tails, which again had the Lattice portion layered over it, were attached with a glue dot.


 I added a couple of black/white/silver layered flowers, which are cut with the Spellbinders Layered Poinsettia Dies, to fill the corners.
 Final touch was to add the greeting, a Happy Birthday cut with Poppystamps Dies Vintage Happy Birthday, and that's it.


Friday, 15 April 2016

.......And the last rescue card!

Well, I knew it worked, so I had one more set of bases with the embossing line on.


Colour change this time, as well as an ink change- this one uses Distress Inks.


This was my selection, but I didn't use them all in the end. I think Wild Honey got left out.


I also didn't have a ribbon & bow cut in a colour suitable, so had to cut one. As I did, I thought this time round I'd actually emboss it as well.


Liked how that turned out. The stamps I used were the same as before, except I swapped out the Roses stamps for one from a Rubber Tapestry set called Triple Dragonfly Floral.


 After stamping and then  matting the first two layers, I attached the ribbon part of the die, again using a couple of bits of DST on the back to hold it in place.


Add the bow, matt onto the final layer, and mount on a 6x6" card base. A coloured Peel off provides the sentiment again.

An End of an era

An end of an era

I write this with a broken heart, that only time can heal My beautiful, wonderful wifelet Shaz (Silverwolf) passed away peacefully in the ea...