A warm welcome to all my visitors,

Thank you for taking the time to come and look at my blog, I really do appreciate it. I would love you to leave me a comment, even if it’s just to say Hi. It means I can come visit you!

All my designs are original, so copyrighted to me. If I have been inspired by someone elses work, I have named them in the post, and where able, I have provided a link.

Please feel free to use my designs for inspiration, I just ask you to credit me, and provide a link back to my blog.

Thanks, Shaz XX

Wednesday 28 February 2018

WOYWW #456

So, two months down already, and March tomorrow. WOYWW as usual, over at The Stamping Ground.
I sorted my cards, and made up the dividers. Liked them so much, I did the same for my dies too.

 Getting my moneys worth out of that Laminator, lol. And getting down some of the cardstock mountain into the bargain.

The dividers I had in already were made from really thick chipboard style card, so having much thinner ones now means I can fit in more dies! Result!


Speaking of which, I said last week I wanted a reasonable sized Dragonfly die, and at a reasonable price, as I probably won't use it enough to justify buying the TH one.

 Happened to spot one on Amazon, for £1.49, free shipping. One of the cheap Chinese dies, which I hadn't expected to see on Amazon. Anyway, thought I'd have to wait a few weeks for it, but it arrived yesterday-Tuesday- and I only ordered it on Thursday..


It's roughly 3" wide x 2 3/4" tall, (7.2x6.0mm).


 Organising my cards has let me see what I ought to be making to have pretty much all occasions covered, and to that end I'm in the middle of some Baby cards- 4 each boy & girl. They'll get blogged when I finish them, probably Friday.


and finally .............................
............... ain't that the truth!


 .........which actually made me think of this funny too. Not me, I hasten to add, but I am absolutely definite that Doug would!


Anyway, I'm hoping that none of you have too much snow, we've only really had the odd scattering, and when it has gone on for a while, it's only tiny little snowflakes, so barely more than about 4 snowflakes high here.

Thursday 22 February 2018

Quick & Easy Butterfly die cut cards

As promised yesterday, here is the blog post on the Butterfly cards.
 I saw a You Tube video a couple of nights ago making these cards, and I'm sorry but I forgot to make a note of the name of the crafter, and trying to search You Tube using key words brought up masses of similar cards!
 The lady used plain vellum behind the Butterfly, and added colour using markers.
But it reminded me I have some vellum sheets that are multicoloured, and thought I'd use up some scraps to do these.
 You could also use plain vellum and blend ink over it, or I reckon you could also use acetate and Alcohol inks, or Alcohol markers.
 The Butterfly die is a Tim Holtz/Sizzix Thinlets set:


 You get the base Butterfly, and the Wings overlay, which is the part used to cut out the cards.
Base are the top pair, overlay is the bottom ones.


The card bases themselves are White Pearl cardstock,topfold, and made by cutting an A4 sheet in half lengthways. It's better to use white as a base, as darker card will not show the pattern on the vellum very well.

4 pieces of black cardstock for the fronts, I've used two Black Linen card, and two plain card so I can run them through an embossing folder. They are trimmed to leave around a 1/4" border all round.

 The two folders I chose are a Cuttlebug one, called Forest Branches, and the stone wall effect one was bought at a Craft fair, and I have no idea of the brand!

Both are slightly too small to fill the card front in one go- I think they made them based on the standard US card sizes, thank heaven they are getting larger these days!


Anyway, there is a way to resolve this without leaving a harsh line where you joined it.
I ran the Forest Branches through the 'Bug, and as you can see it doesn't quite extend all the way to the bottom.
 Now, for the fix.
 Line up your cardstock so it extends out of the bottom of the folder,and allowing the pattern to continue down.  Like so:

Now, lay your top plate in place, BUT line up the edge of the B plate with the very edge of the Embossing Folder, not past it. This looks odd in my picture, but that's because the B plate is a bit warped.😀
 Now run through the machine again.


Result- a completely embossed piece, with no lines.


After both were embossed I started cutting out the four butterflies.

Also, be careful where you place the cut out. You'll need to add DST/tape runner later to matt the panel onto the card, and if it  goes behind the vellum on the wings it will show. You can see bottom right I cut that one a bit close, so had to trim down a strip of tape for that bit.


Now for the vellum.


Having a look through my stash, I found these oddments.
Hard to believe how much vellum was a 'thing' back in the day. Rarely see it used now except for Parchment work.


 I cut the vellum down to fit behind the butterfly cut out.

Used a Stix2 tape runner to attach it to the back.
It's a good idea to mark the top of the vellum, so you get the pattern you wanted.


Vellum all stuck down, ready to add the butterfly bodies.


I also cut out the bodies of the butterflies using scraps of glitter paper/card. You can skip this, or add Stickles/Pearls to the bodies.


Trimmed them to shape, and added to the body with Glossy Accents.


 The next step was to fold up the wings slightly either side of the body, then attach to the respective panel with glue dots.


The panels added to the card base with DST.


Now for a sentiment. I chose some Text dies from Crealies.  
They are only small, so ideal for smaller cards. And not expensive either.


I went with Birthday, Sympathy and Get Well, and cut each sentiment 3 times, so I could layer them up for some dimension. I cut them from the same white pearl card as the bases.


I layered them up with Glossy Accents, and put an acrylic block on top to make sure they stuck well.
 While those were sticking, I stamped inserts for the card.
 The sentiments are from Phill Martin sets, Feel Better Soon and So Sorry for you loss from a set called Mini Baroque Occasions Sentiments, and Very Happy Birthday from the Butterfly Elegance set.
 I added some random small butterflies of unknown origin to the edges, all stamped In Versafine Majestic Blue.
 The sentiments were added using Glossy Accents again, and this was when I realised I hadn't actually kept the dot from the 'i' in Birthday.
Rectified that with a clear acrylic gem, from a pack of Anitas 2mm stones.


Wednesday 21 February 2018

WOYWW #455

Well, can you believe it, this time next week we are at the end of February. Already. WOYWW time again, all hosted by our much loved leader, Julia, over at The Stamping Ground.
 If you haven't already seen it, check out Julias post from yesterday- the 2018 Crop! Awesome news.


This is my desk from earlier, and until well into today!
 I decided I needed to organise my card box- every time I want a card, especially a non birthday one, I have to sort through the whole box. So, I've decided to pull them all out,sort into 'types', and then make some dividers to go in the box. I may need a bigger box soon!


This is what was on my desk earlier in the day.
Case'd from something I saw made on a You Tube video.
 I'll blog them tomorrow, or Friday.
 I've decided I need a large Dragonfly die now, lol.

 There are a couple of Christmas cards in the post below this one.


Speaking of needs, I asked my local craft shop to reserve me a couple of the TH Alcohol Ink tins when they came in, and they are now in stock, so I'll be picking them up later in the week. I have a lot of Stickles/Pearls/ AI's and Adirondack re-inkers that are all going to fit, so a few of them *might* be bought, to free up some drawer space.


Some of you may have seen this on BJ's desk last week- Beloved Hubby did, and promptly ordered me one.


I can sleep like a log once I get to sleep- it's just the getting to sleep that eludes me. Tried going to bed early- all that does is mean I'm awake a lot longer! I rarely go to bed much before midnight at the earliest, and it's not unusual for me to still be awake at 4.00am still. I've just taken to listening to some Guided Sleep Meditations with headphones, and that's helping too.I know over the last week of using the two, I'm usually asleep within an hour, hour and a half. Which is a big improvement.


and finally.............................


Sunday 18 February 2018

Christmas Card Club Challenge-Reindeer

  This fortnights challenge was set by Zoe,and is for Reindeer.
 My first card features a Reindeer by Tim Holtz, a Movers & Shapers die. It's cut from a dark brown glitter paper, and if I ever use it again, I'm going to cover it with a coat of clear embossing powder! It sheds like nothing on earth!
 I cut a selection of snowflakes from a sheet of white linen card, and then backed that with some light blue glitter paper. Then I decided to add the snowflake die cuts back, just coming in from the edges. The A5 card base was covered with some Christmas backing paper- which strangely enough also has reindeer on it- it was just the closest paper I had to the colour of the one behind the snowflakes.


 The next one  ended up with a bit of paper piecing. Simply because I used some of the silver glitter paper that can be coloured that I bought from Pink Frog Crafts and Cards, that I got at the NEC last year. It does colour fine, but I didn't realise the Promarkers would be a little slow to dry, and ended up with green fingerprints on the central snow section. Then I cut another white piece to go behind the reindeer, and a dark blue piece to go behind the trees.
 The die is one of the Cheap from China dies.


 I added a small acrylic gem to the centre of each snowflake. I covered the A5 card base with a silver snowflake patterned paper, then matted the picture on foam pads.

Thursday 15 February 2018

First Shaker card, or a Comedy of Errors!

 A pretty accurate title as you will see as we go on.
I've long been meaning to have a go at a shaker card. Having seen them made in numerous crafting videos, I decided it looked pretty straightforward.
 And it is, as long as you remember one simple detail- forward planning!
 However, I think mine had gone off for a day trip somewhere, leaving me to fend for myself.


So, lets start. My base card was going to be an 8"x8" square, so I cut a separate sheet of Pearl White card to fit the front.  That is one thing I do remember- always measure your card base first before cutting.
 I've found the measurement given for card base packs seems to be the envelope dimensions, rather than the card, and it's annoying to go to assemble your card, only to find the front panel is bigger than the base.
 So, that bit done, I then decided I wanted to matt my white pearl onto a red cardstock, so cut the red, then trimmed down the white pearl cardstock. See,stage 1 and I'm already tripping over myself.  I used a Sizzix Heart Steel Rule die I've had for years to cut the centre heart out, after I'd marked the die position on the back of the card, along with corner to corner & side to side lines to make sure I got it as central as possible.

 Next the foam tape to raise the cut out. I have some rolls of foam tape- Poundland, 2 rolls and about 10 sheets of mid sized foam tabs for quid- I took a strip and cut it into 3 lengths. Then as I laid it down, I snipped at intervals to allow it to bend around the shape. I thought using the tape I didn't have to worry about any gaps between foam pop dots letting the filling leak out.By the way, the embossing bag was there as I used it to wipe over the inside edge of the foam tape to stop the filler from sticking to it.
 Amused myself that I thought of something that small, yet missed important stuff.😀


 So, I have one layer down on the reverse, and decide it needs two to give the filling enough room to move about. I'm halfway round with the second layer, when something occurs to me. I should have attached the plastic/acetate/film front to the reverse of the cardstock first!  Fortunately, I hadn't pressed the tape down firmly yet, so I carefully peeled it back off, and put to one side.
I cut a square from saved Embossing Folder packaging, and stuck that in place with DST.
 Then I put the foam tape back, on top of the plastic this time.

 So that was error number two so far- but I'm not done with them yet!
 Now we are onto the backing for the shaker, and in my Peel off stash, I remembered some holographic  peel off sheets.    Trimmed some off the sheet, and used it to cover some spare white card.


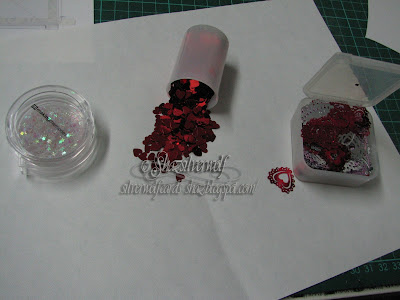
 Having a look in my stash, I sort out some tiny stars, some small and large hearts. All are those little bags of confetti for tables at parties. You can tell how long I've had some of them- that tiny hearts container used to hold camera film. Remember that?


Sprinkled some of each confetti into the opening. I can just imagine my face,had I still not realised about the plastic!


Peeled the backing tape off the top layer of the foam, and added a larger  foam tab to the four corners of the backing piece, then lay it on top.


Turned it over, and this is when I realised the next mistake I'd made. I intended to stamp the two sentiments in the top left & bottom right corners.

But now these two layers were together, I wasn't going to be able to stamp there, it wasn't a level enough base.
 I should have done the stamping after I'd cut out the heart, before I did anything else. So now we're onto Plan C. Or possibly D, I've lost track.


Finding a piece of the white pearl card, I stamped both sentiments, then trimmed down and matted onto the same red cardstock as the matt layer for the card, and mounted them with foam pads.
 The inkpad was Memento Lady Bug, and I heat embossed it with WOW! Sparkling Poinsettia.


Matted it onto the red layer with foam tabs, that attached it all to the card base with DST.

 As if the bling level wasn't high enough, I also added some acrylic hearts with Glossy Accents.


 Hubby loved it, sat shaking it for a while, trying to separate some of the larger hearts that had wedged on top of one another. Said it was a bit like those kiddies games where you have to tilt and turn them to get little balls into indentations, lol.


Stamps:
 I love you to the Moon & Back, Stampasaurus
Today Tomorrow, Inkylicious, available in 2 sizes, this is the larger one. The smaller one is about the same size as the one top left.


Wednesday 14 February 2018

WOYWW #454

And a Happy Valentines Day to everyone!  Our mid-week desk-fest begins again, over at  Julias, the Mistress of the Desks,at The Stamping ground.
So, what do i have for you this week? Well, I took myself out to town for a walk around yesterday, and popped into The Works, as you do. Snagged a couple of bargains,some Black acrylic paint, and some clear Banner stamps.

 Made some Stampscapes cards, in the post below.
 Then I was working on Beloved Hubbys Valentines card, and picked up one of my pairs of scissors, when I remembered something I saw on a TH video from Creativation, on some Tonic scissors.
 He said as well as being non stick the pair of blades had one that was serrated, and one plain. So you could flip them over and either cut a tiny serrated edge, or a plain one. Now, rather like the other Tonic releases, these looked exactly like my X-Cut ones I've had for quite a few years. I kept meaning to check mine, as the main reason I rarely use them is I don't always like the serrated edge if I cut something out with them.
 And guess what? Yep, mine too have the same pair of blades. Leaving me with two questions- how have I never noticed this? and How come EVERY single time I've used them, I've always picked them up the same way?


Not sure how well these pics will show it, but  this way up you will get a smooth cut . I cut a piece off the card its lay on to show a smooth cut.
 Serrated blade at the top, smooth one at the bottom.


This way up- serrated blade at the bottom- you get a serrated edge, hopefully you can see it on the cardstock.

 So, apart from this exciting discovery, it convinces me even more that Tonic manufacture X-Cut.


And posted at the bottom so it won't appear on our FB feed, Beloved Hubbys card. I've never made a shaker card before, and I'll blog it in a few days, as it wasn't so much a learning curve, as a learning Ski slope, and I can't ski!


And Finally....................


Speaking for most of us, I think.😏


An End of an era

An end of an era

I write this with a broken heart, that only time can heal My beautiful, wonderful wifelet Shaz (Silverwolf) passed away peacefully in the ea...