A warm welcome to all my visitors,

Thank you for taking the time to come and look at my blog, I really do appreciate it. I would love you to leave me a comment, even if it’s just to say Hi. It means I can come visit you!

All my designs are original, so copyrighted to me. If I have been inspired by someone elses work, I have named them in the post, and where able, I have provided a link.

Please feel free to use my designs for inspiration, I just ask you to credit me, and provide a link back to my blog.

Thanks, Shaz XX

Showing posts with label Christmas Cards. Show all posts

Sunday, 8 November 2020

Christmas Card Club Challenge #23- Use Stencils.

Hello ladies, and here we are with Rachels choice for this Challenge, to use Stencils.


My stencil is from Sweet poppy, and is called Mistletoe Tree. I made my own glitter stencil paste, using Translucent paste and mixing in a pale green glitter. This is a really good way of glittering stencils, as you get all the glitter, but because it's mixed into the paste, there is no shedding. It's also way cheaper than buying small pots of pre-made glitter paste!

The sentiment is back to me using up my peel off stash, added to a thin die cut label. 
 I added a few half pearls to some of the design.
 And thats my contribution for this challenge.

Not sure how many cards I have now, but suspect I'm well into next years supply!


Wednesday, 28 October 2020

WOYWW #595- The Snowman Edition


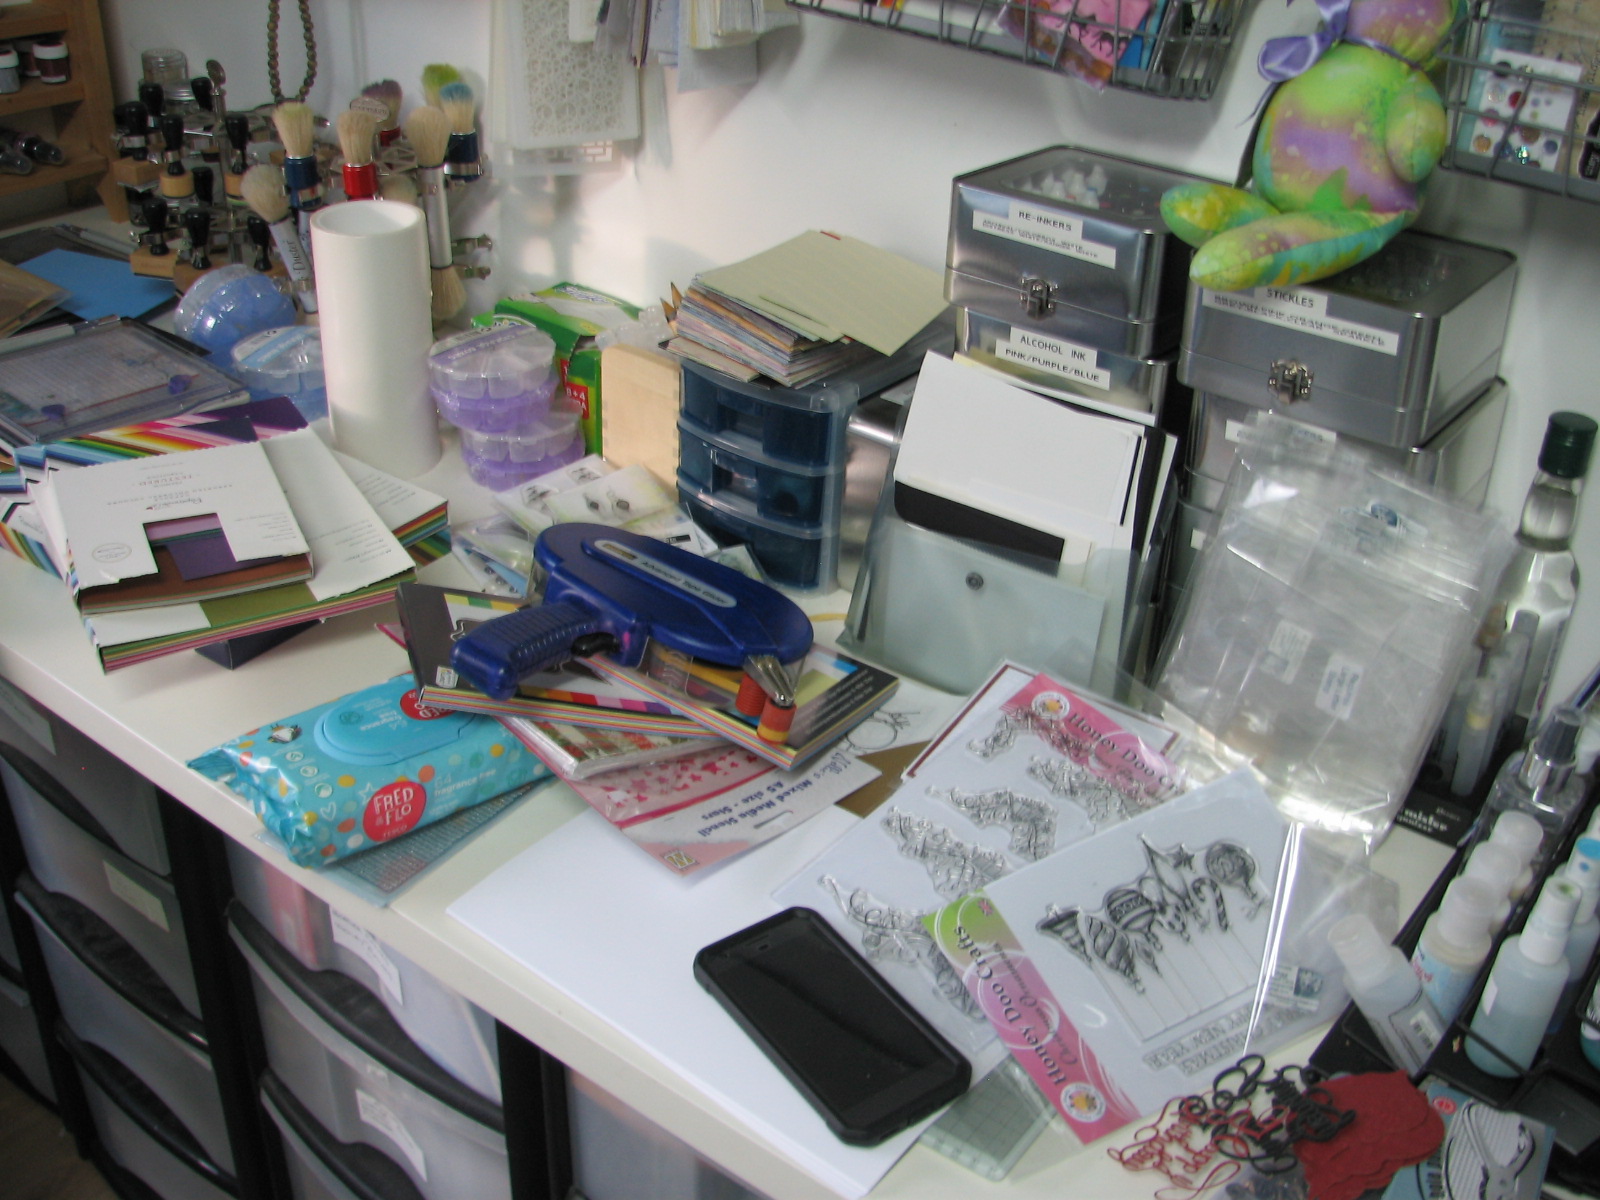
 The desk- and this is probably the tidy half!  It's WOYWW day again, so lots of desks to visit, thanks to Julia over at our home base, The Stamping Ground.

 I was making some more Christmas cards, this time featuring a snowman. Here I've just added a bit of colour, and am going to add some Puffy Stuff to his hat.


 This is the desk behind the desk, otherwise known as the place to dump everything I've got out, lol.I really do need to clear it off and put it all away. Soon.


This snowman is a very, very old stamp. The company was Funstamps, and it used to be wood mounted. Pretty sure I probably bought this back when I first started stamping, which is more years ago than I want to recall! He's probably my favourite snowman stamp, he looks so cheerful.


This one is much newer, bought it last year. By a company called Two Jays.


The finished cards are in the post below.

 I kept them simple, just added some colour to the scarves, and a little blue ink added to ground them. Added a sentiment from Phill Martins Stately Christmas Sentiments, and that was it.  


Which brings us round to .......And Finally........as it's nearly Halloween, I've added a couple of funnies on that theme.


Tuesday, 27 October 2020

Christmas Card Club Challenge #22- Snowman/Snowmen


Hello ladies, I'm finally here with Margarets choice for this challenge, Snowman/Snowmen. I wanted to keep these simple, just the snowman and a sentiment. I had to be quite firm with myself, as I have a tendency to start adding scenery behind, lol. The first snowman is from a company called Two Jays.All I did was add a little colour to his scarf and carrot nose, as well as the holly on his hat.

 I also added a little patch of blue to ground him.


 The sentiment is from Phill Martin, a set called Stately Christmas Sentiments.

The second set of four is using a really, really old stamp called Scribble Snowman,from a company called Funstamps. I've had him more years than I can recall, and he used to be a wood mount, and I do think he's fab. Again, just added a small amount of colour to his hat & scarf, and some grounding. For the fur on his hat I used some Inkylicious Puffy Stuff. It's a thick liquid in a bottle with a nozzle, and when heated it puffs up. 

You do have to be careful not to overheat it, and with my first one I did just that, and scorched the puffy stuff, and the cardstock! But it was a simple fix to cut him out then stick onto a fresh piece of cardstock. And that's why I'm not confident enough to work directly on my card base, lol.


Wednesday, 21 October 2020

WOYWW #594- The Christmas Stocking Edition.


Here we are again, back at The Stamping Ground, with our much loved leader, Julia, for another Wednesday desk hop.

Long shot of the desk, covered in half made cards, stamps, inkpads and assorted other odds and ends.

The sheet of clear stamps are all HoneyDoo Christmas stamps, used for the cards you can see. The pack of fancy card at the front was bought last time we went to the NEC, sort of oil on water finish to it. I'd used some for the bells, and some baubles I'd also stamped. Like an idiot, I stamped in Versafine, which totally will not dry on shiny/coated surfaces. So I redid the bells, and haven't got round to the baubles yet.


Here are the Christmas stockings, cut down to fit on a square card base, and matted ready.


The Holly & bells, I stamped the bells again onto gold paper, with gold pigment ink, and heat set with gold EP. Matted onto gold card.

Also discovered, via a bit of You Tube searching, why I was having so much trouble colouring & shading. I'd been working from light to dark, which to me seemed logical, when in fact you're supposed to work dark to light, and going over the previous section with the next shade. So, you learn something new every day,lol.


These stamps on the left Julia are the ones I was telling you about. I also added a Birthday background stamp- lots of words and phrases for birthdays. Saw a sample done with it stamped in black onto an ink blended background, and thought it would make some quick birthday cards, just add a die cut sentiment. Or you could stamp in Versamark, heat set with white EP, then ink blend over that, so a few options.

Speaking of sentiments, I picked this up in The Range. I have a few friends who don't celebrate Christmas as such, so thought this will be useful. I think it was about £3.50.

So thats my desk for this week, and my regular enabling provided- you're welcome,😀.


Which brings us round to ..........And Finally.............


Wednesday, 14 October 2020

WOYWW#593- The Paper Piecing Edition.


And just like that, it's Wednesday again. Cannot believe how fast these weeks are flying by. As always on Wednesday, we meet up at Julias place, The Stamping Ground, for our weekly desk-fest.

Here is the start of my paper-piecing of the Christmas Stockings from last week. I stamped the image onto cardstock, then coloured the parcels and holly. Then I stamped and cut out the stocking part, using blue and red card. You can also see the small pieces for the heel, toe and  top, which I'm planning to cut out of some glittery felt I picked up in Hobbycrafts sometime last year.


This is it, it's not overly glittery, in fact I may give it a blast with some Crafters Companion Spray & Sparkle I have on my shelf- and in fact, you could make your own using plain felt & a spray.


And here is the first one put together. I used pinking shears to edge the top, and cut it a little longer than the pattern piece, so it would definitely cover the join.

 I've got another 6 to do, then I have the Holly & Bell images I've coloured to do, and the baubles. I'm sure they'll appear next week.

 So thats my contribution for this week, which brings us round to......And Finally.......

I have to admit, it wouldn't be wine for me, I can't bear the stuff! But G&T, or Jack Daniels/Southern Comfort and Coke, and I'm your girl!

This made me laugh, a lot!

Wednesday, 30 September 2020

WOYWW #591- The Odds and Ends Edition

 Time for Whats on your Workdesk Wednesday again- is it just me, or do these weeks seem to be getting shorter? Pop over to Julias place, The Stamping Ground, to join in.


Some enabling right at the start this week- two new Visible Image stamps. I thought the star one would decoupage nicely, for quick cards, and loved the size and font on the sentiment stamp. I'm thinking stamp the Star onto the card base & heat emboss in silver, gold or sparkle EP, then stamp again onto glitter card or patterned paper, cut out and add on top. Also, the new Distress colour, Crackling Campfire.


Two cards made last weekend, should have been 3. I'm retrying the third one in the pic below. You know when somethings not gone right, so you try to fix it? And end up making an even bigger mess of it? Yeah, well that happened. The image, an old VI one, is framed, so in order not to stamp the frame across the snowflakes, I wiped the ink off the bottom part, then, completely forgetting the top part of the frame, stamped it. Looked awful, so I added in the same colour ink- which I intended doing anyway-, but it went all blotchy. So, next intended fix was to die cut a circle of double sided adhesive, place over the image, and sprinkle with Glamourdust.
The Glamourdust would hide the blotchy patch.That went well, right up to the sprinkling bit. I grabbed the bottle, and sprinkled. Except it was the Gold coloured one, not the Crystal. It hid the blotchy patch alright, but it hid everything else too! That's when I  realised every fix was making it worse, not better, so it went in the bin. This is the fresh version, and so far, so good. Good job I have a sense of the ridiculous!

Thank you to everyone for your input on White pens last week. General opinion seemed to be that A) Posca or Sakura Gelli Roll are the best, and B) and actually finding a good white pen is a bit like looking for hen's teeth!

And all that brings us round to .........And Finally.............................

Saw this last week on FB, made me laugh, so I thought I'd share with you all


...and this about sums me up. 😀


One final moan about the new Blogger- whats the new Labels thing about? Now I have to start typing each subject, then select what I want, rather than just scroll through the list. Grrr.

Sunday, 27 September 2020

Christmas Card Club Challenge #20- Gifts, Ribbons & Bows.

 Well another fortnight has flown past, and we are again showing our cards for another Christmas Card Club.

As well as the fortnightly theme, we also have the option of Anything Goes, and this challenge is Zoe's choice, she wanted to see Gifts, Ribbons & Bows on our cards. 

 I had a search, and couldn't find anything in my stash for gifts, although the new stencil I chose to use does feature a nice big bow, so mine are a bit of the challenge, and a bit of Anything Goes.

The Stencil is from Sweet Poppy, and many of you have probably seen a lot of cards made using it on Facebook. It's been so popular, Lucy has really struggled to keep up with demand.


The baubles are done by inking through the stencil, then adding some stamping to the centre. As you see, I did 3, but only have 2 finished cards. The one on the left wasn't going well, the image is actually set within an oblong frame, and I remembered not to ink the frame at the bottom, and completely forgot not to ink the top! Didn't like how that looked, so tried to fix it by inking the remaining part of the bauble with the same ink. That didn't go too well, it was drying out blotchy, so I thought I'd die cut a circle from double sided adhesive sheet, and sprinkle with Glamour Dust, which should even out the background a bit. I should have just tossed it in the beginning! Cut the sheet and stuck it down, grabbed my Glamourdust and sprinkled it- and it wasn't the Crystal Glamourdust that I'd intended to use, but a gold one that completely hid the design. So thats the point when I accepted every attempt to fix it just made it worse, and tossed it. But I will do some more, using that stamp, as it will look good, if I do it properly, lol.


So these are the two I ended up with. On the red bow I added a little Translucent stencil paste, and some crystal glitter. The stamped image is from Inkylicious.

The blue one is stamped with an image from a Card-io set, called Winter Fun. The set contains a few other images, and two sizes of this one, a larger and a small. This is the larger one. I matted them onto some pale blue card, added some silvery snowflake paper from my stash to the card base, then added a peel off greeting. 

Sunday, 13 September 2020

Christmas Card Club #19- Christmas Sentiments.

My these weeks just seem to fly past! Explains why I used to end up in a panic making Christmas Cards in November! But, thanks to our Christmas Card Clubs fortnightly challenge, that horror is way behind me now.😀 This fortnights challenge has been set by Rita, and she wants us to use Christmas Sentiments on our cards. I bought some smashing Christmas Verse stamps from Circa Design a couple of years ago, and their beauty is they look good either inside your card, or as a  focal point on the front, which is how I've used one on my cards.


The first one is in green and silver, and the dies used are an old Spellbinders one called Lacy Squares. I stamped the verse in Silver Pigment ink, then heat embossed with silver EP.

Both pieces of cardstock have an embossed design on them.


The second card is exactly the same, only this time using red & gold.


I has intended to wrap a ribbon around behind the die cuts, but like an idiot, I stuck the gold & silver card down to the card base a bit too quickly!

Sunday, 30 August 2020

Christmas Card Club #18- Use mainly Red

This fortnights theme was set by Lorraine, who wanted us to use mainly red. A real challenge, and took some thinking about! I'd finally decided I was going to emboss some red card with a  Christmas words folder, when I recalled I had a Tim Holtz pad of embossed card, and I was sure there was a red Christmas one, so in the spirit of trying to use stuff I've had forever, I dug it out with fingers crossed. And indeed there was a red, as well as a green, for Christmas. The whole pad is embossed with various holidays/special days, not all applicable to anyone outside the US, lol. Have no idea what I'll do with those.
I cut 2 6" square pieces of the card, then die cut a couple of bauble shapes from each. The die set is from Spellbinders- Heirloom Ornaments 2010. Most likely retired long ago. I backed this with some cream paper marbled with gold, bought at the NEC Christmas show more years ago than I like to recall.  The string for the baubles is some sparkly peel off lines, and then I added a peel off sentiment, again using stuff I've had far too long.I matted this onto some gold glitter card for a bit of sparkle. I decided the baubles didn't look 'finished ' enough, so found some red ribbon to make a bow at the top of each, which looked better. Looking at them now, I think I may go back to these and add a few acrylic gems in a pattern on the baubles, as they look a little plain, I feel. Or maybe some liquid pearls in dots to follow the swirls of the marbling. Don't know, will have to give it some thought. So thats my offering for this challenge, for the first time in ages, I'm on time, lol.

Saturday, 22 August 2020

Christmas Card Club #17- A Winter Scene


Hello Ladies, sincere apologies for having missed two challenges, I'll explain at the end!
I hope these are suitable for Mrs.A's choice of a Winter Scene. The stencil is from Sweet Poppy, called North Pole. The top 3 were done in glitter paste- made by mixing my own glitter into various pastes. Having seen the price of tiny pots of ready made glitter paste, I had a go at making my own a while back, and it works absolutely fine. Plus the bonus is that as the glitter is mixed into the paste, there's no shedding!
The bottom three were done with plain white stencil paste- again from Sweet Poppy Stencils, and I added a little Diamond Stickles to give the snow a little sparkle. I managed to use up some off cuts of Christmas papers to cover the front of the cards, but don't really have space for a greeting on these.

 So, it feels like I've just stumbled from one medical issue to another lately. You may recall I had some real pain from my right shoulder, and being right handed that was not good. I thought it was down to my old injury when I snapped off the part of my shoulder blade where the rotator cuff joined, and it's not the first time I've had trouble from it. However, as it was taking forever to heal, and I'd noticed that some days I had no trouble, then would get up and be in pain again, I did what you shouldn't and Googled it. Turned out the most likely cause was actually a trapped/pinched nerve in my neck, and the fact I could wake up with it made me think maybe it had something to do with how I was sleeping. Added a second pillow,and within days it had gone! Next came a UTI, and thats taken 4 weeks to get on top of- at least I hope we're on top of it. Had a weeks antibiotics, and they helped, but two days after finishing the course it was back. So, I got given different antibiotics, and a sample was sent for testing. Well, these antibiotics did absolutely nothing, and I got worse every day till they got the results back. I was literally getting up in the morning, and laying down on the sofa, having naps, reading, wanting to go to bed about 9, then repeat every day. Once they got the results back, I was given a new antibiotic, and so far, that seems to have done the trick. In this time I also had a CT scan, which shows the nodule from the cancer isn't doing much, but also showed that the stent I have between my kidney and bladder seems to be blocked, which is probably whats causing the UTI, and will mean being admitted in the next 2 or 3 weeks to have it changed. Finally, not to be indelicate, but for the last few weeks, it's felt like when I sit down, I'm sitting on very bruised buttocks. So bad, that mainly I've been lying on the sofa again, trying to take the pressure off. Literally could not sit for more than 5 minutes. Anyway, my GP looked at the CT scan,and said she can see thickened scar tissue going into my buttocks, and is most likely from the bowel surgery when they took muscle & flesh from my abdomen to cover the area removed on my bottom! So, painkillers and painkiller gel, and trying not to sit on it for too long, and that does seem to be working, as it's nowhere near as bad as it was. Funny thing was I couldn't for the life of me figure out why it should have started causing problems, then last night I had a light bulb moment. The one thing that HAS gone my was lately has been losing some weight- I've lost a little over a stone, and ideally want to lose another half, to get to where I'd like to be. Suddenly realised I was probably feeling that pain as I'd lost some of the natural padding in that area I'd accumulated, lol. But, it seems much better, I'm still spending as much time as I can not directly sitting down, and that and the gel seem to be doing the trick.
I will be doing my best to keep up with the challenges, and am going to pop round and look at everyones from last week. Hugs to everyone.

Wednesday, 15 July 2020

WOYWW #580- The not much happening Edition.

There isn't really. Long shot of todays desk. Some piles of Christmas Cards, I've finally got round to cutting, stamping and sticking in inserts. My own fault, if I did it at the time, I wouldn't end up having to do so many at once.
 From front to back- glasses, phone, guillotine, wallet of Gelly Roll pens. Now, there's a question. How come Sakura can make gelly roll pens that always work- even white ones- yet no one else can make a white gel pen that doesn't fail almost as soon as you get it home?
Bottle of home made stamp cleaner, Versafine inkpads, Versamark and embossing powder- still experimenting with the MINC and stamping. Piles of Christmas cards,reading glasses, dry microfibre cloth for drying stamps and cleaning brushes on. Two carousels full of stuff to numerous to mention.
Far end is scalpels, tweezers and pokey tool. Pincushion- courtesy of Elizabeth at the last crop- and one of those loose sheet telephone pads that comes in handy for jotting stuff on, or squeezing blobs of glue onto.


Desk two- the desk behind the desk. Handy as a general dumping ground for what I'm using, just not right now, lol. The big  Really Useful Box is full of Christmas papers,tub on top has a damp microfibre cloth for wiping stamps. The big Document holder is holding card bags, some packs of coloured textured card underneath it. ATG next to that. Along the back storage tins for alcohol inks and a number of reinkers, Stickles & Pearls, with the Crop Bear sitting on top. Spray inks at the end on a Nail Varnish storage thingy from Amazon.Tim Holtz layering stencils hanging off a rail, along with Embossing Folder samples. The drawers under the desk have all sorts of card & paper, punches- which I really need to sort out, as I don't know  when I last used most of them- one drawer full of peel off sheets I'm trying to use up. Just at the very front, the corner of my Hobbycraft trolley with my make up brushes on top.And thats my contribution for this weeks WOYWW, courtesy of Julia over at Base Camp, The Stamping Ground.
 Which just leaves us with......And Finally.....


This did make me laugh, especially number 8!


Clearly from the US, as over here we'd say handbag, but all the same so, so true. I think I can handle anything short of a Zombie Apocalypse with the contents of mine.


Oh, I might be a bit late visiting today, I have a CT Scan at 10.00, and I have no idea how long I may be there. The longest part is usually them trying to find a willing vein!

Wednesday, 8 July 2020

WOYWW #579- The MINC Edition

So, back in the craft room for our regular Wednesday met up of desk around the world, commonly known as Whats on your Workdesk Wednesday, courtesy of our much loved leader, she of the recent birthday, Julia, at home in The Stamping Ground.
On my desk, is evidence I've been playing with the new toy I bought myself months ago, a MINC. I went for the 12" version- there's also a 6" one- as I often find myself working on 7" square cardstock, so I have some leeway.

The reason I bought the MINC is that I want to be able to use my stamps with foil, and I wasn't haven't a huge amount of success with my laminator. But to be fair, it's a really basic one- an on off switch and thats it. One speed, one heat. Works fine for it's original function, and is usually quite successful with  foiling over stencil paste, but was having no luck with stamping.
 As you can see, notes jotted on various experiments so far, just trying to find the perfect combo of ink/powder/heat for repeatable good results.
 So that's going to be an ongoing thing  for a few more days, a blog post will appear when I get the results I'm looking for.


The weekends Christmas cards were done with the tree stamps and various embossing powders.
The stamps are all quite old now, made by a company called Butterfly Kisses, but they seem to have faded away, can't find any reference to them or their stamps any more.


One thing about the MINC I do want to mention, is for anyone thinking of getting one, be very careful if you go through Amazon. Looking at reviews, I saw that a number of people had ones with the wrong plug delivered- now that could just be errors in ordering, as there are EU, UK and US plugs available, maybe the buyers didn't notice that- one person got a 6" one instead of a 12", and someone else had things missing from the box. So I ended up ordering mine via Hobbycraft for safety. I don't know if the sales pages have been changed since those comments were made, as now you get a separate page for each plug type, perhaps it was a 'tick box' system before? Like I say,most could  have been buyer error, but I wasn't taking the chance.
 And so I'm done for this week, nice and short & sweet.
Good news for Dougs family, Tim, Lyndsay & Curtis are all ready to be released, the council have found them a bungalow as a temporary solution until they can all safely manage stairs, when they'll move them to a 3/4 bed house. Friends & family have been in since the weekend painting & decorating, and furniture is being delivered tomorrow, so they should be home by the weekend. Livvy isn't ready for release yet, but she's doing tremendously well, I honestly think far better than was anticipated when she was admitted.
To all my crafting friends who shared the GoFundMe page, and to everyone who donated, a huge thank you from us, and from Tim & Lyndsay too, it is so appreciated.💓
Which brings us round to ......And Finally.......


...and that would be a catastrophe!

Sunday, 5 July 2020

Christmas Card Club Challenge #14- Christmas Trees.

It would be really bad form if I was late with this fortnights challenge, as it's chosen by me, and I've asked for Christmas Trees, although we always have the option of Anything Goes. You can't even imagine how many photographs it took for me to get ones you could actually see clearly- Sparkly/Holographic Embossing Powders and cameras do not play nicely together!


My 4 cards are made with A4 cardstock folded in half, and I've used a selection of trees with a variety of Embossing powders for my offering  this week.
 The stamps are all by a company called Butterfly Kisses, who seem to have vanished from the industry. I bought the stamps quite a few years ago, at a couple of NEC visits, but haven't seen them for a very long time.


They are a mix of grey rubber and clear stamps,with 7 different designs for the trees. The grey rubber used to be wood mounted, but I unmounted them a long time ago.


  I finished them off by wrapping a black & white checked ribbon round them, then added the greeting onto a die cut banner label


I completely forgot to take any in-process photos, so I'm afraid it's a short and sweet entry from me this time round!


Wednesday, 20 May 2020

WOYWW #572- The Happy Birthday To Us Edition.

Yes, our 11th Birthday! What a milestone that is, eh? All down to our lovely Julia, over at The Stamping Ground. This is my UFO for the theme, and I thought I'd make it into a Birthday card to us all. The balloons and gifts are both Card-io/Majestix stamps, the 11th is Honey Doo Crafts, and I'm afraid I have no idea where the 'Birthday' balloon came from, may have been a freebie at some time.
This was the envelope I decided to work from, I can't believe how many of these stencilled sheets I have and not used yet.
 I used an assortment of Versafine Clair inkpads for the stamping, and although it's hard to see, I did cover the balloons with a coat of Glossy Accents, and sprinkled them with a little Glamourdust.
 And I learned a little trick that some might find helpful.
 When you're trying to place clear stamps on your background, ready to pick up with the lid, they can be really annoying, as they keep sticking to your fingers, am I right? Well, the 'string' on the balloons above is a separate stamp to the balloons, and was a total nightmare to get to lie where I wanted it, as it's really thin. It was driving me nuts, and I was sort of looking round my desk for a solution. And then I spotted my anti static bag, and the little dish it sits on has a good coating of powder on it. Dipped my fingers into the powder and rubbed it over my fingertips, and Yay!!! no more stamp sticking to my fingers.


 Got the Christmas cards finished, and the Caught in Crystal sheets worked out a treat.


 Nothing much in the Enabling Dept- just a 2" Speedball brayer! Came across these a few weeks ago, but couldn't find them anywhere in the UK. Not sure if they're new, or just not widely stocked. Got mine on Amazon- via Supermart USA, which are really good, as their prices are always competitive, and they ship worldwide for free.


  realised a few days too late last week that I completely forgot to add an And Finally! So this week there's two to make up for it.


So here you are....And Finally.......


An End of an era

An end of an era

I write this with a broken heart, that only time can heal My beautiful, wonderful wifelet Shaz (Silverwolf) passed away peacefully in the ea...