A warm welcome to all my visitors,

Thank you for taking the time to come and look at my blog, I really do appreciate it. I would love you to leave me a comment, even if it’s just to say Hi. It means I can come visit you!

All my designs are original, so copyrighted to me. If I have been inspired by someone elses work, I have named them in the post, and where able, I have provided a link.

Please feel free to use my designs for inspiration, I just ask you to credit me, and provide a link back to my blog.

Thanks, Shaz XX

Wednesday 27 May 2015

WOYWW #312


And indeed it is! Six amazing years of WOYWW, and making new friends.All thanks to the amazing Julia at The Stamping Ground, who came up with the idea, and regularly does her best to keep us in some sort of order.
 Just been searching back through my blog, and I first joined in with WOYWW on 12 Jan 2011,  #84, and according to my stats, I've posted 155 times, so occasionally I've missed a few.


Two desk pics today, only, as we went away for the Bank Holiday weekend. Beloved Hubby did a spur of the moment decision on Friday afternoon, and we ended up visiting a few places, so I've posted some pics at the end. When we got back yesterday, waiting on the mat was the latest Tim Holtz Distress ink colour- Twisted Citron. He seems to have gone very bright with this 12 colour release so far, I've noticed.


 Also on the desk, a couple of pressies bought by Hubby- a penguin with an extremely cute face, and a little wooden sheep.
 On the way home yesterday, we stopped off at Weston Super Mare. Walking  along the main promenade, Hubby spots this:
'What do you think?' he says. ' Me, like an idiot, says, 'Yes, I can do that'.  Well, it seemed like a good idea at the time!


And it was ok, until it started to turn! Once we are a quarter of the way round, waiting for others to get on, I decided it wasn't such a smart idea after all. Mild panic attack, realise there's not a whole lot I can do about it, and hang on to the centre pole for grim death.
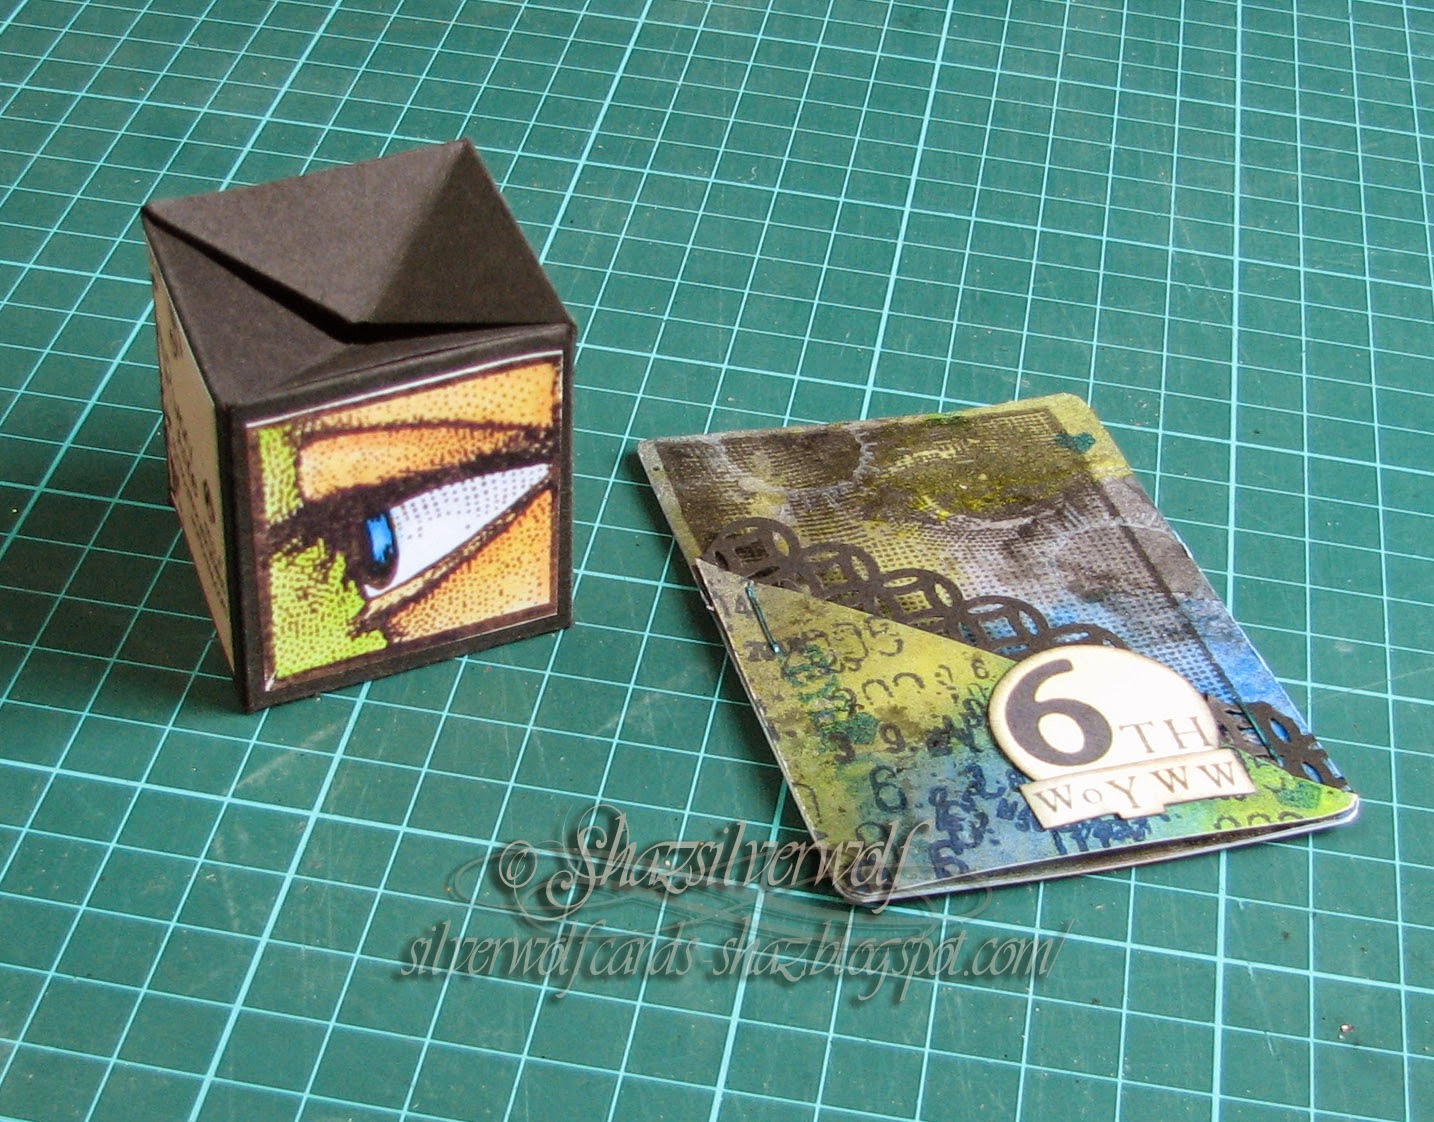
So thats mainly my anniversary WOYWW post, and my ATC's I've already hooked up to trade with people will go out today, and I'll be putting a star for joining in the general swap.
 The rest of the pics you can skip and go off visiting, it's places we stopped at over the weekend.

 These are the Beer Quarry Caves, not a planned visit, we just happened to spot the signs for it. Really very interesting, they've been quarrying stone from it for over 2000 years- the earliest part of the caves dates from Roman times, and they can tell when each part was being quarried by the shape of the roof and supporting pillars- different ages used a different shape to support the roof.
 It's also home to at least 4 species of bats, and there were a few hanging from the roof.

 Very, very cold down there- appreciated the warning Jan!


Sat and had a coffee when we came out, and this fellow was pecking around under a tree with bird feeders in it, getting what had been dropped.


Lyme Regis seafront. This area is known as The Jurassic Coast, for the vast amount of fossils found here.


This one is at Bristol Zoo on Saturday, feeding the Lorikeets. I expected the Zoo to be larger than it was, but it was a glorious day, and a lovely place to walk around in the sun.


On Sunday we moved slightly along the coast to Seaton, Hubby here clambering over rocks. Me sitting down! Walking over the stones on the beach was darned hard work.


 I said that on Monday, we stopped at Weston Super Mare. Something they do every year is have a Sand Sculpture competition.  On display at the moment are winning entries from previous years, recarved for the display. They are truly amazingly detailed.

This one was truly exceptional- if you enlarge the image and look closely, the writing, and the clock face have been carved as a mirror image. This one was on the theme of 'games'- just look at that chessboard!


The amount of detail involved in them is incredible.


Had to take this pic- Sid the Sloth is who I named my Sid after! The wooden boxes at the back are how the sculpture bases are made. A box is filled with wet sand, then compressed, and more sand added until its full, then a second, and however many more are required to get the approximate size of the sculpture, are added.


They have no supporting structure inside, and where you can see some wires sticking out, they are not a framework, but to stop the seagulls landing and pecking them.


Wednesday 20 May 2015

WOYWW #311

Well, we're back, and one week away from our 6th anniversary.I'm sure many of you have seen the photos on some of the blogs from Saturdays Crop, what a lovely day it was too, even though far too short for us.
 I came away with a fabulous selection of ATC's, which I'll show you in a minute, but first pic is a lovely pressie for me from our lovely Debbie Rock (Tattered Rocks).
Just how 'me' is that? It's awesome, and I rather think there may be skull patterned biscuits going to the next crop!


First bunch of glorious ATC's- from top left, Twiglet, Eliza ,Chris & Helen, 2nd row, LLJ, Marg( silvercrafter) Debbie and Cindy. 3rd Row: Head Desker Julia,Zoe,Sam & Kyla.
Second batch, and an amazing paper construction from Mary Anne (I'll show you more in a moment), Annie RosA and Elizabeth & Bleubeard.
Mary Annes contained a fabulous little box, that opens out, to look like this.


 Just awesome.


 I ordered a Stampin Up stamp from Fiona ( Staring at the Sea), and bought a stamp from Julia- what a cute little owl.


Just a few pics of the morning- Julia, Fiona and Lisa Jane.


Marg, Debbie and Julias friend Fiona, with Beloved Hubby in the background attempting to get out of shot.


The Queen of Catering herself, LLJ, who we stayed with on Friday night, and as always, along with her menfolk, made us feel so welcome in their home.


From the front, Zoe, Me,and Sam at the back, then LLJ, and I can't remember the name of who is beside her! Over in the background is Chris.


Final pic, Me, Chris & Zoe- Zoe wanted a 'red, white & blue' photo, lol. Although I could manage two of those on my own, :).

So thats my 'desk' this week. I'll be around later, probably while you are reading this I'm down at the hospital for a second go at being scanned, this time with a lot of Diazepam in my system!It may be much later, as it makes you drowsy, so I'll probably be asleep on the new recliner sofa for a while when we get back.
EDIT:
 Had my MRI, thanks to the magic of Diazepam, and being able to have Doug there, all went ok. Now walking round in my own Happy Bubble, lol.


Last pics, from the Wedding. Pic on the left, Doug, his 'little' brother, Rob, and their Mom.2nd pic, Doug, Ellie, Wendy ( another sister)  and Rob.


 Post below has the Wedding card in, and a pic of the Bride & Groom.

Sunday 17 May 2015

A Black & White Wedding card

So, this did get a mention a couple of weeks ago on the WOYWW post, and I promised a photo step by step guide, along with a How-to, after the card had been given. Well, the Wedding was yesterday, so here is the card.
 The base is an A4 sheet of White Stardream card, scored and folded in half.
 A sheet of black card was cut to fit the front of the card, then another piece of Stardream white was cut to fit onto the black, just leaving a very narrow border.


The white sheet was embossed with the Couture Creations folder, Tied Together, then the shaped edge was cut using one of the Spellbinders Borderabilities, Curved Borders 2.


I've enlarged that image here, you can see you get 3 fancy borders, then two which have a sort of 'stitched' line of embossing, one has a dotted line, and one is plain.They also have notches on them, so you can line up to cut a longer piece. I used the scalloped one to cut the top half of the card.
 I wanted a different embossing on the bottom half, and had a metal stencil I wanted to use for this. So for this one we are going 'old school'! I could no doubt of looked up online, or figured out myself what plates/shims etc I needed to do it with my BS Pro, but in the time that took, I could have done it by hand. So out came the old lightbox.
Two tips for these, if you still have one. First, DON'T use it directly on top of a craft mat- the heat from the bulb will warp it. Yes, been there, done that, got the ruined mat to prove it.
Second, if the light is not as bright as you'd like, put a small mirror, or mirror tile, underneath it.


This was the stencil, and it was only the lines at the bottom I wanted, so it was an easy thing to emboss by hand.


Another piece of Stardream card, and two different embossing tools used- a wider one for the wide lines and a narrow one for the thinner ones. I also needed to make the piece slightly bigger than the lines on the stencil, to allow for cutting it at an angle, so I just moved the cardstock down, and lengthened them. Tip here, don't go all the way to the end of the stencil lines if you are doing this- you tend to get a harsh line that its hard to emboss out. If you go half or two thirds of the way, you can then carry on easily.


 To cut the curve on this one, I used the plain curve in the Borderabilities set. You do need to check your curve against the top one you've already cut, to get a balanced gap between them, and position your edge cutting die accordingly. You will probably also need to extend it a little too, but that's easy to do with the lining up notches.
This was the embossed sheet, which now needed to be cut to fit with the top piece.

Laid out on the black card to make sure they fit, and match.
 Then foam tape added to the back, so they would have dimension against the black card.
And then stuck in place.

Next step was to cut the hearts for the front, and originally I had been going to use the X-Cut set of hearts I have.
Then I realised I didn't like how big the gap was from one size to the next, so instead I used a Nellie Snellen set I have, which has a lot more dies, with a narrower graduation of sizes.

I used the central two dies in the top batch for my topper. The larger one cut from some scrap black, and the smaller from a piece of the Stardream white. The white heart was run through the Cuttlebug in the Swiss Dots embossing folder.
 I matted them together, and mounted them on the card with more foam tape.
 Once that was in place, I used white and black half pearls to decorate the joins in the Tied Together embossed piece, attaching them with Pinflair Glue Gel.


Last but one touch was wrapping black and white ribbon around the card front, and tying in a bow. Final bit was cutting a small piece of card, using the plain border again, and adding the couples names with some small silver peel off letters. Again, foam dots used to add this to the bottom right of the card.
Final pic: the Happy Couple.

An End of an era

An end of an era

I write this with a broken heart, that only time can heal My beautiful, wonderful wifelet Shaz (Silverwolf) passed away peacefully in the ea...