A warm welcome to all my visitors,

Thank you for taking the time to come and look at my blog, I really do appreciate it. I would love you to leave me a comment, even if it’s just to say Hi. It means I can come visit you!

All my designs are original, so copyrighted to me. If I have been inspired by someone elses work, I have named them in the post, and where able, I have provided a link.

Please feel free to use my designs for inspiration, I just ask you to credit me, and provide a link back to my blog.

Thanks, Shaz XX

Showing posts with label punches. Show all posts

Wednesday, 1 April 2020

WOYWW #565- The Still Hangin in there Edition.

Please tell me I'm not alone in not knowing what day of the week it is!  In fact, it's so bad now that the only day I know is Wednesday- for WOYWW and the day we need to put the bins out! So, it's time again to link up over at Julia's place, The Stamping Ground, and show your desk to the world.
Desk shot number one, tubs of punched out flowers, to help finish off another batch of UFO's.


This batch, to be precise.


One down, about 10 left to go. All made by die cutting cardstock with Tim Holtz Mixed Media dies, then backing them with some pre made backgrounds, mainly alcohol inked ones.
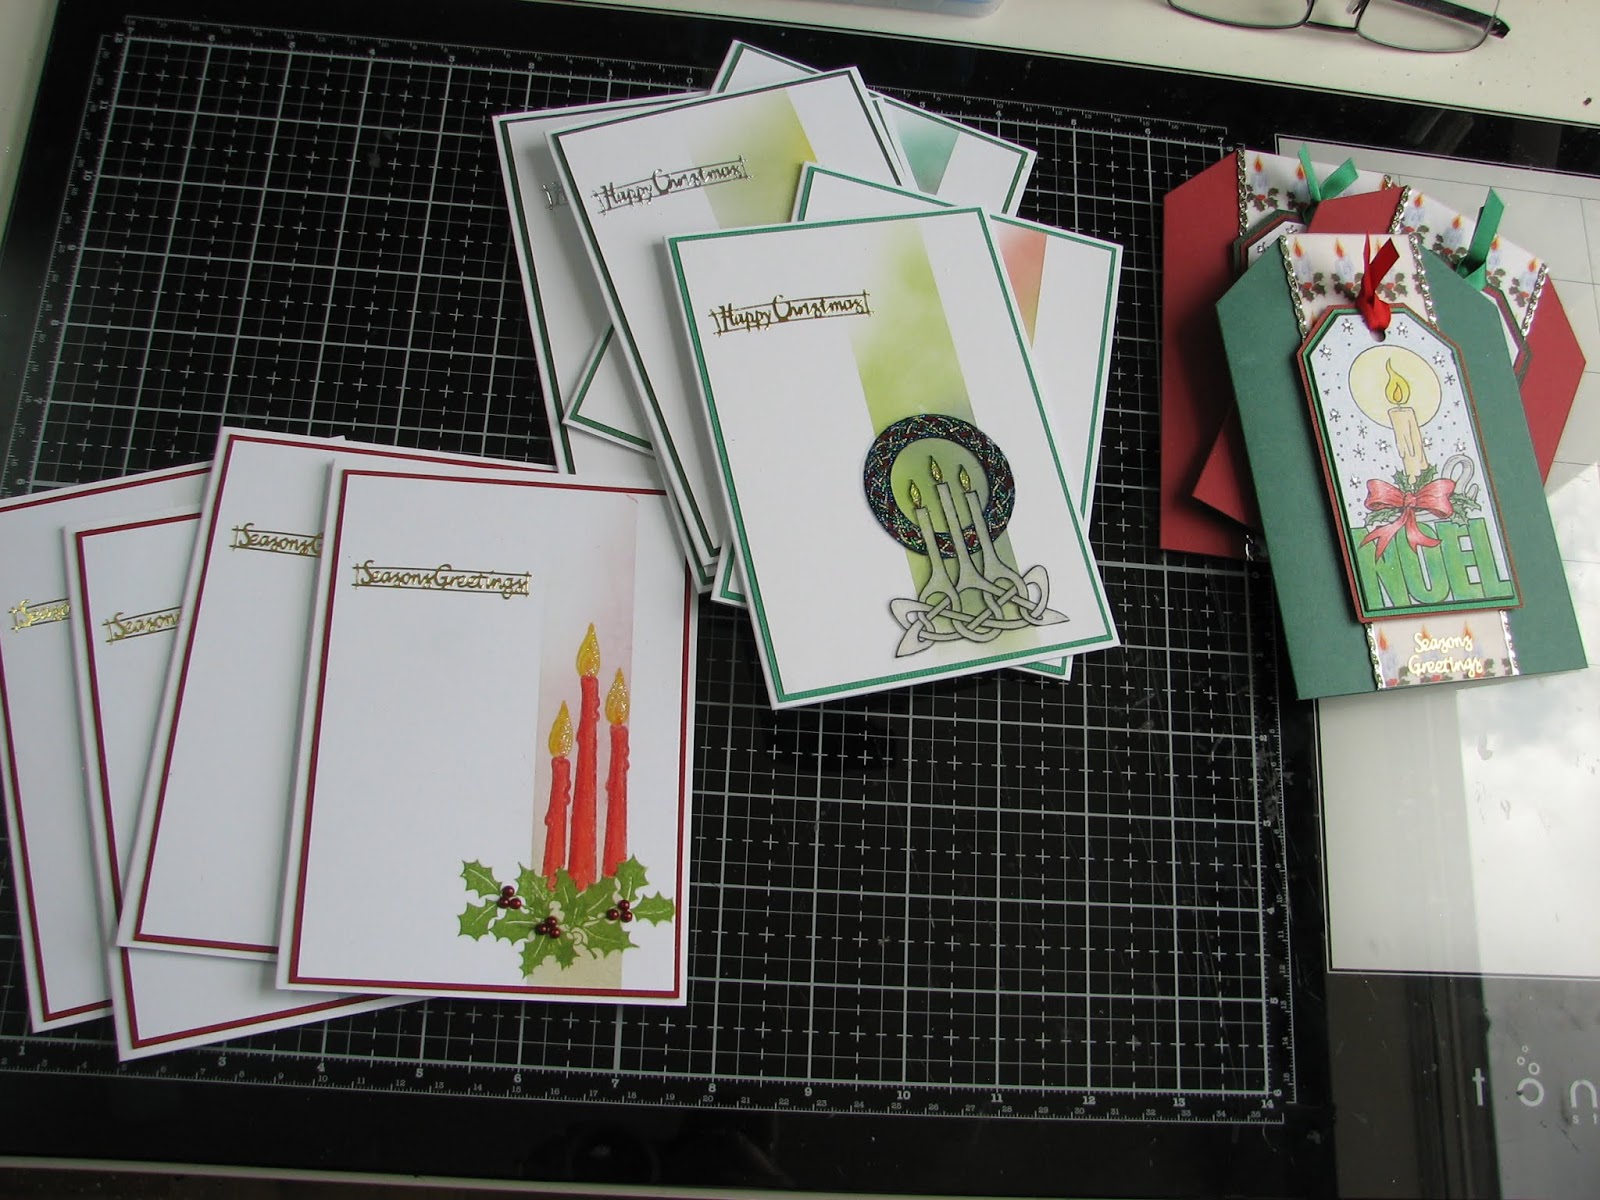
I've got a few backgrounds to stamp on here, extras from the weekends Christmas Card making.
 I've seen Eileen Godwin make these backgrounds, really simple, just mask off a strip of cardstock, and sponge or brush some inks into the space.Then add some stamping. Eileen usually does these as one layer cards, but I'm not actually brave enough to stamp straight onto my card base, so mine end up being matted and layered, but they still come out really thin, so good for posting.
The reason I had extra backgrounds- I started the Christmas cards using the tag stamp on the far right, then remembered I had those Celtic Candle pieces I'd glittered, and wanted something fairly minimal to go behind them. It also worked perfectly for the stamped red candles using Cardio stamps- Christmas by Candlelight.
 I'd expect the tag stamp is long discontinued, I don't even recall who made it, and the Celtic Candles was a red rubber stamp by Aspects of Design, also I think long retired, but there is a larger version, which I have but didn't use, and that one was available as a Woodware clear stamp last Christmas. And with that, I'm done. One quick message for Ali Wade, I have been visiting, but when I try to leave a comment, I get a message come up that seems to think it's a bot attempting to leave it. I think Neet was having the same problem too. I hope everyone is still well, and looking after yourselves.

 Which just leaves ...........And Finally..............., and again, you get a twofer this week.


Which is why I have so many UFO'S!!!!!!!


And this is most definitely true.😇

Thursday, 16 February 2017

The Making Of a Valentines Card

Well, I promised a blog post on it, so here it is.  It all came together fairly quickly, as the general idea had rattled around in my head over the weekend. Of course, the smart thing would to have got it made before I went into hospital, but lets not go there, hey?
 Kept it simple in colours- Black, White & Silver, with a small splash of red at the end.
 We bought the word stamp at the Hobbycrafts NEC last year, as it's a phrase special to us, we use it between us often.
  My Supplies: Silver Encore Pigment pad, Black Memento ink,- there was also silver EP and Black detail EP not in the picture- A Moon stamp from Lavinia Stamps,  and the word stamp from Inkylicious. The notebook was to try out the positioning of the moon & words, to make sure I could stamp it and die cut it with a heart shaped die.
 I had a 7" square card base as a starter, and cut a silver cardstock square to fit the front, then cut a black pearl layer to sit on top of that.
 Next came the stamping, and I first stamped the words in Memento Tuxedo Black, and then heat embossed with Black detail Powder, onto white pearl card.
 Positioning the Moon stamp needed a bit of care, as I wanted it to fit easily into the heart, but not obscure the wording.
Here you can see I had positioned the heart die I was going to use after I'd stamped the words, and drawn lightly around the outer edge of the heart, to give me a guideline.  

 I stamped the Moon using Silver Encore Pigment Ink, then heat embossed using Silver EP. That did actually cover the lettering in a couple of places, but I used a finepoint Black marker to bring the letters back.

The heart shape is from a set by Nellie Snellen, and is the largest die of the set.

I was intending to add a white card layer slightly smaller than the black one, to leave a narrow border, but then I looked at the white offcut that I had die cut the focal heart from, and it made a pleasing layout with  a larger black border, so I went with that.
I'd already pictured that I wanted a sort of sweep of hearts from one corner to the opposite one, so set about sorting some out. There are a various sizes, some punched, some small die cuts, all from oddments of glitter card/ stamped card or paper and vellum.
 I lay out my small hearts,roughly lining them up to opposite corners, then used some dabs of silicone glue to adhere them, so I didn't have to unassemble everything. Finally added the main Focal Point on top, using some foam pads.

Sunday, 13 November 2016

Canvas calendar

I had to wait a while to blog this, as it was a gift for a FB friend, so needed to wait until she'd received it.
 A while back I posted about some stencils I bought at Happy Stampers, and my friend Erika said she had the same one, and that we ought to make something for each other, which I thought was a lovely idea.My WOYWW visitors will remember seeing a picture of lots of punched flowers recently, which were for this project. As usual, I made way more than I need, so the rest are filed away for later use.


This was the card Erika sent to me, a gorgeous Copper paste embossed card, with a background in shades of purple.


 I also gone with a similar colour scheme, oddly enough, using a  canvas board base from The Works. I'd just roughly sponged on some shades of blue & purple Distress inks, then left it to dry.
 I added a sheet of Tim Holtz Tissue paper with Matt medium, and left it to dry again.

Next day I stencilled on the image, called Flower Tree. I used Pearlescent white stencil paste, also from Sweet Poppy.

While this part was drying, I punched out the flowers.Many years ago at the Hobbycrafts NEC I purchased some Paper Blox pads, which are pearlescent/glittered/metallic papers, some in a square format, some long narrow pads. I pulled out a selection of sheets, and gave them a blast with Crafters Companion Iridescent Glitter spray before punching.


In the end, I didn't use all the colours I punched out, but what the heck, now I have some punched flowers in stock, lol.


I used a selection that blended together well, and added one to each of the flowers on the tree, having shaped them a little first with a stylus tool.


The flower centres were created with Crystal Stickles.


I added some toning Liquid Pearls in pinks and purples to the dots in the image.


I knew the wording that I wanted to add, so sorted out some white tissue paper, to make it sort of blend into the background, rather than stand out.


The 'Believe' and 'Never let go of your dreams' are both from Lavinia stamps, and I stamped each twice, as I had to tear them out, and that was a recipe for something going wrong! I used Archival Cobalt ink to stamp, and Crystal Embossing Powder for some sparkle.
 By the way, the phrase is in individual words, which is why the stamping here looks a bit weird.


 I placed the Believe word to follow the shape of the tree,after tearing into individual letters, then added the phrase at the bottom on either side of the tree trunk. All done with Matt Medium.


So I was almost done, when I thought I could add a small calendar to the bottom, to make it functional, as well as nice to look at.
 Cue trip to the shops- I'd actually expected to be able to buy them at the NEC last week, but didn't see any. I got them in a card shop in town, in a pack of 5, for 99p, if anyone needs to get any. Pretty sure it was called 'A Write Card'. If your shopping centre is anything like ours, there are so many card shops, they sort of all merge together!


 I added the calendar with a couple of strips of pale purple ribbon, and made a hanging loop from the same ribbon.
Final touch, I thought a flower tree needs butterflies, so punched out a couple from some glitter paper.

Tuesday, 4 October 2016

Happy Birthday Die Cut cards


A batch of 8 Birthday cards, all from one die, just changes in the cardstock they were cut from, and different coloured matts.
 The die used here is from DieSire, called Birthday Flowers. there is an almost identical one, called Birthday Stars, which as it suggests, has stars in place of the flowers.


This die has to be cut and embossed, otherwise you don't get the 'Happy Birthday' sentiment. Took me a while- yes, and reading the online instructions for it- to figure out what I was doing wrong!
 The pile of die cut and matted images were on last weeks desk, waiting to be mounted.
 The die itself measures a fraction under 6" (15cm) square. Unfortunately, as 6" square card bases actually only measure 5 3/4", I had to go up a size and use 7" square bases, hence the matting & layering. To get them to fit a 6" base would require cutting the image down too far, chopping flowers and so on in half.


  Here I left the die in place, and added some ink through the die cut with a dauber.


  A die cut from plain black card matted onto a bright blue pearl card sheet.


This one was white on white, matted onto gold.
For this one, Black Pearl cardstock onto white.


 Here, Copper Pearl cardstock onto Black for contrast.


A reverse of the earlier black onto blue card, using Blue Pearl and black card.

The last two are both white on white, with the matt providing a spot of colour.The die cut was matted onto a sheet of white, then matted onto the colour.

Lilac in the first one and silver in the final one.

 I punched out a batch of daisy shapes in two sizes, and layered them up for some flowers to add to each one, adding the colour pop.


Friday, 19 August 2016

Embossed Panels Part 2

Another card made with the embossed panels, this one in very soft pink, blue and a silvery purple.
The stencil is Tim Holtz Lace Layering Stencil.
 The techniques I'm using I saw in a You Tube video, and HERE is the link to my first blog post, which also includes the link for the video.


I'd spread Pearl embossing paste through the stencil, then chose some embossing powders to use.
 The three here I have had for more years than I care to recall, and I'm not even sure they are still available.
 I've just done a search, and they are available in America, from Lindys Stamp Gang, but I can't find them in the UK.


 They are called Moonglow powders, and each has a two toned effect, depending on the angle of the light.


 Here is the panel after heating, before being trimmed down.


Trimmed down, and just mounted onto a white card base, and again two score lines were made above and below the design.
 The sentiment is from the Phill Martin Scribbled Sentiments set, stamped onto a scrap of white card and attached with foam pads. A punched flower was added to both ends, with an acrylic gem in the centres.


The second card of this post is this one.
 For this one, Pearl Embossing paste was coloured with Distress Ink- Mustard Seed, Worn Lipstick and Wilted Violet. Although they are quite strong colours, they become very pastel when combined with the paste.

The Stencil is Tim Holtz Flourish.


Each pad was pressed onto a craft mat, then a little paste added and worked together well.  It's a good idea to have some small pots to hand, as even with this small amount, I had coloured paste left over, and wasn't going to waste it. One colour was made at a time, but I think next time I will make all the colours first, then do the spreading. It takes a few minutes to get the paste and ink thoroughly mixed, and this does mean that excess paste starts to dry on the stencil, making it harder to clean.
Another point with this stencil, take care when lifting it and do so gently. Many of the curly parts of the flourishes tend to get stuck in the paste.

Put aside to dry, and when it is it looks like this. You still have the pearl sheen in lovely pale colours.


Now for matting and layering. It's matted onto a pale purple card, now I'm adding a couple of offset triangle 'corners' to it.


This gadget, from Stix2, is a Corner Ruler, and I bought mine in Imperial measurements, although they do make a metric version too. Useful in this sort of situation for getting things straight. 


Mounted onto the card front, and I've used a blank I folded a while back, and had lightly spritzed with some pink and purple inks.


The Sentiment is from a Tim Holtz set, Crazy Talk. Stamped in the same Mustard Seed ink, then cut to a banner shape. Added to the card with some Silicone glue.
 Now, due to the problem I mentioned earlier of some of the curls in the flourishes getting stuck, there were a couple of patches on the stencilled paste that were not perfect.
 So,  simple solution- Hide them! Out came some punched flowers, which I just layered up, then finished with an acrylic gem. Added an extra couple, and one on the banner for balance.

Wednesday, 6 April 2016

Butterfly Tree & Tree of Hope.


 Another two cards here, again both using Sweet Poppy Stencils, but this time with the addition of Gilding flake.
This one on the left is the Butterfly Tree, and after spreading gold paste through the stencil, it was put off to one side to dry. To add the Gilding flake, you need the stencil paste to have dried completely. When you are sure, then you need to replace the stencil over your design, and stick it down again.
 Next, using a small stencil type brush, pick up a little of the gilding glue.What Lucy Ellis showed us next was to dab off most of the glue onto scrap card, and if you use a scrap of black, you will be able to see what you are doing. By tapping off most of the glue, you avoid the problem of it going under the stencil.


It helps if you can decant some of the glue into a smaller pot as well.


After you have added glue all over your image, remove the stencil and drop into water. Now you are ready to add your flake, and this is where it can get messy!
I used some Sweet Poppy flake on this tree, and this flake is actually quite a bit larger than some others I have bought.
Just dab it onto the glue, and let it catch.Keep doing that until your image is covered.
At this point, do not sneeze, cough or make any sudden moves, or you will have flake launching itself in all directions!


When your image is totally covered, then you can begin to smooth it down, by gently rubbing with your fingers.This will start to pull away the majority of the excess flake, which can be be returned to the tub.

Next, take a stencil brush, or any brush you may have with short, fairly stiff bristles, and begin to work your way all over the image to remove all excess flake, and leave you with a nice clear design. You can either return this flake to the tub, or you can start another small tub of this very fine flake, for other uses.


In order to get some gilded butterflies to add to this tree, I needed some gilded paper. I took a half sheet of copy paper, and coated it in glue. I had already got a small pot of mixed flake from previous projects, and I tipped this on top, then added some more flake to fill in gaps. I smoothed it all off, started my tub of mixed bits going again, and this is what I was left with.


I used my Butterfly punch for a few, then used a length of it to cut from the Tim Holtz strip die.


I used an X-Cut punch to cut out some dragonflies too, which I wanted for the Tree of Hope card.


After matting each tree onto some dull gold card,I added a border punched edge to the Tree of Hope, then mounted it onto a 6x6 black card base. Using some Pinflair glue gel, I added a few Dragonflies to the tree. A very small Happy Birthday greeting was added below the tree.
The Butterfly tree was given a similar treatment,but was mounted onto a 5x7 white card base. The greeting this time was added on a strip of gold cardstock, and another punched border added to that. The butterflies were also added with the Pinflair glue.


An End of an era

An end of an era

I write this with a broken heart, that only time can heal My beautiful, wonderful wifelet Shaz (Silverwolf) passed away peacefully in the ea...