A warm welcome to all my visitors,

Thank you for taking the time to come and look at my blog, I really do appreciate it. I would love you to leave me a comment, even if it’s just to say Hi. It means I can come visit you!

All my designs are original, so copyrighted to me. If I have been inspired by someone elses work, I have named them in the post, and where able, I have provided a link.

Please feel free to use my designs for inspiration, I just ask you to credit me, and provide a link back to my blog.

Thanks, Shaz XX

Showing posts with label Embossing Folder. Show all posts

Sunday, 26 April 2020

Christmas Card Club #9- Bauble/baubles

Back with more Christmas Cards, this fortnights theme has been chosen by Kate, and she'd like to see a Bauble or Baubles on our cards.
 I pulled out quite a few on the theme from my Christmas UFO's, and ended up with another 18 cards for my box.


This is the collection of UFO's, some, like the glittered pieces, I did last year, others are leftovers from a couple of years ago.


In the end, not all of them got used, so they're back in the UFO folder.


I also did some pieces run through Bauble EF's, to use as backings.
 I have 3 folders with Baubles on, the blue one is by Creative, called Baubles, The one on the top right is an old Papermania one, and the one below it is another oldie, from Cuttlebug.


These are glittered baubles, the stamp was by Great Impressions, bought many years ago at the NEC.

I think I was most surprised to find matching glitter card in my stash for all of them!
 Die cut banner and small sentiment peel off added, along with a couple of acrylic gems. I'd added the Cuttlebug folder backgrounds to the card base.


These four were done with a Sweet Poppy stencil & paste, with a small sprinkling of glitter added. The stencil is called Damask Baubles.


 These four use the Papermania EF, and I've just added a few acrylic gems for a little bling. Added a die cut banner and peel off sentiment again. Also used up some Christmas paper from my stash to cover the card bases.


Final four  are again Sweet Poppy stencils and paste, this time with foil added. The stencil for the two on the left is called Christmas Season, The top right is Snowflake Bauble, and the bottom right is Holly Baubles. All were matted onto some holo/metallic foil card, then the card bases had some Christmas stash paper on them.

 So thats it, my cards for this fortnights challenge all done.

Thursday, 19 March 2020

Invading the UFO box!

So, five cards made so far from the UFO's. The first two are both Eclipse cards.
I used Happy as one Eclipse, and Birthday for the second card. Die cut a small sentiment to complete them.
 The stamp is by Phill Martin, called Birthday Cloud, and is roughly A5 in size.
The Alpha dies are by X-Cut, called Wedding Alpha & Numbers. 1⅜" or 3.5cm high.


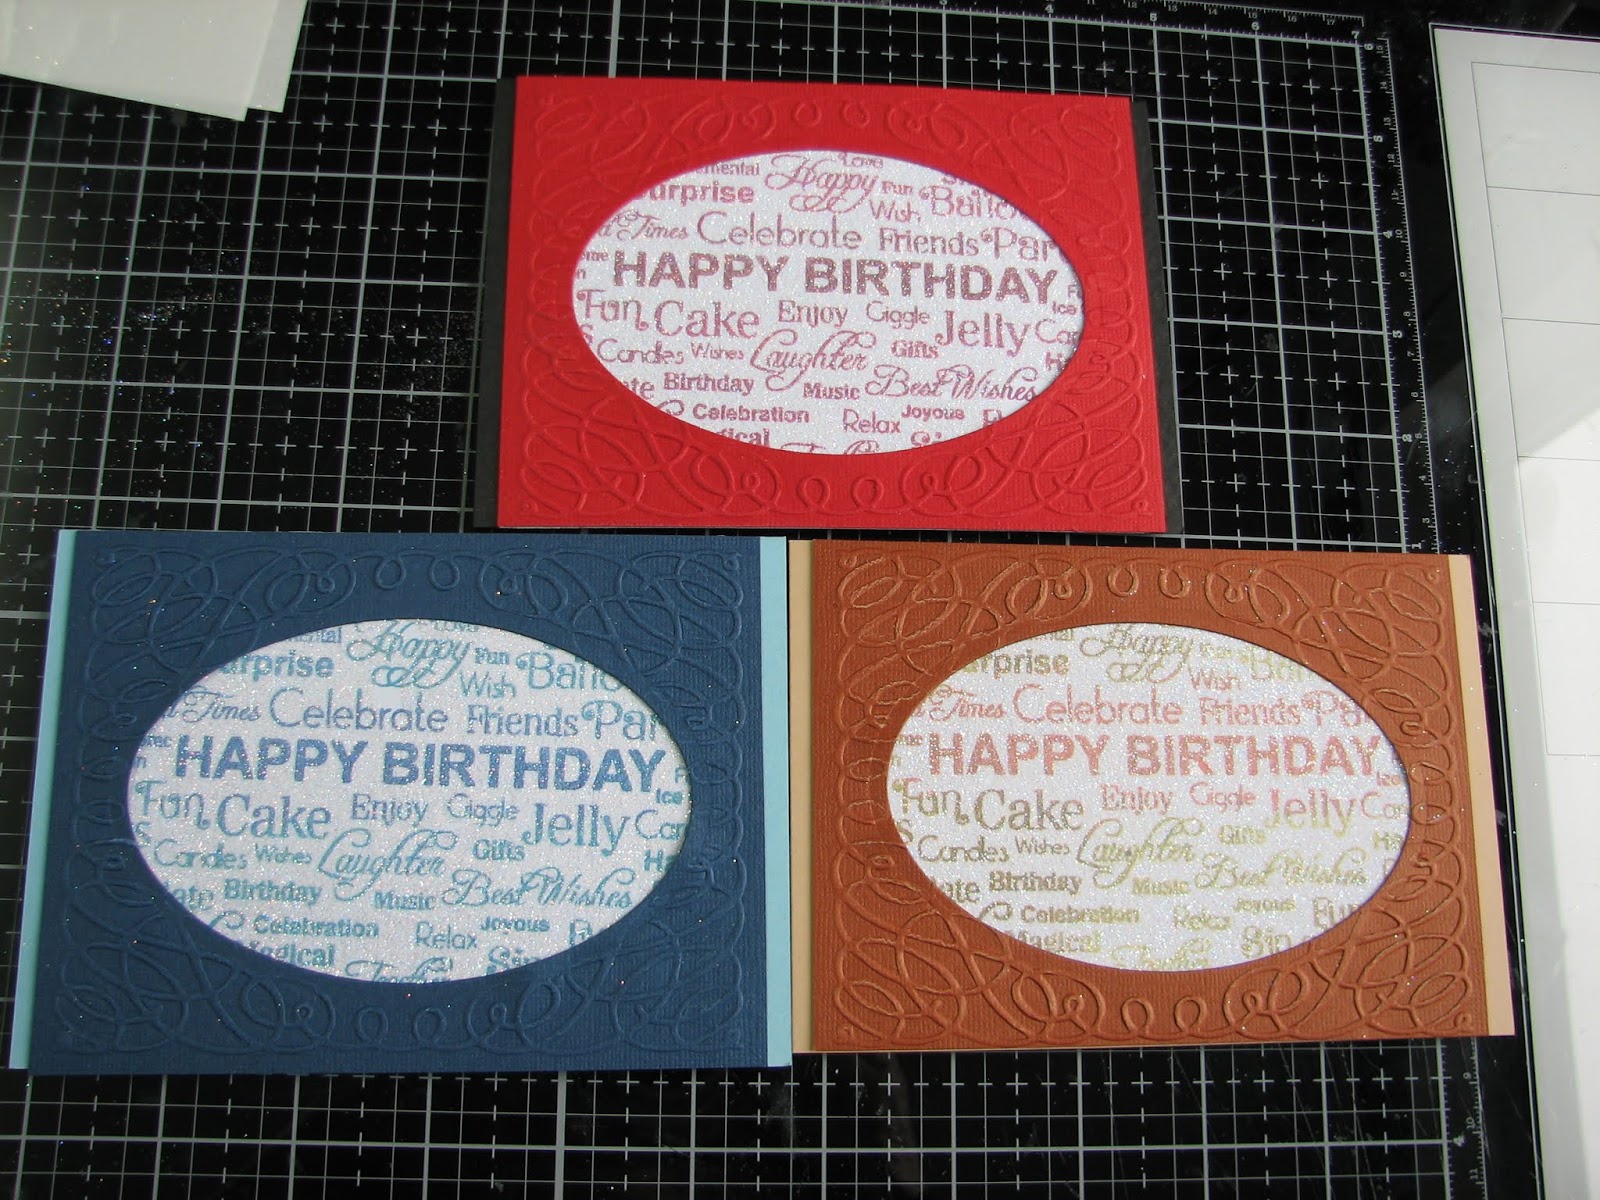
The other three use the same stamp. I had stamped a number of these in different colourways, when I made some into Shaker cards.


 For these, I added some double sided adhesive sheets, then sprinkled that with Glamourdust. Because the Glamourdust is so fine, it doesn't hide what's behind it, just gives a little sparkle.
 The cover frame is an old Cuttlebug Embossing folder, Scrollwork Frame.
 Then I cut out the blank oval in the middle with an oval die. The Embossing folder is slightly too small to cover the front of the card, so I trimmed it down to leave a contrasting border, from the base card, on each side.

Wednesday, 19 February 2020

WOYWW #559- The Return to Normal Service Edition.

And of course, by that I mean a bit of enabling to share on this weeks desk sharing link up, hosted as always by our beloved Julia, over at The Stamping Ground.
 But the first thing on my desk this week is some home cut stencils/masks.


Cut on my Silhouette, using Mylar stencil sheets.I buy them off E-Bay, and they are a great price. I buy the 125 micron as that seems fine for my uses, which are mainly to ink through. I'd possibly say you may want the thicker 190 micron (also available on E-Bay) if you wanted them to put paint or stencil paste through.


I used  deckle edged cutting files for these, just for a bit of a change. I'm intending to do some more Christmas cards (and probably others) with these, based on a design I saw posted on FB, and the maker very kindly said it was fine to CASE them.


Last week being Valentines day, and here is Hubbys card. Also inspired by something similar I saw on Fb. That one used punched hearts, in 3 rows. I made some hearts using cardstock & UTEE. some of which had glitter sprinkled in, a couple have stamping on the cardstock, and one had the impression from a crackle stamp in silver impressed in it.

And now, the moment you've all been waiting for.....drum roll....the Enabling!


 A couple of new stamp sets from VI, there are more but these two were the ones that grabbed me.


And a 3-D embossing folder from Tim Holtz,called Mechanics. Gives a great impression of riveted metal pieces. Be cool for masculine type cards.


A bunch of Christmas cards made, based around the star one from a couple of weeks ago. I found a pad of vellum in with my Christmas stuff , have no idea how many years ago I bought it,but I'm trying to get stuff thats been here years used up! I just used bauble die cuts instead of stars. Post is below this one.


So thats me done, just leaves room for.....And Finally......


Monday, 1 April 2019

Christmas Card Club #7- Santa

Late this week, but I'm finally here. This fortnights Challenge was set by Rita, and she wanted to see Santa on our cards.
 I've made a total of a dozen cards, in three different colours, and two designs.

 Not the most fantastic photos, sorry, but the silver EP and the Sparkly one do not play nicely with the camera lens!


  There are three green, three blue and 3 red.
 In each case I stamped then die cut with a tag die the Santa image, then die cut three more white tags and embossed each with a Christmas Embossing Folder.

I found it's better to die cut the tags, then emboss, rather than the other way round, as the embossing gets flattened going through the machine to die cut.


Made a small hit on my eyelet stash, to add one to hold each pair of tags together.

Added the tags to the card front with foam pads.


Two shades of Distress Oxides were blended over the edges.


I added Christmas Vellum to the card front, and found that if you use double sided adhesive sheet over the whole of the back of the vellum, it doesn't show. The drawback is- don't use textured card! You can see the problem you get with the red card, which was a hammer finish.


For the second design I used a stitched oblong die to cut out the stamped image and also an embossed piece the same size, then just adhered to the card. The embossed piece with DST, the image with foam tabs, just offsetting them slightly.


This Santa stamp is a really old one, it used to be wood mounted, so must be 15+ years old. I believe it was by Rubber Stampede.


This one, called St Nick, was also a rubber wood mounted stamp,so is also quite old, but it is available now as a clear stamp, part of a set from Butterfly Kisses, which can be bought from Hobby Art Stamps.
I'd originally added Vintage Photo DI around the edges on top of the colour, but it dulled it too far, so I ended up going over it with a second darker shade of the colour used.


On a side note, we see Santa in a Red suit these days, but pre-1930's, Tan or Green were the traditional colours. Thomas Nast, actually the artist who developed the Santa image we all know and love, then changed to painting him in a Red suit. This was spotted by an artist called Haddon Sundblom, who was commissioned to do a Christmas advert for Coca Cola, and he used Red as it tied in with that theme. And the rest is history!

Sunday, 24 June 2018

Christmas Card Club #13

Hi Ladies, I'm late, but have some cards for this week. Lorraine has set this fortnights challenge, which is Candy Canes/Gingerbread.
 Unfortunately, I don't have any stamps or dies that fit the theme, so I've gone back to a Challenge I missed whilst on holiday. That is Christmas Wreaths, which was Ritas choice back in April.

 The first two cards use a Penny Black stamp, called Adornment. The first is stamped in  Encore Metallic Green pigment ink, and then heat set with Stampendous Metallic Green embossing powder.
 The stitched circle dies were bought from The Works.
I added a few acrylic gems to give a bit of sparkle.
The embossing folder used is a Cuttlebug one, and I accidentally put my cardstock in upside down, so it's actually debossed!


This time stamped in Silver Encore pigment ink, and heat set with silver detail powder. Red gems in assorted sizes gives this one it's bling.
 The embossing folder is from Craft Concepts.


For the next two I built a wreath using a die from Sue Wilson, called Twig Wreath as a base, and then some holly twigs cut with the Tim Holtz Christmas Mixed Media die, and the Winter Greens die set. I've added some red gems for berries, and a bow at the top. I have no idea where the tiny Poinsettia die cut is from, I rather think someone must have gifted it to me. I had 2, in different sizes, along with some tiny deer. If anyone knows what the die is, I'd love to know. I rather think the sentiment die cut was gifted too, as I don't have a die like that.
 The embossing folder is by Dovecraft.
Last card, and made exactly the same way, but this time was cut from white glitter card, and some golden holly added, along with the smallest of the two poinsettia flowers.


The background is a folder that I think was a magazine freebie, as it has no info on it.
 The sentiment is also from an embossing folder by Crafts Too, and has  6 sentiments strips on it.


The Sue Wilson twig wreath die cut, along with an assortment of foliage.


Three of the Penny Black stamped images, I haven't done the copper one yet.


Some embossed backgrounds I made up, you can see the Crafts Too one 2nd from the right.


Thursday, 22 February 2018

Quick & Easy Butterfly die cut cards

As promised yesterday, here is the blog post on the Butterfly cards.
 I saw a You Tube video a couple of nights ago making these cards, and I'm sorry but I forgot to make a note of the name of the crafter, and trying to search You Tube using key words brought up masses of similar cards!
 The lady used plain vellum behind the Butterfly, and added colour using markers.
But it reminded me I have some vellum sheets that are multicoloured, and thought I'd use up some scraps to do these.
 You could also use plain vellum and blend ink over it, or I reckon you could also use acetate and Alcohol inks, or Alcohol markers.
 The Butterfly die is a Tim Holtz/Sizzix Thinlets set:


 You get the base Butterfly, and the Wings overlay, which is the part used to cut out the cards.
Base are the top pair, overlay is the bottom ones.


The card bases themselves are White Pearl cardstock,topfold, and made by cutting an A4 sheet in half lengthways. It's better to use white as a base, as darker card will not show the pattern on the vellum very well.

4 pieces of black cardstock for the fronts, I've used two Black Linen card, and two plain card so I can run them through an embossing folder. They are trimmed to leave around a 1/4" border all round.

 The two folders I chose are a Cuttlebug one, called Forest Branches, and the stone wall effect one was bought at a Craft fair, and I have no idea of the brand!

Both are slightly too small to fill the card front in one go- I think they made them based on the standard US card sizes, thank heaven they are getting larger these days!


Anyway, there is a way to resolve this without leaving a harsh line where you joined it.
I ran the Forest Branches through the 'Bug, and as you can see it doesn't quite extend all the way to the bottom.
 Now, for the fix.
 Line up your cardstock so it extends out of the bottom of the folder,and allowing the pattern to continue down.  Like so:

Now, lay your top plate in place, BUT line up the edge of the B plate with the very edge of the Embossing Folder, not past it. This looks odd in my picture, but that's because the B plate is a bit warped.😀
 Now run through the machine again.


Result- a completely embossed piece, with no lines.


After both were embossed I started cutting out the four butterflies.

Also, be careful where you place the cut out. You'll need to add DST/tape runner later to matt the panel onto the card, and if it  goes behind the vellum on the wings it will show. You can see bottom right I cut that one a bit close, so had to trim down a strip of tape for that bit.


Now for the vellum.


Having a look through my stash, I found these oddments.
Hard to believe how much vellum was a 'thing' back in the day. Rarely see it used now except for Parchment work.


 I cut the vellum down to fit behind the butterfly cut out.

Used a Stix2 tape runner to attach it to the back.
It's a good idea to mark the top of the vellum, so you get the pattern you wanted.


Vellum all stuck down, ready to add the butterfly bodies.


I also cut out the bodies of the butterflies using scraps of glitter paper/card. You can skip this, or add Stickles/Pearls to the bodies.


Trimmed them to shape, and added to the body with Glossy Accents.


 The next step was to fold up the wings slightly either side of the body, then attach to the respective panel with glue dots.


The panels added to the card base with DST.


Now for a sentiment. I chose some Text dies from Crealies.  
They are only small, so ideal for smaller cards. And not expensive either.


I went with Birthday, Sympathy and Get Well, and cut each sentiment 3 times, so I could layer them up for some dimension. I cut them from the same white pearl card as the bases.


I layered them up with Glossy Accents, and put an acrylic block on top to make sure they stuck well.
 While those were sticking, I stamped inserts for the card.
 The sentiments are from Phill Martin sets, Feel Better Soon and So Sorry for you loss from a set called Mini Baroque Occasions Sentiments, and Very Happy Birthday from the Butterfly Elegance set.
 I added some random small butterflies of unknown origin to the edges, all stamped In Versafine Majestic Blue.
 The sentiments were added using Glossy Accents again, and this was when I realised I hadn't actually kept the dot from the 'i' in Birthday.
Rectified that with a clear acrylic gem, from a pack of Anitas 2mm stones.


An End of an era

An end of an era

I write this with a broken heart, that only time can heal My beautiful, wonderful wifelet Shaz (Silverwolf) passed away peacefully in the ea...