A warm welcome to all my visitors,

Thank you for taking the time to come and look at my blog, I really do appreciate it. I would love you to leave me a comment, even if it’s just to say Hi. It means I can come visit you!

All my designs are original, so copyrighted to me. If I have been inspired by someone elses work, I have named them in the post, and where able, I have provided a link.

Please feel free to use my designs for inspiration, I just ask you to credit me, and provide a link back to my blog.

Thanks, Shaz XX

Thursday 31 March 2016

Plastic Canvas Drawer organisers- My 500th post!

Ok, so I showed pictures yesterday of the finished job, with not a great deal of info on the actual doing. Lots of you asked questions about it, so this post is to clear things up. First off, this is the blog of the lady who did this, A Page in Time.I came across it on Pinterest, and went to have a look.
To do this, you need 7 count plastic canvas, not 10 count. I got mine from Amazon, a pack of ten sheets. Depending how many drawers you need to do, you may need more than one pack. I bought two, and only used a couple of sheets from the second pack.
 I'm not going to give measurements, as what you need will depend entirely on the size of the drawers you are making the dividers for. I can say that my ALEX IKEA drawers are longer than the plastic canvas, so in a couple of cases I joined sections together to make them longer. The Pinner did say you could use a glue gun to hold pieces together if needed, and that would be one solution. I just did it by overlapping the lengths. You can see that in this picture.
If you do need to make the front to back lengths longer,and don't want to use a glue gun, I'd say make your first section with the lengths cut from the sheet, then add on to extend it afterwards.
 First thing you need to do is decide how tall you want your dividers to be- I chose to go about two thirds of the height of the bottles.You also need to work out how many lengthways strips you will need, and how many widthways ones.

Once you have cut all your strips,the next thing is to mark how wide each 'cell' is going to be. You want it to hold your bottles comfortably, so they don't rattle around, nor are they too tight.If you cut your first strip to the width of your drawer, then mark on it the width of your bottles, you will be able to tell how many lengthways strips you are going to get across your drawer.

Standing the bottle on the canvas strip, and marking the outside edge seemed the easiest way.
 You can see here for the Dylusions spray, the mark is made 11 sections from the end. So I will be cutting a slit at the 11th section, leaving 10 full spaces between cuts.
Using a marker pen, I marked every 11th space all along one strip.
To save counting on each strip, just lay the marked strip onto an unmarked one, and transfer the dots.

Now to start snipping. Take one of your lengthways strips, and cut the first section, going about halfway up. Now take one of your widthway sections, and cut the first line on that too, also about halfway up. Now test fit them together.


My first cutting was not quite far enough up each strip, and the pieces do not fit flush. So I snipped another square out of each strip, and retested it.


 Now I know they will sit flat, and I can cut all my strips to that height. This saves getting them all cut and finding they don't sit flat, and having to go back over all the strips.


Once you have all your strips cut, divide them into two piles, lengthways ones, and widthways ones.


I found these were easier to put together on top of the desk, and transfer to the drawer after,as the IKEA drawers do not fully come out of the casing. First off I took a widthways section, and held it with the slits at the bottom.
 Then I added in the lengthways sections, which slid up on the slits. This first bit can be a bit fiddly, as sometimes getting one in place means another drops out, but if you lean your hand onto the ones you've already done, and just lift up the end you are putting another in, it works ok.


You could of course also use a blob of hot glue in the corners to hold this in place, and may be a bit less frustrating, to be honest! Once you have this first row in place, the rest is much easier, as you are just slotting the widthway sections down from the top.


When your divider is completed, it's time to transfer it to the drawer. To do this, simply fold it together, by pushing towards the centre, from two opposite corners. Then it goes flat.


Lift this up and place it in your drawer. Just pull out from opposite corners again, and you have it ready to start filling.


As I said yesterday, I wanted to get my Brusho's in there as well, so did a little rejigging. Some of the smaller re-inker bottles I moved to the top drawer, and then I made a new piece that would hold the Brusho's,and sit behind the Distress Ink Reinkers.


Edited to add: Remember to keep scrap pieces- ideal for using as stencils, or adding to mixed media canvases!


Links:
 Plastic Canvas
A Page In Time Blog

Wednesday 30 March 2016

WOYWW #356

I hope everyone had a good Easter, although the weather wasn't anything to get excited about, but then that's Bank Holidays for you.Talking of Easter, those of you who know me on Facebook will have seen this, but those who don't have a look in your local store for Cadburys Egg & Spoon packs being sold off.
The reason being, you get two very small spoons with them, which are perfect for sprinkling glitter/micas/embossing powders etc. Added bonus- the box is great for storing those egg shaped blending sponges in. The eggs are rather nice too!
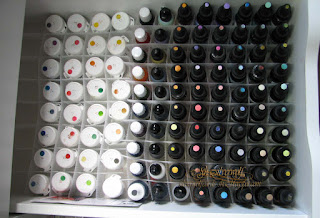
And onwards. Mine is more of a 'Whats IN your workdesk' this week, the reason being something I spotted on Pinterest a while ago. A lady had made some sectioned storage for her  Stickles/reinkers etc.  It caught my eye, as I'd already got fed up with mine sliding all over the place whenever I opened the drawer, and there were always just too many for one size of storage box, or too few for the next size up, bringing me back to square one.
What she had used was plastic canvas, and created dividers for all her bottles, making the sections the right size for the bottles. I'm sure you've all seen the cardboard dividers in boxes of wine for instance in supermarkets- well this is done exactly the same, by cutting part way up each strip, then arranging them together.


There was quite a bit of mess made in the process, this is one of the tidier shots!


This is what the drawer looks like after the dividers have been put in.
One thing I like about these IKEA drawers is that they pull out far enough that you can access stuff at the back of the drawer.


 Distress Stains- I've only bought colours that really speak to me, and if I do get any more, I can move a row of the Adirondack re-inkers back.
 I coloured some stickers with each colour, then punched out a circle for the lids. For the Adirondack re-inkers I used small circular dot stickers, and just coloured them with a bit of ink on a cotton bud.

The next drawer up now has the Distress Re-inkers in, plus all my random re-inkers. Versafine/Archival/Marvy/ some embossing ink reinkers, those horrid Staz-on white & pastel ones, plus some for the black/brown Staz-on pads.
Just looking at that space, I'm wondering if I can re-jig it a bit, and get my Brusho's in there too.
 The DI's have the same small dot sticker on top of each one. It's not perfect, but it works.


This is the top drawer- at the front Stickles, then some Liquid Pearls. Following that are alcohol inks.
 I'm thinking that if I moved the random re-inkers to the top drawer, I could definitely get my Brusho's in that drawer.


Mind you, I'm working on doing the bottom drawer at the moment, to hold spray inks. I don't have a vast number of those, so I may have room in there for them. We'll see.
This is a slightly messier shot, mid flow. I must admit, it's rather pleasing to see so much colour when I open a drawer!
 Well, I hope you all have a lovely Wednesday, and we'll all meet up at our lovely leaders place, The Stamping Ground, and leave her a virtual hug.

Thursday 24 March 2016

Christmas Wishes

Just browsing through the folders on my PC, and came across these cards I did a few weeks ago, and realised I hadn't blogged them yet.
 You are probably sick and fed up with stencilled cards by now, but sorry to say, there are a few more to come yet!
Sweet Poppy stencils again, this time done in Gold paste, and sprinkled with Gold glitter before it set. I do have to say, that for adding glitter, the Sweet Poppy paste does beat the Dreamweaver one, as Sweet Poppys is a gooey-er paste, so the glitter sticks better.
Dreamweavers is a slightly drier paste, and I've found the only way for success with glitter with this paste, is to come back to it after the paste has dried and add a glue through the stencil.


This pair of cards was done using Glossy white paste, and Crystal glitter.The punched Holly edge is an old Fiskars Border punch.


This pair are done in silver paste and glitter. All the images were matted onto a matching card,then onto a black paper punched with the holly border,and finally onto a 6x6 card base.
 The last four had a white spotted ribbon knotted on the spine, whilst the Gold card had a matching gold ribbon.

Wednesday 23 March 2016

WOYWW #355

Another week gone by, another Wednesday here.  Where is this year going already? Barely a week until we're in April, this weekend is Easter, AND we put the clocks forward. Yes, I'm telling you now. Yes, I'll be reminding people all the way up till Saturday. Yes, I will completely forget about it Saturday evening, and quite possibly get half way through Sunday before realising I'm in my own little time zone. Happens every year. I'm assuming you've all checked in with our lovely Lady of Deskiness, Julia, (It's a word, because I say so), over at The Stamping Ground.
A lot of desk messiness here, but it has actually got a purpose. I've just been putting DST on the back of all the images so I can start matting them up to mount onto cards. There have been quite a few cards made from the Sweet Poppy stencils, over the last week, mostly posted below this one. There are about 8 more Christmas images there, so that'll be more for my stash, and will be posted up later in the week. The white on black stencilling were versions I did of two stencils in black on white- Leafy Flower, which is in one of the earlier posts, and another one called Black Orchid, which is this one.

I wanted to try them out in black and white versions.


They both make quite a large image- they were both mounted onto a folded sheet of A4 card. The Black Orchid one here was just matted onto black, then white cardstock first. By the way, I used Black Glossy stencil paste, then sprinkled it with Black glitter before it dried.


I added the sentiment from a sheet of small black birthday greeting peel offs.


Don't know if you can see the glitter better on this one? Love this image, and can see a lot of potential cards being made from it.I'm hoping that by working fairly quickly, I should be able to glitter the flowers and leaves different colours.  So thats my desk for today, quite possibly a few more of those images will have been transformed into cards by tomorrow. Have a great Wednesday folks.

PS. I had an appointment sent through last Thursday, to see the Oncologist at the QE on Friday! Nothing like short notice, is there? Anyway, appointment was for midday, finally got to see someone at 2.00pm- why do they make so many  short appointments, when they must know with this subject, most people will take more than 10 or 15 minutes to see? Anyway, the decision is, that as I had two rounds of Chemo before my surgery, that would have got any nasties in my system, so they will just be monitoring me through frequent checks. The mop- up chemo usually comes into play because, like our Shoshi, it's generally surgery first, so then they do the chemo to make sure nothing escapes.I was pretty much expecting that would be the route taken, as Chemo damages healthy cells as well as bad ones, so I didn't expect they'd bother.

Tuesday 22 March 2016

Bare Trees and Brusho's.

Still with the Sweet Poppy stencils, this one is called 'Walk in the Park'.
 I used the Glossy Black Stencil paste here, on top of one of my Brusho backgrounds from a while ago.

After I'd left it to dry and trimmed it to size, I realised it reminded me of some rainbow glitter card I've had for ages- I remember buying it at the NEC years ago!


 The colours were similar enough to make a good matting layer. This glitter card is not as rough a surface as some, but not entirely smooth, either. So as well as using DST to matt it, when I peeled the backing tape off, I smeared a little Pinflair Glue gel onto the tape.


It gives you a little 'slideability' for placing, but also ensures that the layer will stay firmly stuck to your background, which can often be a problem with glitter card/paper.
You may just about be able to see the blobs of glue squidged onto the tape here.


I used an offcut of the rainbow card to die cut a sentiment for the card, using a PoppyStamps die, called Vintage Happy Birthday.
 By the way, Poppystamps, and Sweet Poppy  are no connection to each other!
The die cuts out at 2.3"x1" (Happy), and 3"x1" ( Birthday), which is 5.9x2.6cm, and 7.7x2.6cm respectively.
 I'd mounted the image onto a 7x7" card base, then added the sentiment at the side.
 To attach the sentiment, I used something Beloved Hubby bought me a while back- Blu Sticks, by Blu Tack.


Its easy to put on the die cut, just smear it on over a scrap piece of paper. It goes on Blue as you can see, but it dries completely clear. I use a cotton bud to remove any excess that gets in the  spaces of letters.


You can see here after it's dried on an enlarged view of the card- no trace of glue showing.


This is the Sweet Poppy stencil,                                                     and this is the Dreamweaver one.
                                                   Size-wise, they are the same too.


Monday 21 March 2016

Leafy Flowers


Leafy Flowers is the name of the next Sweet Poppy Stencil I've used here.This is the image done with Glossy Black Paste, (Sweet Poppy), and then sprinkled with black ultrafine glitter.


As you can see, I worked this one upside down- having learnt this lesson off Lucy Ellis, I can't believe how much difference it makes to getting a good clean print.


 It was matted onto a black smooth glitter card, and trimmed leaving a narrow border on three sides, and a wider one at the bottom.I intended to make another paper ribbon & bow for it, using black paper.


This time, I still used the ribbon, centre and folded small bow, but I added the triangular shaped 'bow ends' you can see here.


I took a piece of the white pearl card I'd trimmed off the image, and wrapped the black ribbon around it. The folded bow was made up, and held together with a glue dot. I added the tail ends to the back of this, also with a glue dot, and used another one to secure the bow over the ribbon.


The whole panel was mounted onto a card base made from a folded sheet of A4 white pearl card.


The end result. I added some flat back half pearls in black to the top left and bottom right corners.This is working in my favourite colour combo, I just love how it always looks good. There will be another one of these later in the week, I've also done a white on black with the same stencil.


Thursday 17 March 2016

Lavinia Stamps Scenescapes & Sweet Poppy Stencils.

Okay, so one thing Lucy Ellis mentioned was that the Lavinia Stamps image stencils work really well with the Scenescapes pre-printed backing cards that Lavinia stamps make. There are quite a few of them available, so well worth checking out, as you can use them with Lavinia Stamps as well.
This is one of two cards I've put together using them. The fairy stencil was done with Sweet Poppy Glossy black paste, and before it had time to dry, I sprinkled a little of their Superfine Glitter, one called  Crystalline Rainbow, onto her wings, and the stars around her hand.
 After it had dried, I matted it onto toning shades of pearl cardstock, and finally onto black cardstock, just leaving a narrow border.
 Then I had a thought, as I was planning to put this onto a 7x7" card blank, and had space to fill.  I saw a gorgeous card on Sunday ( Not sure if it was a Sweet Poppy  DT piece, or one of Pink Tulips own), where the card had a lovely paper ribbon & bow on a narrow panel.
 I had already bought the die set, another Sue Wilson one, so set about cutting the
pieces out.  I cut two of the ribbon pieces, one of the smaller rounded bow, and one centre piece for it.
 I have to say I'm unsure what the paler pieces are shown on the ribbon for, as it doesn't actually cut them out. Presumably it's what you could emboss onto it.
 I had two lengths of ribbon, as one alone wasn't quite long enough to do the full length, and fold behind. So I made the join underneath where the bow was to go. The bow was added with a glue dot, which was also what I used to secure the bow when I folded it. When it was on the card, I felt it needed something, so found out some square acrylic gems in purple.

 I do like this die, as it has a number of possible permutations. I believe there are some other styles in the range too.


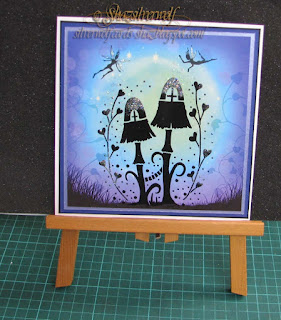
 The second card also sits on a 7x7" card base, and was also matted and layered on toning card to fill the front. This one also uses Glossy Black paste, and again it was sprinkled with glitter over the tops of the mushroom houses before it dried. I did that as I planned to stamp a couple of Lavinia Stamps fairies sprinkling fairy dust from the top of the card. Although you can't see it in the picture, I have dotted Crystal Stickles for the fairy dust, and have also added it to the fairies wings.


Wednesday 16 March 2016

WOYWW #354

Good Morning all. I hope everyone is having a good start to the day. As usual, Wednesday means time for our Show & Tell, Meet & Greet over at Julias place, The Stamping Ground. Today finds me doing things with some of the pieces I stencilled on Sunday & Monday. I'd been punching out some butterflies, from glitter paper, to go on the butterfly tree stencil. Sunday  I went to a local craft store, Pink Tulip, along with Marg, Silvercrafter, to see a demo by Lucy Ellis of Sweet Poppy Stencils. It was a most enjoyable couple of hours, and much was spent, and much was learnt. I've done a post about it below this one, and if you have stencils, and get any problems, it's well worth you popping back when you get time, to read it, as I've included all the excellent tips and advice Lucy shared with us.
Something I forgot last week, was that the week previous to that, I'd had my first CT scan since my surgery. Last Thursday we had a meeting with the surgeon, Mr Patel, and the good news is that the scan was all clear. I get a scan every 6 months, for two years, then every 12 months for three years, before they declare me totally clear. But for now, all is good.
These are on another desk drying out. Some Holly Wreath stencils, and some Mistletoe Wreath ones. The Holly ones have had red acrylic gems added, the Mistletoe ones have half pearls. When I blog them, I will try to get better pictures! Well, that's me for this week, I'll see you all later.

Monday 14 March 2016

Sweet Poppy Stencils- Demo Day

Well, yesterday, Sunday, I went to a demo day at Pink Tulip Crafts in Studley, taken by my good friend and co- mother in law, Marg, who you may know as Silvercrafter.
 The demo was being done by Lucy Ellis, who I believe is the owner of The Craft Station, and Sweet Poppy Stencils.
 And yes, money changed hands. Well, let's be honest, that was pretty much a certainty. And I'm not going to the NEC Hobbycrafts this March, so......
 The first four stencils(!), some glitters. a pot of Bronze Stencil Paste,some gorgeous Gilding Flake in a colour called Golden Meadow, a beautiful gold/green mix.
 A pot of glue, for using with the flake, and a brush for tidying up your stencil after the gilding has dried.
 Some more stencils- a couple of fairy ones- you may recognise many of the fairy images on the stencils from Lavinia Stamps, but I will tell you now that the fairy stencils are being retired, so many of them are reduced. If you like them, get them now before they're gone.


The butterfly stencil is the one the sample in the top corner was done with.


The bronze stencil paste and the Gilding Flakes.
 I have a few Sweet Poppy stencil pastes, and some Dreamweaver ones too. I will say, as Lucy told us yesterday, the consistency of both are different. The Sweet Poppy one is almost a gloopy, gel- like substance, whilst the Dreamweaver does not have that jelly like feel. But both work exactly the same way.

So, I'm going to run through what I did yesterday afternoon, passing on the tips given by Lucy ( in red). I'm not going to admit to how many 'doh!' moments there were as she explained something that should have been blindingly obvious!


Things you will need- a craft sheet is a good idea as this  can get very messy.
 TIP No 1:   Tape your craft sheet down well onto your desk/worksurface. This way, when you spread your paste, nothing moves, so you can have both hands free for spreading, rather than needing one to hold your work still.
 This simple tip made such a huge difference, no more stressing about not having enough hands!

 
 I found masking tape/stencil tape wouldn't hold mine down, so used some fancy sellotape. 
Stencil Tape- Lucy said it's important to get tape for Stencils, rather than standard masking tape, to avoid tearing your cardstock when removing it. Sweet Poppy,Stix2 and Woodware all make good stencil tapes. 
A spatula: Mine is metal, but a plastic one suffices just as well. Easiest way to get paste from, and return excess to, the jar.

A Spreader: The one I have is a Dreamweaver one, and is slightly different to the Sweet Poppy one. I have to say, I think the Sweet Poppy one is the better of the two, as it is not so rounded, so the positioning of your hands is easier.
This is the Sweet Poppy one.

A Magnetic Sheet:
 The magnetic sheet doesn't have to be any special type, I'm using one that I've cut down from A4 sheets bought off Amazon, for storing dies on, hence the punched holes.


 TIP No 2: Slip a magnetic sheet underneath  your cardstock & stencil. This holds your stencil in place on your cardstock whilst you apply your tape, and helps stop any slipping when removing the tape afterwards.
 So far I've had two excellent tips in the space of the first fifteen minutes, and having used them now, both have made a huge difference to working with the paste.

TIP No 3:  Do not be stingy with your tape! Lucy uses 6 pieces- 2 at the top, 2 at the bottom, and one either side. Make sure your tape extends past the edges of your stencil/cardstock, and attaches to the craft sheet. Again, you want your work to stay perfectly still without you having to hold it.
This is a huge help in protecting the rest of your cardstock. I have always used one strip on each edge, and almost always have excess paste going on to my cardstock. But the greatest bit is  your work is now held firmly on your craft sheet, so you have two hands free, as neither your craft sheet, nor your stencil, is now going to move. No more trying to work around one of your hands holding the stencil in place!

So, by now you should have your craft sheet taped to your desk,on top of this, a magnetic sheet, a sheet of cardstock, then your stencil.  Now you apply your stencil tape. If all you do have is masking tape, de-stick it slightly by holding it against your clothes/skin first. Overlap the tape at the top and bottom to give you a wider margin. If you thought you needed it, you could do the same at the sides.
Down to business then. 
TIP No 3: Scoop out some Stencil paste and place a line of blobs along the top edge, either on the metal part of the stencil, or going onto the stencil tape. DO NOT put paste directly onto open areas of the stencil. You are pretty much guaranteed to get it going under parts of the design. Make sure you have plenty of paste along the edge, leaving no gaps, so that when you pull the paste down, you do not have bare spaces.

Again, this was great advice. I've never really worried about where I was putting the paste, just dumping it on anywhere, and being very stingy with how much I put out. That's a big mistake. You want to have loads laid down. 
I realised at this point that I hadn't taken any photos of the next bit, so I've re-done it with a different stencil & paste. Apologies for the images, I had to use the camera's self timer, and get my other hand back in the shot quickly, lol. 
 Loads of paste along the top.


 TIP No4: Both hands on the top of the spreader, close together.
 Sorry, had to do a dry-run pic here, I hadn't got my hands close enough together in the others.Now, I have to admit here, that I'd had my spreader a while, I just hadn't tried using it. I'd been spreading using the spatula. I honestly cannot tell you how much easier this is with the spreader.

 Place the spreader behind the line of stencil paste,and with the spreader at a slight angle to the stencil. pull it cleanly towards you in one motion. Don't stop, and don't press too hard either.
 You will have a lot of stencil paste on your spreader at the end, use your spatula to remove it and put it back in the pot.
 Repeat pulling the spreader down over the stencil a second time, to catch any excess you missed.

 TIP No5: Lucy said two swipes should be enough. If you keep repeating it, you will push paste underneath parts of the stencil.


Now you can start removing the tape- reverse order to placing it, so take off one side first, then the other. Next remove the bottom tape- you can peel the two pieces off together.

  This just leaves the top tape as your 'hinge'. Firstly, remove the upper piece of tape, then gently lift the ends of the remaining piece from the craft mat.


Slide the magnetic sheet/cardstock/stencil towards you, so that it overhangs slightly the edge of your desk. Then use one hand to press down on the cardstock/magnetic sheet, and the other hand to lift the stencil up and away from your work.


Swapped back here, as this pic came out better.


Stencil removed, and job done. I really cannot believe how much simpler and effective this method is- I had total success with every piece I did this afternoon. First time I've not had any scrap pieces.


Now onto what was a real 'light-bulb' moment for me, and taught me a second way to stop getting stencil paste underneath my stencils.


 TIP No6: Work with your stencil, not against it. That means, take a close look at your stencil for what Lucy called 'fingers'.


 This design is a perfect example, and one I've always had problems with the paste going underneath the part of the stencil that forms the cats haunch, marked with the arrow.That's what Lucy means by 'fingers'. It's also difficult to avoid catching the finger of metal with a spatula. When using my stencils I automatically place them on the cardstock with the design the right way up.
What I should be doing, is flipping the stencil around, so the finger points in the direction I'm spreading in, like this.


This is what has happened in the past with the way I've always worked. You can see there is very little gap, or none at all, to define his haunch.


 Here I've turned the stencil upside down, and just used one sweep of the spreader to take the paste all the way over. Using a spatula in the past has made it difficult to get a clean sweep, so that has also helped to push paste under the stencil.


Result is a  nice clean stencil, with the haunch of the cat clearly defined! 


So, to the rest of yesterdays playtime:


  Another Christmas Snow-Globe Stencil.


 A whole bunch of stencils- some are glittered, some left plain to try using the gilding flakes with later today.


One thing I didn't mention further up, is getting your stencils clean. It's best to have a bowl of warm soapy water to hand, and a nailbrush, or old toothbrush. If you can't do this, and I can't at the moment, my solution is to have baby wipes to hand. Lay one down, stencil on top, then another baby wipe. If you want to use it again, then use the baby wipes and paper towel to clean and dry it. Word of warning- be VERY careful when cleaning stencils, whatever method you use. Some of the pointed parts of the stencils are very sharp, and it's easy to jab your fingers. It's also very easy to bend such pieces, so take great care.
Then you can take your stencils and give them a wash all together when you've finished.


Lucy did some other techniques, with the gilding flakes, with mica's, glitter and Micro Beads, but I'll get to them in another post, I think this one is more than long enough!


An End of an era

An end of an era

I write this with a broken heart, that only time can heal My beautiful, wonderful wifelet Shaz (Silverwolf) passed away peacefully in the ea...