A warm welcome to all my visitors,

Thank you for taking the time to come and look at my blog, I really do appreciate it. I would love you to leave me a comment, even if it’s just to say Hi. It means I can come visit you!

All my designs are original, so copyrighted to me. If I have been inspired by someone elses work, I have named them in the post, and where able, I have provided a link.

Please feel free to use my designs for inspiration, I just ask you to credit me, and provide a link back to my blog.

Thanks, Shaz XX

Showing posts with label Mixed Media dies. Show all posts

Wednesday, 8 April 2020

WOYWW #566- The Bored with UFO's Edition

 I am so done with my UFO's again, so the ones left are going back in their storage wallets till the urge to finish them comes round again.This is what the desk looked like while I was doing some finishing off.
Just about to stamp up the inserts, then the backs.


A small selection of them ready to bag and put away.


Which means I can create some new ones, to replace the ones I've used, lol.

Did a small batch of those inked panel backgrounds, ready to do some stamping on in a while.


And now for what's been missing for a few weeks- The Enabling section.


Two batches this week- A few new Alcohol Ink colours, and one of the blower thingys. I've been using a straw, but apparently thats not ideal, as you can inhale fumes when drawing breath, plus, I run out of puff too easily.
So bought the gadget. Also two of the Alloys, slightly different to the older Mixatives, these are much thinner, more the consistency of normal Alcohol ink.


And a few supplies from Lavinia- some stamps, two new Clair inkpads and some Lavinia Glitter. A few of these will get stamped onto those backgrounds above.

I hope everyone and their families are keeping well and virus free.


So, apart from leaving my link over at Julias place, The Stamping Ground, I'm done.

Which just leaves.....................And Finally.....................


Wednesday, 1 April 2020

WOYWW #565- The Still Hangin in there Edition.

Please tell me I'm not alone in not knowing what day of the week it is!  In fact, it's so bad now that the only day I know is Wednesday- for WOYWW and the day we need to put the bins out! So, it's time again to link up over at Julia's place, The Stamping Ground, and show your desk to the world.
Desk shot number one, tubs of punched out flowers, to help finish off another batch of UFO's.


This batch, to be precise.


One down, about 10 left to go. All made by die cutting cardstock with Tim Holtz Mixed Media dies, then backing them with some pre made backgrounds, mainly alcohol inked ones.
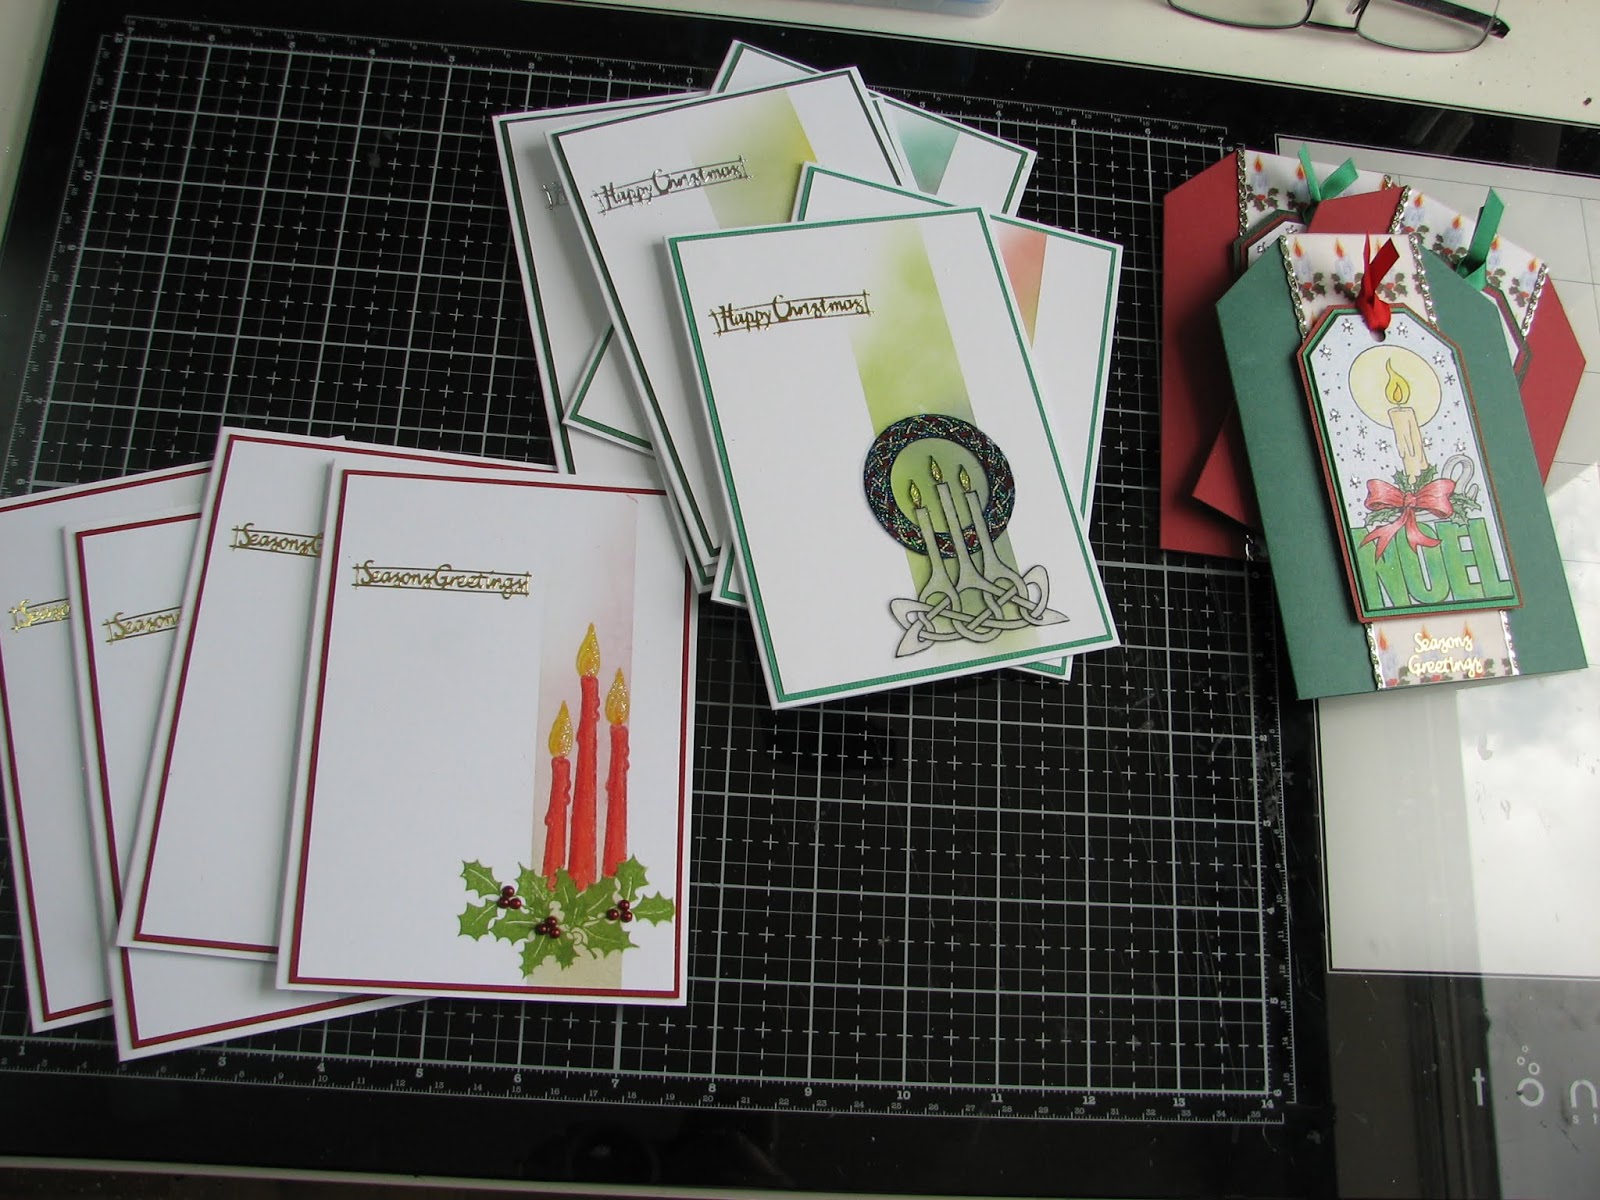
I've got a few backgrounds to stamp on here, extras from the weekends Christmas Card making.
 I've seen Eileen Godwin make these backgrounds, really simple, just mask off a strip of cardstock, and sponge or brush some inks into the space.Then add some stamping. Eileen usually does these as one layer cards, but I'm not actually brave enough to stamp straight onto my card base, so mine end up being matted and layered, but they still come out really thin, so good for posting.
The reason I had extra backgrounds- I started the Christmas cards using the tag stamp on the far right, then remembered I had those Celtic Candle pieces I'd glittered, and wanted something fairly minimal to go behind them. It also worked perfectly for the stamped red candles using Cardio stamps- Christmas by Candlelight.
 I'd expect the tag stamp is long discontinued, I don't even recall who made it, and the Celtic Candles was a red rubber stamp by Aspects of Design, also I think long retired, but there is a larger version, which I have but didn't use, and that one was available as a Woodware clear stamp last Christmas. And with that, I'm done. One quick message for Ali Wade, I have been visiting, but when I try to leave a comment, I get a message come up that seems to think it's a bot attempting to leave it. I think Neet was having the same problem too. I hope everyone is still well, and looking after yourselves.

 Which just leaves ...........And Finally..............., and again, you get a twofer this week.


Which is why I have so many UFO'S!!!!!!!


And this is most definitely true.😇

Wednesday, 29 August 2018

WOYWW #482

Yep, there you go. No warning, just hitting you with a messy desk shot. Mind you, you ought to see the table behind me, lol. WOYWW is here again, so leave your link over at Julias, The Stamping Ground, and you too can visit desks like this. 😀


 I decided that using up some UFO's today was in order, so hauled out an envelope full of these:


A whole bundle of Mixed Media Die cuts, that were going to make some fast cards.


Pretty much only needing trimming to size, and then a sentiment adding.


9 cards so far, and quite a few more partly done.


I do love these dies, they are great for using for any type of card, so even a last minute card can look really fab.


A wedding card made from one of these is in the post a couple back, and Morts birthday card and it's jazzed up interior is just below this one.


Had a very productive Sunday, as inspiration struck for some ATC's for the crop, and I got them all made the same day. Go me!


Sunday also involved a visit to Tesco, where I saw these 'Cosmic Colour' Sharpies, for a couple of quid, in the Back to School promotion.


Sent of for our tickets to the Happy Stampers Festival on October 6th. I've put the link there for anyone curious. It's held at Port Sunlight,and is a great show that's all Papercrafting. There is a list of those taking part on the link, as well as the address to buy tickets, which have to be bought in advance, there are no on the door sales. But the really fab thing is that the tickets cost £2.50, and the parking is free, either in the adjoining, but quite small, car park, or the surrounding roads. It's a really nice show, and there are always a few WOYWers there.
 Less than two weeks now to the crop, and I have been putting quite a lot of crafting books and other stuff into a box , ready to go looking for a new home.
 I'll be bringing my dies, as usual, probably my embossing folders, and my Cuttlebug. I expect someone will have a Big Shot about their person as well. So bring your cardstock- I'll also bring my envelopes of off cuts to be used up.
 We've booked into the Travelodge in Llandudno town for Friday night & Saturday night, then travel home on Sunday.
 Well, I think I'm done, that only leaves
 And Finally..................................

Sunday, 26 August 2018

A Mixed Media die Wedding Card

I didn't actually take a huge number of pictures for this make, mainly as I had a whole envelope full of various Mixed Media die cuts waiting for the right card to be made with them.
 The Mixed Media die is the Flourish one, MM set #2, from Tim Holtz/Sizzix.

The card base is a sheet of Pearl White, scored & folded in half.
 I'd cut the die from a slightly less than A5 size pearl card, and I trimmed it further to give me some space for some embossed details on the card front.

After I'd trimmed it down, I used a piece of cardstock I'd coloured with oil pastels in Pinks, blues & purples, and fixed that behind the die cut area.
 On the inside of the card, I marked where the panel would go, and then scored two lines either side of that with a scoreboard & stylus tool.
 To add a little more interest, I used a different scoreboard to make the chevron pattern above & below the score lines.
 For this I used a board that has diagonal score lines on it.

The bottom board is a Martha Stewart one, and the dark brown one with the diagonal lines is an 'add on' board,from Stampin Up. I believe it was being retired when I bought it, as it was reduced. Hard to see in the pic, but the score lines in fact match up perfectly with the lines and markings on the MS board.


I stamped the sentiment, from a Phill Martin set called Baroque Sentiments 2, in silver Encore pigment ink, and heat embossed using Silver detail powder. Final addition was three silk flowers, in colours to match the background paper. The Mixed Media dies are so useful for making fast, but good looking cards for any occasion, and have been a good investment.

Wednesday, 17 January 2018

WOYWW #450

Right I'm Back!lol. MIA last week, so I'm here again to link up with Julia at The Stamping Ground for another tour of Desk Duty.I was doing some colouring in my books last week, and after dumping a lot of felts and markers that had run out/dried up, I ended up using some coloured pencils in an Art set from WHSmiths I'd been bought as a Christmas pressie a few years ago. I actually found I enjoyed the pencils much more than I expected, plus you don't get the bleed through issues you get with some markers, so I invested in a set of Prismacolours from Amazon.  I've been watching You Tube videos on blending & shading with them, and they seemed about the best at a reasonable price point.

I also bought another couple of Christmas stencils from Sweet Poppy in their  sale, I was very taken with the bauble one, as I'd seen some Christmas Cards  made using a rubber stamp in the same sort of lay out. I think these will look amazing done with the foil & laminator technique.

I'm actually starting to feel more like crafting, now that I seem to finally be getting beyond this blasted cold/cough/chest infection.
So much so, I have three new cards put together, the top one just needing a sentiment. I shall stamp a greeting onto cardstock and die cut, as I really should have done any heat embossing before the gluing down stage!
 Mind you, maybe I'm making work for myself- they don't have to be heat embossed really.


A quick bit of back info on things mentioned in the past few weeks- first, the Groovi Grip. I've put this onto my rulers now, and also onto my Stix2 layering thingy. It works like a dream, the ruler stays put with just the slightest pressure from your fingers. I also discovered it's not actually sticky, it's a static cling. So once you smooth it down, it stays put, but if you want to take it off, there's no icky residue to get rid of.
Second, the Versafine Clair Fallen Leaves Brown. I emailed Tsukineko, and told them what I was seeing, and asked if I had a faulty pad.
This was the response I got, admittedly very fast, in fact the next day. 

To inform you the conclusion, the Fallen Leaves you bought is not a faulty pad.
 The Fallen Leaves is blackish dark brown and when there is a lot of ink on the pad, it look blackish.
Especially when you just opened the pad, there is plenty of the ink on the pad, it may look more blackish.
 And, it may affect the color a little depend on the type of paper you use.
 The color sample of the labelling on the Fallen Leaves is not exactly the same as actual color.
 We appreciate for  your understanding and hope to continue to choose our TSUKINEKO products for years to come.

 So I replied, as this didn't really address the issue I had, which wasn't the colour of the inkpad, but rather the colour it stamped out at. I also asked if they were planning to put a colour chart on the website.
 
Thank you for your email and precious opinion.
 We will pass your opinion to our product development department and take your opinion into account in the case of next product development.
 As to the website, we are planning to add the color chart of Versafine Clair, but the details such as time has not been decided yet.
 Thank you and best regards,

I  have to wonder if they have had this ink tested by stampers before release. I still don't see any brown in it at all. I did email Lavinia Stamps, to let them know what I was seeing, in case anyone else had a problem. They tested it out and agreed that yes, it does not look brown at all, although they could get a brown impression with a second generation print. I think it may need to be coated cardstock, as on my bog standard plain card, I'm not seeing that.

 Talking of ink, another Black ink that may interest people.
When I did the TH workshop, he mentioned the 4 colour Archival inkpads the designers had all brought out. He said that in his, the black part of the pad wasn't the original Black Archival, but in fact a Black Soot Archival. He also said it wasn't available as a separate pad- won't be surprised to see that change in the near future- but that you could buy a blank Archival inkpad, and an Archival Black Soot reinker, and make your own. From the demo he showed us, the original Archival Black has clear Purplish tones, which the Black Soot doesn't have. So, it was out of stock for quite a while at Art from the Heart, but I now have one, and will be inking it up and testing it out soon.

 Had the follow up from the scan, and they seem happy enough. They're happy it's not grown, and may be smaller, so they will monitor it and I get another scan in 3 months.
And finally.........................

Wednesday, 9 August 2017

WOYWW #427

Hump day again, and time to meet up at Lady Julias (if the Tiara fits....) place, The Stamping Ground.
I have a cunning plan...well a sort of plan anyway. I have not really crafted a lot these last couple of weeks, I suspect my mojo is still sitting in a bar on Kos, sipping on cocktails.
 So, in an attempt to drag him kicking & screaming back, I've been sorting out my UFO box. I was actually quite shocked at what I found- loads of pieces I'd forgotten about.


Exhibit A is some Stampscapes scenes, an experiment with some glitter paste, a few masterboard pieces and the bits for some Honey Doo stamped florals.


A couple of plastic wallets with half done projects in.
A whole load of those Mixed Media die cuts, matted up and waiting to be finished.
 A Christmas snow globe scene, and another wallet with some backgrounds in.


These are the backgrounds from the wallet- some just sprayed, some had white heat embossed images done with Brushos.


I found these in the same wallet- heat embossed dragonfly images, and I think smooshed through Distress Inks on my craft mat. Shows how long they've been there, having to try and think how I did them.


The Mixed Media die cuts.


So, the project for later this week is to turn most of these into cards.


And I've barely made a dent in the UFO box! I've told myself no more experiments until I've at least made all these up.


Finally, a quick giggle for everyone.


Quick edit I forgot about last night:
 I've had my PET scan, last Friday, and Monday morning I had my Radiotherapy planning session, and my first Radio is scheduled for the 31st of August.

Wednesday, 12 April 2017

WOYWW #410

Another WOYWW, courtesy of Julia at The Stamping Ground. So what IS on my workdesk? Well, a batch of cards made with the Mixed Media dies, that are blogged below.


Also, a visit to our local craft store yielded these Teasel stamps from Woodware, as well as a couple of Tim Holtz layering stencils I forgot to photograph!


Quite large stamps, so should make a good stamped image, I hope.


A walk through town yesterday, and a visit to Poundland to get some more foam tape.


A roll of tape, and 10 sheets of 25 square foam pads for a quid is a great buy.


There were also ear rings on my desk earlier, from a few days ago.


I had to repair a pair which had separated from the posts, and as I'd been having problems when wearing them, I came to the conclusion they were not nickel free, so ordered some new posts. Which came in a pack of 100. As I only needed to repair two pairs, that left me with 48 pairs going idle. Thats the two sets of square glass stones on the left.


 So I had a bit of a shopping expedition on Google, and bought a bunch of flatback semi precious stones, and made another dozen or so pairs. As most of the stones cost me between 30p and 85p each, it was a cheap batch.


Well thats me done, fairly short & sweet this week. Happy Wednesday folks, and see you later.

Tuesday, 11 April 2017

Mixed Media cards- Part 2

Ok, following on from yesterdays post are a few more die cuts made up into cards.
This die cut is from the Mixed Media set #2, and it does need glue on the back of the design, as it won't lay flat otherwise.

 The card base is an A4 sheet of Pearl white card, folded, and with embossed scoring either side of the panel.


 The paper it's backed with is a shimmery one bought a few years ago, and I have it in a few colourways. rarely used it, but it was perfect for this.

I used a Crealies die to cut the sentiment, once from the shimmer paper, and twice more from white card so I could stack them up for a dimensional look.


 A few small flowers were punched from the same paper, and doubled up, then some Stickles in dark blue added to the centres.


 A similar design for this one, but it's backed with an alcohol inked sheet.
 The sentiment is another Phill Martin one, from Mini Baroque Occasions.
 Two small butterflies punched from some shimmer paper, and very tiny acrylic gems added to the bodies.


A different die for this one, from Mixed Media set #3, and cut from an ivory base.The backing sheet is an alcohol ink one, in blues with Gold Mixative.
 It was matted onto dull gold card, then onto a 6" square card base.
 The sentiment is again from Mini Baroque Occasions, and was stamped in Archival Cobalt.  A couple of dark blue half pearls added as well.


A 7" square base for this card, and the die is from Mixed Media set # 1. It was cut from a linen cardstock, and then trimmed with a deckle edged blade.
 The backing is an oil pastel sheet, and I found some pale purpley-grey cardstock to matt it on to.
 Heartfelt Creations Spellbinders die called Delicate Aster was used for the flower, and the centre is filled with Glossy Accents and seed beads.
 The sentiment is from Chic Floral Occasions Borders, Phill Martin. I matted the sentiment strip onto an offcut of the backing card before sticking it down.


 This one is 5"x7", the die from Mixed Media #3. The backing is a rainbow piece made with oil pastels, and the sentiment is from Mini Baroque Occasions. I repeated what I did previously, and stamped and heat embossed onto an offcut, which I then die cut with a Spellbinders Labels 8 die and mounted with foam tabs. I also added a couple of acrylic gems again.


Another 7" square card, this time the Mixed Media die was cut from black cardstock. It's backed with a different colour of the shimmer paper, and  at first glance it almost looks like glitter embossing onto the card.
I backed it again with a dull gold matt.
 The sentiment is stamped onto a black heart, and then matted onto a gold heart. Die set is by Nellie Snellen. The sentiment is from Butterfly Elegance Sentiments by Phill Martin, heat embossed in gold.
 Some small flowers in black and gold completed the front.


And that's the end of the second batch. More to follow later in the week, I've still got a few to put together.


Monday, 10 April 2017

Mixed Media Cards- Part 1

Right, this is the post I promised last week, but I got sidetracked by the ear rings in the previous post.
I'd cut a whole pile of cardstock with an assortment of the Tim Holtz Mixed Media dies, with the intention of being able to batch make a load of cards, but still have them all different.

First thing to do was sort out backing sheets for them, and this was also a bit of a stash buster, as I have loads of alcohol ink/oil pastel/blended ink/brusho background sheets- you know how you make up a load at the time while you have everything out? Yeah, that.
 I started off matching each die cut with a background individually as I made the card, but that seemed to take forever, sorting through all the coloured sheets each time, so I swapped method and paired them all up first, then got down to the sticking bit.

One bit of advice to bear in mind before starting, if you want to heat emboss a sentiment onto your die cut pieces, do that before you stick down your backing sheet, as heat & glue do not play nicely together!


There may have been a little mess made during the die cutting, lol.


Another thing to note, is that a couple of the dies do tend to leave slight edge marks in places I found. This may well depend on your machine, of course, some applying more pressure than others. The Lattice die in MM set #1 I found the worst, and no amount of shimming or such made any difference.


First set of backed die cuts.


Second set.


Sets 3...........................


....................and 4.


Fifth batch.


And the last three.
 By using a bunch of different colourways, I can swap out what I make up each card for.


 On to the cards then. the first couple are both using a  5x7 card base, and I turned both into Sympathy cards.


Anyone else remember these paper blox? I have a few, this one has darker shades, and I have one with pastels in, as well as some that were about 9"x2". Bought many years ago at the NEC, I think the packaging says Craftwork Cards. First one I chose is a dark blue with a gold sheen to it.


I trimmed the whole panel down to fit the card base.
 Sentiment next, and this was just stamped in a dye based ink.
These were the three I found that sat best with the cardstock colour- I also found the labels are not a very good representation of the colour.


 I stamped with all three on scrap, and there was really nothing to chose between them, although you'd expect the Paris Dusk to be the darkest.
In the end I went with the Versamagic Night Sky.


Foam tape added to the back so it would have a little dimension.
 I get my foam tape from Poundland- you get one roll- slightly larger than what you can see here- and I think about 10 sheets of foam pads, which have around 25 pads per sheet, in the pack. Bargain. 😀.


Finished card, with a few small white flowers added, along with a couple of punched fern leaves.

Oh, the sentiment stamp is from Inkylicious, by the way.


The second one is similar, but uses a purple sheet of backing paper, has a few more flowers, and a  Sincere Condolences stamp from Phill Martin, a set called Chic Floral Occasions Borders.


Next up I stayed with a 5x7" card base, but this time for a Thank You card. This die cut is from the Mixed Media Halloween set, a nice Brocade pattern. I've backed it with a bright blue pearl paper, and you can see I've used liquid glue in and around the pattern, as this die I found tended to warp the cardstock when it cuts, and the result doesn't lie flat on your backing paper. I used the Tombow Mono Multi glue, as this dispenser has two nozzles, one end has a chisel tip that spreads the glue over a wider area, the other has a fine nib for detail work.

I put it aside under some acrylic blocks so it would dry flat, then used Versafine Deep Lagoon to stamp the sentiment, which I think came from a Penny Black clear stamp set. I added a row of tiny acrylic gemstones under the sentiment, and again added it to the card base with foam tape.


The next one was backed onto an orange/yellow Alcohol Inked background, and I found a similar sheet of orange cardstock for the mat.


The sentiment, a New Home one, comes from another Phill Martin set called Mini Baroque Occasions. I stamped this in Archival Tiger Lily, and added some orange acrylic gems for a spot of bling. The card  base was a 7" square.
 This Flourish die comes from Mixed Media set #2, and is another that needs glue on the back of the design  to hold it flat.


Final card for this batch, and this one was backed with an orange & gold Alcohol inked sheet.The die is from Mixed Media #1, and the sentiment from Phill Martin Mini Baroque Everyday Sentiments.
Made a schoolgirl error here- the cardstock is a pearl white, and I forgot to dust it with an anti static bag first, so had stray flecks of EP inside the design. The only solution was to restamp and heat emboss, then use a layering die to cut it out and add to the card front, with foam pads. The die is from Spellbinders Labels 8.


So, with my error nicely covered up, I matted it on to a dull gold card,added some orange acrylic gems again, and matted it onto a 7"square card base.


As this is so picture heavy, I'll stop there, and do another post tomorrow with a few more.

An End of an era

An end of an era

I write this with a broken heart, that only time can heal My beautiful, wonderful wifelet Shaz (Silverwolf) passed away peacefully in the ea...