A warm welcome to all my visitors,

Thank you for taking the time to come and look at my blog, I really do appreciate it. I would love you to leave me a comment, even if it’s just to say Hi. It means I can come visit you!

All my designs are original, so copyrighted to me. If I have been inspired by someone elses work, I have named them in the post, and where able, I have provided a link.

Please feel free to use my designs for inspiration, I just ask you to credit me, and provide a link back to my blog.

Thanks, Shaz XX

Showing posts with label Visible Image. Show all posts

Friday, 12 March 2021

So I may have done a thing


So after coming back from a visit to see Sharon lunch time, ( needed to take over the flowers her Son and Daughter in-law made) I decided I needed to spend some time in her room.

So after finishing some chores I headed up stairs.

Now lets just be clear, the day before I had selected a few stamps I liked the look of and thought would work well together, but I had no time-frame in mind as to what, when or even if  I was going to do anything with them, it was just a well "it would be nice to see if I could", sort of thing, if that makes sense?

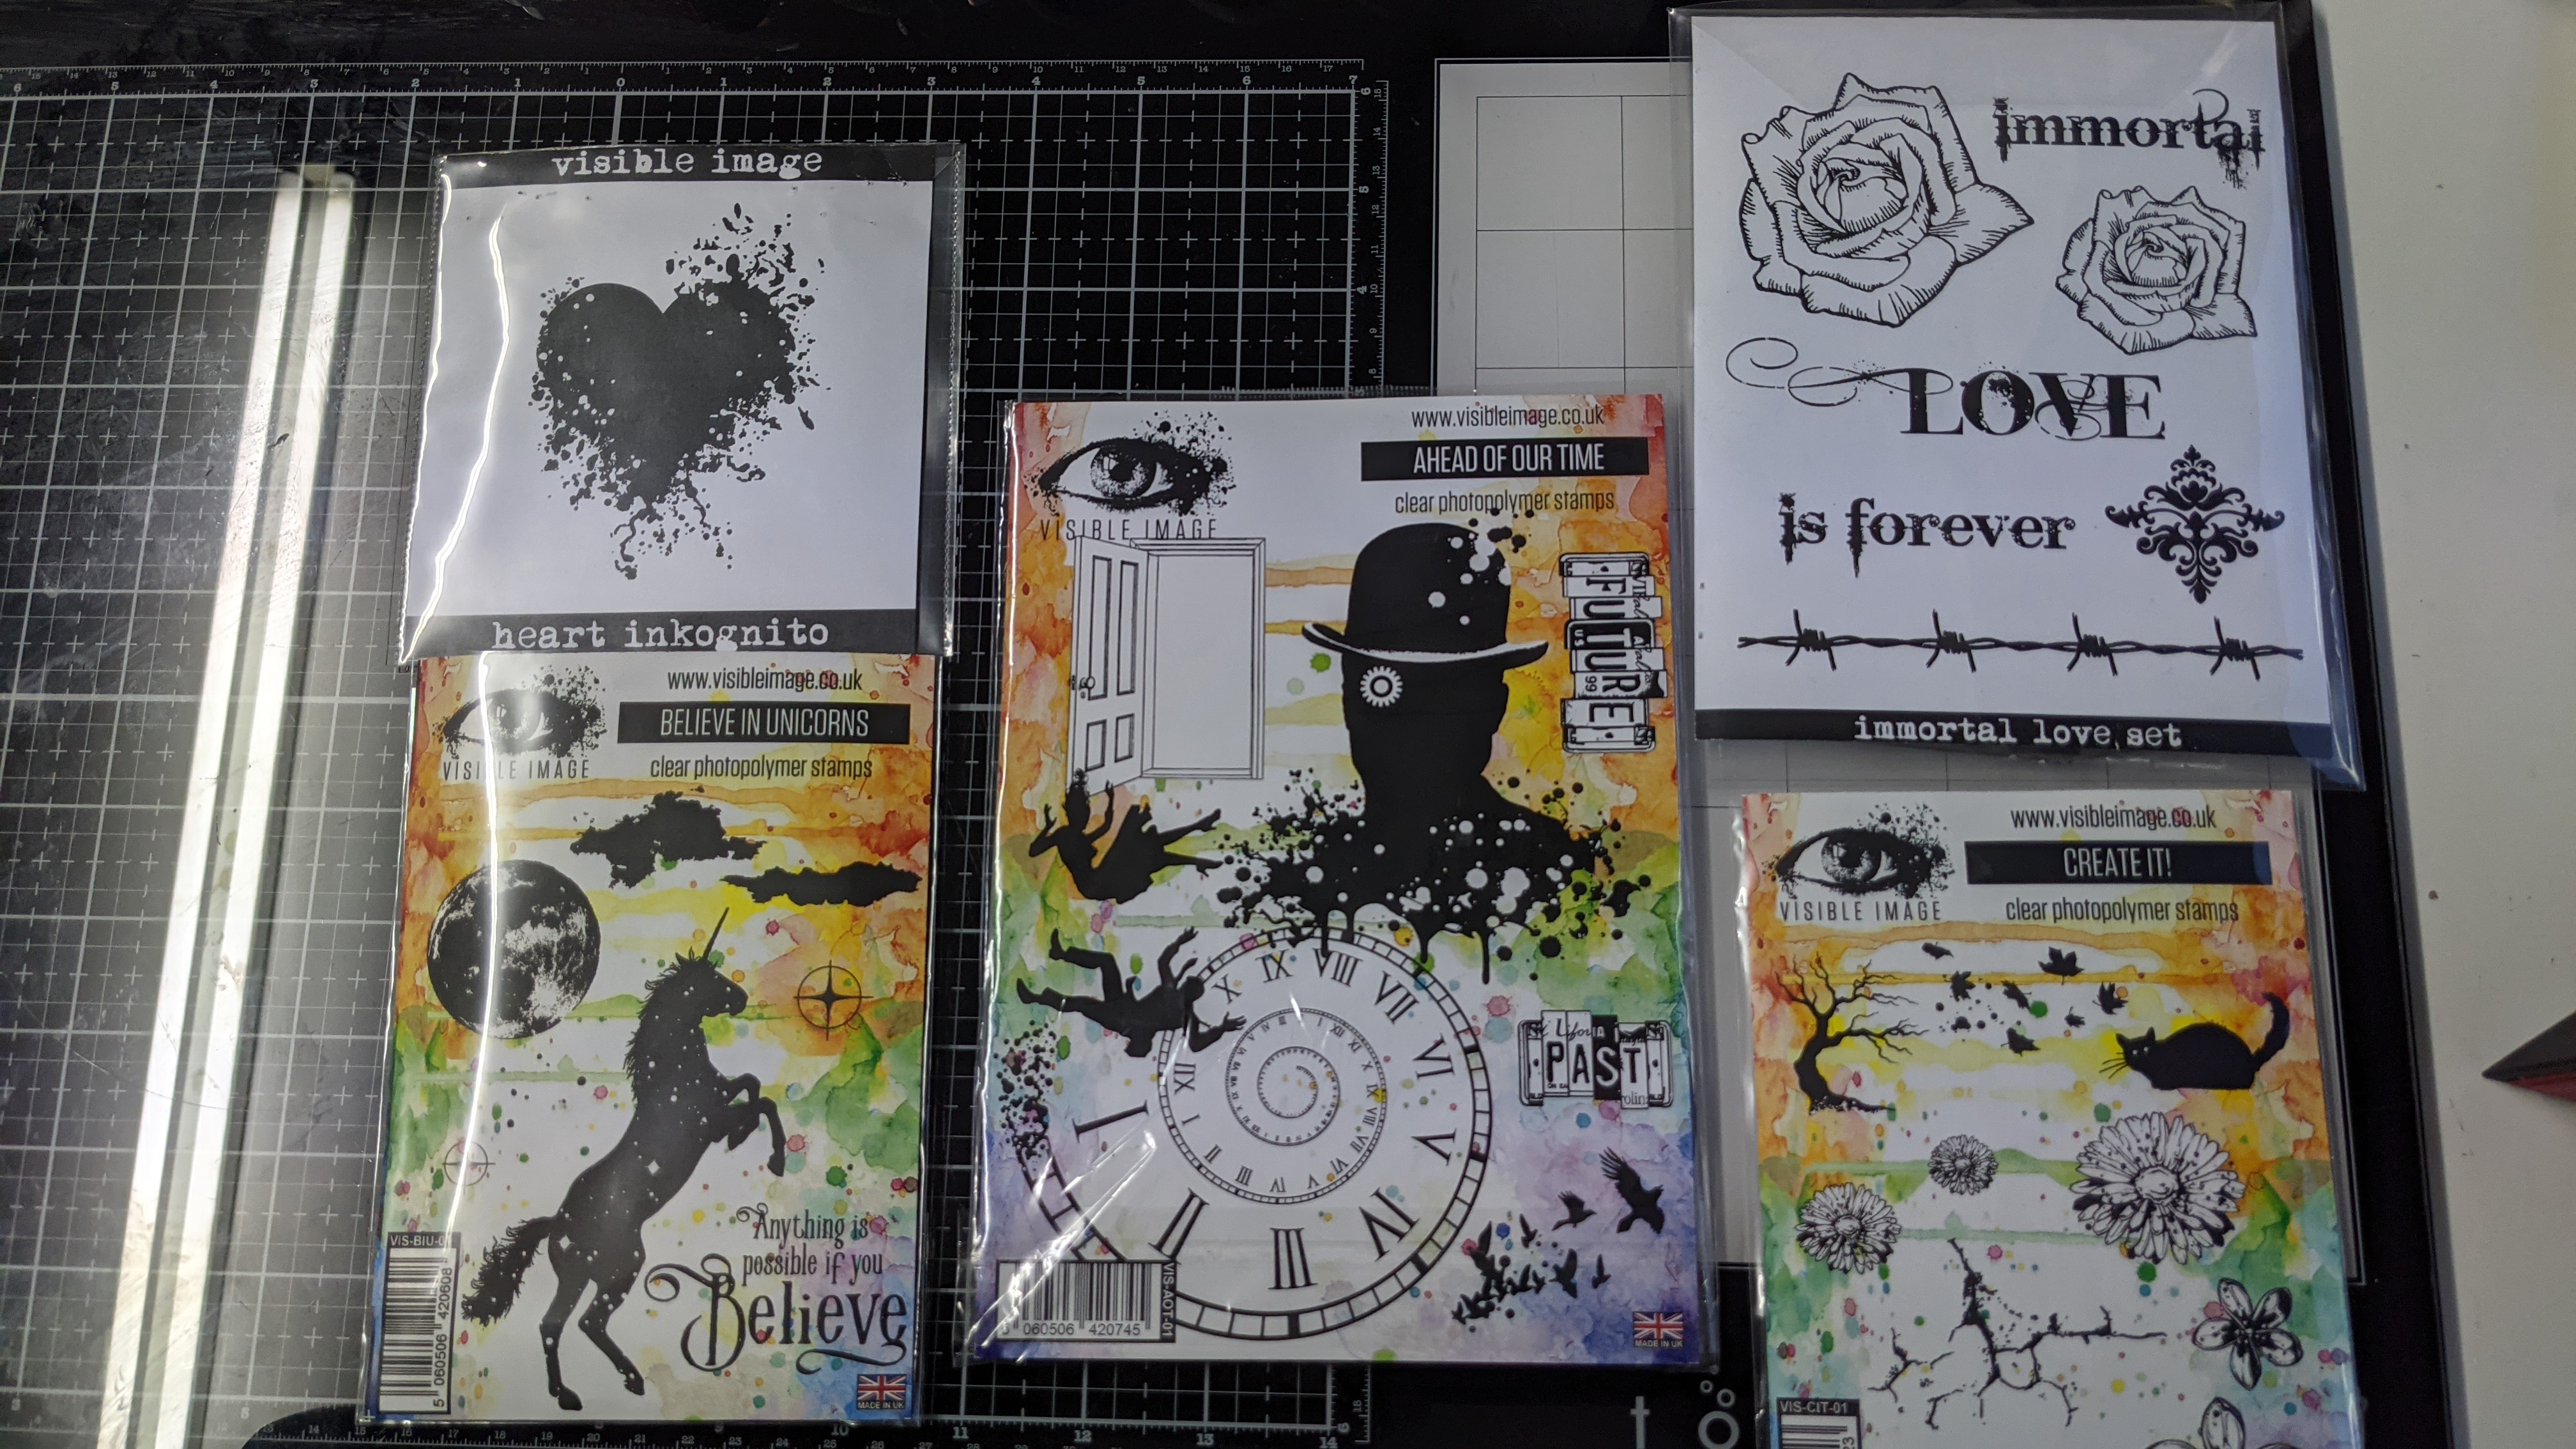
Anyway I had picked out the following Visible Image stamps (and a few others I did not use in the end) 

Ahead Of Our Time (for the spiral)
Immortal Love Set ( for the word "Love"  &  "is Forever")
Heart Inkognito 
Create It!  (for the large crackle)
Believe in unicorns ( for the clouds)

I then went to pick out some inks, yeah that went well, I watched a video on how to create a background (I said I was a noob) and, well, lets just say I tried to use a non water based ink one with water spray, and it did not go so well.

So I swapped to these Distress inks on the left of the picture, all by Sir Tim Holtz
Wilten Violet
Fired Brick (kind of went overboard with it)
Frayed Burlap
Old Paper
Dried Marigold
Tumbled Glass

With the background kind of done, if a little heavy on the Fired brick, I figured what the hell and got to work with the stamping platform, laying the clean stamps on the card where I wanted them, then closing the stamp platform to allow it to pick up the stamp, then adding ink and closed it again.
Pressing down firmly BUT gently at the same time (I have this thing resting on the Tim Holtz glass cutting mat, there would be hell to pay if I broke it (possibly literally).  

Anyway the inks I used for stamping are by Dew Drop

Nautical Blue  (Memento) for most of the back-groundy stuff like the Spiral, the Heart and the Crackle 
Grey Flannel (Memento)
for the clouds
Graphite black (Brilliance) for the text   
Ignore the VersaMagic Perfect Plumeria from the image as it was not used.


I didn't think to take any pictures of the back ground creation as I figured it was going in the bin, it was not until I started to use the stamp platform and add some layers to it i decided I was kind of happy with it, for a first attempt, I am quite happy with it.


The text is not as straight as I would have liked, now its not on the image in this shot but I added clouds to cover up a mistake in the centre of the image.

 I basically added a feather but did not like it, used a colour that I thought would work, so I over stamped it in the final shot below using the clouds from the believe in unicorns set.


So I then stuck it to a burgundy piece of card using that proper cool DST tape gun ( how cool is that bad boy?), trimmed it to give a border (Cough er twice as I stuck it down wonky the first time, so I had to do it again) but don't tell anyone, it's our secret  ;) 

Moving on...

I had thought about adding some ribbon or something on the right side of the image, then thought better of it (just learning to walk this game, not ready for marathons just yet) and trimmed it off instead.

Not only that..

I would have to find it, and it is anyone's guess as to how long that may take...


So my first ever card is done excluding the sentiment that goes inside, So I know what you are thinking...

"will there be more ?" 


I think so... in fact I know so  :)


Simply because Shaz has spent over 25 years collecting all the stuff and things she has in here, it would be almost a crime to break it up!


And because if you read the post below I kind of ordered a stamp as I have a project in mind for it.


So that has got to deserve a picture of Shaz looking happy


We can't very well sign off without adding the 
 and finally....


Wednesday, 30 September 2020

WOYWW #591- The Odds and Ends Edition

 Time for Whats on your Workdesk Wednesday again- is it just me, or do these weeks seem to be getting shorter? Pop over to Julias place, The Stamping Ground, to join in.


Some enabling right at the start this week- two new Visible Image stamps. I thought the star one would decoupage nicely, for quick cards, and loved the size and font on the sentiment stamp. I'm thinking stamp the Star onto the card base & heat emboss in silver, gold or sparkle EP, then stamp again onto glitter card or patterned paper, cut out and add on top. Also, the new Distress colour, Crackling Campfire.


Two cards made last weekend, should have been 3. I'm retrying the third one in the pic below. You know when somethings not gone right, so you try to fix it? And end up making an even bigger mess of it? Yeah, well that happened. The image, an old VI one, is framed, so in order not to stamp the frame across the snowflakes, I wiped the ink off the bottom part, then, completely forgetting the top part of the frame, stamped it. Looked awful, so I added in the same colour ink- which I intended doing anyway-, but it went all blotchy. So, next intended fix was to die cut a circle of double sided adhesive, place over the image, and sprinkle with Glamourdust.
The Glamourdust would hide the blotchy patch.That went well, right up to the sprinkling bit. I grabbed the bottle, and sprinkled. Except it was the Gold coloured one, not the Crystal. It hid the blotchy patch alright, but it hid everything else too! That's when I  realised every fix was making it worse, not better, so it went in the bin. This is the fresh version, and so far, so good. Good job I have a sense of the ridiculous!

Thank you to everyone for your input on White pens last week. General opinion seemed to be that A) Posca or Sakura Gelli Roll are the best, and B) and actually finding a good white pen is a bit like looking for hen's teeth!

And all that brings us round to .........And Finally.............................

Saw this last week on FB, made me laugh, so I thought I'd share with you all


...and this about sums me up. 😀


One final moan about the new Blogger- whats the new Labels thing about? Now I have to start typing each subject, then select what I want, rather than just scroll through the list. Grrr.

Wednesday, 23 September 2020

WOYWW #590- The Finished Cards Edition

And another Wednesday rolls round- more like flies round!- so time to link up again over at Julias place, The Stamping Ground, for our weekly desk shennanigans.

Continuing on from last weeks cards, the one thing that I dislike about Distress Oxides, is trying to stamp over the top of them. I think the fresh wet ink must activate something in them, and you get some of the Oxides design showing through. So I decided to do a few more, this time using my trusty Adirondacks. Clear case of full set syndrome here, lol. But I do love them, they apply easily, blend nicely, and so many colours, from palest barely there, to dark shades.


These were the half dozen I did with them, I forgot to take a pic till after I'd stamped the first one. My pad by the side with the stencil name & ink colours used can be seen to the right.

The stamped one is a Visible Image stamp, as are three in the next picture. The Buddha stamp is from Inkylicious.


These were some of the Oxides ones, now stamped up, and I'll warn those of a nervous disposition to look away, as the Visible Image word stamp I used on the Indigo Blu motorcycle card wouldn't fit, so I took my scissors to it and separated the three phrases. The words were too close together for masking with tape, so scissors it was.


It was so perfect for the motorcycle card, I had to use it.


Back to a touch of enabling, another new stencil from Sweet Poppy, Abstract Backplate.

On the subject of this new Blogger, I discovered today that if you click on your photo, you get the little squares appear that let you adjust the size of the image by pulling at the sides or corners. I'm probably late to the party, but thought I'd mention it. I've also discovered I can get my pictures where I want them by using the 'indent' icons, so I'm getting happier with the new stuff!


Now, some help from everyone please, for one of my visitors/commenters, Magic Maggie. Maggie doesn't blog, but she visits me, and last week in her comment she asked for recommendations on a reliable white pen. Now, I've tested out the ones I have, and will give my results in a minute. I've tried all sorts of storage- lay flat, point down, I've tried writing on my hand to get them started, and most of the well known brands fail miserably. Maybe if you are using them every day, they're ok, but I always find they fail within a few days if I haven't used them. So here are the ones I have, and how they worked.

 Top of the fail list are the Inkessentials pens- don't ask how many I've bought- they all fail. A Signo white pen, also fail. I have a Pentel Hybrid, which also wouldn't work, and finally my Dylusions White paint pen also is dead.

Now for the goodies. First off- and I wasn't overly surprised, as I've seen lots of good comments about these on the various Lavinia pages on Facebook- is a POSCA Paint Pen. Wrote perfectly straight away. They come in a variety of nib sizes I believe, and the one I have is a fineliner, 0.7mm. This would definitely be my top recommendation. Next, a Sakura Gelly Roll  Med white pen, again, worked straight away no problem. I *think* it says #50 on the barrel- white writing on a clear, white filled tube isn't the best idea, lol. But definitely another I'd recommend. I have a Pilot white pen- the sort with a nib you have to pump first- works fine, but is a bit of a broad line drawn with it. And finally one called Artline Multi pen, probably picked up at a local art shop. Rather like the Pilot pen, works fine, but a bit of a broad line. All of these pens have been unused for the same length of time and all stored the same. 

If anyone has any preferences for white pens, any advice on getting them to work again, or any other helpful advice for Maggie, could you leave it in your comment, where Maggie will be able to find it? Thanks folks.

Which just leaves......And Finally..........


Wednesday, 16 September 2020

WOYWW #589- The Inking & Stamping Edition.

Well here we are again, another Wednesday has arrived. Another weekly link up over at Julias place, The Stamping Ground, to bare our desks to the world.


Two shots of my desk this week, this one a long shot, as I can't actually get far enough back- the desk behind the desk is in the way- to get a close shot.


This is a bit more of a close up on what I'm working on. I wanted to do some masculine/teen cards, and I'm getting there. The partial stencil on the card is another Eileen Godwin technique- if you've not seen her stuff, look her up on Facebook or she now has a You Tube channel of videos. She does amazing work, she really does.

The card with the drum kit at the back had to be coloured as it was a simple line stamp, a magazine freebie. I couldn't find the one I wanted- found it now, lol. You can see the VI stamp on the left of a drummer & drum kit.


These were the partially stencilled cards, using Oxide inks. I'll list all the stencils & colours when I do a blog post for them.


I think I've been very restrained during this lockdown, my crafting purchases have been few and far between. So, before I forget, here are my two most recent purchases. The Lines stamp set is by HoneyDoo, and a Christmas Bauble from Sweet Poppy. I think there are going to be a huge number of people getting Christmas Cards with this bauble on- anyone on Facebook will have seen a lot of fabulous cards made, and Lucy at Sweet Poppy has been really struggling to meet the demand for it. I think it's back on pre-order again, for the end of the month.


MIA  last week, you may recall I mentioned the kidney stent looked to be blocked on my last CT scan, and that most probably ties in with the UTI. The Urology team said they'd get me in in the next few weeks to change it early, as it's not actually due it's 12 month change till December. Anyway, the Friday after the last WOYWW I did, I had a phone call to say they'd had a cancellation in the theatre list for last Tuesday, and could I take up a short notice appointment. No problem for me, so of course took it. I did have to go and have a Covid test first, and that came back negative, so clearly what we are doing to shield ourselves is working. Anyhow, stent changed, so hopefully that'll put a stop to any uti's.

Which just leaves .........And Finally............( apologies to anyone who doesn't get it, it's a song by AC/DC, a band I desperately want to see live).

Wednesday, 15 April 2020

WOYWW #567- The Colouring Edition.

Well, as if the lockdown causing us to lose track of the days wasn't enough, now we have bank holidays sticking their nose in. Almost totally missed Wednesday this week, and that would be a Bad Thing, as this is the day we post desk pictures and share them with crafters worldwide, just as we've been doing for almost 11 years.What an achievement that is. I wasn't here right from the start, looking back I seem to have come on board around week 83. So, pop your link over at Julias place, The Stamping Ground, and join in, please. We'd love to meet you.


Desk shot taken from the side, and yes, it's an unholy mess. Cards being stacked towards the front are some of the UFO's that got finished. Well, almost finished. Need inserts and envelopes, but closer to usable than they were a few days ago. And I have tidied a lot away now, as I wanted to stamp some more images to colour.
 
 These are some coloured images, from the post below, I finished over the last week.

One thing I did learn, to colour with pencils, you need a really super smooth  cardstock. Which these weren't.  It was Smooth Stamping card, which is fine for stamping and blending ink on, or for using with markers, but not smooth enough to get a great finish with pencils.


Any surface texture does make it difficult to get a good smooth finish and blend.  So I wanted to stamp some more and I've tried the Super Smooth Lavinia stamps Multifarious card. I'll report back on the success level.

 
I've used some more of my Gorjuss stamps, to try this out, but it feels like it will work well.  I know the Gorjuss girls aren't everyone's taste, but I like the weirdness, lol. Stamped with Archival Black Soot.


I also came across this sheet of butterflies, a Visible Image stamp, and they're done on Letraset paper, which is meant for use with Promarkers. Also a sheet of Bauble images, that's an old stamp, no idea of the maker. The goth girl is also a Visible Image stamp, and she was done with Promarkers. Just needs finishing off, when I manage to do some skin colouring that looks semi realistic, at least!

 And you have an enable free week again, as I haven't bought anything, so there's that.😁
 But thats me done, just leaves.....And Finally........( And it's another twofer)


I've never said I was responsible.......


And this is surely true.😀

Wednesday, 19 February 2020

WOYWW #559- The Return to Normal Service Edition.

And of course, by that I mean a bit of enabling to share on this weeks desk sharing link up, hosted as always by our beloved Julia, over at The Stamping Ground.
 But the first thing on my desk this week is some home cut stencils/masks.


Cut on my Silhouette, using Mylar stencil sheets.I buy them off E-Bay, and they are a great price. I buy the 125 micron as that seems fine for my uses, which are mainly to ink through. I'd possibly say you may want the thicker 190 micron (also available on E-Bay) if you wanted them to put paint or stencil paste through.


I used  deckle edged cutting files for these, just for a bit of a change. I'm intending to do some more Christmas cards (and probably others) with these, based on a design I saw posted on FB, and the maker very kindly said it was fine to CASE them.


Last week being Valentines day, and here is Hubbys card. Also inspired by something similar I saw on Fb. That one used punched hearts, in 3 rows. I made some hearts using cardstock & UTEE. some of which had glitter sprinkled in, a couple have stamping on the cardstock, and one had the impression from a crackle stamp in silver impressed in it.

And now, the moment you've all been waiting for.....drum roll....the Enabling!


 A couple of new stamp sets from VI, there are more but these two were the ones that grabbed me.


And a 3-D embossing folder from Tim Holtz,called Mechanics. Gives a great impression of riveted metal pieces. Be cool for masculine type cards.


A bunch of Christmas cards made, based around the star one from a couple of weeks ago. I found a pad of vellum in with my Christmas stuff , have no idea how many years ago I bought it,but I'm trying to get stuff thats been here years used up! I just used bauble die cuts instead of stars. Post is below this one.


So thats me done, just leaves room for.....And Finally......


Wednesday, 4 December 2019

WOYWW #548- The Getting Tidier Edition.

Exhibit A- the desk where my die cutting is done. As you can see, my Big Shot is barely visible below all the stuff thats got dumped on there. So clearing this was the start.


   Not perfect yet, but much better!
And I have a plan for making it better- thanks to Hobbycrafts Black Friday deals.  I'd considered getting another rolling cart to put all my dies in, thus clearing two boxes off the surface. Only real issue was it was a bit too tall to go under the desk, which was what my plan was. But decided to go with it anyway, I could always roll it to one side, over by the big unit.


 So I went online and ordered one. Great deal, they were £15, instead of £30. Still available till midnight tonight! 
The larger ones are £25.


Big surprise when it arrived, it wasn't the same as the one I already had- it was smaller! Result. Now it will go under the desk.Still plenty big enough to take all my dies, main ones at the top, alphas in the middle and Christmas stuff in the bottom. For once, pleased something turned out smaller than I expected.😁


OK, let the Black Friday Enabling commence!

Some Honey Doo stamps to start with.


This Christmas die from the Paper Edgers line. Should help with some fast Christmas Cards.


These word die & stamp sets from Crafters Companion.


And finally some stamps from Visible Image, including the fab Erikas Maple.


And that's about it. Still plodding along slowly, I recall last time this happened it took me weeks to fully get back to normal, so it's slow but sure. Little bit of tidying and sorting each day at the moment.


  Which just leaves us with .........And Finally.........

Ain't that the truth!

Wednesday, 26 June 2019

WOYWW #525- The Holiday Edition!

Yep, next week we'll be MIA, as tomorrow we are off to Kos for 10 days. So I'll get around to as many people as possible who have joined in at The Stamping Ground, all kept organised by our lovely leader, Julia,before we go in the morning.

On my desk for this week is a card made to send to Ian, Condolences for Erika.  The stamp set is new this week- I'll show them further down- from her beloved Visible Image,  it was the words that went with this set that made me feel they were perfect for this. And it had to be colourful, as that was Erika too. The image was heat embossed, and I used an Encore Metallic pad that has 4 colours across it- pink, purple, blue & green.


Also on the desk some ATC's for a swap in one of the Lavina Stamps pages on Facebook. The backgrounds are as far as I've got for now, so they'll get finished when we get back.


And now for my regular Enabler part of the post 😀😇😉.

First are 4 new Visible Image stamp sets, there are more in this release, but these were the ones that got my attention.


Popped into The Works earlier in the week, and got these two dies.


I have one like the circle Happy Birthday, but it doesn't have stars in it. The other says Wedding Day. Also from The Works, this paper pad. Suitable size for smaller cards, notecard size, and the sort of colours that will work fine for masculine cards. And I think thats pretty much it from me, apart from wishing Helen (StampingbyH) a very Happy Birthday today.  Which just brings us round to......And Finally.......................................


Made me think of Debbie Rock (TatteredRocks) when I saw this.


An End of an era

An end of an era

I write this with a broken heart, that only time can heal My beautiful, wonderful wifelet Shaz (Silverwolf) passed away peacefully in the ea...