Hi folks, Wednesday again, and stopping off at Julias, The Stamping Ground, to link up for our round the world Blog hop. Good job it's a virtual thing, it's gone darned cold out there!
And there has been some crafting done, although not as much as I wanted, which I'll explain in a while.
You may remember seeing this after my NEC post. A kit from Inkylicious, comes with everything you need, and after you've used up the 5 sheets of Kraft card, you just need your own to substitute.
Anyway, I thought before I started on the Kraft card, I could use up some suitable sized pieces from my scraps folder of black card to practice on, and if they were OK, I could use them as card fronts.
Stencil taped in place, and some of the Brilliance white brushed in from the edges. I used a soft brush instead of the Inkylicious Colour Dusters. I'd splodged the ink onto a little Mylar mat, instead of trying to take it from the inkpad.
A bit further on, and I've taken a pale blue- I used Distress Oxide Broken China- over the white at the top.
Now to outline it with the white pen.
Outlined & stamped, and I'm not happy with the outlining, nor the stamping.They recommend using a Colourbox White inkpad, as it's such a true white. And I agree that it is, but it's also so juicy, it loses the detail of a stamp too easily. But it's only a practice piece, so no loss.
This time I used the Colourbox Frost White to brush off the stencil,. then added Distress Oxide Broken China at the top, and Wilted Violet at the bottom.
I stamped in Memento Luxe Wedding Dress, and the detail is much crisper.
Still not totally happy with the outlining, so more practice needed.
Now, more practice was interrupted by me not feeling well on Friday. I was freezing cold all day, and had no energy at all. I spent most of the day reading on the sofa. When I got up on Saturday, Doug said I'd been clammy all night, and I'd clearly been sweating, as my pillowcase was wet, as was the area on the sheet where my shoulders had been. Now this was exactly how the last UTI started, so we jumped on it straight away. Phoned the triple 1 NHS number, expecting to be told to go to the Out of Hours practice at the hospital. So I was a tad surprised when they said they were sending Paramedics to assess me.They did, and she said that as I was showing all the signs of an infection- raised temperature, blood pressure & heart rate (179 bpm, apparently!) and she could see me sweating, they wanted to take me in to A&E, as they had new guidance now on suspected infections, and they were to be treated as potentially Sepsis until diagnosed otherwise with blood tests. I'd sort of expected it, and was glad about it, as after the last time I knew how bad it could get. I packed a bag as I fully expected to be staying in, at least overnight. Anyway, had blood tests, and was given IV antibiotics & fluids, then the Doc came back and said it was definitely a UTI, so he was happy for me to go home with Antibiotics.
I'll be having my catheter changed when I see the Nurse on Friday, as this one has let me leak urine on occasions, and I've not had that before. I've also now had two UTI's with this catheter, and I'm pretty sure that's the problem. Never had leaks before, and never had UTI's before either! Otherwise, I'm now feeling fine, I have antibiotics until Friday, and I'll be getting the nurse to check a sample and make sure it's clear of infection, if not she can get one of the Docs to get me more pills.
Right, thats my round up of the last week, I'll be getting back to my practice after visiting everyone. Have a good day folks.
Oh, the end of post funny....I nearly spat coffee all over the place when I saw this yesterday, so be warned!
Pages
A warm welcome to all my visitors,
Thank you for taking the time to come and look at my blog, I really do appreciate it. I would love you to leave me a comment, even if it’s just to say Hi. It means I can come visit you!
All my designs are original, so copyrighted to me. If I have been inspired by someone elses work, I have named them in the post, and where able, I have provided a link.
Please feel free to use my designs for inspiration, I just ask you to credit me, and provide a link back to my blog.
Thanks, Shaz XX
Showing posts with label Colourbox. Show all posts
Wednesday, 22 November 2017
Wednesday, 23 January 2013
More Birthday cards!
So these were two of the cards in yesterdays picture, but created differently to the others. Still pretty simple, but not one layer.
I do love my Stampscapes stamps, and usually do them on a brayered background, as the texture type stamp Kevin generally uses to colour his scenes with, first I have never got the hang of, and second, it takes so long to get the colour build up.
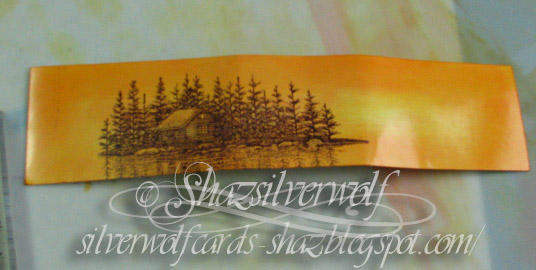
While I haven't been able to do much, I've been watching his tutorials on the Stampscapes YouTube channel. On these, he's been using the Colorbox Stylus tool, and I just happen to have a (pretty much unused) one of these. So I dug it out, and had a go. I have to say, it is really easy to get the colour down with it, and to control where its going, easier than sponging for scenes like these.
You need to use glossy card, which is why I couldn't do them straight onto my card front. Started off layering pale yellow, then added darker yellow, light and dark orange.
I used two stamps, Lakeside cabin, from Nature Sheet #6, and Lakeside Island, from Nature Sheet #4.
Stamped in Adirondack Espresso, and I heat set the first stamp before doing the other, as the ink was quite wet on top of the inked surface, and I always use a stamp positioner to match my images up! Kevin does say theres no need, the images match up/overlap ok, but I know I would miss my mark, then be annoyed.
So I trimmed down both images and matted them onto dark brown card.Then I decided they didn't look right on plain card, so had a root about and found some gold card I'd embossed in a 'bug folder, Forest Branches. I cut that to size for the front of the card and mounted my image on it. I stamped a Happy Birthday sentiment, it comes from a Debbi Moore set, on one of the scraps I had trimmed off, matted it the same and added it under the image.For the second, I ran some dark orange card through the 'bug with the Tim Holtz Woodgrain folder, doing it twice to get the length. Did the same with this one to cover the card front, and used the same Happy Birthday stamp too.
So, not quite CAS, but still quite quick.Watching Kevins videos, they run for about 15 minutes, so it doesn't take long to do this, and his scenes are way more detailed than this! It probably took me 20 minutes or so to get the colour done.
Sunday, 1 May 2011
Flower Tiles
Started out at a bit of a loss for what to do with these tiles I had on my desk from the WOYWW 99 post- I have done so many square cards this week, and of course, that was the first thing to mind, looking at the image. So instead I went with a vertical strip, matted first onto black. Decided I didn't like that, so un-matted them, and went with dark green instead. Then I had trouble finding the right backing paper- everything seemed too busy for these images. Finally came across a pad of papers, Laura Ashley Traditional,and the very pale green with the white flower seemed to work, and also made me think of lace- so went digging in my box of lace pieces, and added a strip of this to the front.

I've enlarged & cropped the picture here, the lace is a little difficult to make out against the pale background. I used spray glue to attach the lace. I lay anything I need to spray in my bin, on top of a scrap piece of paper, then spray it. No mess anywhere else,lol.
While digging around for the lace (which prompted me to find it a box of its own), I spotted a roll of pearl string, which I bought from a discount warehouse in Birmingham, from their florists dept.
By the way, thats a good place to visit if you have one of these places near you- you'd be amazed at what you can find, especially the floristry part- lots of Bridal stuff, which is what this pearl string was for, masses of paper flowers, petals, ribbons, all a lot cheaper than you will get anywhere else.
Anyway, back to the card! I wrapped the pearl string round a couple of times and knotted it towards the top.
Now the top right looked empty!
This card was really starting to feel like a battle of wills- I was determined to finish it, and it was fighting me every step of the way- normally I would put a project to one side when it feels like this, but I really think that if I had, I would keep putting off going back to it- besides, I refuse to be beaten by a piece of paper, (I was in a stubborn mood). I probably needed coffee, lol.
Off on an embellishment hunt then. Didn't want too big, or too fussy, and finally I came across these little pearl hearts. I bought these a few years ago, at one of the Hobbycrafts shows at the NEC, thinking ' ideal for Wedding cards' , and I think I have only ever used a couple. So, I attached these with a little silicone glue. I also used silicone glue to attach the stamped panel to the front, because of the lace.
Final bit was a sentiment, and I used a Whispers Words stamp, by Docrafts, 49701 Birthday Wishes. The Ink I chose was a ColorBox Catseye Pigment Pad, in Verdigris and stamped this along the front edge of the card.
At Last! Finished. Yay!!!
I've enlarged & cropped the picture here, the lace is a little difficult to make out against the pale background. I used spray glue to attach the lace. I lay anything I need to spray in my bin, on top of a scrap piece of paper, then spray it. No mess anywhere else,lol.While digging around for the lace (which prompted me to find it a box of its own), I spotted a roll of pearl string, which I bought from a discount warehouse in Birmingham, from their florists dept.
By the way, thats a good place to visit if you have one of these places near you- you'd be amazed at what you can find, especially the floristry part- lots of Bridal stuff, which is what this pearl string was for, masses of paper flowers, petals, ribbons, all a lot cheaper than you will get anywhere else.
Anyway, back to the card! I wrapped the pearl string round a couple of times and knotted it towards the top.
Now the top right looked empty!This card was really starting to feel like a battle of wills- I was determined to finish it, and it was fighting me every step of the way- normally I would put a project to one side when it feels like this, but I really think that if I had, I would keep putting off going back to it- besides, I refuse to be beaten by a piece of paper, (I was in a stubborn mood). I probably needed coffee, lol.
Off on an embellishment hunt then. Didn't want too big, or too fussy, and finally I came across these little pearl hearts. I bought these a few years ago, at one of the Hobbycrafts shows at the NEC, thinking ' ideal for Wedding cards' , and I think I have only ever used a couple. So, I attached these with a little silicone glue. I also used silicone glue to attach the stamped panel to the front, because of the lace.
Final bit was a sentiment, and I used a Whispers Words stamp, by Docrafts, 49701 Birthday Wishes. The Ink I chose was a ColorBox Catseye Pigment Pad, in Verdigris and stamped this along the front edge of the card.
At Last! Finished. Yay!!!
Subscribe to:
Posts (Atom)
An End of an era
An end of an era
I write this with a broken heart, that only time can heal My beautiful, wonderful wifelet Shaz (Silverwolf) passed away peacefully in the ea...
-
A couple of weeks ago I mentioned that I had bought these, the new Tim Holtz Embossing Diffusers. You have probably seen, like me, the...
-
I take no credit for this discovery, a lady posted this on Pinterest HERE .Like any of us, I hate having to spend money on 'consumables...
-
Right, so this problem appeared a few days ago. I was gifted a whole bunch of these pots, about a year ago, and hadn't as yet used them....