A warm welcome to all my visitors,

Thank you for taking the time to come and look at my blog, I really do appreciate it. I would love you to leave me a comment, even if it’s just to say Hi. It means I can come visit you!

All my designs are original, so copyrighted to me. If I have been inspired by someone elses work, I have named them in the post, and where able, I have provided a link.

Please feel free to use my designs for inspiration, I just ask you to credit me, and provide a link back to my blog.

Thanks, Shaz XX

Showing posts with label acrylic jewels. Show all posts

Tuesday, 16 October 2018

Snowflake Christmas Cards

Putting all of those snowflakes to good use, and this is the first 3 cards made using them. They were inspired by a card I spotted on Pinterest back last week.

 This is the card that I saw, and it was mainly the embossing folder that caught my eye, as I have that one.  It's by Darice, called Snowflake Swirl.

The cardmakers name is Carol, and her blog is Our Little Inspirations.


I think my card is made larger than hers was, as I needed to add some embossing to the lower part of the piece of cardstock I was using. Mine is based on an A4 sheet of cardstock scored and folded.
 A few weeks ago I did some stencilled sheets using the Tim Holtz Merry Christmas stencil with silver embossing paste and sprinkling it with Crystal Glamour Dust, but they weren't long enough for this so I needed to do some new ones.
I found this stencil best to work with upside down, as the tiny parts of some letters- notably the 'R' and 'M', can easily get caught as you spread the paste. This also applies when cleaning them, you do need to be very gentle to avoid bending them.


I also had to do each one in two sittings, as the stencil wasn't long enough for my card front, but they only take about an hour to dry.I tried with the first one doing the whole strip, but it's impossible to do without smudging the paste you've already laid down.
 As you can see, epic fail!


While I was waiting for the paste to dry, I made a start on layering up the snowflakes. They're not all for these cards, I have another set planned. There are 3 or 4 snowflakes used in each one.


 I trimmed the strip down to roughly one third of the card width, then trimmed the embossed panel down to fill the front.


Both were attached with DST. I added a very narrow strip of silver ribbon to cover the join. For that I cut some narrow dst roughly down the centre, and added that over the join, then wrapped the ribbon around the card front, siting the join where I intended to place the large snowflake at the top.


The card base and the embossed panel are both Pearl White cardstock.


The sentiment is a Crealies die, and I cut it 3 times from white cardstock, and once from silver glitter and layered them up for a dimensional sentiment. I added a tiny acrylic jewel as the dot on the 'i'.


I also did a couple of stencilled sheets using Glossy White stencil paste- both this and the silver are by Sweet Poppy- and again sprinkled with Crystal Glamour Dust.


 So I changed it up for the third card, using the white sheet, and swapping the sides round too. In each case the ribbon join is under the large snowflake.

A small acrylic gem in the centre of each snowflake finished them off nicely.

Tuesday, 25 September 2018

Mixed Media & Stencil Paste Baby & Wedding cards


Been having a play with some stencil paste and Tim Holtz Layering stencils today. I thought this flourish design lends itself to so many useful cards, it all depends on the colour paste you use. I coloured white paste with pink and blue  Memento inks to make the baby cards, and left it white for the two wedding ones.In all cases, I gave the wet paste a very light sprinkling of Glamour dust, just to add a gentle sparkle.


 Useful things to know about this technique:
  When colouring your paste- and you can colour white or Translucent- you can use a variety of mediums. Inkpads, reinkers and acrylic paints all work fine, and subtler shades can be achieved with mica powders. You can also add mica powders along with your inks/paints, for a pearly sheen. You can also add glitter, for sparkle that doesn't shed!

One thing to remember when using liquid colours to colour your paste is that the liquid will alter the consistency of the paste, so this is one case where you do not want to start with a little, and add till you've got the colour required. Acrylic paint will not be too bad, as it's not so liquid as ink, but with reinkers especially, go for a fairly dark colour, just adding a drop or two. You can always add a little more paste if you want to lighten it.Remember also, when adding to white paste it will lighten the colour anyway, and it will usually dry slightly lighter as well. Also, don't skimp on mixing up your custom colours. If you run out before finishing, you'll never mix exactly the same shade!Any leftover paste can be stored in small screwtop pots, and will last for a few months. If there is not enough to make that worthwhile, you can spread the excess onto a scrap of cardstock, using that to add all your waste paste to. Then, when dry, just cover with a sheet of hot foil, run through your laminator or foiling machine-you can even just iron it on- and you have a sheet of foiled card you can die cut sentiments from.
Use a fairly good thick cardstock to work on, as the moisture from the paste will cause thinner cardstock to buckle.
Here are some I've done in the past.

 Also, Mylar stencils such as these are not going to lay as totally flat on your cardstock as metal ones, so more care needs to be taken when adding paste, so that it doesn't  start to seep under the edges of the design. Try to add enough paste, and use a wide enough spreader to cover the design in one sweep.  Too many spreading motions will increase the likelihood of the paste going under the lines. Sweet Poppy have a fab wide spreader for this, and Lucy Ellis of Sweet Poppy has some cool videos on You Tube showing how to get the best results.
 Finally- cleaning your stencils. You want to do this as quickly as possible, and I take a sandwich box with warm soapy water  in up to my craft room to drop them in, to save going up and downstairs to a sink every time I've used a stencil. Make sure you have a bowl/tub large enough to lay the stencils flat in. Keeping them flat while washing & drying is really critical to keeping them in good condition. The paste comes off easily if you do it straight away. I have found that the Cosmic Shimmer glitter pastes are really difficult to remove if they start to dry on your stencil,so speedily dropping into water is important. I have an old towel on a work surface, and stand the tub on that. A small nailbrush is ideal for removing the paste, then I lay it onto the towel, and PAT dry. That's important, especially if the stencil has unattached parts, like the Flourish one does. If you bend parts through rubbing, they will always let paste/ink etc seep under the design. This applies to metal ones with unattached parts too, not just Mylar.
So, back to the cards. The card bases are topfold, half A4 sheets, which end up as 5¾ x 4⅛. The cardstock I used for the stencilling was 6 x 4 so I had a little to trim down to tidy it up. I finally trimmed the panels to 5¾ x 3⅜.
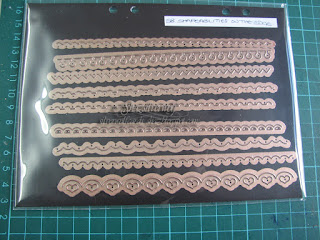
 As the panels were narrower than my base card, I decided to die cut some borders, you could also use border punches, of course.
 I made some choices from this set by Spellbinders, called Shapeabilities On The Edge. They are just a hair longer than my panels,but these dies are fully repeatable, so you can make a border as long as you need.

I chose pearl papers and cut the edges twice for each card, then split down the middle. The pink one, which was the second up from the bottom in the dies, actually gives you two for one- you could easily use the offcut as a border too.
The pearl papers came from some paper blocks I bought years ago at the NEC, from a company called Craftwork Cards, who sadly no longer exist.They are really useful for borders, or for punching from.


The strips were attached to the back of each panel, along the edges, with dst, then trimmed down to fit.


All four done.
 Now they just need mounting onto the card fronts, and again I used DST for this. Remember to add tape to all 4 sides, as there will always be a little warping of the cardstock from the paste. If you are a wet glue user, I'd recommend laying them down with a weight on top for half an hour or so.


Now to add a sentiment, and I chose to use these Crealies Text dies for the baby cards. They are a small die, but the perfect size for these cards. there is quite a selection of sentiments available too. The 'A New Baby' sentiment is one die, but the three words are all separate, which I love as that gives you freedom of placement. I cut  the die 4 times from white scrap card, then once each from the pink & blue pearl paper I used for the borders. This was so I could layer up the white die cuts twice, then add the
colour on top, for a little dimension.


 I have some stitched banner dies, from Aliexpress, and used the smallest size from the long set for this. It was actually a little longer than I wanted, but the bottom set was a little too short. I sorted that by just replacing the banner in the die, matching up the stitched lines, then trimming it shorter.
A simple fix. You may notice than I am cutting down into my bottom plate in my 'Bug. I saw a few crafters switching the order of their plates, putting the 'B' plate on the bottom, and the 'C' plate on the top. This is great, as you can see exactly what you are cutting, so makes precise placing easy. I'd lain my words on the banner first to decide how much shorter it needed to be.
A ZIG glue pen- in fact any glue pen- is ideal for layering up the words, and for attaching to the banner. Again, laying them down under a couple of acrylic blocks for  a few minutes helps them set.
To add them to the card front, I used a few foam pads. Because the surface is uneven, and glittery, both of which can cause problems with adhering stuff, I added a small dab of Pinflair Glue Gel to the top of each foam pad. This helps to make sure it will stick to the awkward surface, and also gives you a little wriggle room to position it straight.


I decided the banners needed a little something else, so added an acrylic heart to each. I used a clear one for the blue card, as the only blue hearts I had were not close enough in colour to the blue used in the card.

For the wedding cards, I used the same banner die, but added the sentiment with peel offs, as there currently isn't a wedding die in the Crealies line. I have emailed to ask her about the possibility,though. 😀 A small white half pearl was added with some Glossy Accents.


Sunday, 24 June 2018

Christmas Card Club #13

Hi Ladies, I'm late, but have some cards for this week. Lorraine has set this fortnights challenge, which is Candy Canes/Gingerbread.
 Unfortunately, I don't have any stamps or dies that fit the theme, so I've gone back to a Challenge I missed whilst on holiday. That is Christmas Wreaths, which was Ritas choice back in April.

 The first two cards use a Penny Black stamp, called Adornment. The first is stamped in  Encore Metallic Green pigment ink, and then heat set with Stampendous Metallic Green embossing powder.
 The stitched circle dies were bought from The Works.
I added a few acrylic gems to give a bit of sparkle.
The embossing folder used is a Cuttlebug one, and I accidentally put my cardstock in upside down, so it's actually debossed!


This time stamped in Silver Encore pigment ink, and heat set with silver detail powder. Red gems in assorted sizes gives this one it's bling.
 The embossing folder is from Craft Concepts.


For the next two I built a wreath using a die from Sue Wilson, called Twig Wreath as a base, and then some holly twigs cut with the Tim Holtz Christmas Mixed Media die, and the Winter Greens die set. I've added some red gems for berries, and a bow at the top. I have no idea where the tiny Poinsettia die cut is from, I rather think someone must have gifted it to me. I had 2, in different sizes, along with some tiny deer. If anyone knows what the die is, I'd love to know. I rather think the sentiment die cut was gifted too, as I don't have a die like that.
 The embossing folder is by Dovecraft.
Last card, and made exactly the same way, but this time was cut from white glitter card, and some golden holly added, along with the smallest of the two poinsettia flowers.


The background is a folder that I think was a magazine freebie, as it has no info on it.
 The sentiment is also from an embossing folder by Crafts Too, and has  6 sentiments strips on it.


The Sue Wilson twig wreath die cut, along with an assortment of foliage.


Three of the Penny Black stamped images, I haven't done the copper one yet.


Some embossed backgrounds I made up, you can see the Crafts Too one 2nd from the right.


Thursday, 22 February 2018

Quick & Easy Butterfly die cut cards

As promised yesterday, here is the blog post on the Butterfly cards.
 I saw a You Tube video a couple of nights ago making these cards, and I'm sorry but I forgot to make a note of the name of the crafter, and trying to search You Tube using key words brought up masses of similar cards!
 The lady used plain vellum behind the Butterfly, and added colour using markers.
But it reminded me I have some vellum sheets that are multicoloured, and thought I'd use up some scraps to do these.
 You could also use plain vellum and blend ink over it, or I reckon you could also use acetate and Alcohol inks, or Alcohol markers.
 The Butterfly die is a Tim Holtz/Sizzix Thinlets set:


 You get the base Butterfly, and the Wings overlay, which is the part used to cut out the cards.
Base are the top pair, overlay is the bottom ones.


The card bases themselves are White Pearl cardstock,topfold, and made by cutting an A4 sheet in half lengthways. It's better to use white as a base, as darker card will not show the pattern on the vellum very well.

4 pieces of black cardstock for the fronts, I've used two Black Linen card, and two plain card so I can run them through an embossing folder. They are trimmed to leave around a 1/4" border all round.

 The two folders I chose are a Cuttlebug one, called Forest Branches, and the stone wall effect one was bought at a Craft fair, and I have no idea of the brand!

Both are slightly too small to fill the card front in one go- I think they made them based on the standard US card sizes, thank heaven they are getting larger these days!


Anyway, there is a way to resolve this without leaving a harsh line where you joined it.
I ran the Forest Branches through the 'Bug, and as you can see it doesn't quite extend all the way to the bottom.
 Now, for the fix.
 Line up your cardstock so it extends out of the bottom of the folder,and allowing the pattern to continue down.  Like so:

Now, lay your top plate in place, BUT line up the edge of the B plate with the very edge of the Embossing Folder, not past it. This looks odd in my picture, but that's because the B plate is a bit warped.😀
 Now run through the machine again.


Result- a completely embossed piece, with no lines.


After both were embossed I started cutting out the four butterflies.

Also, be careful where you place the cut out. You'll need to add DST/tape runner later to matt the panel onto the card, and if it  goes behind the vellum on the wings it will show. You can see bottom right I cut that one a bit close, so had to trim down a strip of tape for that bit.


Now for the vellum.


Having a look through my stash, I found these oddments.
Hard to believe how much vellum was a 'thing' back in the day. Rarely see it used now except for Parchment work.


 I cut the vellum down to fit behind the butterfly cut out.

Used a Stix2 tape runner to attach it to the back.
It's a good idea to mark the top of the vellum, so you get the pattern you wanted.


Vellum all stuck down, ready to add the butterfly bodies.


I also cut out the bodies of the butterflies using scraps of glitter paper/card. You can skip this, or add Stickles/Pearls to the bodies.


Trimmed them to shape, and added to the body with Glossy Accents.


 The next step was to fold up the wings slightly either side of the body, then attach to the respective panel with glue dots.


The panels added to the card base with DST.


Now for a sentiment. I chose some Text dies from Crealies.  
They are only small, so ideal for smaller cards. And not expensive either.


I went with Birthday, Sympathy and Get Well, and cut each sentiment 3 times, so I could layer them up for some dimension. I cut them from the same white pearl card as the bases.


I layered them up with Glossy Accents, and put an acrylic block on top to make sure they stuck well.
 While those were sticking, I stamped inserts for the card.
 The sentiments are from Phill Martin sets, Feel Better Soon and So Sorry for you loss from a set called Mini Baroque Occasions Sentiments, and Very Happy Birthday from the Butterfly Elegance set.
 I added some random small butterflies of unknown origin to the edges, all stamped In Versafine Majestic Blue.
 The sentiments were added using Glossy Accents again, and this was when I realised I hadn't actually kept the dot from the 'i' in Birthday.
Rectified that with a clear acrylic gem, from a pack of Anitas 2mm stones.


An End of an era

An end of an era

I write this with a broken heart, that only time can heal My beautiful, wonderful wifelet Shaz (Silverwolf) passed away peacefully in the ea...