A warm welcome to all my visitors,

Thank you for taking the time to come and look at my blog, I really do appreciate it. I would love you to leave me a comment, even if it’s just to say Hi. It means I can come visit you!

All my designs are original, so copyrighted to me. If I have been inspired by someone elses work, I have named them in the post, and where able, I have provided a link.

Please feel free to use my designs for inspiration, I just ask you to credit me, and provide a link back to my blog.

Thanks, Shaz XX

Showing posts with label Archival. Show all posts

Wednesday, 13 March 2019

WOYWW #510, or The Not Much Happening Edition.

Well, a pretty empty desk this week. Finished making a big batch of Strip cards, and I'm done with that for a while. Couple of posts below this one.
I bought some supplies, a few coloured envelopes. And some Super Smooth Blending Card, from Papermill Direct. They do it in 3 different weights, so I got a pack of each. Recommended by Eileen Godwin, who'd been trying out different ones after getting too varied a result from the Sheena Douglas card.

I'd also been finding that problem, but thought it was just something I was doing, but clearly not.


Decided as well that I'd do some more glitter cards using a Medallion stamp I've had for years.
These were stamped in Staz-on, and it's just not one of my favourite inks. Even with the Stamp Platform, results weren't as crisp as I'd like, and I've had to do some filling in with a Micron pen.


So I've done another batch with Archival Black, and they are definitely a better image. It doesn't dry as quickly as Staz-on, but it will if given some time.


I shall leave them overnight to make sure they're dry, then glittering will commence.


And that really is it for me.

 One mention for Visible Image, anyone wanting any of their stamps & stencils, they have a 20% discount until Sunday, use code INKY at the checkout.

Which just leaves......And Finally.......


It's important to support your local craft store!


Popping over to Julias place, The Stamping Ground, to leave my link, and come visiting.

Tuesday, 29 January 2019

UFO's Part 3

Still working down my UFO's, these two using another Clarity stencil, Framework Circles.
 I used Distress inks in two shades, applied with brushes.


After I'd done these, I really had no plan on how to use them, which is how they ended up as UFO's.
It occurred to me that flowers were the way to go, and this one is from a Honey Doo set, called Cherry Blossom, which has this flower in 3 sizes, this is the middle sized one. It also has leaves to go with them.


Getting them centred turned out to be a breeze using the Stamping Platform, but you do need to make sure your cardstock is accurately cut to size all around in order for you to be able to stamp the flowers central. I placed the first flower in one corner, then just rotated the cardstock each time to do each corner, then I moved the stamp to the space between the corners, then again just rotated the cardstock.


I'd inked the blue one to give me a darker shaded edge to each circle. Tumbled Glass and Salty Ocean Distress Inks. The flowers are stamped in Archival Cobalt Blue.


After I'd stamped all the flowers, I took a strip of pale blue vellum, and stamped some more, so I could add some layers. Wasn't sure if I wanted to double them up, so did a few extra. Stamped in Archival Cobalt, and as it's on vellum, the ink stays wet long enough to add embossing powder, and I used Stampendous Crystal to give a little sparkle.


 The orange one had been inked in Wild Honey  & Spiced Marmalade, and this time the flowers were stamped in Archival Tiger Lily.

I added a Happy Birthday sentiment in the centre circle on both. This sentiment comes from a cheap set of sentiments from Aliexpress. They are mainly small sentiments, which are often useful.
The only downside is that being cheap silicone stamps, they are rather thin, and even on the 'clear' side of the Platform, they wouldn't pick up on the lid.
However, I found a cheap and easy fix for this.  A while ago, I'd bought a silicone non stick baking sheet from Poundland, intending to use it as a craft mat.
 When I tested it out underneath my card on the platform, it raised the cardstock enough to pick up the stamps. So I cut a piece to fit the platform, as it's about 2 feet square. It will be useful, as I've found in the past that some of my unmounted bare rubber stamps are too thin to work in the platform, even on the clear side. So there's an easy fix for anyone having the same problem.


Before cutting out and adding my flowers, I added some colour to the ones on the cardstock with Prismacolor pencils, then did the same on the back of the vellum ones.

One of the things I'm loving about the Prismacolor pencils is the ability to shade just using one colour of pencil, simply by varying the pressure applied. Quick & easy is definitely a thing for me.


I matted each panel onto a matching cardstock, then mounted onto a 7" card blank, which I did have to trim slightly, as I couldn't get an even border of white card base.


The flowers were added with a dab of silicone glue, then some sparkly glass gems added to the centres, using Multi Matt Medium.


The cardstock used for the mat is from a pack by DoCrafts, the Papermania Capsule collection. It's slightly textured, and the pack has 75 sheets, each a different shade. I get them from The Range, and they come in A5 and A4 sizes, and are great for die cutting too.

Friday, 6 April 2018

Retiform Technique Cards

 I came across this technique on You Tube, and there were some really cool cards made with it. I ended up with 4 cards from it, I did make 5 backgrounds, but completely stuffed up the stamping on the first one!


It's very simple, you just need Post-its, dye inks and applicators, and a selection of stamps of a suitable size, and if definitely works best if you have a theme, as this unifies the whole piece.


 The idea is that you mask off a section using Post-its, then sponge ink into that section. Then you move the Post-it to cover the inked section and add another Post-it or two to create another section, and repeat the sponging. You carry on this way until you've created sections all down your cardstock.
 It works best if you vary the size and shape of your sections too, along with the depth of colour sponged on.
For the first one I used Card-io/Majestix stamps, which are great as they are the right sort of size to fill the spaces.. You can of course use partial images, which I've done with the others, and would also be a great way of making use of the smaller 'filler' stamps that are in many sets.
The sets used here are:
Greenery 1, Backyard Blooms( Spider web & spider, and some of the greenery), Pottery petites( the small flowers on the Wheelbarrow),Oriental Whispers( Branch Bottom Right),Perfect Patch( Wheelbarrow & Wellies),Seasonal Rose,Pleasant pastures( Toadstools), Dragonfly Garden, and Feathered Friends for the birds. The blank space has been left for a quote/ sentiment.
I used DI  Old Paper, and an assortment of Versafine inks for the stamping.


I went with a sea/boat theme for the blue one.
Some of these stamps came from a sheet bought from the USA many years ago, and I cannot remember where I got it. Others were 'bargain bin' stamps bought at a stamp show. I believe the quote was a magazine freebie again a few years ago.
 The ink was Tumbled Glass and Broken China Distress ink, the stamping done with Archival Cobalt.


 I used Wilted Violet Distress Oxide for the sponging on this one, and Versafine Majestic Purple for the stamping.
 The stamps are: Visible Image, 'Music Speaks, Smiley Faces and Music on World off.
The 'Rock Star',Skull Border, Drum Kit,Winged Skull and Guitar lower right are from an Inkadinkado set called 'You Rock'.
Guitar top right is from a company called Dimension, who I think are no longer trading.
The angel & guitar is from a magazine freebie sheet, as were the music notes.


All 3 of these would make good masculine cards, I think, indeed the technique itself works well for them.


Final one used Distress Oxide Wild Honey for the sponging.
 There are two stamp sets used, the stylised cats are a set from a company called Inkwell Stamps, a UK company, as is the sentiment.
 The other cats, as well as the Fish bowl, wool ball, paw prints and mouse come from a  Hobby Art set called Catz. They were stamped in Versafine Vintage Sepia.


The four finished pieces.


All four were matted and layered with toning cardstock, then mounted onto card bases- 5x7- also in coloured cardstock.


The quote on the garden one is from a Tim Holtz clear stamp set, and is smaller than the rubber version.
 Not adding sentiments to the other 2, that way I have more latitude when I come to use them.
 The blue and the brown ones would be suitable for a Retirement card, as well as a Birthday, for instance.

Saturday, 25 February 2017

Card for a New Home.

Right,I made this card a few weeks ago, and with waiting for it to arrive, then going into hospital, I've just realised that I hadn't blogged it.

The main stamp is by Hobby Art, from a set called 'Hares'. We spotted this at The Happy Stampers Festival last year, and as Doug pointed out, it would be perfect for anything for LLJ, as she is known for her love of Hares. So when Jan announced they were moving to Wales, and that they had a date for moving in, I remembered this stamp set.
This is the journal I was trying out some scenes using Card-io stamps in a while back, and I can't figure why I've never done this before, instead of winging it and hoping for the best. I've always got a stack of scrap paper under my work, and have occasionally done a test imprint on that, but never tried figuring out placement and colour.
 Anyhow, first off I stamped him in black, then built up the grasses around him using an assortment of green dye inkpads, and some stamps from an Inkylicious set called 'Essential Grasses'. Which it is, I think. A great selection of types of grass.


I didn't think I liked the black version, so instead tried it in Archival Rich Cocoa, which is what I went with for the card.
 When I stamped him onto the card base, I also stamped another onto Post-its, so I could mask him when I wanted to add the sky.
 The hare was coloured with Distress Markers in Antique Linen, and Walnut stain, using a waterbrush to drag the colour.
Bit of a jump here to the finished scene, when I realised I'd forgotten to take any 'in the process' pictures!
 I stamped the hare in Archival Rich Cocoa, then the grasses surrounding him in Adirondack Meadow and Lettuce.
 Tearing some scrap paper into hill shapes, I used a soft brush to create the hills with the Adirondack greens again.
Using Adirondack Sunshine Yellow and Sunset Orange, along with a dry baby wipe, I created a sunrise behind the hills, then put the mask over the hare.
Again using a soft brush I applied Adirondack Stonewashed all over the sky area, then added Sailboat Blue onto the upper portion of the sky, to get a sort of mottled look.
 A portion of fencing from another Hobby Art set was stamped in Archival Black onto one hilltop, then an Inkylicious Flock of Birds, and a butterfly added.


 The corners were rounded off- this little rounder from X-Cut is actually really good, better than other cheap ones I've had. I do have the Corner Chompers, but this one was handy.

 I matted the image onto dark blue cardstock, then rounded those corners too.
 Next it needed a sentiment, and one of the Phill Martin sets I've bought recently, Mini Baroque Occasions Set, has a New Home one in it.
 That was stamped in Archival Cobalt in the upper left of the scene.
I mounted the image onto a 7" square card base, then tied a blue and white spotted chiffon ribbon along the bottom.
 And then it was done.

Stamps Used:
 Hobby Art, March Hares
Hobby Art, Woodland Glade( Hillside fence)
Inkylicious, Essential Grasses
Inkylicious Take Flight( lots of bird flocks)
Inkylicious Playful Cats ( Butterfly)
 Phill Martin Mini Baroque Occasions Sentiment Set.


Sunday, 11 December 2016

Christmas card Club- A Snow Scene.

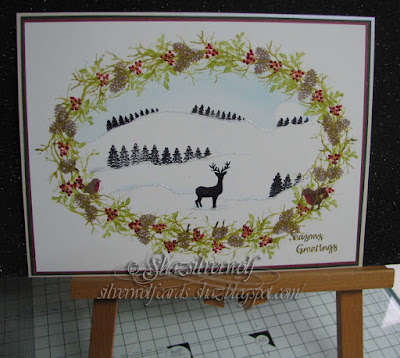
This fortnights challenge theme was set by Rita, and is titled 'A Snow Scene'.
I thought this was time to have a go at a Card-io scene, and I'm fairly happy with how it turned out, but I need more practice, as I can see a few things I could improve on. The robins, for instance, could have done with being a little darker, they sort of get lost in with the pinecones. And some of trees could have stood a little straighter. So I shall keep practising scenes in my notebook for a while.  Speaking of notebook, this was inspired by a scene I stamped in there a while back.


I think I actually prefer my practice one,😀.


I got so engrossed I didn't take as many pictures during the process, but I will list the stamps I used at the end.


Wendy, from Card-io does some awesome scenes with her stamps, and I intend to keep practising. She makes it look far easier than it is!
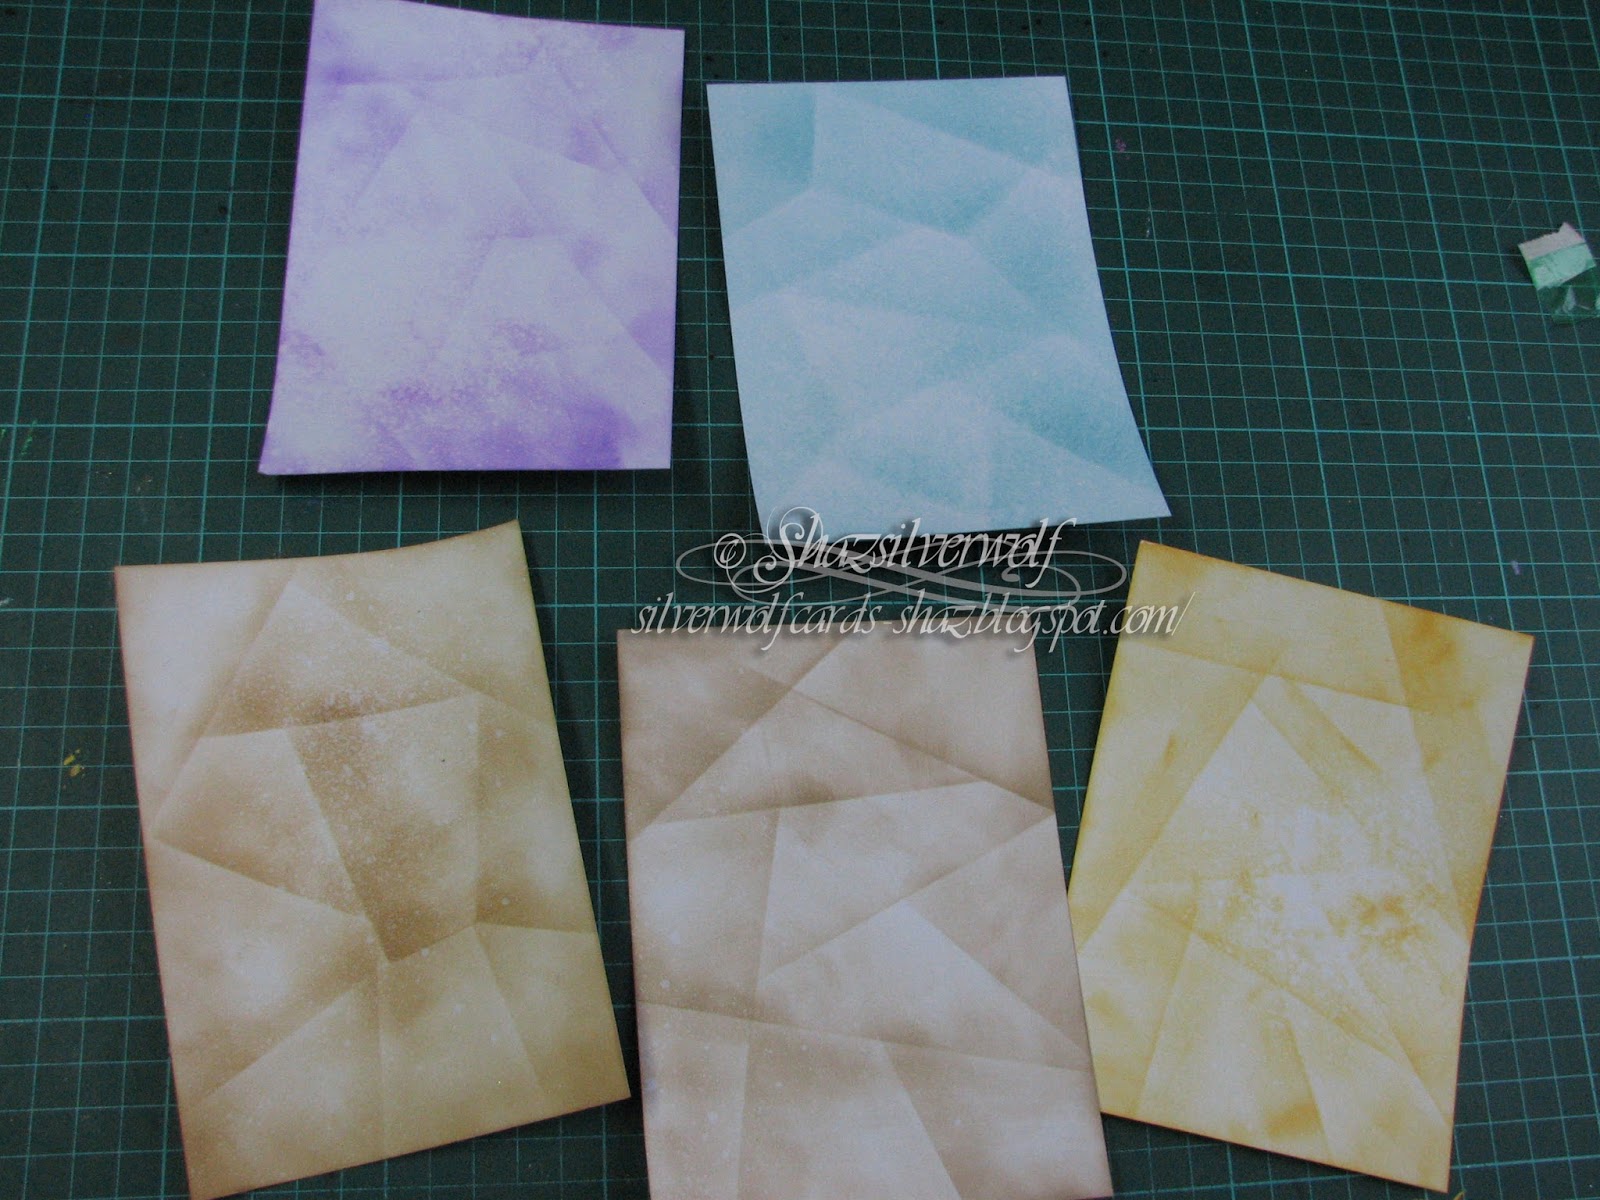
I started as I've seen her do, by placing the four sides first, then filling in to get your shape, I went oval instead of round with mine.
 The image is stamped multiple times, all from the same inking,so you get a variety of shades.


 I stamped the twiggy branch from the Oriental Blossom set, in Versafine Spanish Moss.


It was now I realised I'd not taken any in between photos, but I added some Holly Sprigs in Archival Fern Green, and Holly Berries in Memento Ladybug,along with some Pine cones, which were all from Rubber Stamp tapestry Peg stamp sets.
 I punched out a small circle from a Post-it for the moon, and tore paper to create the hills. The sky was done in Memento Summer Sky and Adirondack Stonewashed. I used the Memento again to just sponge very lightly over the edges of the torn paper mask for the hills. The trees and stag are stamped in Archival Black. Robins were added to the wreath, and I used a marker to give them a red breasts, after inking in brown.
 I've matted the panel onto red, then green card, and it all fits onto a folded sheet of A4 pearl cardstock.
After it was mounted, I used Stickles in Frosted Lace to follow the shape of the hills, and Liquid Pearls in Garnet onto the Holly Berries.

Stamp sets used:
 Rubber Stamp Tapestry:
Pine Branch Border( Pine Cone)
 Cardinal in Holly( Holly branch & Berries)
Card-io
Oriental Blossom( Twiggy branch)
Christmas scenery 2( Tees and Stag)
Winter Tweets( Robins).
 There are similar stamps to the Rubber stamp Tapestry ones in the Card-io range as well.
 I'm going to add here a card I did a few years ago, as it's a snowy scene, I think I love it the most because it was almost the worst disaster ever!

  I was on a DT for a site called Craft A Scene, which doesn't exist now, but as you can guess was all about scenic stamping, a big love of mine.
Well, being my usual organised self,😱, I was doing this the day before I needed to post it up.  It had all gone well, then close to the end, I decided to stamp a reflection of the moon in the water. HUGE mistake! It looked awful!
So, I tried to retrieve it by wiping the ink off with a baby wipe. Which removed the white ink, and also took some of the other colour off around it. So I wiped over the whole thing, trying to even it out. Panic is not the word for it!
Especially when the whole piece just curled up into a roll😰.
 So, in desperation, I flattened it out, and put it under some books , hoping it would flatten out overnight. Imagine my amazement the next day, not only had it flattened out, wiping it with the baby wipe had turned it into a misty, icy scene, which was exactly the brief!
Some white gel pen  highlights, then held my breath as I added some wavy lines in the water for the moons reflection, and it was finished.
I embossed some white cardstock with a Cuttlebug Snowflakes folder, mounted it and breathed an enormous sigh of relief.😲,
 I still have the card, I've kept it as a reminder that sometimes, what seems to be a disaster can be retrieved. Happy Christmas ladies, and I'll see you all again in January.xx

Thursday, 29 September 2016

Honey Doo Cards #2

The second half of the batch started the other day.

   No step by step, as I covered that in the post HERE.  The only slight difference is the Black & White card, which uses a different stamp-called 'Butterflies & Flowers Large Corner.'


 The sentiment is Scribbled sentiments from Phill Martin, and two sets of black half pearls were added for balance.
 All three panels fit onto an A4 folded cardstock base.


This blue one has a Ribbon & Bow die cut, Filligree Bow along the bottom, and to balance, a Phill Martin Decadant Damask Sentiment matted along the top. I masked off the Damask centrepiece again.


Finally, the Plum coloured one, and again another Ribbon & Bow die cut, this time Lattice. I left the Plum coloured cardstock matt a little longer than the image, and added the ribbon on top.
 In each case, I've added a few half pearls to some of the circles of the design.

Tuesday, 27 September 2016

Honey Doo Crafts Birthday Cards.

Well, as there's been such a lot of Christmas Cards lately, I thought it was time for a break, and a change. Birthday Cards it is then.
The stamp used in these is from Honey Doo Crafts, and is called Flower Fountain.


I stamped out a couple in each colour, using Archival ink in Plum, Cobalt and Jet Black.


I stamped two on each sheet of A4, then cut down roughly, so I could decide on the card size later.


Next step was to sort out some coloured vellum, and again stamped each image twice. As the Archival ink was on vellum, it stayed wet long enough for me to heat emboss with clear powder.
 I only want the flowers out of these images, to layer onto the original stamped piece.


Cue the fussy cutting. Not my favourite pastime, I admit, although these curved tweezer scissors I found in a drawer- yes, I was looking for something else entirely- did make it much easier.


Next step was embossing some lines on the reverse of the flowers, roughly following the stamped detail, to give some shape & texture to the petals.


First colour completed.

I used a white vellum with coloured dots in, and a vellum colour to match the flowers too. Love how the black vellum flowers came out, they look sort of pinstriped.


I did give them a blast of Crafters Companion Silver Glitter spray, and when dry, created centres with some Glossy Accents and matching seed bead mixes.
 The Black stamped piece was trimmed down o that it would fit a 5" x7" card base once it was matted onto black cardstock.
 I left the black matt longer than the image, and wrapped around it a ribbon & bow made with a Sue Wilson die, called Filigree Bow. Once it was stuck to the card front, I added the Vellum flowers, with small Pop Dots to give a little dimension.
This one I left without a greeting, which I tend to do with a % of the cards I make, so I can use it for whatever I need at the time.


 The process was similar with the Blue card, although this time I cut a narrow panel to attach another Ribbon bow to, this time using a Lattice Bow die, also by Sue Wilson.


 I also stamped a Birthday Greeting on this one, a Phill Martin Scribbled Corner Sentiments stamp.

This one is an A4 sheet folded sized card.


For the final in this set of three, I first matted the image onto a plum coloured card, trimmed to fit another A4 folded card.
This time I used another Phill Martin sentiment,  from a set called Decadent Damask Sentiment Borders. There is a damask accent in the top centre of the stamps, but I didn't want that, so I just masked it off while I inked the stamp, then removed the masking tape before stamping it in Plum Archival along the base of the card.


In each case I also added a few half pearls to some of the circles in the design.

An End of an era

An end of an era

I write this with a broken heart, that only time can heal My beautiful, wonderful wifelet Shaz (Silverwolf) passed away peacefully in the ea...