A warm welcome to all my visitors,

Thank you for taking the time to come and look at my blog, I really do appreciate it. I would love you to leave me a comment, even if it’s just to say Hi. It means I can come visit you!

All my designs are original, so copyrighted to me. If I have been inspired by someone elses work, I have named them in the post, and where able, I have provided a link.

Please feel free to use my designs for inspiration, I just ask you to credit me, and provide a link back to my blog.

Thanks, Shaz XX

Showing posts with label Valentines card. Show all posts

Friday, 15 February 2019

Valentines Day Card

This is the Valentines Card I couldn't show on Wednesday, for obvious reasons! The base card is an 8" square, which as I've said before, actually means the envelope is 8" square, the card is 7¾".
 The main focal point for the card was the hearts, die cut from a piece made with red, gold & black strips, a technique done back HERE.
 I layered the black card onto dark red, then gold cardstock. The large heart is attached with foam pads, the smaller ones added with Multi Medium Matte.


Next I created a duplicate matted layer for the whole card front, using the same cardstock. I started with the gold layer at roughly 7¼", and came down a quarter inch at a time for the red and black.


 All three pieces have some texture to them, the red & black being a hammered finish, and the gold has a cross hatch pattern.


I layered up both with DST, then added the focal piece to the Matt layer.


I didn't add it to the card front yet, as I wanted to add a die cut ribbon, and wasn't sure exactly how this would fit, so decided to wait till after I'd done this bit.


 Normally, I'd die cut these ribbon parts from paper, but I wanted it to match the rest of the card, so used some scraps of the red & black card. This did make the bow a bit thicker, but I found that if I curled it around a stencil brush handle, I could get the bow to curve, without it getting a crease.


 The dies for this bow are both Sue Wilson dies, Classic Bow, and Lattice Bow. The Classic, on the left, is used as a base for the Lattice on the right.
The ends of the bow were stuck down with glue dots, which I also used to attach the bow to the 'tails', and then onto the ribbon.
 I matted the whole thing onto an offcut of the gold card, then added it to the card front, before adding the whole panel to my card base with DST again.

Now all I needed was a sentiment, and chose one from Inkylicious, Today, Tomorrow, Always & Forever. This comes in two sizes, and the smaller one (approx 1¾" square) is used here. Stamped onto an offcut of the black hammer card with Versamark, then heat embossed with gold EP.
 Trimmed it down to fit the space, then matted it on red & gold again.


Stamping was done on the Tim Holtz Platform, as the cardstock surface is quite heavily textured, but this gives a nice solid print.

Thursday, 15 February 2018

First Shaker card, or a Comedy of Errors!

 A pretty accurate title as you will see as we go on.
I've long been meaning to have a go at a shaker card. Having seen them made in numerous crafting videos, I decided it looked pretty straightforward.
 And it is, as long as you remember one simple detail- forward planning!
 However, I think mine had gone off for a day trip somewhere, leaving me to fend for myself.


So, lets start. My base card was going to be an 8"x8" square, so I cut a separate sheet of Pearl White card to fit the front.  That is one thing I do remember- always measure your card base first before cutting.
 I've found the measurement given for card base packs seems to be the envelope dimensions, rather than the card, and it's annoying to go to assemble your card, only to find the front panel is bigger than the base.
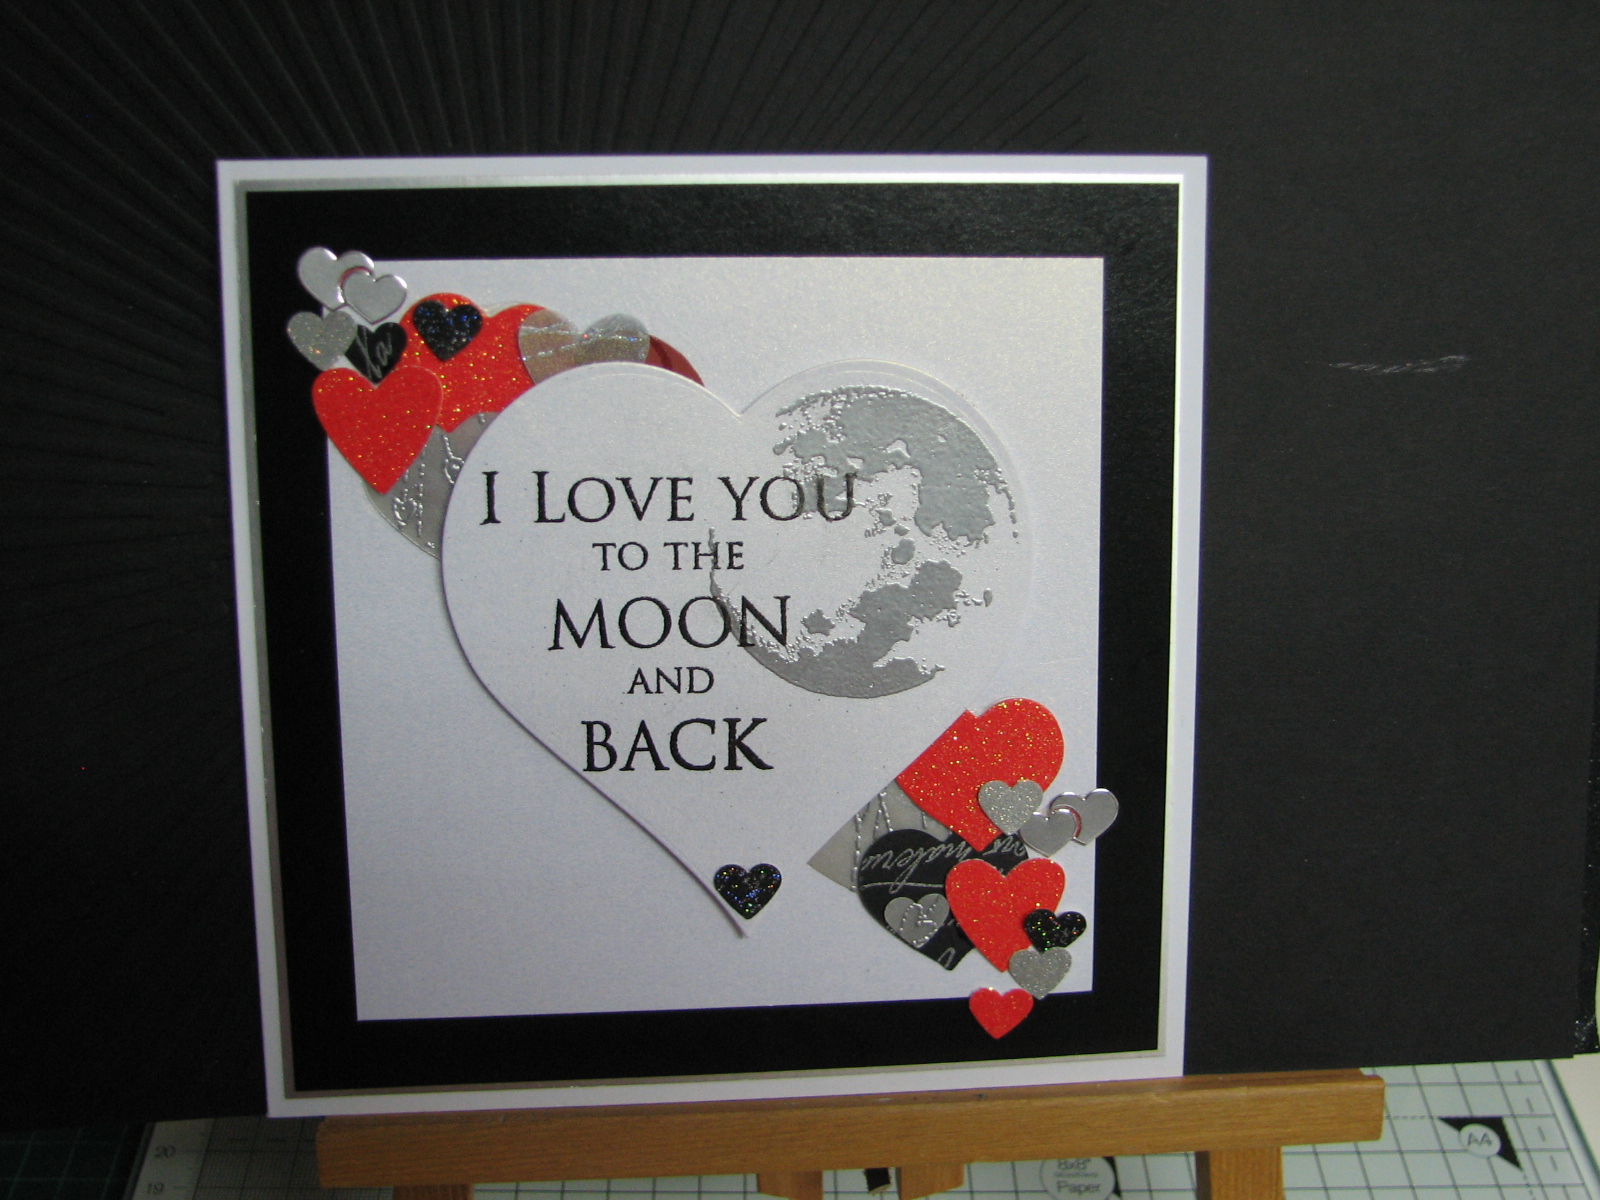
 So, that bit done, I then decided I wanted to matt my white pearl onto a red cardstock, so cut the red, then trimmed down the white pearl cardstock. See,stage 1 and I'm already tripping over myself.  I used a Sizzix Heart Steel Rule die I've had for years to cut the centre heart out, after I'd marked the die position on the back of the card, along with corner to corner & side to side lines to make sure I got it as central as possible.

 Next the foam tape to raise the cut out. I have some rolls of foam tape- Poundland, 2 rolls and about 10 sheets of mid sized foam tabs for quid- I took a strip and cut it into 3 lengths. Then as I laid it down, I snipped at intervals to allow it to bend around the shape. I thought using the tape I didn't have to worry about any gaps between foam pop dots letting the filling leak out.By the way, the embossing bag was there as I used it to wipe over the inside edge of the foam tape to stop the filler from sticking to it.
 Amused myself that I thought of something that small, yet missed important stuff.😀


 So, I have one layer down on the reverse, and decide it needs two to give the filling enough room to move about. I'm halfway round with the second layer, when something occurs to me. I should have attached the plastic/acetate/film front to the reverse of the cardstock first!  Fortunately, I hadn't pressed the tape down firmly yet, so I carefully peeled it back off, and put to one side.
I cut a square from saved Embossing Folder packaging, and stuck that in place with DST.
 Then I put the foam tape back, on top of the plastic this time.

 So that was error number two so far- but I'm not done with them yet!
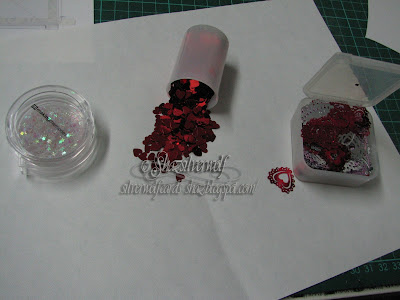
 Now we are onto the backing for the shaker, and in my Peel off stash, I remembered some holographic  peel off sheets.    Trimmed some off the sheet, and used it to cover some spare white card.


 Having a look in my stash, I sort out some tiny stars, some small and large hearts. All are those little bags of confetti for tables at parties. You can tell how long I've had some of them- that tiny hearts container used to hold camera film. Remember that?


Sprinkled some of each confetti into the opening. I can just imagine my face,had I still not realised about the plastic!


Peeled the backing tape off the top layer of the foam, and added a larger  foam tab to the four corners of the backing piece, then lay it on top.


Turned it over, and this is when I realised the next mistake I'd made. I intended to stamp the two sentiments in the top left & bottom right corners.

But now these two layers were together, I wasn't going to be able to stamp there, it wasn't a level enough base.
 I should have done the stamping after I'd cut out the heart, before I did anything else. So now we're onto Plan C. Or possibly D, I've lost track.


Finding a piece of the white pearl card, I stamped both sentiments, then trimmed down and matted onto the same red cardstock as the matt layer for the card, and mounted them with foam pads.
 The inkpad was Memento Lady Bug, and I heat embossed it with WOW! Sparkling Poinsettia.


Matted it onto the red layer with foam tabs, that attached it all to the card base with DST.

 As if the bling level wasn't high enough, I also added some acrylic hearts with Glossy Accents.


 Hubby loved it, sat shaking it for a while, trying to separate some of the larger hearts that had wedged on top of one another. Said it was a bit like those kiddies games where you have to tilt and turn them to get little balls into indentations, lol.


Stamps:
 I love you to the Moon & Back, Stampasaurus
Today Tomorrow, Inkylicious, available in 2 sizes, this is the larger one. The smaller one is about the same size as the one top left.


Thursday, 16 February 2017

The Making Of a Valentines Card

Well, I promised a blog post on it, so here it is.  It all came together fairly quickly, as the general idea had rattled around in my head over the weekend. Of course, the smart thing would to have got it made before I went into hospital, but lets not go there, hey?
 Kept it simple in colours- Black, White & Silver, with a small splash of red at the end.
 We bought the word stamp at the Hobbycrafts NEC last year, as it's a phrase special to us, we use it between us often.
  My Supplies: Silver Encore Pigment pad, Black Memento ink,- there was also silver EP and Black detail EP not in the picture- A Moon stamp from Lavinia Stamps,  and the word stamp from Inkylicious. The notebook was to try out the positioning of the moon & words, to make sure I could stamp it and die cut it with a heart shaped die.
 I had a 7" square card base as a starter, and cut a silver cardstock square to fit the front, then cut a black pearl layer to sit on top of that.
 Next came the stamping, and I first stamped the words in Memento Tuxedo Black, and then heat embossed with Black detail Powder, onto white pearl card.
 Positioning the Moon stamp needed a bit of care, as I wanted it to fit easily into the heart, but not obscure the wording.
Here you can see I had positioned the heart die I was going to use after I'd stamped the words, and drawn lightly around the outer edge of the heart, to give me a guideline.  

 I stamped the Moon using Silver Encore Pigment Ink, then heat embossed using Silver EP. That did actually cover the lettering in a couple of places, but I used a finepoint Black marker to bring the letters back.

The heart shape is from a set by Nellie Snellen, and is the largest die of the set.

I was intending to add a white card layer slightly smaller than the black one, to leave a narrow border, but then I looked at the white offcut that I had die cut the focal heart from, and it made a pleasing layout with  a larger black border, so I went with that.
I'd already pictured that I wanted a sort of sweep of hearts from one corner to the opposite one, so set about sorting some out. There are a various sizes, some punched, some small die cuts, all from oddments of glitter card/ stamped card or paper and vellum.
 I lay out my small hearts,roughly lining them up to opposite corners, then used some dabs of silicone glue to adhere them, so I didn't have to unassemble everything. Finally added the main Focal Point on top, using some foam pads.

Wednesday, 15 February 2017

WOYWW #402

And as most of you will know from following all the updates, I'm out of hospital, and starting to get back to my desk. Doing everything very slowly, trying to gradually build myself up again, and bolstering myself with painkillers along the way. Another week, and another WOYWW, over at Julia's place, The Stamping Ground.
  A balloon decorating the back of my PC desk chair!
 A huge bunch of flowers were waiting for me when I got downstairs, from my Beloved Hubby.
I'll blog this card I made for Hubby in the next couple of days- one of those that all sort of came together in my head, then everything went where it was supposed to!

I'll be round visiting on and off, I still can't sit too long in one position or my side hurts, so I end up going off for a lie down every now and then.
 But it's wonderful to be back home with Beloved Hubby, and to be able to visit all my Blogging friends.

Monday, 16 February 2015

Valentines Day


This is the card that was out of sight on last weeks WOYWW, and was inspired by a Pin I spotted on Pinterest a few weeks ago.


Its a scalloped 6x6 card blank base, by the way.


This is the Pin that gave me the inspiration:
Mine is also matted and layered, rather than a one layer card. I expect all sorts of things to go wrong working straight onto my card base, so hedge my bets!


The heart shape was done by cutting a heart from copy paper, I used an old Red Sizzix die, but there are loads of heart die shapes around. Cut your shape from the centre of the paper, and hold it down onto your cardstock with some low tack tape on the back- gives you more room to sponge off excess ink, with less chance of straying onto your cardstock.


I started off  sponging on the new Ranger Classic Cherry inkpad through the heart aperture, and came back in around the edges with Distress Ink Aged Mahogany. A Leafy Flourish stamp, from Dimension Stamps, was overstamped using Versafine Crimson Red. If you reposition your mask a fraction off the sponged shape before you do this, you will get your flourish starting right at the edge of your heart, rather than a few millimetres in.
I just tried to do a link to Dimension Rubber Stamps, and I can't find them, so maybe they have changed name, or ceased trading, sorry.

Using an off cut of the white card from trimming down the heart, I sponged again in the same two inks, and stamped the sentiment, from Visible Image in Versafine Crimson Red again.


Both pieces were matted onto dark red cardstock, and the sentiment attached with foam pads.


Inside the card, I used another Visible Image sentiment stamp:


I'm also linking this to Fiona's (Staring At the Sea) blog, for her SIPIDI meme, which is for See it, Pin it, Do it. I think most of us manage the first two ok, its the third one that we never get around to!

Wednesday, 11 February 2015

WOYWW #297

Annnnd we're back! Where'd that week go? Anybody? A pic of a very busy/messy/creative/untidy (delete as appropriate) desk this week. Head over to our Julias, at The Stamping Ground, and add your link to the greatest Blog show on Earth.
So, the desk. Current project, Hubbys Valentines card hiding under the paper on the left. He reads this blog, you see.  You probably got the Valentines theme from all the red inkpads, lol. The second one from the left is one of Rangers new pads to replace the Adirondacks. A nice bright red, but to me it has a bit of a funny, solvent like smell to it. Not like a dye ink smell at all.At the back, inkpads I'm labelling. Just using narrow sticky labels that I drag over the inkpad to get the 'true' colour, as opposed to the colour my printer prints out with the official labels. Some new pots of Stencil paste, so I can try that cat stencil again. A couple of House Mouse stamps, not my normal stuff, but they were so sweet. Over on the right, torn off the envelope my Rubberstampmadness magazines arrived in, some really cool looking stamps. Sheets of sticky 'dot' sized labels that I label the lids of my re-inkers with, also the ends of my Promarkers, although the last few I ordered, I saw Promarker have finally started doing that. A mini Ink Blending Tool, next to my coffee. Decaff, it is 9.30 on Tuesday night.The red ribbon is from this years Christmas cake. Not only Valentines day on Saturday, also my youngest sons birthday. We took him and KT, his fiancée, out for a Chinese all you can eat buffet last Saturday, for a birthday meal, as we are going out for a Valentines meal ourselves this week. I have an appointment tomorrow, Thursday, for my treatment to start. Not sure if its actually my first treatment, or a meeting with the nurses to get all the procedure explained, and all the info. If it is that, then the actual treatment starts a couple of days later, so probably Monday. If I'm ok, we'll be having the following weekend down in Plymouth. One of Hubbys friends is 30 on the 21st, and his Mom is organising a surprise Birthday meal, getting as many of his friends there as she can. So fingers crossed. Right, I'm done, so you can wander off to many other wondrous desks around the world. See you later.

Saturday, 1 March 2014

Visible Images February 'Love' Challenge

Excited me! You may remember I said after I'd posted this I was entering it into the Visible Image February Challenge, Love. It got picked as the Random Choice winner today! I get £20 to spend on their stamps- like I'm going to be able to stop there, lol.

An End of an era

An end of an era

I write this with a broken heart, that only time can heal My beautiful, wonderful wifelet Shaz (Silverwolf) passed away peacefully in the ea...