A warm welcome to all my visitors,

Thank you for taking the time to come and look at my blog, I really do appreciate it. I would love you to leave me a comment, even if it’s just to say Hi. It means I can come visit you!

All my designs are original, so copyrighted to me. If I have been inspired by someone elses work, I have named them in the post, and where able, I have provided a link.

Please feel free to use my designs for inspiration, I just ask you to credit me, and provide a link back to my blog.

Thanks, Shaz XX

Showing posts with label The Works. Show all posts

Wednesday, 26 June 2019

WOYWW #525- The Holiday Edition!

Yep, next week we'll be MIA, as tomorrow we are off to Kos for 10 days. So I'll get around to as many people as possible who have joined in at The Stamping Ground, all kept organised by our lovely leader, Julia,before we go in the morning.

On my desk for this week is a card made to send to Ian, Condolences for Erika.  The stamp set is new this week- I'll show them further down- from her beloved Visible Image,  it was the words that went with this set that made me feel they were perfect for this. And it had to be colourful, as that was Erika too. The image was heat embossed, and I used an Encore Metallic pad that has 4 colours across it- pink, purple, blue & green.


Also on the desk some ATC's for a swap in one of the Lavina Stamps pages on Facebook. The backgrounds are as far as I've got for now, so they'll get finished when we get back.


And now for my regular Enabler part of the post 😀😇😉.

First are 4 new Visible Image stamp sets, there are more in this release, but these were the ones that got my attention.


Popped into The Works earlier in the week, and got these two dies.


I have one like the circle Happy Birthday, but it doesn't have stars in it. The other says Wedding Day. Also from The Works, this paper pad. Suitable size for smaller cards, notecard size, and the sort of colours that will work fine for masculine cards. And I think thats pretty much it from me, apart from wishing Helen (StampingbyH) a very Happy Birthday today.  Which just brings us round to......And Finally.......................................


Made me think of Debbie Rock (TatteredRocks) when I saw this.


Wednesday, 10 October 2018

WOYWW #488

These Wednesdays seem to get here faster every week! Back to leaving our link at Julias place, The Stamping Ground, for this weeks Desk Fest.
 Had a great time at Happy Stampers, as always so much to buy, lol.
This was my desk on Sunday, ready to start the mammoth task of cataloguing in One Note, then putting it all away. Love One Note, as I have it on my PC and on my phone, so can check whether I have something before I end up buying it again. Yeah, that's a thing.
 Favourite purchases of the day?
Has to be these three stamps from Crafty Individuals.
 Love that fluffy, scruffy Raven on the end.


A few more Lavinia stamps.


And some fab ones from Hobby Art. Love the Round Penguins, far left, and the super cute Polar Bears.


There's a great Indigo Blu stamp called Batty, and a cool Fairy Castle, a steampunk Dragonfly and a couple of Halloween stamps.


 A great Halloween die cut, and a small Poinsettia die too, something I've been on the look out for.  Another Fairy House stamp, and some snowflake dies, reduced. You can never have too many snowflakes!


Good job, as I found a set at The Works this morning, too.

Along with some small wood shapes, angels & Trees, great bargain at 32 for a Quid.


These were on my desk on Tuesday morning, fussy cutting some stamped flowers from Honey Doo to go on the stamped bases. Had to shift them for now, as I needed to make an Anniversary card for Hubby. Married 9 years today, but I can't share it yet as he's on earlies this week, so he won't have it till this afternoon.


I'll blog it later in the week.

Along with the flower cards when I get back to them.


And I'm all done, apart from.........
  .......................... and Finally

 yeah, that's a thing too!


Wednesday, 14 February 2018

WOYWW #454

And a Happy Valentines Day to everyone!  Our mid-week desk-fest begins again, over at  Julias, the Mistress of the Desks,at The Stamping ground.
So, what do i have for you this week? Well, I took myself out to town for a walk around yesterday, and popped into The Works, as you do. Snagged a couple of bargains,some Black acrylic paint, and some clear Banner stamps.

 Made some Stampscapes cards, in the post below.
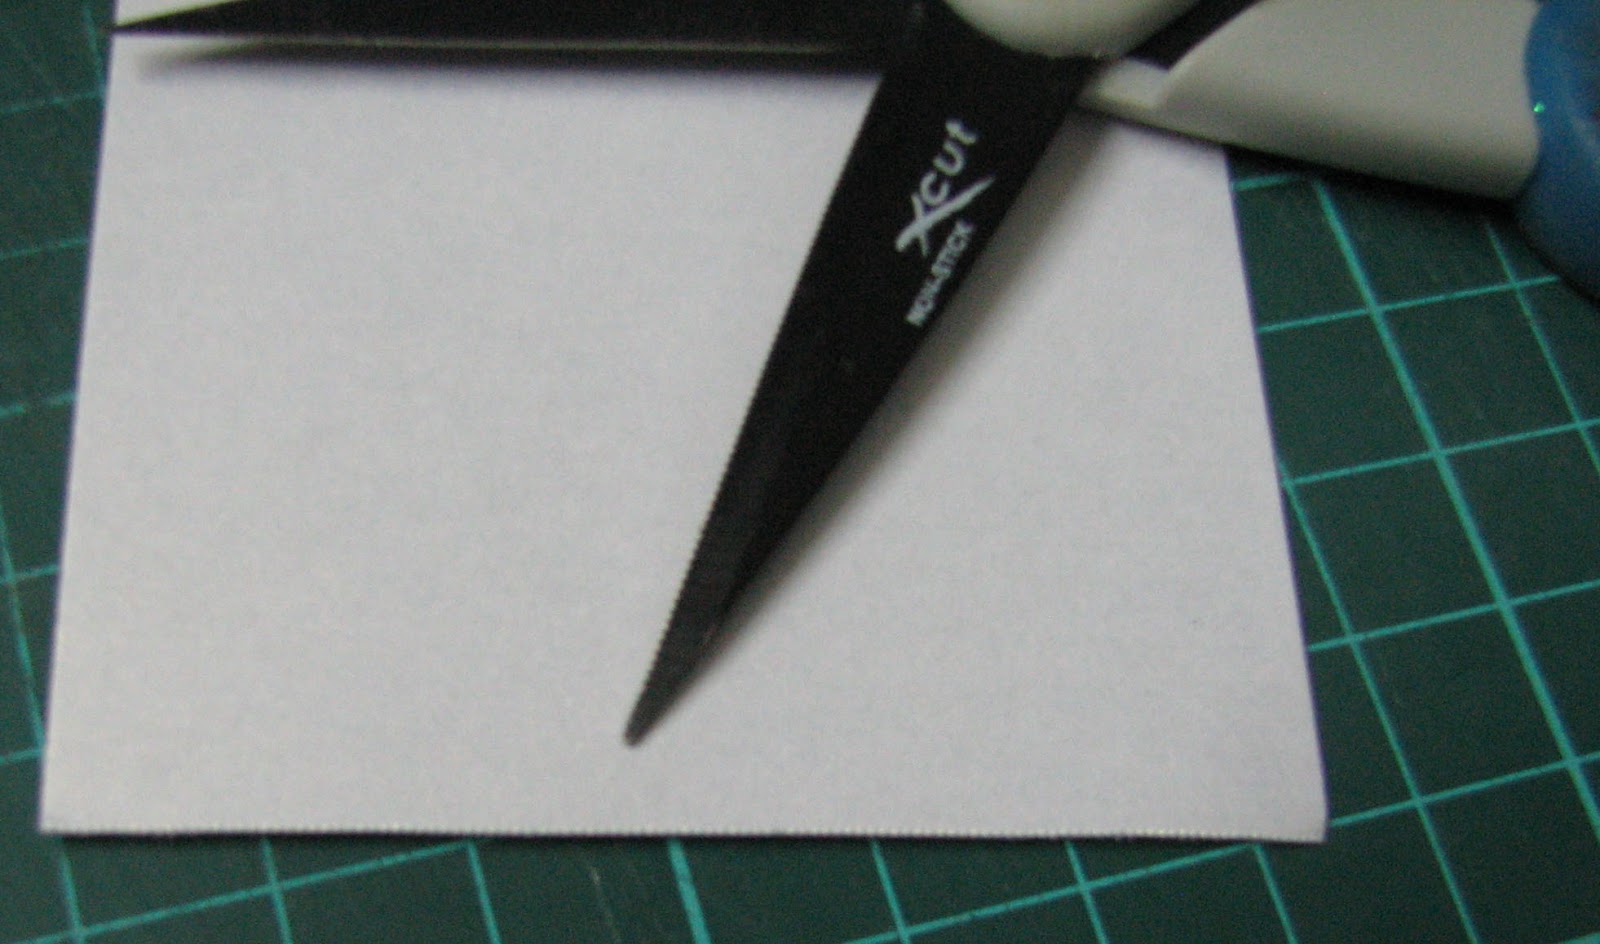
 Then I was working on Beloved Hubbys Valentines card, and picked up one of my pairs of scissors, when I remembered something I saw on a TH video from Creativation, on some Tonic scissors.
 He said as well as being non stick the pair of blades had one that was serrated, and one plain. So you could flip them over and either cut a tiny serrated edge, or a plain one. Now, rather like the other Tonic releases, these looked exactly like my X-Cut ones I've had for quite a few years. I kept meaning to check mine, as the main reason I rarely use them is I don't always like the serrated edge if I cut something out with them.
 And guess what? Yep, mine too have the same pair of blades. Leaving me with two questions- how have I never noticed this? and How come EVERY single time I've used them, I've always picked them up the same way?


Not sure how well these pics will show it, but  this way up you will get a smooth cut . I cut a piece off the card its lay on to show a smooth cut.
 Serrated blade at the top, smooth one at the bottom.


This way up- serrated blade at the bottom- you get a serrated edge, hopefully you can see it on the cardstock.

 So, apart from this exciting discovery, it convinces me even more that Tonic manufacture X-Cut.


And posted at the bottom so it won't appear on our FB feed, Beloved Hubbys card. I've never made a shaker card before, and I'll blog it in a few days, as it wasn't so much a learning curve, as a learning Ski slope, and I can't ski!


And Finally....................


Speaking for most of us, I think.😏


Sunday, 4 February 2018

Christmas Card Club Challenge #3- Angels or Fairies.

This fortnights challenge is chosen by Granmargaret, and calls for Angels or Fairies.
Two different cards, one square in blue, and one Easel fold in brown. The papers for both come from a pad I picked up in The Works last year,and is a slightly unusual format of 15cm x30cm. Which worked perfectly for the easel card!
 The stamp is by Rubber Stampede, called Angel Chorus Collage. I doubt it's still available, as I can remember this was one of the first Christmas stamps I bought, and that would be close on 15 years ago.

 OK, I'm officially shocked! Just went off to see if it was available, and turns out it is! A UK online retailer called Carysma has it, along with a whole load of other fabulous Rubber Stampede stamps!

 The circular Happy Christmas stamp is by Circa Design, and comes as a set of three called Christmas Circles. The other two are Seasons Greetings and Happy New year.


So to start with the Blue one, I took a 6" square card base and covered with the paper. The Angel stamp was stamped onto a dark blue cardstock with gold encore Pigment ink, and heat embossed in gold. I trimmed it flush with the edges of the image, then cut some gold glitter cardstock the same size and matted them together, offset. The greeting was stamped in Archival Cobalt onto a matching sheet of blue paper from the pack, then die cut with a small hexagon die. This also was matted onto glitter card, then trimmed down and mounted with a foam tab.
This is my favourite go to technique for this stamp, and was a design I saw in a magazine a lot of years ago. Firstly the image is stamped onto cardstock and heat embossed in gold again, then stamped again onto vellum, heat embossing in gold again.
 Both pieces are trimmed down to the same size, and the vellum is torn down around the two angels.
 Next I added Vintage Photo DI around the cardstock, then a little shading on the reverse of the vellum with Promarkers. That keeps it nice and subtle. It's such a detailed stamp, it needs the subtle treatment, it's easy to overpower the image- I had a couple of fails while doing this where just that happened. I'll show them at the end.😡
 Next both pieces of vellum are attached to the relevant part of the cardstock image, and another light coating of Vintage Photo added over the top. You can add glue- either a liquid like Glossy Accents, or a snail type adhesive in small spots behind  the shading.
 The whole piece was matted onto an embossed gold cardstock, and mounted onto the Easel card base, which I'd covered with a Brown version of the same Christmas pad paper. A couple of Flourishes die cut from the gold card added to opposite corners, and a white Poinsettia made from a Spellbinders die topped it off. The same sentiment as the first card was stamped in Archival Cocoa, die cut with a circle die. I cut a second piece, this time with a  scalloped die to mount it onto, then added to the card base with a foam pad.


These two were made last year with the stamp, this time using Brilliance Pearlescent Sky Blue, and the same technique.

Both were easel cards.


 I said I'd show you my fails!
 On the left, I tried covering the image with double sided adhesive sheet and Glamourdust, funny thing is, in this picture it doesn't look too bad, but in reality, much of the detail of the stamp is lost, it just looks blurred to the naked eye.

On the right, I thought I'd try adding Gilding flake to the wings. Another fail. It looked terrible, so I went over it with a gold metallic marker, which just made it worse rather than better. I should have used some sheet golf leaf, rather than the loose stuff I think.

Wednesday, 31 January 2018

WOYWW #452

So, we're at the last day of January already-if time flies when you're having fun, I must have been having a whirlwind of a time this month. I mean, seriously, where did it go? Another tour of the Desks of Delight then, at Julias place, The Stamping Ground.
 A bit of crafting done over the last few days- this card, in the post below is Foiling without using a Laminator- just two widths of DST.


And speaking of foil, we popped into town at the weekend, and whilst there, a visit to The Works was called for. Where I found this:
 A pack of 10 x 1 metre rolls of foil, for the grand sum of £4! It comes with a tube of glue, so you don't actually have to Heat Laminate it to work, but it will still be OK for that too. Total bargain.

 Later on Saturday, we went up to Amelias Crafts at Studley, as they'd announced a 50% off Sale, in order to clear some space for new stuff from Creativation releases- mainly Tim's I'd imagine.


Well, it would have been rude not to!


Some cool Christmas stamps, which I need like a fish needs a bicycle.


And a couple of Tim Holtz/Stampers Anonymous sets.Yet another Christmas set- Beloved Hubby liked the stags head, and the Sea themed one caught his eye, thanks to the octopus. He's rather fond of The Kraken Rum, lol.
So overall, a day of bargains, which can't be bad.

Oh, last week Magic Maggie asked about the proportions for mixing glitter & stencil paste.
 I have to admit that it's not an exact science, I just added what I thought was enough. I'd guess it was around 3 teaspoons of paste to 1 or 1 1/2 of glitter. Ish. It's easy to see roughly how it'll look if you're mixing coloured Glitter into white or Translucent paste. Harder when it's say gold glitter into gold paste. So I'd try it first with a clear/white/translucent paste to get a feel for the mix.  You want to maintain roughly the consistency of the paste- too dry will make it harder to spread over the stencil without having to keep reworking it to fill the spaces. Too much rework increases the likelihood of pushing the paste under the edges of the design. It's one reason I prefer the Sweet Poppy paste to Dreamweaver, I find the Dreamweaver to be a much stiffer paste to start with. The Sweet Poppy is much softer.
 And finally................

Wednesday, 26 April 2017

WOYWW #412

Another week further into the year, and another WOYWW,hosted as always by our lovely leader, Julia, over at The Stamping Ground. And I'm sending Julia hugs, and hoping her poor eye is somewhat better by now.
On the desk, these dies from The Works. Great deal at the price, and although I had some I'd bought of the Dies from China, these go much bigger.
One niggle- why do die manufacturers stick them down with such ridiculously strong tape? The struggle to get them off without bending any, then you have to remove all the sticky residue from them.
 Another die, bought from Joanna Sheene is a nice trailing ivy. Cuts beautifully, and that was only held down by a really light sticky stuff, which wiped straight off. So plus point to Joanna for that.
 I've put it on my cutting mat so you can see the size.


I'd been going back to some of the stencils I did a few weeks ago, and it dawned on me I've been doing stencils, and die cut cards for weeks, and I haven't done any stamping. So I stamped out the Teasels stamp in white,to sponge some ink over. Then I wanted to add a dragonfly, and spotted  The Dragonfly Flourish stamp, so did some of those too. I'll finish them off over the next few days, and get the cards posted up.


Talking of Teasels, did you know they were the inspiration behind Velcro? Some guy was struggling to get them off his sons coat and a lightbulb went off, and as they say, the rest is history.


Another stencil experiment, and I'll get these made up too, and explain how I ended up with the ones below. It all started with a card I saw on Pinterest, lol.


No idea where I'm going with these, hopefully inspiration will strike in the near future, or they'll find themselves in the UFO box, which is getting kinda full.

Quick mention, just over a week till Happy Stampers. Anyone else who is going, give us a shout, and we'll meet up. I know Neet ( Hickydorums) is going.
 I finally have the date for my scan, it's a CT, not an MRI which is good, as they don't take as long. Scan is an Saturday, then we have a meeting with the Oncologist on the 5th of May for the results. Fingers crossed.
 And finally, this:

Wednesday, 7 December 2016

WOYWW #392

Hello again, and I'd be curious to know where that last week vanished to!Linking up as always at WOYWW Towers, otherwise known as The Stamping Ground, home of our Glorious Leader, Julia.
A few things on my desk today, all related to each other. This pic is a Birthday Book I bought from Wilkinsons last week. Well, it's the covers from it, anyway. You see, I bought the book, then when I unwrapped it, I realised it was totally useless as it was.The 'pockets'- and I use that term very loosely- were just a piece of paper across the bottom of the page. I could possibly have got one birthday card in it. Maybe. So, I thought I could improve that, I slit down each side of the paper, then taped a plastic pocket to each page, then stuck the paper with the date list back on top.
Like so. Then I decided I didn't like the covers anyway, and I keep saying I'm going to dabble in some mixed media, and the next thing you know, I've got the covers off!
 I've given them a coat of gesso, as the surface was slightly shiny.
 And thats as far as the plan goes, at the moment. Not a clue what I'm going to do next, to be honest.


However, that does take me neatly to the next pics. First, a pic of some stuff from a visit to the former  Pink Tulip, now called Amelias Creative Crafts, back last weekend.
I have to say that it is much improved since my visit a while ago, and a lot more products being stocked, so it looks like they are investing in the business.
 Anyway, these metal pieces were 3 for a £1, I got a box of little wooden pieces, and a couple of bags of small wooden words. Plus the pack of Woodware book rings, a large size in a pack of 24 for £2.50. Didn't have a project for them then, but now they'll be very useful. I'll use half a dozen to put the book back together, instead of the wire binder that it had.
 It also caused me to start having a hunt around amongst my stuff for other odds & ends. I'll put most of the pictures in the post when I start making it, but suffice to say I had a lot of 'Wow, I'd forgotten about that' and 'So that's where I put them' moments, 😁😁.


Then, I went off over to the town for my regular walk, and called in at The Works. Found loads of these little wooden things, at £1 each, and a whole alphabet set in wood for £2.


This tub of stuff was given to me by Beloved Hubby a few weeks ago. Anyone care to guess what they used to be? I'll tell you next week.😎

I tell you what, looking out all this stuff took me right back to when my eldest, Ant, was about 10-11 years old. He seriously got into model making, and he had this humungous box in his room, filled with all sorts of broken stuff, bits of broken toys/models,screws, nuts,paper tubes, lids from bottles- you name it, it was in there. Way ahead of his time, lol.


He still does the same sort of stuff now- some of these started as kits, and he's added stuff to them to change the appearance. Real 3-D altered art.


This is just a fraction of the models he builds- many of them are packed away as they are just too large to have out.


So, I'm almost done. I'll be around to visit later, as I had an appointment come through finally to see the Thoracic surgeon, at 9.10 this morning. I rather expect we should get a surgery date today, so, I'll add any info I get as an edit when we get back, and if you've already visited me by then, I'll let you know in my comment.

EDIT: 
Back from the appointment, not exactly happy. When we got there, the surgeon wasn't in clinic, we saw his registrar, and he now has to speak to the surgeon about scheduling the surgery! So don't actually know when it will be, but it does look like mid-January is likely. They have no surgery listings for next week, which would take us too close to Christmas if it was the week after.  We did find out that as it turns out, all the areas of my lungs are operating at the same level, which was not what he was hoping for, so the surgery will have an impact on my breathing. Hopefully it will be keyhole, and they will take out the nodule with some surrounding tissue to make sure they've cleared it all.  Fairly certain it is a new primary Lung cancer, as it has grown, only by 4mm since June, but  still it is growing. The likelihood of it being a secondary Bowel cancer was never very high, as there was no sign of any spread to lymph nodes when that was removed. So not really any further forward.

Sunday, 13 November 2016

Canvas calendar

I had to wait a while to blog this, as it was a gift for a FB friend, so needed to wait until she'd received it.
 A while back I posted about some stencils I bought at Happy Stampers, and my friend Erika said she had the same one, and that we ought to make something for each other, which I thought was a lovely idea.My WOYWW visitors will remember seeing a picture of lots of punched flowers recently, which were for this project. As usual, I made way more than I need, so the rest are filed away for later use.


This was the card Erika sent to me, a gorgeous Copper paste embossed card, with a background in shades of purple.


 I also gone with a similar colour scheme, oddly enough, using a  canvas board base from The Works. I'd just roughly sponged on some shades of blue & purple Distress inks, then left it to dry.
 I added a sheet of Tim Holtz Tissue paper with Matt medium, and left it to dry again.

Next day I stencilled on the image, called Flower Tree. I used Pearlescent white stencil paste, also from Sweet Poppy.

While this part was drying, I punched out the flowers.Many years ago at the Hobbycrafts NEC I purchased some Paper Blox pads, which are pearlescent/glittered/metallic papers, some in a square format, some long narrow pads. I pulled out a selection of sheets, and gave them a blast with Crafters Companion Iridescent Glitter spray before punching.


In the end, I didn't use all the colours I punched out, but what the heck, now I have some punched flowers in stock, lol.


I used a selection that blended together well, and added one to each of the flowers on the tree, having shaped them a little first with a stylus tool.


The flower centres were created with Crystal Stickles.


I added some toning Liquid Pearls in pinks and purples to the dots in the image.


I knew the wording that I wanted to add, so sorted out some white tissue paper, to make it sort of blend into the background, rather than stand out.


The 'Believe' and 'Never let go of your dreams' are both from Lavinia stamps, and I stamped each twice, as I had to tear them out, and that was a recipe for something going wrong! I used Archival Cobalt ink to stamp, and Crystal Embossing Powder for some sparkle.
 By the way, the phrase is in individual words, which is why the stamping here looks a bit weird.


 I placed the Believe word to follow the shape of the tree,after tearing into individual letters, then added the phrase at the bottom on either side of the tree trunk. All done with Matt Medium.


So I was almost done, when I thought I could add a small calendar to the bottom, to make it functional, as well as nice to look at.
 Cue trip to the shops- I'd actually expected to be able to buy them at the NEC last week, but didn't see any. I got them in a card shop in town, in a pack of 5, for 99p, if anyone needs to get any. Pretty sure it was called 'A Write Card'. If your shopping centre is anything like ours, there are so many card shops, they sort of all merge together!


 I added the calendar with a couple of strips of pale purple ribbon, and made a hanging loop from the same ribbon.
Final touch, I thought a flower tree needs butterflies, so punched out a couple from some glitter paper.

An End of an era

An end of an era

I write this with a broken heart, that only time can heal My beautiful, wonderful wifelet Shaz (Silverwolf) passed away peacefully in the ea...