So these one layer cards-they were actually really easy to do! I think it took longer to decide on the colours than to do the card. This one is various dye inks (Adirondacks, Distress, Marvys) in yellows & oranges, with the images stamped in Adirondack Espresso.
First off, I tried it out on some scrap paper, just to get a feel for the process.
 To start with I made up some post-it note masks, which I then trimmed
along the top edge with a deckle blade. I stuck two post-its side by
side, and made two pairs for the card, as I started off with topfold DL
sized cards.
To start with I made up some post-it note masks, which I then trimmed
along the top edge with a deckle blade. I stuck two post-its side by
side, and made two pairs for the card, as I started off with topfold DL
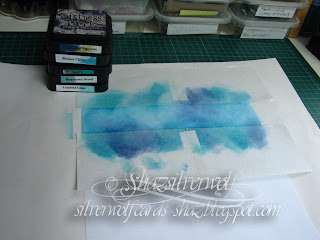
sized cards.I masked my paper, and I found it easiest to line the masks up with the lines on my cutting mat, so I knew they were straight.I started sponging on various blues.

 Then I started to add a few patches of 'background' - a crackle stamp here, in slightly darker shades of blue than I had sponged with.
 Next I used a Paperartsy stamp, which I inked up with a darker blue, then smudged off some of the colour. I also stamped it off first, and used the second impression, so it was light, then did the same with a script stamp.
Random overstamping with various foliage stamps, and a flock of birds. All going well, then I dropped my inkpad- thats the square on the left. Have you noticed a dropped inkpad always lands ink side down!
Anyhow, I tried out another couple of strips.
Exactly the same process, just changed the colours and stamps. I decided I quite like these, although there were a few problems- I thought the bottom one too busy, and I had that ink pad mark, but I have a plan for these, even though they are on scrap paper.

So onto the cards then.

Sponged with yellows & oranges.
Overstamped with grasses, willow & birds, all by Inkylicious.
 Next one up was yellows & browns. I added some mesh, then a flourish or two.
Changed the format slightly, I took the mask off, and stamped a Stampscapes tree on the right. I also stamped some of the tree on the left, before I unmasked.That flock of birds is in there again, lol.
Last one of the day, I did in yellow & greens. The dandelion heads are Inkylicious again, and the little dragonfly is part of a Lavinia Stamps set.
I've stamped them all with Happy Birthday, but you could leave that off, and stamp them up with whatever sentiment you needed at the time.
The three little blue flowers were never intended to be there- I wasn't concentrating, and didn't realise I had a little blue ink on the edge of my Happy Birthday stamp. I think it was Anna Griffin who said' there are no mistakes in card-making, only embellishments!'
There are some other cards in the first picture, and I will blog those tomorrow, as they were done differently.


