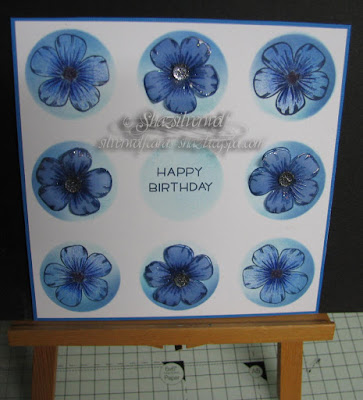
I used Distress inks in two shades, applied with brushes.
After I'd done these, I really had no plan on how to use them, which is how they ended up as UFO's.
It occurred to me that flowers were the way to go, and this one is from a Honey Doo set, called Cherry Blossom, which has this flower in 3 sizes, this is the middle sized one. It also has leaves to go with them.
Getting them centred turned out to be a breeze using the Stamping Platform, but you do need to make sure your cardstock is accurately cut to size all around in order for you to be able to stamp the flowers central. I placed the first flower in one corner, then just rotated the cardstock each time to do each corner, then I moved the stamp to the space between the corners, then again just rotated the cardstock.
I'd inked the blue one to give me a darker shaded edge to each circle. Tumbled Glass and Salty Ocean Distress Inks. The flowers are stamped in Archival Cobalt Blue.
After I'd stamped all the flowers, I took a strip of pale blue vellum, and stamped some more, so I could add some layers. Wasn't sure if I wanted to double them up, so did a few extra. Stamped in Archival Cobalt, and as it's on vellum, the ink stays wet long enough to add embossing powder, and I used Stampendous Crystal to give a little sparkle.
 The orange one had been inked in Wild Honey & Spiced Marmalade, and this time the flowers were stamped in Archival Tiger Lily.
I added a Happy Birthday sentiment in the centre circle on both. This sentiment comes from a cheap set of sentiments from Aliexpress. They are mainly small sentiments, which are often useful.
 The only downside is that being cheap silicone stamps, they are rather thin, and even on the 'clear' side of the Platform, they wouldn't pick up on the lid.
 However, I found a cheap and easy fix for this. A while ago, I'd bought a silicone non stick baking sheet from Poundland, intending to use it as a craft mat.
When I tested it out underneath my card on the platform, it raised the cardstock enough to pick up the stamps. So I cut a piece to fit the platform, as it's about 2 feet square. It will be useful, as I've found in the past that some of my unmounted bare rubber stamps are too thin to work in the platform, even on the clear side. So there's an easy fix for anyone having the same problem.
Before cutting out and adding my flowers, I added some colour to the ones on the cardstock with Prismacolor pencils, then did the same on the back of the vellum ones.
One of the things I'm loving about the Prismacolor pencils is the ability to shade just using one colour of pencil, simply by varying the pressure applied. Quick & easy is definitely a thing for me.
I matted each panel onto a matching cardstock, then mounted onto a 7" card blank, which I did have to trim slightly, as I couldn't get an even border of white card base.
The flowers were added with a dab of silicone glue, then some sparkly glass gems added to the centres, using Multi Matt Medium.
The cardstock used for the mat is from a pack by DoCrafts, the Papermania Capsule collection. It's slightly textured, and the pack has 75 sheets, each a different shade. I get them from The Range, and they come in A5 and A4 sizes, and are great for die cutting too.


