Tell me I'm not alone in wondering where on earth the weeks are going! Feels like I did this yesterday, not a week ago.Time again to leave our links over at Julia's place, The Stamping Ground, and also at #WOYWW on Instagram too now.
As you can see, I've been cutting up paper strips again.Been through my scraps folders, and reckon I've got every colour sorted now. Still got lots of ideas for designs using them.
These are the two most recent ones.
No, you are not seeing things. Yes, I did Pink!
The fancy edges were a set of dies from Aliexpress.
I bought another couple of sets of line/edge cutting dies that arrived Tuesday.
The top set are 5" long, cost £1.70.
The bottom set are just a bit shy of 6", cost £1.30.
I also bought a star frame set of 2 dies.
The square is just about 5" and the circle 3½". £2.82.
I'm careful not to buy anything I know is a copy of something else
on sale, but I've not seen any of these anywhere, and the edger ones are
just basic lines.
The project I couldn't show last week, my DIL's Birthday Card.
The Fairy House is Crafters Companion, bought at Happy Stampers. All the others are Lavinia stamps. Most of the colour done with Prismacolor pencils, I'm really loving those. The sky and grass are Distress inks applied with a brush.
So, short and sweet this week. Makes a change, lol. Which just leaves .........................And Finally...........................................
Sounds like a plan to me. 😁😁😁
👻👻👻👻👻👻👻👻👻👻
Pages
A warm welcome to all my visitors,
Thank you for taking the time to come and look at my blog, I really do appreciate it. I would love you to leave me a comment, even if it’s just to say Hi. It means I can come visit you!
All my designs are original, so copyrighted to me. If I have been inspired by someone elses work, I have named them in the post, and where able, I have provided a link.
Please feel free to use my designs for inspiration, I just ask you to credit me, and provide a link back to my blog.
Thanks, Shaz XX
Wednesday, 31 October 2018
Tuesday, 30 October 2018
More cards with off cuts
Yep, back to that again. Probably because I have so many off cuts that never get used otherwise, they're always the wrong size or colour for what I'm doing.Right up front, this idea wasn't one of mine. I saw Jennifer McGuire do this in a couple of videos,HERE & HERE, and loved it, not only for the fact it used up leftovers, but has so many potential designs too.
This is the latest pair of cards I've done with the technique.
The pink one, as anyone who knows me will understand, is WAY outside my comfort zone! I really don't do pink, ever. I can probably count on my fingers how many times I've done pink cards in the 15 or so years I've been cardmaking.
To start, the card bases are topfold, more or less standard notecard size- 4¼x 5¾.
I made two panels roughly 4½x 3½, so I had extra for trimming to neaten.
Double sided adhesive sheet is added to some copy paper- you could also use patterned paper you don't use- then the strips of cardstock are added over that. It's easier to work on a diagonal, Jennifer said, and she's right. It's not easy to keep vertical lines perfectly straight, as can be seen in the lower edge of the pink one. Yeah, I had to go there!
For the purple one- and that took a lot of photographing, my camera wanted it to be blue, lol- I used the 'offcut' to add to the lower half of the card.
For the pink one, I made a new panel of vertical stripes. Won't be trying that again. I neatened the top edge with a strip of glitter card.
On the purple card, I used foam tape behind the panels, and I did the same for the top pink panel. The bottom panel is added straight to the card front.
I'm going to enter this over at Pixies Crafty Workshop, for her Snippets challenge, as all the cards are totally made from snippets!
This is the latest pair of cards I've done with the technique.
The pink one, as anyone who knows me will understand, is WAY outside my comfort zone! I really don't do pink, ever. I can probably count on my fingers how many times I've done pink cards in the 15 or so years I've been cardmaking.
To start, the card bases are topfold, more or less standard notecard size- 4¼x 5¾.
I made two panels roughly 4½x 3½, so I had extra for trimming to neaten.
Double sided adhesive sheet is added to some copy paper- you could also use patterned paper you don't use- then the strips of cardstock are added over that. It's easier to work on a diagonal, Jennifer said, and she's right. It's not easy to keep vertical lines perfectly straight, as can be seen in the lower edge of the pink one. Yeah, I had to go there!
For the purple one- and that took a lot of photographing, my camera wanted it to be blue, lol- I used the 'offcut' to add to the lower half of the card.
For the pink one, I made a new panel of vertical stripes. Won't be trying that again. I neatened the top edge with a strip of glitter card.
On the purple card, I used foam tape behind the panels, and I did the same for the top pink panel. The bottom panel is added straight to the card front.
So far I've made these using this technique, as well as a couple of Christmas cards.
I'm going to enter this over at Pixies Crafty Workshop, for her Snippets challenge, as all the cards are totally made from snippets!
Sunday, 28 October 2018
Christmas Card Club #22- Winter Wonderland
Back with the Christmas Cards, for this fortnights Christmas Card Club, and this time the theme has been chosen by Christine, and she wanted to see a Winter Wonderland.
I created 4 cards on the theme, all using Bauble stencils and Card-io stamps.
The first one is using a bauble stencil from Inkylicious.
All the sky inking was done in the same way, using a Clarity brush and Distress Inks. The colours were Tumbled Glass, Faded Jeans and Chipped Sapphire, concentrating the colour at the top of the bauble, and fading it out as I came towards the torn paper mask made for the hillside.
The torn paper was moved down the shape, and some Tumbled glass added over the edge with a dry baby wipe to create more hills.
I'd added a moon mask punched from the sticky edge of a Post-it note before adding any ink.
With all the baubles, when I'd finished inking the sky, I used the ink left on the stencil to gently drag inwards all round the stencil the define the bauble shape- a good tip picked up from Barbara Gray!
Stamping is done in Versafine Clair Nocturne.
The backing paper is from a pad I picked up from The Range, some lovely greys & silvers, including some with foil. Was only a couple of quid too. Made use of some more of those snowflakes, and a peel off greeting.
The next one is done with a stencil I cut myself, with a Spellbinders die, Heirloom Ornaments 2011. I recently bought some stencil material from E-bay to do this sort of thing, so now I have a durable stencil. This is the largest die from the set, and I also cut it from copy paper, so that I could swap it for the stencil,and stamp right up to the edges, as even thin stencil material is a bit too thick, and leaves too much gap. Another piece of backing paper from the same pad, this one has foiled stars on.
These last two are done with another die cut stencil, this time Spellbinders Heirloom Ornaments 2010. The backing paper is from a really old pack by Dovecraft, and I added silver & blue ribbon on the left.
Same stencil, this backing paper is so old I have no idea where it was from!
Forgot to say, all the hillsides were outlined with a Quickie Glue pen, and Crystal glitter sprinkled on. I dotted some onto the trees, and also added it to the cabin roof.
Also, the card bases are 8" square.
Saturday, 27 October 2018
Fairy Easel Birthday Card
The project I was working on earlier in the week. A birthday card for my Daughter in Law, Becky.
I turned it into an easel card, as I'd made quite a large scene.
Starting to write this post, I've realised I didn't actually take any in process photos!
The image itself is done on an A5 sheet of cardstock, added to an A4 folded card base.
The fairy house is from Crafters Companion, called Fairy Wishes.
The house, drying wings, fairy path and small fairy were stamped in Versafine Clair Nocturne.
Apart from the house, most of the other stamps used are by Lavinia Stamps. The little dragonfly is from a Crafty Individuals stamp sheet. There is also a random grass stamp used at the bottom, from an Inkylicious set.
Colour was added to the house, path and wings using Prismacolour pencils.
The sky and grass area is Distress inks, brushed on with a Clarity brush. They are really good for getting a light coating of ink on a background. I have one set only, as I don't use them that often, and just wash them when I'm done. The blues used in order, were Tumbled Glass, Faded Jeans and Chipped Sapphire, the greens were Mowed Lawn, Shabby Shutters and Lucky Clover.
I used a couple of older Versafine Greens to stamp the top foliage, Olympia Green and Spanish Moss, which is all second/3rd generation stamping.
These are Leafy Trail, Whimsical Wisps,and just the Ivy part of Creeping Vine.
Foliage at the bottom is Fairy Buttercups, Meadow Grass, Willow, and an Inkylicious grass. Same inkpads.
The Tiny Mushrooms were stamped using a couple of Distress Markers- a brown for the stem, and Festive Berries for the tops.
Versafine Clair Paradise was used to stamp the dragonflies. Their wings, and the wings on the washing line all got a coat of Wink of Stella in Clear Glitter.
Liquid Pearls in White Opal was used for the spots on the tiny Mushrooms, and for the mushrooms on the fairy house. Tiny spots of Stickles in Crystal added for the fairy dust being scattered by the small fairy.
The base and the piece to hold the greeting were covered with some TH backing paper, I thought the colour worked well with the image, all the better for being plain. The greeting is a Tonic die, cut from a sheet of foil laminated cardstock. I also cut 3 from dark green cardstock and layered them all together to make the greeting pop up. Matted it onto black, then attached with some foam tape, using 1 layer at the front, and 3 at the back.
Wednesday, 24 October 2018
WOYWW #490
The cards I was making here are a fantastic way to use up your scraps, or maybe it'd be better to call them leftovers, lol. Cards from scraps sounds weird!
Details are in the post below this one. Really quick, easy and uses up stash. A win all round, I'd say. Not my idea, I hasten to add, I got the inspiration from a Jennifer McGuire video. Links to them are in the post, if anyone wants to see them. She does some great cards, and has lots of techniques, and ways to make the most of your stash and products.
The post below that, HERE, has some of the cards I wanted all those snowflakes for.
Okay, now for the mystery photo!
Any guesses as to what this is from?
Maybe the next pic will help.
My trusty Cuttlebug has cut it's last, and gone to the great 'Bug graveyard. To be fair to it, I've had it for about 15 years, so it's done well.
There was an almighty bang as I rolled a die through, and after Beloved Hubby took it apart, one of the sides had snapped clean in half.
Done a bit of research into what's out there, and a Big Shot has gone onto my Christmas Wish list. So, I'll wait and see what Santa brings! I still have my Big Shot Pro, but a smaller machine is useful too, especially as the Pro is way too big
& heavy to move around.
As always, I'll be leaving my link over at Julias place, The Stamping Ground, and visiting later. I'll also post on Instagram, as I've finally opened up an account on there, to post cards to. And who knew there were so many US Majors/Generals who wanted to follow a British cardmaker? lol. I'd just used a pic of me for the profile, they stopped after I swapped it to one of our wedding photos, oddly enough!
Oh, which reminds me, blood test went fine. Back last year, one of the nurses recommended putting one of those warming pads over the area, as the problems much worse when it's cold. So Doug bought me one, it's a wheat bag inside a Penguin soft toy. People in the waiting room must have thought I was quite mad, walking in with a soft toy cuddled in my arm! But it does the trick.
Which brings me to.................And Finally...................
Just a reminder for those in the UK- clocks go back this weekend.
And this is funny because it's so true.😊😊
Tuesday, 23 October 2018
Quick and easy cards using up scraps!
I often watch crafting videos in the evening, especially when Doug's on lates, and I'm waiting for him to finish. Lately, one of my favourites to watch has been Jennifer McGuire.
She does so many videos, and shows lots of great techniques, as well as showcasing products. Obviously not everything is to my taste, but I've picked up lots of techniques I've not thought of, or tried before. She is great at coming up with ways to make more of your stash, and to use things in different ways. She's also often to be seen cutting up her stamps to switch them around, which I love, lol.
This technique, and I've linked to two of her videos doing it HERE, and HERE, makes great use of your card scraps. And we all have loads of those- I know I never seem to have the right size or colour scrap to use up, and end up creating more.
What you do is cut them up into strips, and use them to create panels for your cards.
Now, I did mine as she did in one of the videos, just cutting random width strips with my mini guillotine. You can of course cut them all the same width if you prefer, and she shows one way to do that using your paper shredder, if you have a strip cut one.
I cut up black, grey, white and blue, and included some glitter card strips as well.
She also recommends using copy paper to stick the strips onto, as that will not make the panel too thick.
I covered a strip of copy paper with double sided adhesive sheet- you could just put strips of dst onto it, or tape runner.
Then just start laying your paper strips, either in a regular pattern, or just random. She also did them on a diagonal, so you don't have to be extra careful to keep them all vertical.
The finished panel with all the ends cut off. I've made mine to fit a C5 card base, which is roughly 5⅞ x 4⅛. (15x10.5cm).
I trimmed it down afterwards to about 2½" wide, as that seemed more to scale.
The Happy Birthday die is from Poppy Dies, called Jumbled Happy Birthday.
The next one I cut some copy paper into an oblong, big enough to accommodate a large Stitched Star die, and I think I picked up that set in The Works.
This one used black and blue strips.
I die cut the star, and also a few small ones with the smallest star in the set, as well as the sentiment.
Same base card size, C5.
It also occurs to me that this technique would be great for creating cards for men.
I went back to the black, white & grey mix for this one, and this time die cut a large heart from it, and a sentiment.
The banner is cut from one of the grey pieces, still not sure if it was the right choice though. I might yet change that.
Also cut a small heart from the smallest die in the set.
You could also do this using patterned paper strips instead of cardstock, but I'd definitely say use either card or paper, not a mix, as you will get a very uneven finish if you do mix them.
If you don't have copy paper, you could use oddments of patterned papers/ ones you don't like , for the backing too.
Made a birthday card, I die cut the sentiment twice from black cardstock, and once from blue glitter card. I also added a couple of cardstock strips down the sides of the panel.
I had no plans to do any Christmas cards, but the thought occurred to me, so I gave it a try. For this I cut strips in Green, Gold & red shades, including some glitter strips again.
I have a Memory Box Merry Christmas 'channel' die, and I thought this strip would back it nicely.
This is how the die cuts out- well almost. It does actually leave the ends attached at both ends of the words, which you need to trim off. Odd, but that's how it is.
Occurs to me that this die cut would make a great shaker card too, but that's for another time.
I added the die cut panel onto the card front with some foam tape, and added a peel off star border top and bottom.
So this would make some great quick Christmas cards, that look more trouble than they were, and uses up stash! What's not to like?
So I did a second. This time I cut an oblong scalloped shape with a Presscut die set, and the greeting is an Elizabeth Crafts die, cut 3 times from white cardstock, then once from gold and layered up for dimension.
Another great tip from Jennifer- if you use adhesive sheets, keep the backing paper that you peel off to reveal the sticky side.
It's great for using under anything you want to apply glue to, as the glue won't stick to the release sheet.
Saturday, 20 October 2018
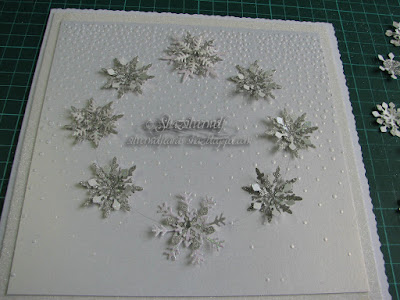
Snowflake wreath
This is the project I needed so many snowflakes for.
I still have loads left over, but I'm all snowflaked out for now.
I cut the flakes with a variety of snowflake dies, and 3 punches, a large, medium and small.
I used glitter card/paper mainly, but also as I hadn't enough white, or a pale blue, I made my own. I sprayed some pearl paper with Crafters Companion Spray and Sparkle in Iridescent, then sprinkled on some Glamour Dust in Crystal, and a pale blue glitter from Sweet Poppy, as punches cope with paper better than card.
The flakes have been layered up in threes and fours, and have an acrylic gem in the centre.
The sentiment was cut three times from white card, then once from silver glitter card and layered up.
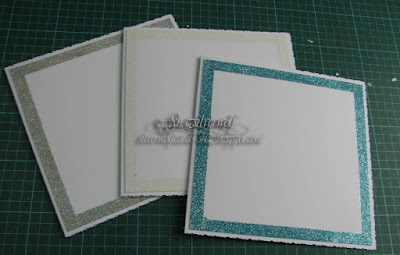
Rather than use a whole sheet of glitter cardstock to matt my embossed panel onto, - these are 8" card bases- I made a 'cheat' glitter background.
First I cut what would be my glitter panel down to fit the card front.
Then added a strip of Double sided tape along one edge.
I sprinkled fine glitter onto it, then before tipping the excess off I rubbed it in well with my finger.
This really helps to make sure you have even coverage. Just repeat this process around all four edges.
If you find any gaps because your tape was too short, either add in a little piece, or you could dab in some wet glue with your finger, then sprinkle glitter over that.
I tipped off the excess, then using a bone folder and a sheet of paper, I burnished over the glitter really well. This gives the glitter a really soft, almost velvet like finish, and of course helps to make sure none will shed.
I picked this tip up from Jennifer McGuire- she does loads of You Tube videos, and always has lots of great techniques and tips to share. Another tip from her regarding glitter is to use Swiffer cloths to mop up glitter from your card/workdesk. She cuts each one up into a few smaller pieces, and watching her use them it really does pick up glitter easily.
My 'glitter' cardstock now matted onto the card fronts.
Next job was the panels I was going to make my wreaths on, and I was intending to run them through embossing folders, so I cut some white pearl cardstock down to show some of the glitter border when it was matted.
I used two different folders, one called Elegant Snowfall, by Crafters Companion. I think it's been retired, but they have a very similar one called Snowfall Drift now. The second one is called Seamless Circle, from Crafts Too.
Took a bit of sorting to find folders where the pattern could be repeated across the panel, as most folders are not wide enough.
To add these panels to the card fronts, I ran a line of dst just inside the glitter square, and then added the embossed cardstock onto that, as dst will not stick to glitter, so putting it on the back of the embossed panel as I normally would ran the risk of it being too close to, or on top of the glitter.
To make the wreath, I took a large circle die and lightly marked around it in pencil. This won't show at the end, as it will be covered by snowflakes.
Then I 'dry fit' all my snowflakes to make sure it looked right. I put 4 of the larger ones down first, then put 4 medium ones between those.
That left me enough space to add the smaller ones between those, so 8 of them in total. I also had made up a few tiny snowflakes, and they came in handy to fill the odd gap.
They got moved to one side then, and I began adding them to the panel with a blob of Glossy Accents.
The sentiment was stacked up for dimension, using a Zig Glue pen, then added to the centre of the wreath with some Glossy Accents added with a fine tip fitted to the bottle.
And I also got a slightly different look by accidentally putting one of my cardstock sheets into the folder the wrong way round, so one of the Falling snow ones is debossed, one embossed!
I still have loads left over, but I'm all snowflaked out for now.
I cut the flakes with a variety of snowflake dies, and 3 punches, a large, medium and small.
I used glitter card/paper mainly, but also as I hadn't enough white, or a pale blue, I made my own. I sprayed some pearl paper with Crafters Companion Spray and Sparkle in Iridescent, then sprinkled on some Glamour Dust in Crystal, and a pale blue glitter from Sweet Poppy, as punches cope with paper better than card.
The flakes have been layered up in threes and fours, and have an acrylic gem in the centre.
The sentiment was cut three times from white card, then once from silver glitter card and layered up.
Rather than use a whole sheet of glitter cardstock to matt my embossed panel onto, - these are 8" card bases- I made a 'cheat' glitter background.
First I cut what would be my glitter panel down to fit the card front.
Then added a strip of Double sided tape along one edge.
I sprinkled fine glitter onto it, then before tipping the excess off I rubbed it in well with my finger.
This really helps to make sure you have even coverage. Just repeat this process around all four edges.
If you find any gaps because your tape was too short, either add in a little piece, or you could dab in some wet glue with your finger, then sprinkle glitter over that.
I tipped off the excess, then using a bone folder and a sheet of paper, I burnished over the glitter really well. This gives the glitter a really soft, almost velvet like finish, and of course helps to make sure none will shed.
I picked this tip up from Jennifer McGuire- she does loads of You Tube videos, and always has lots of great techniques and tips to share. Another tip from her regarding glitter is to use Swiffer cloths to mop up glitter from your card/workdesk. She cuts each one up into a few smaller pieces, and watching her use them it really does pick up glitter easily.
My 'glitter' cardstock now matted onto the card fronts.
Next job was the panels I was going to make my wreaths on, and I was intending to run them through embossing folders, so I cut some white pearl cardstock down to show some of the glitter border when it was matted.
I used two different folders, one called Elegant Snowfall, by Crafters Companion. I think it's been retired, but they have a very similar one called Snowfall Drift now. The second one is called Seamless Circle, from Crafts Too.
Took a bit of sorting to find folders where the pattern could be repeated across the panel, as most folders are not wide enough.
To add these panels to the card fronts, I ran a line of dst just inside the glitter square, and then added the embossed cardstock onto that, as dst will not stick to glitter, so putting it on the back of the embossed panel as I normally would ran the risk of it being too close to, or on top of the glitter.
To make the wreath, I took a large circle die and lightly marked around it in pencil. This won't show at the end, as it will be covered by snowflakes.
Then I 'dry fit' all my snowflakes to make sure it looked right. I put 4 of the larger ones down first, then put 4 medium ones between those.
That left me enough space to add the smaller ones between those, so 8 of them in total. I also had made up a few tiny snowflakes, and they came in handy to fill the odd gap.
They got moved to one side then, and I began adding them to the panel with a blob of Glossy Accents.
The sentiment was stacked up for dimension, using a Zig Glue pen, then added to the centre of the wreath with some Glossy Accents added with a fine tip fitted to the bottle.
And I also got a slightly different look by accidentally putting one of my cardstock sheets into the folder the wrong way round, so one of the Falling snow ones is debossed, one embossed!
Subscribe to:
Posts (Atom)
An End of an era
An end of an era
I write this with a broken heart, that only time can heal My beautiful, wonderful wifelet Shaz (Silverwolf) passed away peacefully in the ea...
-
A couple of weeks ago I mentioned that I had bought these, the new Tim Holtz Embossing Diffusers. You have probably seen, like me, the...
-
I take no credit for this discovery, a lady posted this on Pinterest HERE .Like any of us, I hate having to spend money on 'consumables...
-
This is the first of the batch of seven cards I made, thanks to some Pinterest inspiration. Here is the card that caught my eye,...