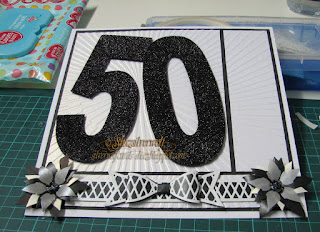
The templates are still available, from Clevercut, but I know they are having website problems at the moment,as something on their site has fallen foul of Virgin Media's' Virusafe, which has blocked the page. Just had a look on the FB page, and Ali has posted THIS LINK, which goes straight to the site.
For making a special card, these templates are ace, as they measure 5 1/2" tall,and approximately 2 1/2" wide, so they can make a great impact.
Mine were cut from a black glitter paper, a pad I picked up once in Hobbycrafts.

Although it's a paper pad, the paper is more like lightweight card.
I already had a vague plan of what I wanted to do- you can see my notes on measurements, as I wanted to have different sized white blocks matted onto black card, which would all be mounted onto a white 8x8" card base.
With my 3 pieces of base card cut. I proceeded to emboss them with a new folder I bought from Crafters Companion, called Sunburst. Of course, had I actually measured the folder first, I would have realised it was 8x8", so could have just embossed one sheet of card, then cut it to size.

I was quite impressed with how well the folder embossed to be honest. It came out lovely and crisp, with nice detail. No squishing or distortion of the embossing at all.
My next detail involved the use of two of the Sue Wilson Finishing Touches dies, the Classic Ribbon & Bow, and the Lattice Ribbon & Bow.
These dies are the 'normal' sized ones, as it's worth mentioning they come in a second smaller size called 'Bitty Bows'.
I cut the Classic, which is a solid shape, from black paper, and the Lattice from white paper, to layer over it.
As my card was wider than the ribbon die length, I cut two pieces of each, and joined them together. This turned out to be a mistake, and something I should have remembered from the first time I did this.
Because of the orientation of the bow, you can see the join in the middle- I need to remember that I must remove the 'ends' of the Lattice ribbon, and join by the Lattices in future.

I made a quick adjustment to my card, trimming down the bottom panel so that it was just long enough to allow one ribbon to wrap over the ends. Then the bow and tails, which again had the Lattice portion layered over it, were attached with a glue dot.
I added a couple of black/white/silver layered flowers, which are cut with the Spellbinders Layered Poinsettia Dies, to fill the corners.
Final touch was to add the greeting, a Happy Birthday cut with Poppystamps Dies Vintage Happy Birthday, and that's it.


