I still have loads left over, but I'm all snowflaked out for now.
I cut the flakes with a variety of snowflake dies, and 3 punches, a large, medium and small.
I used glitter card/paper mainly, but also as I hadn't enough white, or a pale blue, I made my own. I sprayed some pearl paper with Crafters Companion Spray and Sparkle in Iridescent, then sprinkled on some Glamour Dust in Crystal, and a pale blue glitter from Sweet Poppy, as punches cope with paper better than card.

The flakes have been layered up in threes and fours, and have an acrylic gem in the centre.
The sentiment was cut three times from white card, then once from silver glitter card and layered up.
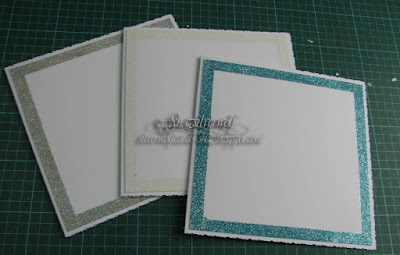
Rather than use a whole sheet of glitter cardstock to matt my embossed panel onto, - these are 8" card bases- I made a 'cheat' glitter background.
First I cut what would be my glitter panel down to fit the card front.
Then added a strip of Double sided tape along one edge.
I sprinkled fine glitter onto it, then before tipping the excess off I rubbed it in well with my finger.
This really helps to make sure you have even coverage. Just repeat this process around all four edges.
If you find any gaps because your tape was too short, either add in a little piece, or you could dab in some wet glue with your finger, then sprinkle glitter over that.
I tipped off the excess, then using a bone folder and a sheet of paper, I burnished over the glitter really well. This gives the glitter a really soft, almost velvet like finish, and of course helps to make sure none will shed.
I picked this tip up from Jennifer McGuire- she does loads of You Tube videos, and always has lots of great techniques and tips to share. Another tip from her regarding glitter is to use Swiffer cloths to mop up glitter from your card/workdesk. She cuts each one up into a few smaller pieces, and watching her use them it really does pick up glitter easily.
My 'glitter' cardstock now matted onto the card fronts.
Next job was the panels I was going to make my wreaths on, and I was intending to run them through embossing folders, so I cut some white pearl cardstock down to show some of the glitter border when it was matted.
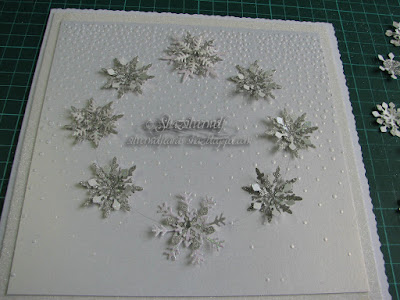
 I used two different folders, one called Elegant Snowfall, by Crafters Companion. I think it's been retired, but they have a very similar one called Snowfall Drift now. The second one is called Seamless Circle, from Crafts Too.
Took a bit of sorting to find folders where the pattern could be repeated across the panel, as most folders are not wide enough.
 To add these panels to the card fronts, I ran a line of dst just inside the glitter square, and then added the embossed cardstock onto that, as dst will not stick to glitter, so putting it on the back of the embossed panel as I normally would ran the risk of it being too close to, or on top of the glitter.
To make the wreath, I took a large circle die and lightly marked around it in pencil. This won't show at the end, as it will be covered by snowflakes.
Then I 'dry fit' all my snowflakes to make sure it looked right. I put 4 of the larger ones down first, then put 4 medium ones between those.
That left me enough space to add the smaller ones between those, so 8 of them in total. I also had made up a few tiny snowflakes, and they came in handy to fill the odd gap.
They got moved to one side then, and I began adding them to the panel with a blob of Glossy Accents.
The sentiment was stacked up for dimension, using a Zig Glue pen, then added to the centre of the wreath with some Glossy Accents added with a fine tip fitted to the bottle.
And I also got a slightly different look by accidentally putting one of my cardstock sheets into the folder the wrong way round, so one of the Falling snow ones is debossed, one embossed!


6 comments:
I'm not surprised that your all flaked out but these sure are beauties. Thankyou for showing your process on making these gorgeous cards. Hugs Mrs A.
Hi Shaz, loving your gorgeous snowflake cards, so wonderfully glittery, super designs, Kate x
Hi Shaz, love the snowflakes, and great tip on the DST and glitter! Have a lovely week Heather x
Hi Shaz, more gorgeous cards! You always have should great ideas for Christmas cards and these are no exception. Have a lovely week, Angela xXx
Some great ideas here, Shaz. I love the snowflake cards. I have done these style too and like you I use the four main flakes to mark the circle and then I keep redividing the circle to keep the circle centered so to speak!
Beautiful snowflake cards, thank you for joining us at Daring Cardmakers this week.
Sylvia xx
Post a Comment