A warm welcome to all my visitors,

Thank you for taking the time to come and look at my blog, I really do appreciate it. I would love you to leave me a comment, even if it’s just to say Hi. It means I can come visit you!

All my designs are original, so copyrighted to me. If I have been inspired by someone elses work, I have named them in the post, and where able, I have provided a link.

Please feel free to use my designs for inspiration, I just ask you to credit me, and provide a link back to my blog.

Thanks, Shaz XX

Monday 25 April 2016

Fantasy Willow

Another Sweet Poppy stencil, this one is called Fantasy Willow. It was done in White Glossy stencil paste, then a brown glitter used for the trunk, with a light purple glitter for the hanging branches. I added a little dark purple Stickles at the ends of the flowers afterwards.


 The image is matted onto two shades of purple card, then finally onto black. A sheet of A4 pearlescent purple cardstock was folded for the base card.
 The sentiment, cut from purple glitter paper, is by  Creative Expressions, a Sue Wilson die.
 It's added to the base of the card with foam tabs.

Butterfly Tree, times 2.

This card is using the Butterfly tree from Sweet Poppy Stencils. It was done using white Glossy embossing paste and a selection of glitters. I added the Copper Glitter for the trunk first, and it's just a matter of being careful where you sprinkle it, and then tip it off away from the butterflies. A little going on them won't matter, especially if you are going to do an assortment of butterfly colours as I have here. I think in all I used 4 colours for the butterflies.
 I punched some spare butterflies from glitter paper, and added them atop the image with some Pinflair gel glue.
 It was matted onto  a copper coloured glitter paper, and I find when attaching any card to glitter paper, it is better to use a glue such as the Pinflair glue gel. You can put DST on the back first, but smear some glue gel on top of that. It will stick well to the glittery surface, and also give you some slide-ability when matting.
 Next I matted it onto a sheet of purple glitter paper that had had one edge punched with an X-cut border punch, called Doily Dots.
 All mounted onto a 7x7 card base.
The second card is similar, but I used a paler almost Champagne coloured glitter for the trunk, and pale pink and lilac glitter for the butterflies. I matted this one onto silver glitter paper, then purple again. The purple this time was punched with another X-cut border punch called Looped Fringe.The base is an A4 cardstock sheet folded in half.
 Both have copper coloured peel offs used for the Birthday greeting.
 I may end up adding a ribbon to these, as they seem to be missing something, I think.

Sunday 24 April 2016

Black Orchid Sweet Poppy Stencil, in White on Black.

The last time I did this card, I used Black stencil Paste and Black glitter, on white. This time round, I've used White Glossy embossing paste, onto black card, with a crystal glitter sprinkled over the wet paste.
I've added two black half pearls, and 1 white one into opposite corners of the image.The card base is a black textured A4 sheet folded.
 All the stencilling do'sand don'ts can be found in THIS POST.  


 The second card to get the reverse treatment is this one using the Leafy Flowers Stencil. Again, White Glossy paste and Crystal glitter were used. This one is also on a folded A4 card base.
 Dark acrylic gems are added in the two opposite corners, and  Birthday Peel offs supply the greeting.

Wednesday 20 April 2016

WOYWW #359

Well, this is my desk right now. I've shown you this first, so you can see I did get things sorted! We are back again for our regular Wednesday round up of the desks from hell, otherwise know as WOYWW, all kept in some sort of order by our fantastic Hostess, Julia, over at The Stamping Ground.
On the left, a pile of images I am determined to get turned in to cards, at the back, 2 already done, on the right, one image and a stack of white & black card for layering.
 In the posts below this one, there are a few cards I made towards last weekend, including one about how to avoid lines in your cardstock if you are embossing with a small folder, or border ones, so if you get time, you may want to have a quick look.
 OK, that was the good bit. Now you may need to brace yourself for the next few photos. This was my craft room over the weekend;
 
 Besides my main workdesk, I have IKEA worktops in three other places in my room, two along walls, and one which is a table attached to an EXPEDIT unit, which I use as my cutting/embossing station.
This one on the right is the worktop in front of my inkpad storage.


The desk on the left here, is my main workdesk, and as you can see is an utter mess. The reason for all this  is that a lady I know from work has decided to give up crafting completely, and take up quilting, so she sent me an enormous tub full of loads of crafting stuff.

                              This on the right is my 'desk behind my desk'.

This is my cutting/embossing station. In order to get everything put away,it involved creating even more mess to start with.


Just so you know I was successful, this it what it looks like now:


Looking much better, with the easel I use for photographing my cards on.
This is my real desk, just before I started trying to finish some more cards.
 The white turntable caddy at the back is something she gifted me, and I have to say, whilst I'd never bought one as I thought it unnecessary, I'm actually loving being able to have so much to hand in such a small space.
 A small guillotine and my glass mat as well.If it's on the desk, it's possible I'll use it!


The  'desk behind the desk', showing a nice splash of sunshine on Tuesday afternoon.


My cutting/embossing station, clean & tidy.
 I've found homes for Tattered Angels glimmer mists, a couple of dozen pots of embossing powder, mica powders, Cosmic Shimmers version of Liquid Pearls and Stickles, masses of tools, and loads more I can't even remember it all now.
 Needless to say, despite her saying she didn't want anything for it, I've sent her a huge bunch of flowers, and a Hobbycrafts voucher.

And, finally, our tickets arrived yesterday for the Happy Stampers festival at Port Sunlight, so I've also booked us a hotel for Friday night, as Doug said we could drive up Friday afternoon and stay over. Really excited, as we get to meet our Neet!( And some purchasing of crafting items (mainly stamps I expect) may well be made. :)

P.S. Forgot to say that I might be missing next week, as we go off on holiday on Tuesday. Fly to Tenerife in the morning, but thinking about it, the ship doesn't sail until midnight on Tuesday, so might be able to do a post, it will depend on my tablet, and the ships wifi. We shall see. xx

Monday 18 April 2016

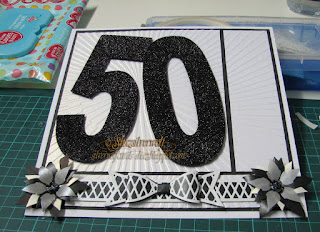
50th Birthday Card


Right, this was the card I was working on last week, but couldn't show as it was for a Birthday at the weekend. Visitors last Wednesday will remember seeing the embossed background, and the letter templates on my desk.
 The templates  are still available, from Clevercut, but I know they are having website problems at the moment,as something on their site has fallen foul of Virgin Media's' Virusafe, which has blocked the page. Just had a look on the FB page, and Ali has posted THIS LINK, which goes straight to the site.
 For making a special card, these templates are ace, as they measure 5 1/2" tall,and approximately 2 1/2" wide, so they can make a great impact.


Mine were cut from a black glitter paper, a pad I picked up once in Hobbycrafts.


Although it's a paper pad, the paper is more like lightweight card.


I already had a vague plan of what I wanted to do- you can see my notes on measurements, as I wanted to have different sized white blocks matted onto black card, which would all be mounted onto a white 8x8" card base.

With my 3 pieces of base card cut. I proceeded to emboss them with a new folder I bought from Crafters Companion, called Sunburst. Of course, had I actually measured the folder first, I would have realised it was 8x8", so could have just embossed one sheet of card, then cut it to size.


 I was quite impressed with how well the folder embossed to be honest. It came out lovely and crisp, with nice detail. No squishing or distortion of the embossing at all.

My next detail involved the use of two of the Sue Wilson Finishing Touches dies, the Classic Ribbon & Bow, and the Lattice Ribbon & Bow.
 These dies are the 'normal' sized ones, as it's worth mentioning they come in a second smaller size called 'Bitty Bows'.


I cut the Classic, which is a solid shape, from black paper, and the Lattice from white paper, to layer over it.


As my card was wider than the ribbon die length, I cut two pieces of each, and joined them together. This turned out to be a mistake, and something I should have remembered from the first time I did this.
Because of the orientation of the bow, you can see the join in the middle- I need to remember that I must remove the 'ends' of the Lattice ribbon, and join by the Lattices in future.


  I made a quick adjustment to my card, trimming down the bottom panel so that it was just long enough to allow one ribbon to wrap over the ends. Then the bow and tails, which again had the Lattice portion layered over it, were attached with a glue dot.


 I added a couple of black/white/silver layered flowers, which are cut with the Spellbinders Layered Poinsettia Dies, to fill the corners.
 Final touch was to add the greeting, a Happy Birthday cut with Poppystamps Dies Vintage Happy Birthday, and that's it.


Friday 15 April 2016

Some white on white for a change.


This card is another inspired by one spotted on Pinterest.
This is my version, with the addition of a pale yellow with white spots Organza ribbon, just to make it pop.

The centre panel is again made from the Butterfly Border embossing folder.


 I'd done a few,  testing out the sandwich required, and it seems a waste not to use them.


 A couple are on paper, and the others on card. I picked one of the pearl white cardstock ones, and trimmed it down to the card height, which in this case is a folded A4 sheet.


The border strips, of which there are two each side, are made with a Spellbinders die set, called Shapeabilities On The Edge.
It was very good value, as it contains 9 different edges, and the dies are made so that you can extend the length to whatever you need.


The first border I cut was with the 4th from the right, the eyelet one.
 I trimmed two strips of the same pearl card, and ran through the bug, extending the cut to the same length as the panel.


Then I chose the 3rd from the right to make the second border with.This one was slightly trickier to line up when I came to extend it, but it worked out fine.


So now I had my two border sets and my centre panel. A strip of  DST down each side of the panel, and the eyelet pieces were put in place. The panel was lined up to the embossed line that is produced by the die.


Then another strip of DST, this time down the back of the eyelet piece, and the waveform border was stuck down.


Once the second border had been added, I die cut the sentiment with a Britannia Dies set, Christmas and Birthday set, Small. Another great value set, as you get a Christmas and Birthday sentiment together. The dies are half an inch, or 14mm high, which is a really useful size.
 Stuck this down with a Quickie glue pen. At this point I decided it was just too lacking in colour, so added the ribbon to brighten it up slightly.
 And here is the Pinterest card that inspired me, and the original post on SCS by Susi B.


.......And the last rescue card!

Well, I knew it worked, so I had one more set of bases with the embossing line on.


Colour change this time, as well as an ink change- this one uses Distress Inks.


This was my selection, but I didn't use them all in the end. I think Wild Honey got left out.


I also didn't have a ribbon & bow cut in a colour suitable, so had to cut one. As I did, I thought this time round I'd actually emboss it as well.


Liked how that turned out. The stamps I used were the same as before, except I swapped out the Roses stamps for one from a Rubber Tapestry set called Triple Dragonfly Floral.


 After stamping and then  matting the first two layers, I attached the ribbon part of the die, again using a couple of bits of DST on the back to hold it in place.


Add the bow, matt onto the final layer, and mount on a 6x6" card base. A coloured Peel off provides the sentiment again.

Thursday 14 April 2016

Ribbon Bow Die cuts to the rescue!

So, as I got to the end of the card I made yesterday, I had to hide a boo-boo with a paper bow. Which made me think that maybe I could rescue the ones with the dreaded embossing line across them. Only one way to find out.


As normal, I stacked up the white sheets and held them together with a bit of repositionable tape.
 The Cardio stamps used this time are called  Seasonal Rose, and again, Greenery No1. Adirondack inks used were Clover, Meadow and Lettuce for the greenery, with Wild Plum and Raspberry for the roses.


The Greenery set has a  corner stamp, which fitted nicely. I added to this with other stamps from the set.


 Once I had enough greenery, then I added a few roses. The set for these contains two different sizes of Rose, as well as a few twigs and branches.
 Added a few Dragonflies in blue.


Ready to matt the three layers. I chose a purple cardstock to matt these onto.


I shall mount the first two layers together, then put on the ribbon bow and see if I can hide the line.


 How much of a fluke is this? When I cut out  a whole bunch of ribbons and bows the other day, one I cut out was from a purple vellum. It sits nicely across the indent, is just long enough to cover the two layers, and get held down on the back with some DST.


Add the bow, held together and attached to the ribbon with small glue dots.


I'm not going to try stamping a greeting, I learnt that lesson already! So, a small silver peel off, coloured with these pens I picked up in Tesco years ago. Still going strong. The special 'peel off pens' I bought at the NEC years ago have long since given up the ghost.


And we're done. As this one was so successful, I shall be doing the same with the second one, but I'll go with a different colour scheme.

An End of an era

An end of an era

I write this with a broken heart, that only time can heal My beautiful, wonderful wifelet Shaz (Silverwolf) passed away peacefully in the ea...