A warm welcome to all my visitors,

Thank you for taking the time to come and look at my blog, I really do appreciate it. I would love you to leave me a comment, even if it’s just to say Hi. It means I can come visit you!

All my designs are original, so copyrighted to me. If I have been inspired by someone elses work, I have named them in the post, and where able, I have provided a link.

Please feel free to use my designs for inspiration, I just ask you to credit me, and provide a link back to my blog.

Thanks, Shaz XX

Sunday, 17 November 2013

Christmas Cards- Indigo Blu style

I must admit that I've amazed myself this year- barely the third week of November, and my Christmas cards are finished! I haven't usually even settled on a design yet, let alone started.I do two batches, smaller ones for work colleagues etc, and a larger design for family.
 The smaller ones are back a few posts, but this is the family card. You may remember a couple of weeks ago I posted my purchases at the NEC, and amongst them was this stamp from Indigo Blu.


Called Baubles Flourish, its quite a large stamp, the design is 5 1/2" wide, by 5" deep.


I stamped the flourish onto white card with Black Versafine, and then heat embossed with Stardust embossing powder. After all the flourishes were done, I repeated the stamping with a Christmas Greeting.


          I had already cut the black matt layer, so it would fit on my card blank, which is 6x6.


The black layer is roughly 5 1/2" square, and the stamped white layer 5 1/4", so the image goes off the left hand side just a little.


 The image matted onto the black layer with DST.


Red ribbon wrapped across the card front, and the ends stuck down on the back with a little DST, then a small bow added with a glue dot.


Next some acrylic gems were added for a bit of sparkle.


 Green on the bauble centres,clear in the centre of the snowflakes, red ones for the holly berries, and a dark one on the bauble string.


This is the original Indigo Blu version. on display at the NEC.


                                          .......and this is my version of the design


Supplies:
White scalloped card blank, 6x6
Baubles Flourish, Indigo Blu
White Cardstock
Black Cardstock
Ribbon
Sentiment stamp
Versafine Onyx Black inkpad
Stampendous Stardust embossing powder
Acrylic gems, e-bay
Heat gun
 Pinflair glue gel, or silicone glue for the gems

Wednesday, 13 November 2013

WOYWW 232

Not enough days between Wednesdays- these weeks just fly past. Almost finished all my friends/work colleagues Christmas cards, I just have to stamp the inside sentiment. They're in the post below, by the way. Doing this up on Tuesday night to schedule, so my desk has some of my purchases from the NEC, where I did indeed meet up with Andrea, we had coffee and a chat.  Love meeting WOYWWers, so nice to speak in the flesh to our friends online. Completely forgot I had my camera in my bag, so no pics, sorry! Waffling away here, so pop over to our Head of Desks, Julia, at The Stamping Ground, and come see the desks of the world in all their glory.
 So what did I get?
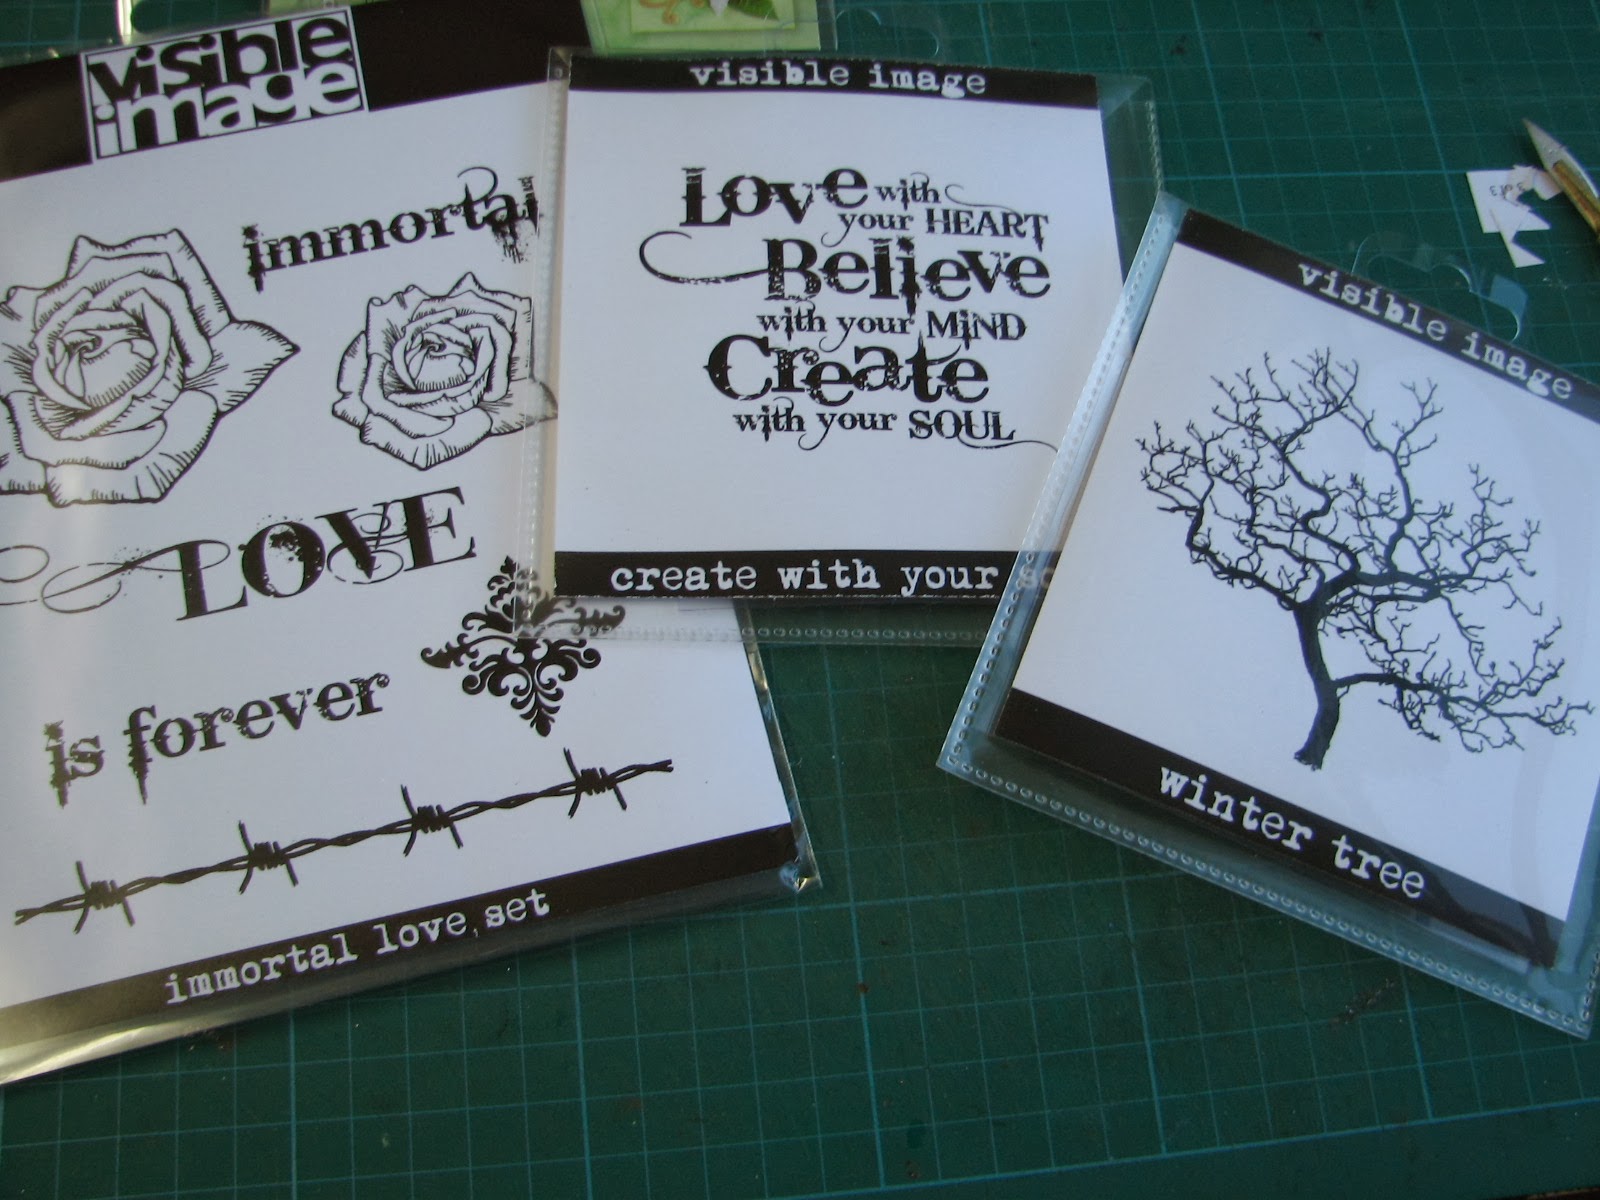
Mainly stamps, what a surprise! A couple of Indigo Blu ones, a couple of Lavinia stamps, some Inkylicious, but my absolute favourites- a company called Visible Image were there. I've seen them lately in Craft Stamper, and they have some delicious Gothic stamps.


The set on the left in the picture below I fell in love with when I first saw it.
 
You can also see a Poinsettia die in the first picture, I  have the Spellbinders  Layered Poinsettia, which is fine for larger cards, but a bit overwhelming on smaller ones. This one makes a lovely sized small flower, (Nellie Snellen, btw).


This one came from Inkwell stamps, which will be great for simple Wedding cards, and the coolest thing is they also have a 'Mrs & Mrs', and a 'Mr & Mr' stamp for civil weddings.


Indigo Blu- you can see the Ella Bella stamp in the top picture, and this one I bought to use for family/friend cards this year. They had a gorgeous sample on display, which was what sold me on the stamp.


Apart from a few odds & ends- a set of square dies which had 14 squares in it, some tape,a couple of ink pads and a couple of embossing folders on sale,the only other thing I bought was some packs of pre cut & scored cards. I usually cut & score my own, but liked the scalloped shape on these, and cutting square cards from A4 limits the size somewhat, and they were reasonable, the largest, which fold to 6x6, were £4.99 for a pack of 50, with envelopes. And they'll be the perfect size for the bauble stamp.
I have to say that overall, I thought the Hobbycrafts show was not as good as previous years, although that does somewhat depend on your area of crafting. It seemed this year that well over half the show was beading or fabric retailers, this seems to go in cycles, I've noticed. Each year there is a heavy leaning to one particular craft. Last year it seemed every other stall was beads. I also noticed a number of regulars absent - Paper Artsy for one. Also missing were Crafters Companion, who I don't buy from very often, but they usually have a big stand, and some good bargains.And a lot of others had far smaller stalls than they usually do. So do have a lovely Wednesday, I'll be catching up with you later.
 Quick PS-For anyone with bent 'bug plates- a couple of posts down is a method to flatten out your warped Cuttlebug plates- I've done it and it does work.

Monday, 11 November 2013

First batch of Christmas cards finished.


I started these a few weeks ago, and finally got them finished today. well, almost, I just have to stamp a greeting inside them.
The stamp is by Penny Black, called Adornment. I stamped it in Silver Encore pigment ink, and heat embossed with Stampendous 'Stardust' embossing powder, after trying out a few others.
 The Merry Christmas sentiment was done in the same way.
 After cutting out the squares with the image on, the corners were rounded with a Corner Chomper.
 I have the one that cuts in 1/4" and 1/2"


 I used the 1/4" side for the main image, then later used the 1/2" side to round the top corner of the cards. It does a lovely job, and much more tidily than the other corner punches I've had over the years.Doesn't need any real effort to punch either, certainly less than a normal punch.I matted the image onto silver card and rounded the corners again. I used a mix of 2mm and 3mm acrylic gems, added with Pinflair glue gel.


 When I came to mount the image, I thought the base card just TOO plain, so browsed my box of embossing folders. I have a couple with snowflakes etc on, but they seemed too busy. Then I came across this recent purchase, called 'Tied Together', by Couture Creations.


 What I really liked about this folder was that the back part is slightly narrower than the front, which makes it easy to emboss the front of a card, right up to the fold. So I embossed all the card fronts, then rounded the corners.


The image is mounted with DST, and the sentiment with a couple of blobs of silicone glue.


The main image mounted on the card front, waiting for the sentiment & ribbon.


By the way, I used up all the scrap pieces of card from cutting out my images to stamp the sentiments onto, then trimmed them down and matted onto silver again.


Ribbon now in place, waiting for the glue to dry. Some are silver, some have a splash of red. OK, I admit it, I ran out of silver ribbon, lol.


Supplies:
Stamp, Penny Black Adornment
Silver Encore Pigment ink
Stampendous Stardust embossing powder
Acrylic gems, e-bay
Tied Together Embossing folder
White pearl card base
Red/silver narrow ribbon
Sentiment stamp
Corner chomper/rounder punch

Fixing warped Cuttlebug plates!

I take no credit for this discovery, a lady posted this on Pinterest HERE.Like any of us, I hate having to spend money on 'consumables', and new 'bug plates are not cheap, are they? As one of my 'B' plates was quite warped, and full of bits of paper stuck in the cutting marks, I thought I'd give it a try.
This was my 'B' plate before:
I don't think the bend in the plate shows up at all, but it was quite bent, despite keep flipping it when I used it.

What she did was wrap it in tinfoil, put it on a baking tray, put some weight on top of it, and then cooked it at 170C,325, or gas mark 3, for half an hour.


So I wrapped it up, and I used a good quality thick foil for it,and put it on  a tray, with 2  pyrex dishes and a stone lasagne dish on top.

She doesn't say if she had a fan assisted oven, so to be on the safe side, I knocked 10 minutes off the cooking time. When it came out, I left it to cool, then unwrapped it. The result was pretty flat, although the heat had got to a couple of the corners.
 So I wrapped it in a second coat of foil, and as I was about to cook Toad in the Hole for dinner, I waited till that had finished, then put the tray back in the oven after I had turned it off, and just used the residual heat of the oven.


And this is my 'B' plate now- nice and flat, and all the bits of paper have dropped out.


Bit easier to see against a white background- you can see the top two corners felt the heat a little too much. I'd recommend putting two tin-foil coats on it, more if its a cheaper thin foil, (which is what I normally buy from Poundland, lol, only got the Bacofoil 'cos Tesco had it going cheap!) and maybe some extra on the corners too. But it really does work! Makes them nice and flat again, and pops out all the paper. You still have the cutting marks, but that doesn't affect how they cut.


Before & After


Wednesday, 6 November 2013

WOYWW 231

Goood Morning everyone! I swear someone is pinching the days between Wednesdays- it goes so fast. Head over to the Head Desker, Julia at The Stamping Ground, click on Mr Linky and come join us, for the most fun you can have without the aid of alcohol, lol.
Nearly done on the C-cards, I'll blog them in the next day or two. So, my show & tell for this week, is a couple of (possibly) usefultips I came up with while making them.
My first thought for the sentiments was to matt them onto little banners, although I dropped that plan afterwards. But  while I was planning to do it, I wanted a quick way to cut all the strips into pointy banner shapes. I'd seen a tutorial link on Pinterest using a heart punch, but my heart punch has a slightly wonky shaped heart, and wouldn't work. Rooting about in the punch drawer. I spotted a square punch.
So I wondered if I could do it with that. And you can.


 By placing the strip into the punch like in the picture below,  you get quick, neat banners.


If you want single points, just post it into one of the corners, like so:


So thats my exciting discovery for this week, :).


Now a little bit of a (cheap) enabler. You know that expensive copper tape for edging microscope slides, dominoes etc? Retails at about a fiver a roll, I believe? Well, I was in Poundland a few weeks ago, and spotted this stuff, which I originally bought to put around my planters, to keep the slugs at bay.


 Copper barrier tape, 2 metres, (thats 6ft 6" in proper measurements) for a quid. Good job I bought a couple, 'cos this one won't be going in the garden!

 I had a couple of replies last week from WOYWWers going to the NEC on Saturday, so I'm looking forward to meeting up with them at some point during the day.You can be sure there'll be pictures next week.
 Finally, to brighten what is bound to be a wet & icky day, at least here in the UK, a bit of humour.
Have a great day!


An End of an era

An end of an era

I write this with a broken heart, that only time can heal My beautiful, wonderful wifelet Shaz (Silverwolf) passed away peacefully in the ea...