

First step was the base card, and generally all my cards are made from an A4 sheet of card, this one in Pearlescent white.

Scored on both sides with the scoreboard and an embossing stylus- I find that helps to stop any cracks in the folding.

I selected a sheet of black card for the first layer, then lay my next white layer over it to mark where to cut it down.

This piece was cut down with my guillotine-and a tip here if you find it hard to get a straight cut on your guillotine or trimmer. Don't butt your card up to the top plastic edges, line it up instead onto the printed or scored lines. They always seem to be straight, whereas for some reason the body isn't.

This piece was going to be embossed with a folder, and I used a Quickutz folder for this, called Diamonds & Dots.This is about the same size as the early Cuttlebug folders, so I had to emboss twice across the card to fill it. Fortunately, this design makes that simple.


Now I needed another piece of white card to do the stamped background on. I wasn't fussy about the size here, just used a half A4 sheet, as I'd be trimming it down later.
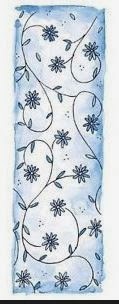
The stamp I used is by Penny Black, called Daisy Pattern, 2642K.
As its only a narrow stamp, I needed to layer it across the card,so out came the Stamp Positioner.You could probably do it by eye, but I get paranoid about gaps, lol.
 Image stamped onto the plate, and lined up for the first one to be stamped. The only thing you need to take care with using the stamp positioner is to always keep your stamp the same orientation as you first stamped.
First image stamped and second one lined up.

The whole sheet stamped.
I used Versafine Onyx black, as it gives a good black image and is wet enough to still be able to heat emboss after.

I lay this against my dry embossed layer, and marked where I wanted to trim it down.
I wanted to 'separate' this stamped layer from the white embossed one below it, but didn't want to add yet another card layer.

I have a few of these embossing pens- had them for years and they have never seemed to dry out- so decided to draw a line down each edge then emboss with clear powder. You could also use a Distress Marker for this, the ink in them is really wet & would be embossable. In fact any marker with a 'wet' ink would do the job.
I used a ruler to draw along, one edge at a time.
Just make sure to clean your ruler edge each time so you don't get any smudges!


I added the powder & heated each edge one at a time.

I think I will be bearing this in mind for future cards- its a simple way to visually separate layers, without adding card/paper.

Now I needed a simple focal image, and this is a really old stamp, from Anitas, I think called Mackintosh Rose.
Stamped in Versafine Black again, onto one of the scraps of white card from earlier. I added clear detail embossing powder, and I did that three times, quickly tipping the powder onto the heated image.

I trimmed it down leaving a narrow white border, as it was going onto a black panel, then trimmed the panel down so it was all in proportion.
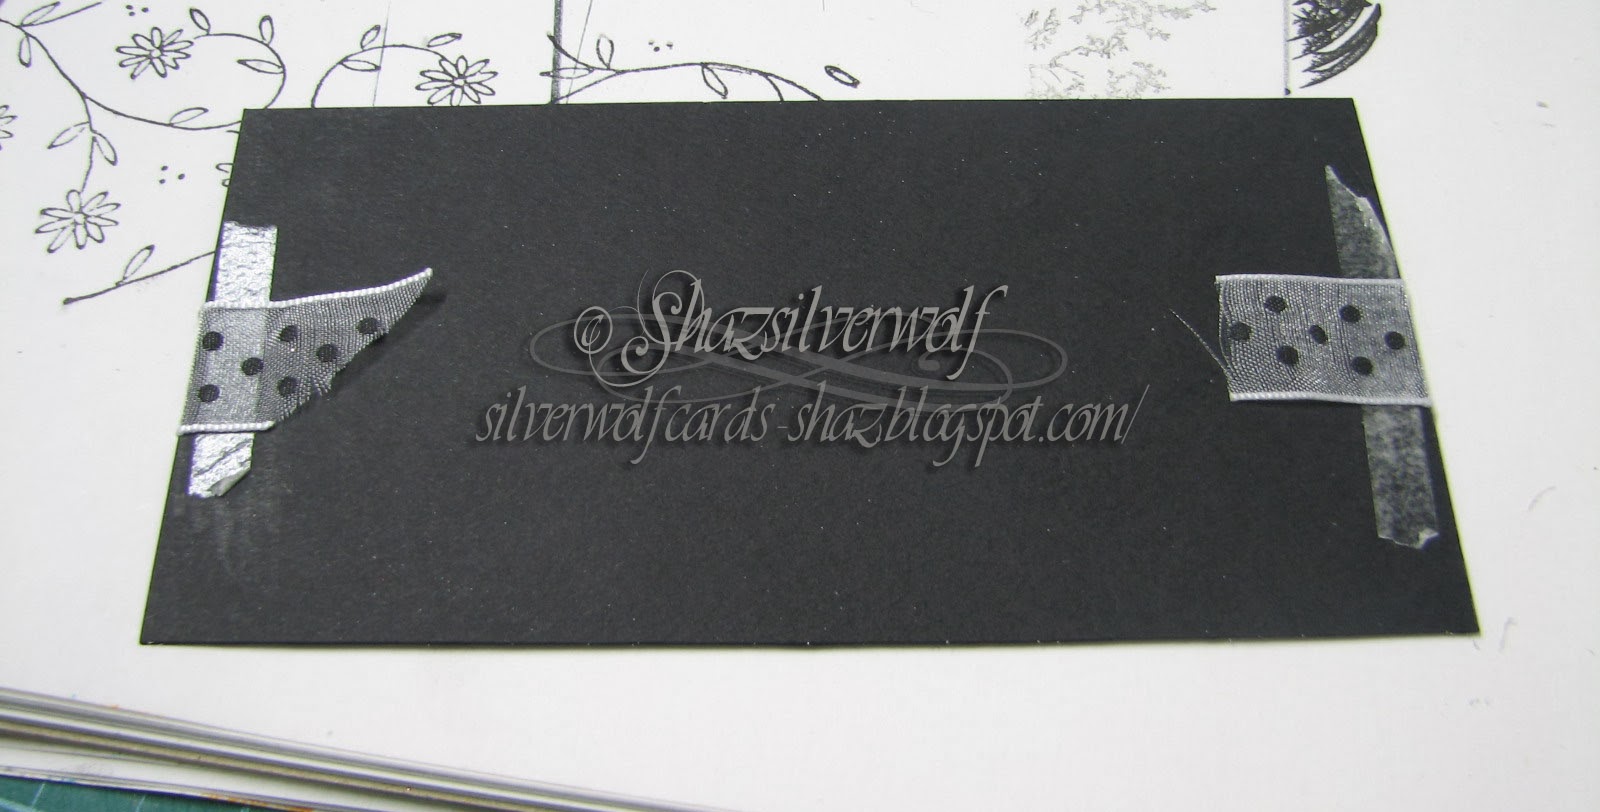
Before mounting it though, I added a strip of white organza ribbon with black spots to the black card, securing it with DST on the back.

Now the layering up began.
The black panel was added close to the top of the stamped panel.


Then the stamped panel added to the white embossed layer.
These layers were matted onto the black layer, then mounted onto the card front.

Now for the greeting, stamped in Versafine Black onto a scrap of the white pearl, and matted onto a scrap of black.
I added that to the lower front of the card, along with a ribbon bow over the strip of ribbon, with a glue dot.

Supplies:
White pearl card 2 xA4, 1xA5 or scraps
Black card, A4
Background stamp, Penny Black daisy Pattern
Focal stamp
Onyx Black Versafine
Clear detail embossing powder
Black marker
Ribbon
Embossing folder
One thing you probably spotted in the pictures are my steel edged rulers.
I've acquired four over time, and they are possibly one of my most used, and useful, tools.More often than not, I use a ruler & scalpel for cutting, as I tend to mount my images, then trim down, rather than cutting mats first and trying to line up equally all round.
Why so many? Well the thing is they all have slightly different features.

From the left, the first one is a quilters ruler.If you look closely, you can see there is a narrow gap between the marked grid and the steel edge. If I line up the bottom grid line with my cardstock, then cut along the steel edge, it gives me a perfect width narrow border.
The second one, next to it, is also a quilters ruler, but this one has the steeledge set against the first grid line.So I can cut a super fine narrow border with that. Or no border at all.
Next to that is my Tim Holtz ruler, who's greatest asset is that its in inches! It also has double measurements on it, 1-12 from left to right as normal, but it also goes from the centre of the ruler out (6" being 0), so you can measure a set distance from the centre in both directions. It also has solid lines at 1/4" intervals, and 1/8" dotted lines between them, and no 'excess' ruler either end. Oh, and it has a row of pricking holes along the top, too, on the 1/8th marks.Last one is the X-cut, back to metric again, but it also has a centre point mark, and measurements going outwards, as well as the usual. It has a wider steel strip butted up to the grid, so I can get a different border size from it.


10 comments:
ah Shaz just loved this post and steps.. and wow what a great piece of work to finish with.. clever you.. and yes have the TH ruler too and is a fav..
..and agree about getting straight cut by "not" butting it up against top bar..
A really great card, Shaz in Oz.x
Wow, what a marvellous post. And how utterly fascinating to see and read your reasons for using and doing certain things! we definitely have a lot of stamps in common too! I love to read that you wake up thinking about cards, and just when we're getting so similar...I confess that I wouldn't have used the stamp positioned straight away...would have tried to get away with it first!!
Beautiful card and a great tutorial!
I am WELL stocked on rulers too, and I do believe and I have a stamp positioner somewhere.....LOL
Thanks for the wonderful share.
So beautiful and great step by step
Rosie x
Very interesting post. I am not neat enough to do this.
Such an elegant card, Shaz. I am thinking it would work well for so many occasions with a different sentiment. Love the quilting background. Great rulers there, I have about 6 myself and I use them all. So fun!
Love all the step by step photos to show and why you did things
Jackie 10
Beautiful card! Very elegant. Enjoyed checking out your step by step pics too. :)
~Elaine #61 http://www.quixoticcards.com
Beautiful card and I like that you have taken the time to take a pic of the steps. I always forget. I only have a TH ruler (I like inches) and an old metal ruler used in drafting. Nice to see your collection.
Sandra @59
Marvellous!! Love all the pictures, love that you woke up thinking about it.... and those rulers ... thank you for a wonderful post.
Bishopsmate #71
Post a Comment