Well here we are again, the regular stalk around the workdesks of the world. New to this? Pop over to Auntie Julia's, at The Stamping Ground, click on Mr Linky and join the fun. And great fun it is too.
Not a lot happening on mine this week, still plodding along with the C-Cards,and I've stuck all the acrylic gems (finally, they took forever) onto my stamped image,now I've had to order some plain white card to make the bases.
All sitting in a pile, looking like a load of sparkly beer mats, lol.
Various odds & ends elsewhere, my Bamboo plant( must give it a drink), offcuts of card etc.
The new stamps at the front I couldn't resist-who in their right mind sends me an e-mail about stamps that contain a skull, and think I might not be tempted?
I really did not 'get' the whole moustache thing- they probably will never get used, but the skull & top hat? Sold, to this lady. From Stamp Addicts, by the way.
So thats my selection for you this week- and as for the cocktail stirrers, the only thing I've made with them so far is another couple of Mohito's, rofl.
Oh an early heads up- next weekend, 7th to 10th November is the Hobbycrafts show at the NEC, Birmingham. I will be going along on Saturday 9th, so if anyone else is visiting that day and would like to meet up & maybe have a coffee & chat, let me know. I do Saturday rather than Friday, as the NEC is a 20 minute drive from where we live to get there, and at least an hour on a Friday afternoon for Hubby to come & pick me up. M42 traffic is horrendous then.
Pages
A warm welcome to all my visitors,
Thank you for taking the time to come and look at my blog, I really do appreciate it. I would love you to leave me a comment, even if it’s just to say Hi. It means I can come visit you!
All my designs are original, so copyrighted to me. If I have been inspired by someone elses work, I have named them in the post, and where able, I have provided a link.
Please feel free to use my designs for inspiration, I just ask you to credit me, and provide a link back to my blog.
Thanks, Shaz XX
Wednesday, 30 October 2013
Wednesday, 23 October 2013
WOYWW 229- The C- cards
Well, you finally shamed me into it! seeing so many people working on their Christmas cards over the last couple of weeks has forced me into starting. Bit of a struggle, I need to feel Christmasy to enjoy doing them, and I do NOT feel christmasy before the second week of December, at the very earliest, lol. Anyway, this is my desk as of Tuesday night:
My stamped & embossed images from the previous post, cut out and corner chomped. Really like that tool, made a much better job of the corners than my normal corner rounder punch.
This is where I am now, matted onto silver card, chomped again, and some clear acrylic flatback gems added with Pinflair Glue Gel. I think I will be adding a ribbon bow, over the ribbon on the image, just to finish them off.
One more thing on this weeks desk, one of those 'I know I'll find a use for it' type of things:
We went out for an Anniversary meal,and these stirrers arrived in my cocktails! ( Mojito's and Long Island Iced Tea, as you ask),- not all on the same night I hasten to add- we went out again last weekend. They had to come home with me- be honest, would you have left them behind? So, get yourselves over to our Head of Desks, Julia, at The Stamping Ground, and join the fun.
Saturday, 19 October 2013
A new Christmas stamp, and playing with embossing powders....
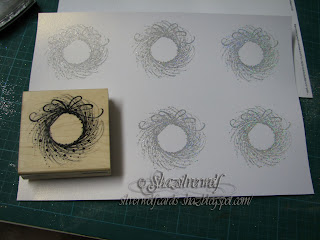
Well, I saw this Penny Black stamp used for Christmas cards, and thought it would make a whole bunch of nice, easy batch cards.
Its called Adornment, a wood mounted stamp, and I got mine from Handy Hippo.
I started stamping in Silver Encore Pigment ink, and using silver detail embossing powder (Stampendous). The image in the bottom left, you can see some ink around the print- thats one thing I dislike about Pigment pads, because they are foam, they tend to deposit ink where you don't want it! I forgot to clean around the outside of the stamp with a cotton bud before I stamped this one. One good thing with this image, its very forgiving of stray bits of embossing powder, if you miss any flecks.Although my little embossing bag did do a very good job of keeping it clear.
They look ok, but a little plain. So out came some powders with a bit of sparkle.
The first one I tried was Stampendous Stardust, and I really like how this one came out. I still stamped in the Silver Embossing ink, by the way.
This one still showed up silver, but with a lovely sparkle to it.
I had a few more to try out, and the next up was a WOW embossing powder, Snow Sparkle.
Its actually quite pretty, but the white does hide the silver ink.
Next to try were a couple more Stampendous powders, Crystal and Rainbow Crystal.
I like them, but not as much as the Stardust. So I will be sticking with that one.
It always surprises me how different various powders can make an image look.
Stardust embossing powder |
silver detail powder |
Tuesday, 15 October 2013
WOYWW 228
Morning everyone. Once again, Wednesdays here, and time to go link in with the Mistress of Desks, Julia at The Stamping Ground. This pic of my desk is a bit of a shocker, I have to admit. I've been making cards with those images from last week, (last but one post) and still have a few more to do. Prepare yourselves, sit down with a nice strong coffee (or whatever takes your fancy...)
You name it,its probably on there! DST, sticky tabs, ink pad,sticky ribbon, card blanks,peel-offs, baby wipes, ordinary ribbon, ruler, glasses, scalpels, backing paper from the DST- good job you can't see the table behind me, lol.But, a good time was had, and a dozen cards emerged unscathed from the carnage.Hope you are all having a great Wednesday, we'll meet up on a desk somewhere around the world over the next few days.
Weddings and Anniversary
A couple of recent cards for this post, One made for a couples Civil Wedding, and a card for my Beloved Hubby for our Wedding Anniversary.
Hubbies card is based on the design for our Wedding Invites, using the same colours and fold.
Instead of our initials, I stamped and heat embossed the number 4 , as its our fourth anniversary.
The second card was asked for by a friend at work, for a gay couple of her friends getting married, as she couldn't find anything suitable in the shops.
I used a Chocolate baroque stamp, Harlequin Rose, that had been stamped onto Transparency film, then glittered. I layered it over some gold card embossed with hearts. Some Wedding vellum and white ribbon on the left, and dry embossing from a Glitter Girls Embossing board on the right. Finally added a few half pearls to the embossing, and a couple of satin hearts to the image.
Sunday, 13 October 2013
Batch cards with those 'filler' stamps
So, in my WOYWW post I had a lot of small stamped images. I'd pinned a number of cards onto this Pinterest board, which had given me an idea how to make some use of those little 'filler' stamps that every set seems to include. Usually, most of my cards are made with a folded sheet of A4 card, so they always seem too tiny for me, and just hang around never getting used.
All of these were done by double stamping the image. I used a pale and bright version of each colour, but you'd get the same effect by stamping the image, then stamping again with the ink left on the stamp.
For this one, the grasses in the bottom card were stamped in Versamark, then heat embossed with White detail embossing powder. The shades of yellow & orange Distress Inks were sponged over the top, then the white image wiped over with some kitchen towel to take off any ink.
These three are done the same way, mounted onto a smaller card base- A5 folded.In the top two, I punched out parts of the images, using a Woodware punch, which measures about an inch & a quarter. I added some dry embossing detail to two of them, and the Dandelion heads have Diamond Stickles added.
Some have stamped sentiments, others have peel-offs, coloured with markers to match.Something else I have loads of, as I bought a lot of sentiment peeloffs in the days before I had many sentiment stamps!
Its given me a dozen cards, and I have images left to do another half a dozen. All bright & cheerful, and I really like the Versamark & White Embossing powder technique.
Wednesday, 9 October 2013
WOYWW #227
Morning all! MIA last week, mainly thanks to Beloved Hubby. Despite telling him he doesn't have to share EVERYTHING with me, he absolutely insisted on giving me his leftover flu germs. Of course, I didn't get the full, terrible type of man-flu, just the weedy female bird-flu version (!), but left me fit for nothing. Plus the week from hell at work didn't help. But I'm back again, and as you see, have been playing with stamps & inkpads. A lot of smallish images to make some batch cards with, which I will be putting together & blogging later in the week. Probably over the weekend, as Thursday is our 4th Wedding Anniversary, so Friday night we are going out for a celebratory meal. Bonus- no washing up!
This was how they all started:
You know all those little 'filler' type stamps you get in sets?The ones that you never seem to use? I decided I'd have a go at using some of them, based on some similar cards I'd seen on Pinterest recently.
And by the way, no, its not a blurred image, and its not your eyes, even if it is early. The images have been stamped twice, in a pale, then vivid, version of the same colour. So, do the right thing, pop over to Auntie Julia's at The Stamping Ground and link in, show us what you got! On earlies this week (groan), so with a bit of luck, and no oversleeping, I'll link before going to work and visit this afternoon.
Subscribe to:
Posts (Atom)
An End of an era
An end of an era
I write this with a broken heart, that only time can heal My beautiful, wonderful wifelet Shaz (Silverwolf) passed away peacefully in the ea...
-
A couple of weeks ago I mentioned that I had bought these, the new Tim Holtz Embossing Diffusers. You have probably seen, like me, the...
-
I take no credit for this discovery, a lady posted this on Pinterest HERE .Like any of us, I hate having to spend money on 'consumables...
-
This is the first of the batch of seven cards I made, thanks to some Pinterest inspiration. Here is the card that caught my eye,...