Now, normally this subject would not even arise, as up until this year, my Christmas Card making has involved panic-struck frantic card making of maybe 2 designs, usually starting mid-November.Then it gets packed away as fast as possible. For some unaccountable reason, last year I wasn't sick of the sight of Christmas stuff, and carried on making cards after Christmas. I also decided I'd do 4-6 of each design, no more. And that was mainly what allowed me to work on them all year- I wasn't done in by the mass production of 1 or 2 designs.
So again in no particular order, here are my favourites of the year.
This one used a sheet of copy paper torn as a mask to sponge ink through. When the ink was good & dry,I replaced the mask, and stamped the Christmas Word Background (Visible Image) through it, which I then heat embossed with Crystal EP. A Tim Holtz die cut tree, and a die cut white sentiment finished them off. I also did a pair in red & green.
The same Words Background stamp used here,then trimmed down to give me two squares. The image is also a VI stamp, and had double sided film added, then Glamourdust for a nice sparkle. The sentiment is also VI. A couple of die cut snowflakes finished them off
This was a sort of cheat, to be honest. I came across some sheets of these bears I must have stamped years ago, and forgotten about. I added some Tumbled Glass & Faded Jeans ink with a soft brush for the sky, then used the same in markers to draw a line inside the images which I softened with a waterbrush. Drew a line around the outside of the piece with a Versamark pen, and added Crystal EP and heat set. A few acrylic gems were added to the stars.As I used a different cardstock for the sentiment piece, the colours came out a little different. The sentiment is by Stamps Away.
I've included these cards as one choice, as the creation of one gave me the pieces for the second. I'd die cut some baubles from a sheet of card, when I realised that if I embossed the cardstock first with an Embossing Folder, then arranged the die cuts carefully onto the cardstock, I could use the 'negative' version for one set of cards.
The 'positive' baubles made a second set. Which also helped make a small dent in my backing paper stash. A few scattered small acrylic gems added a bit of bling to the embossed ornaments.
The dies are both by Spellbinders, Heirloom Ornaments 2010 for the long bauble, and 2011 for the flatter round one.
These cards came about from a card seen on Pinterest.
Tim Holtz Mixed Media Dies,#1,and some patterned paper behind the cut out.
Added a die cut Poinsettia, and gold heat embossed sentiment, these were a lot quicker & easier than they look.
Final choice, and these were made using an Imagination Crafts stencil, Poinsettia Multi, and an assortment of Glitter Embossing Pastes.
The sentiment is from Honey Doo, and was heat embossed with matching EP. Acrylic gems added to the centres of the flowers.
.
There were plenty more made, and an image of them all can be seen on the Christmas Card Gallery Page, and there is a link to the relevant blog post for each design, if anyone wants product info.
Pages
A warm welcome to all my visitors,
Thank you for taking the time to come and look at my blog, I really do appreciate it. I would love you to leave me a comment, even if it’s just to say Hi. It means I can come visit you!
All my designs are original, so copyrighted to me. If I have been inspired by someone elses work, I have named them in the post, and where able, I have provided a link.
Please feel free to use my designs for inspiration, I just ask you to credit me, and provide a link back to my blog.
Thanks, Shaz XX
Friday, 30 December 2016
Wednesday, 28 December 2016
WOYWW #395- The Almost New Year One.
A teeny bit early, I know, but wishing everyone a Happy,Healthy & Peaceful New Year, wherever you are. I'm hoping you've all had a wonderful Christmas, and Santa brought you all that you wanted.
There have been a couple of blog posts below, one with the new storage idea for bare rubber stamps, which I'm loving. So, if that's a problem for you, take a look and see what you think. There's the first of two posts of my favourite makes of the year, and I'll do a second one with my favourite Christmas Card makes.
But, onto the desk. Christmas Stamping Goodies!
Helen will recognise some of these, I'm sure, lol. Hubbie saw them at the crop, and came back and ordered them. Which I also did with the Penguins, which got me in to trouble. Never mind, now I have a spare set, which I think will end up as a raffle prize at the next crop, wherever and whenever that is.
While finding the Katzelkraft Penguins, he also saw these two sheets of cat stamps. Aren't they ace? Love the expressions on the faces.
And finally, these Paper Artsy monsters- just fab.
My card to Beloved Hubby is on the left- Hobby Art Robins which are so sweet. I'll blog this one later on. And Hubbys card to me,which is quite beautiful.
And speaking of Christmas Cards, I said last week I'd get a shot of the cards received. Huge thank you to everyone, they have all been lovely.
And so, when we meet again, it will be 2017. Whatever you are doing for New Year celebrations, we hope you have a great time, and look forward to the next year of WOYWW!😸😸
Tuesday, 27 December 2016
Favourite Cards of the Year- 2016
So, I've done this post for the last few years, at the end of each year. Slightly different this year, as I'm doing two- Christmas Cards are getting their own separate post, as I've made so many! This years Favourite Cards, in no particular order, start with this one, a mosaic made from a piece of masterboard. This mosaic technique remains one of my firm favourites, especially because you can use any assortment of pieces- masterboards, leftovers, trimmings from things that didn't quite work- a whole host of potential scrap pieces get a lease of life this way.
Next up are two cards using Stencil Paste, Sweet Poppy Stencils and Glitter.
White on Black, then Black on white.
These cards were really all about the technique- one I came across on Pinterest.
Although I'd used brass stencils with paste and glitter, I hadn't thought of using Tim Holtz's Layering stencils to do the same. Although this looks like a black lacy design on a white background, it's actually the reverse.
I also learnt that you could colour white paste with ink, which led to a whole host of possibilities. And with Embossing powder, which led to even more.
A new discovery for me this year was Honey Doo Stamps, courtesy of a visit to the Happy Stampers Festival.
These cards all used the same stamp, just different coloured inks and vellums.
The ribbon & Bows are Sue Wilson Dies.
A lot of fun was had this year trying new techniques to me, and stencils of all types played a huge part in this. The stencil here is from Clarity, and have been teamed up with Lavinia Stamps, and inks applied with a soft brush.
I had a great time doing this one, again using a Clarity stencil, and an assortment of Halloween images from various companies.
It also made me think that maybe I could transfer this design to a canvas- a process still under consideration!
Almost done, these quick & easy cards came about after I made some Christmas Cards the same way, using Card-Io/Rubber Stamp Tapestry stamps.
My final selection uses stamps from Visible Image. The skeletons facing each other was achieved by stamping them on opposite sides of a piece of acetate, which then had double sided film added, so I could cover the back with gilding flake.
These are just the ones that jumped out at me- I could have added more, but I think this enough. I've added a link in each description to the relevant Blog post.
Monday, 26 December 2016
Unmounted Stamps- A Storage Solution.
OK, so this has been an ongoing & evolving issue.It also seems like this time of the year is when I get into overhauling storage to make it more user friendly. When I first started buying stamps, almost everything was wood-mounted. Then Barbara Gray came up with Clear stamps, and the market boomed. Sheets of rubber stamps started to become readily available, then individual rubber stamps, all unmounted. At the outset, the main option here was to attach the stamps to a foam layer, usually EZ Mount, or Kling-on being the two most well known. The lack of wood mount did help with storage,as the foam layer clung to laminated sheets just like clear stamps. Personally, I noticed after a few years, some of the foam had started to shrink on the back of the stamps, causing them to not stay on the storage sheets, and making the stamp itself curve in a concave fashion. It also still took up more space than bare rubber- but then you need a method of attaching the stamps to a carrier sheet. After I removed the foam from the majority of my stamps, I looked at how to do this. Most recommendations were for Aileenes Tack It Over & Over, or Tombow Mono Multi glues for this. I've tried both, along with Quickie Glue pens, and to be honest have had mixed results with all of them.Then, quite by chance, I saw this method being used, and to be honest, I thought it was sheer genius.
I was watching one of Kevin Nakagawas recent Stampscaping 101 videos, and noticed he had his bare rubber stored in the storage sheets you use to keep coin/banknote/postcard collections in. So, I dived in and ordered some sheets. They come in a wide variety of options- 2/3/4/6/8/9/20 pockets per sheet, and I'll give the link to them at the end.
I transferred first my Stampscapes stamps, as there are a number of small filler stamps in this range, and they have a nasty habit of dropping off the sheet. These tiny stamps go into the coin holder sheets.
I made up index pages in Photoshop to go in plastic document pockets opposite each page of stamps.
Medium sized stamps go into the 4 pocket pages.
Larger ones into the 3 pocket ones.
Others fit nicely into the 9 pocket pages.
The whole beauty of this is that now I don't need any adhesive on the back of my stamps, just some Tack'N'Peel on a few acrylic blocks, which I've already done, and the jobs a good 'un!
The Tack'N'Peel is transparent, so your block can still be used for other stamps on the opposite side. And if it starts to loose it's tackiness, just rinse under the tap and let it air dry. As long as you keep the clear plastic protective sheet on the Tacky side when not in use, you'll have no problems with it.
This is the supplier I got mine from,Westgate Supplies, originally via Amazon, but the second batch direct from them. A huge selection of sheets, and very good prices, I thought.
The link takes you directly to the page with the storage pockets on, and then you can pick what you want from the drop down list on the left.
Tack'N'Peel available from Amazon, here.
It comes in A5 sized sheets, and is easily cut to size to fit your block, by placing the block on the Sticky side of the T&P, then cutting around it with a craft knife.
Wednesday, 21 December 2016
WOYWW #394- MERRY CHRISTMAS EVERYONE! xxx
And here we are at last- the Christmas Edition. Make sure to visit Santa Central, otherwise known as Julia's place, The Stamping Ground.
I notice Blogger has been doing stuff behind my back- I've got a lot of new buttons along the top. Time will tell what they are all for.
The desk isn't particularly exciting, unless organisation gets you all a-quiver.
Stamps are what I'm organising, and thats been a bit of an ongoing thing, to be honest. I like unmounted, bare rubber stamps for preference, and there have been a number of ways tried to get them to stay attached to the laminated sheets. I've tried the Tack It Over & Over- worked fine on some stamps, OK on others, and not at all well on yet more. So I tried the Glue pens, same result. Switched to Tombow Mono Multi, and still getting the same mixed results. It's not just one brand of stamps that I have problems with though- some it works fine on, others not at all.
Anyway, long story marginally shorter-😎- I was watching one of Kevin Nakagawa's Stampscaping 101 videos the other night, and spotted what he was storing his stamps in. Those wallets/pockets you get to store coins in, and ones for Trading Cards/ATC's, and Banknotes. Absolutely brilliant idea.So I ordered some, and am in mid swap of my Stampscapes stamps at the moment. Really love it for the small stamps, I'm forever finding ones that have dropped off, and not just in this line either. So all my small stamps will be getting this treatment.
I'll do a post on them properly next week when I've finished them.
Talking of storage, a lovely Blogger stopped by here, having a look at one of my Christmas Card Club posts, and left me a message about the Avery Elle Storage Wallets. You can get them at One Stop Craft Shop, pretty much the same price as they were on Amazon. So, anyone who wanted them, the link is there for you. I bought the Large, which are just under A5 size. I've seen One Stop at the NEC Hobbycrafts pretty much every time I've been, so they've been around a while. Talking of Hobbycrafts, we popped into their Wychbold store on Saturday, on the way back from Moms. I wanted some tape runners, the Stix2 ones. I also got a handful of their own branded clear stamps.
Finally, a huge thank you to all the people who've sent us Christmas Cards, they have all been lovely. I shall get them all together for a photo next week. So from the two of us, have a lovely peaceful Christmas, and I'll see you next week for the Almost New Year Edition!
Wednesday, 14 December 2016
WOYWW 393- The Almost Christmas edition!
I truly do not know where the last week went, I've only just registered that it's Tuesday evening! Having been the scene of a massive card writing session, my desk is looking pretty untidy, to be fair.
The address book- I've decided it's probably a better idea than scribbling addys onto bits of paper, which I then lose! A few cards to drop in with Pressies, and a box of cards, some of which I still need to write out.
Last weeks little puzzle- what was this in this picture?
Morti got it right- believe it or not, it's the internal gubbins from a hard drive.Those discs are actually what all your data is written onto, and the triangle thingy in the small box is the arm that travels over the disc to read it.
The Birthday book has got as far as having a coat of black Gesso on it. I'm waiting for inspiration to strike now.
A handful of tags I stamped last year- the stamp set is called Winter Birds, by Inkadinkado. Stamped in Pearl Blue Brilliance, and heat embossed with Stampendous Crystal EP.
I must show you these, sentiment dies by Crealies. They are small, but a lovely simple font, and they were £3.75 each. Actually Euros, not Pounds, but more or less equal. She's got quite a selection on her site, and considering they came from Holland, I ordered last Tuesday, and got them on Saturday.
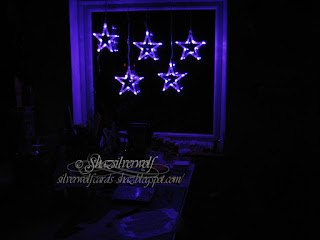
And finally, the lights that go up in my craft room window every year. I was surprised when I saw this, as the last time I photographed them, they came out looking blue, when in fact they really are purple.
So, thats it from this desk, I'll be linking up with Julia at The Stamping Ground in a while.
Sunday, 11 December 2016
Christmas card Club- A Snow Scene.
This fortnights challenge theme was set by Rita, and is titled 'A Snow Scene'.
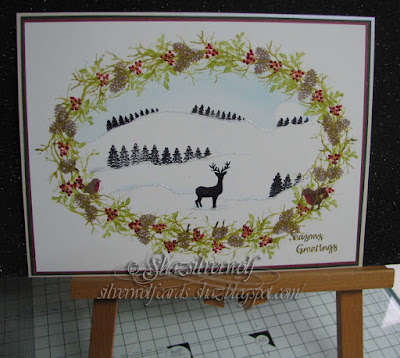
I thought this was time to have a go at a Card-io scene, and I'm fairly happy with how it turned out, but I need more practice, as I can see a few things I could improve on. The robins, for instance, could have done with being a little darker, they sort of get lost in with the pinecones. And some of trees could have stood a little straighter. So I shall keep practising scenes in my notebook for a while. Speaking of notebook, this was inspired by a scene I stamped in there a while back.
I think I actually prefer my practice one,😀.
I got so engrossed I didn't take as many pictures during the process, but I will list the stamps I used at the end.
Wendy, from Card-io does some awesome scenes with her stamps, and I intend to keep practising. She makes it look far easier than it is!
I started as I've seen her do, by placing the four sides first, then filling in to get your shape, I went oval instead of round with mine.
The image is stamped multiple times, all from the same inking,so you get a variety of shades.
I stamped the twiggy branch from the Oriental Blossom set, in Versafine Spanish Moss.
It was now I realised I'd not taken any in between photos, but I added some Holly Sprigs in Archival Fern Green, and Holly Berries in Memento Ladybug,along with some Pine cones, which were all from Rubber Stamp tapestry Peg stamp sets.
I punched out a small circle from a Post-it for the moon, and tore paper to create the hills. The sky was done in Memento Summer Sky and Adirondack Stonewashed. I used the Memento again to just sponge very lightly over the edges of the torn paper mask for the hills. The trees and stag are stamped in Archival Black. Robins were added to the wreath, and I used a marker to give them a red breasts, after inking in brown.
I've matted the panel onto red, then green card, and it all fits onto a folded sheet of A4 pearl cardstock.
After it was mounted, I used Stickles in Frosted Lace to follow the shape of the hills, and Liquid Pearls in Garnet onto the Holly Berries.
Stamp sets used:
Rubber Stamp Tapestry:
Pine Branch Border( Pine Cone)
Cardinal in Holly( Holly branch & Berries)
Card-io
Oriental Blossom( Twiggy branch)
Christmas scenery 2( Tees and Stag)
Winter Tweets( Robins).
There are similar stamps to the Rubber stamp Tapestry ones in the Card-io range as well.
I'm going to add here a card I did a few years ago, as it's a snowy scene, I think I love it the most because it was almost the worst disaster ever!
I was on a DT for a site called Craft A Scene, which doesn't exist now, but as you can guess was all about scenic stamping, a big love of mine.
Well, being my usual organised self,😱, I was doing this the day before I needed to post it up. It had all gone well, then close to the end, I decided to stamp a reflection of the moon in the water. HUGE mistake! It looked awful!
So, I tried to retrieve it by wiping the ink off with a baby wipe. Which removed the white ink, and also took some of the other colour off around it. So I wiped over the whole thing, trying to even it out. Panic is not the word for it!
Especially when the whole piece just curled up into a roll😰.
So, in desperation, I flattened it out, and put it under some books , hoping it would flatten out overnight. Imagine my amazement the next day, not only had it flattened out, wiping it with the baby wipe had turned it into a misty, icy scene, which was exactly the brief!
Some white gel pen highlights, then held my breath as I added some wavy lines in the water for the moons reflection, and it was finished.
I embossed some white cardstock with a Cuttlebug Snowflakes folder, mounted it and breathed an enormous sigh of relief.😲,
I still have the card, I've kept it as a reminder that sometimes, what seems to be a disaster can be retrieved. Happy Christmas ladies, and I'll see you all again in January.xx
Subscribe to:
Posts (Atom)
An End of an era
An end of an era
I write this with a broken heart, that only time can heal My beautiful, wonderful wifelet Shaz (Silverwolf) passed away peacefully in the ea...
-
A couple of weeks ago I mentioned that I had bought these, the new Tim Holtz Embossing Diffusers. You have probably seen, like me, the...
-
I take no credit for this discovery, a lady posted this on Pinterest HERE .Like any of us, I hate having to spend money on 'consumables...
-
This is the first of the batch of seven cards I made, thanks to some Pinterest inspiration. Here is the card that caught my eye,...