A warm welcome to all my visitors,

Thank you for taking the time to come and look at my blog, I really do appreciate it. I would love you to leave me a comment, even if it’s just to say Hi. It means I can come visit you!

All my designs are original, so copyrighted to me. If I have been inspired by someone elses work, I have named them in the post, and where able, I have provided a link.

Please feel free to use my designs for inspiration, I just ask you to credit me, and provide a link back to my blog.

Thanks, Shaz XX

Sunday, 13 January 2019

Part One of Using up UFO's.

Over the last few days I've been tackling my UFO folders, and so far have made 9 cards from them.
 All the cards are 5¾x 4¼. An assortment of top fold and side fold, landscape instead of portrait.


 These two used Tim Holtz layering stencils and stencil paste that was then hot foiled.
 I die cut a strip of cardstock with a fancy edge in a matching cardstock. The Stitched Hearts die I believe came from The Works, and the stamp set for the sentiment is from Woodware, called Little Messages.
Doug had recently said some 'Just 'Cos' cards would be a good idea, and we happened to spot this set on a recent trip to a local craft store.
The top stencil is Mosaic, the bottom, Splash.


These two again used TH Layering stencils, this time just using paste. I coloured Translucent paste using reinkers for these.


The green one has an edge from a Spellbinders Shapebilities set ,called On The Edge. The top one uses a Stitched Border from a set bought on Aliexpress.


The top stencil is called Woven, the bottom one Splash.

Another TH stencil, Gothic, again stencil paste & Hot Foil. The sentiment comes from a Phill Martin set, Baroque Sentiments 2. Heat embossed in Copper EP, The Banner die is another Aliexpress purchase, and the dies are much longer than this, I just re- sited the die and cut it off shorter.


More Hot foil & TH stencils, in both cases the foils are multi coloured or have a gradient.
 The Birthday Wishes sentiment is another Woodware set bought at the same time as the first one, called Double Birthday.

The die cut sentiment uses two dies, the HUGS is an Aliexpress die, the Birthday comes from a Crealies Happy Birthday die.
Last pair of cards, Both using coloured stencil paste. The top one uses Translucent paste coloured with reinkers, to give a blended look across it, and the stencil is another TH one,called Lace.
 The bottom one used a stencil from a company called That Special Touch, and is called Waves. This time I used three of the Sweet Poppy  Pastel Stencil mediums, Pink, blue & lilac.
 The sentiment on this one is another Phill Martin one, Mini Baroque Sentiments. The top sentiment is an Aliexpress set, which is mainly a lot of individual words. The strip was diecut with a stitched strip die, again, Aliexpress. You get 6 dies, in either stitched or plain edges.


Saturday, 12 January 2019

Tim Holtz Glass Media Mat- unboxing

Ummd and Aarrd  about one of these for a while, but after watching Jennifer Mcguire- that woman is SUCH an enabler!- talk about it in her review of her favourite tools recently, decided to get myself one.
Up until now I'd been using one of the A3 cutting mats on my desk, and while it's done the job well, does get very tatty over time, and of course has lots of cuts into the surface.

 So, to the unboxing.

It arrived very well packaged, the smaller box on the top was the Toolkit for it, which is sold as a separate item, and I'll get to that in a while.

 By the way, I ordered mine from Crafty Devils Papercraft, which at £31.99, was the best price I found,as the price took it into the Free Shipping level. I was going to add a link, but it seems maybe I had the last, as it's not showing on their page right now. I'd advise doing a thorough search if you want one, as prices vary considerably.  I saw them priced as high as £45, and unsurprisingly, Amazon seems to have the next best price, at £32.83, with free shipping.


A sturdy outer box, inside is the boxed product, and the outer box is a tight fit, so it doesn't move about inside. At the top is the Toolkit.


Here it is out of the box, and I liked the corner protectors it came with, they are a soft rubber as opposed to the hard plastic type/polystyrene usually on these sort of things. On the right is a Non Stick heat resistant non slip mat. Replacements for this can be purchased.


Flip it over, and you have a good amount of non slip feet on it- I especially like that there are feet in the centre, as well as the corners.


If you are familiar with the Tim Holtz ruler, you'll be happy to see the markings on the Mat are very similar- every ¼ of an inch, and dotted lines on the ½ inch. This was one of it's biggest pluses for me- and a downside for the old mat, in that it didn't have small enough measurements. I personally love that the products have Imperial measurements, but there are also metric ones too if that's your preference. I'm just old school, and 'see' Imperial measurements better, plus, I work in the Aerospace industry, and that is Imperial in it's measurements, so sort of reinforces how I think.


 Anyway, along the bottom and up the left hand side are standard measurements, going left to right and bottom to top.
Along the bottom the work area is 14", or 36cm, and from bottom to top, 12", 30.5cm.The rulers themselves are marked in 1/16ths, and 1mm.


 Again, like the Tim Holtz ruler, the top and left side are marked from the centre- so 0-7" or 15cm either side of the thicker centre line along the top, and 0-6" or 15½cm at the right side.


On the right hand side you have a white working area, marked into a grid so you can put individual colours into each one, whether that's paint/ink/marker etc.


The beauty of it being bright white is that you get a true representation of the colour you are using. Just wipes clean with a baby wipe/cloth afterwards.

The Replacement mat can be taped over this area if you wish to use other mediums/gels etc for Mixed Media work.


Now to the toolkit. It comprises a scraper, which has one soft rubber edge, and one hard plastic, to enable you to scrape off anything that has stuck to the glass mat, and also a ruler.
 Now the 'ruler' does not have any markings, it's effectively a T ruler, that butts up to  any side of the mat, and gives you a straight edge/straight line to work from.

Hard to show this, but hopefully you can see that one end has a lip that rests against the edge of the mat.


Meaning you can line it up with a line in the measurements, making sure your project is square to them first, and you will have a nice straight edge to line up stamps/layers etc.
 It also has a metal strip down one edge to cut against, and the opposite side is tapered as in a normal ruler.


 So overall, I think a great purchase. I found cutting on it with a scalpel is really easy- although I have the Clarity anti slip Groovi Grip on the back of my rulers anyway, but I think you would definitely need to add that to any rulers you wanted to use on here, as obviously the glass surface is super slidey. It may also help to hold any cardstock down with a little repositional tape runner first, I think.

 Another plus is that the mat is heat proof, so you can heat emboss directly on it, previously I had to get out a wooden chopping board to go under any heat embossing I wanted to do, as the green mat would have melted/warped.


Now, nothing to do with the glass mat, but a use for those old Cutting mats. I'd seen videos of people using them as replacement Cutting Pads in various die cutting machines, mainly Big Shots and Cuttlebugs. You can often pick them up in Pound/Dollar stores, which makes them way cheaper than the Branded replacement plates, and they don't warp. My 'Bug died before I could test it out in that, but I've been using one in my Big Shot Pro for a few weeks now, and I must say it's working great.Pretty much everything cuts without a problem so far.
WARNING!!!
Now, as all machines vary in what sandwich they will accept, trying this may involve some trial and error- especially as there can be some variation in the thickness of these cutting mats too. So try to check if the mat and your pads are the same thickness first, and err on the side of too thin if adjusting your sandwich to try this. Never force through a sandwich that your machine seems to be struggling with.
When I checked mine out, it seemed that the original pad and my mat were pretty identical in thickness, and that seems to be the case.

Wednesday, 9 January 2019

WOYWW #501-The UFO Edition

UFO's.  As in, loads of partly done projects that need making into cards. I store them in plastic wallets, with the intention of getting back to them. Usually that time frame is supposed to be soon. Lately I'm expanding my definition of the word 'soon' to mean anytime in the next decade. Or even lifetime.😁
As you can see, quite a few piled there. But, the important bit is that I've started. A bit.

 But I'm wandering. Time to meet up at our Head Deskers place, The Stamping Ground, where Julia will try and keep us organised. Did some stamping at the weekend, as it was the first Christmas Card Club post of the year. Made a Masterboard to use as backgrounds.
Two cards using it, still got a lot left, I rather like the 4 panel one, might do some more like that, and make some more masterboards too. After I've finished the UFO's, lol.


First UFO getting there, matted one onto dark purple cardstock, the cut the border with a Shapeabilities On the Edge die. Just got to stamp a sentiment and matt that on then. Thats it you can see on the white paper bottom left of the top picture. It's all individual words, and I was trying to make sure they were all straight before I stamped.


 A better look at my UFO pile! Then of course I have to do the inserts- and I already have a load of Christmas & other cards waiting in that UFO pile.

There's a post about the Tim Holtz Travel Platform compared to the full sized one HERE, in case anyone was considering a purchase.
        Which just leaves............And Finally.......

Sunday, 6 January 2019

Christmas Card Club - Snowflakes

Running late today, struggling to get into the Christmas Card zone, to be honest. Plus, I made quite a few cards last year using snowflakes, so had to think of something new! Christine chose this first theme of the year for us.
I managed four in the end, and as I made a Masterboard, I have plenty left over to do some more.


These panels were trimmed from the Masterboard,and matted onto dark blue card. I initially cut the sentiment from the same dark blue cardstock, but when I came to add it, realised it vanished into the background, so swapped it for white. The die is a Sue Wilson one.


Went for Eclipse cards next, replacing the O in snow with a layered snowflake. 


 This time I stamped a strip of white cardstock with a random assortment of snowflakes, using Brilliance Pearlescent blue.


Last of the four and again a panel from the Masterboard, and a layered snowflake, the snowflake die is another Sue Wilson one, it's lovely, but it's a real pain to cut well!


This was the masterboard I made, a random selection of snowflakes again, stamped in Clair Medieval Blue and Silver Encore and heat embossed with Crystal EP. Given a few spritzes of a blue Mica spray, an old one from That Special Touch. The original blue was quite dark, so I mixed some White Pearl with it in a Mini Mister, and gave it a couple of sprays, then added a couple of drops of Blueprint Sketch re inker to it to give me a slightly darker shade.

Thursday, 3 January 2019

The Tim Holtz Travel Platform

Right then. I promised a comparison of the Travel Platform and the Original Platform, so here goes. I'd not actually considered getting a Travel version,as I don't go to workshops and such, until I saw Christine (Bishopsmate) using hers at the Llandudno crop earlier this year. It seemed a really sensible size, so it went on my Christmas Wish List.
To start off, here they are side by side.
Dimensions first, and the Original has a stamping area of 8½"square, (21½cm). The Travel version is 6½" square, or 16½cm.
 Meaning the size difference isn't huge, and certainly accommodates a wide range of stamp sizes.
Pretty much the largest stamps I have are 6" square background stamps, and it will still accommodate them.


Like it's big brother, it has clearly marked rulers on the top and left edge- black rulers with white markings,⅛ on the inches scale, 1mm on the decimal.


Also like the original, it has an open right hand side, and bottom, so you have no restrictions on card/paper size.


That's an A4 sheet of paper.


It also has the same system of an engraved grid on the lid, and a CLEAR and a RUBBER side to flip.
It comes with two round magnets, and like many I have wrapped a strip of washi tape round them leaving a long end, to make them easier to pick up.


If you wanted longer bar magnets instead, I believe Tonic do do them, but you can easily buy Rare Earth magnets on E-Bay or Amazon quite cheaply, just be careful not to buy ones too thick. The originals are 2mm thick, so don't buy any thicker than 3mm, I'd say.


The underside is the same, with a non slip foam matting.


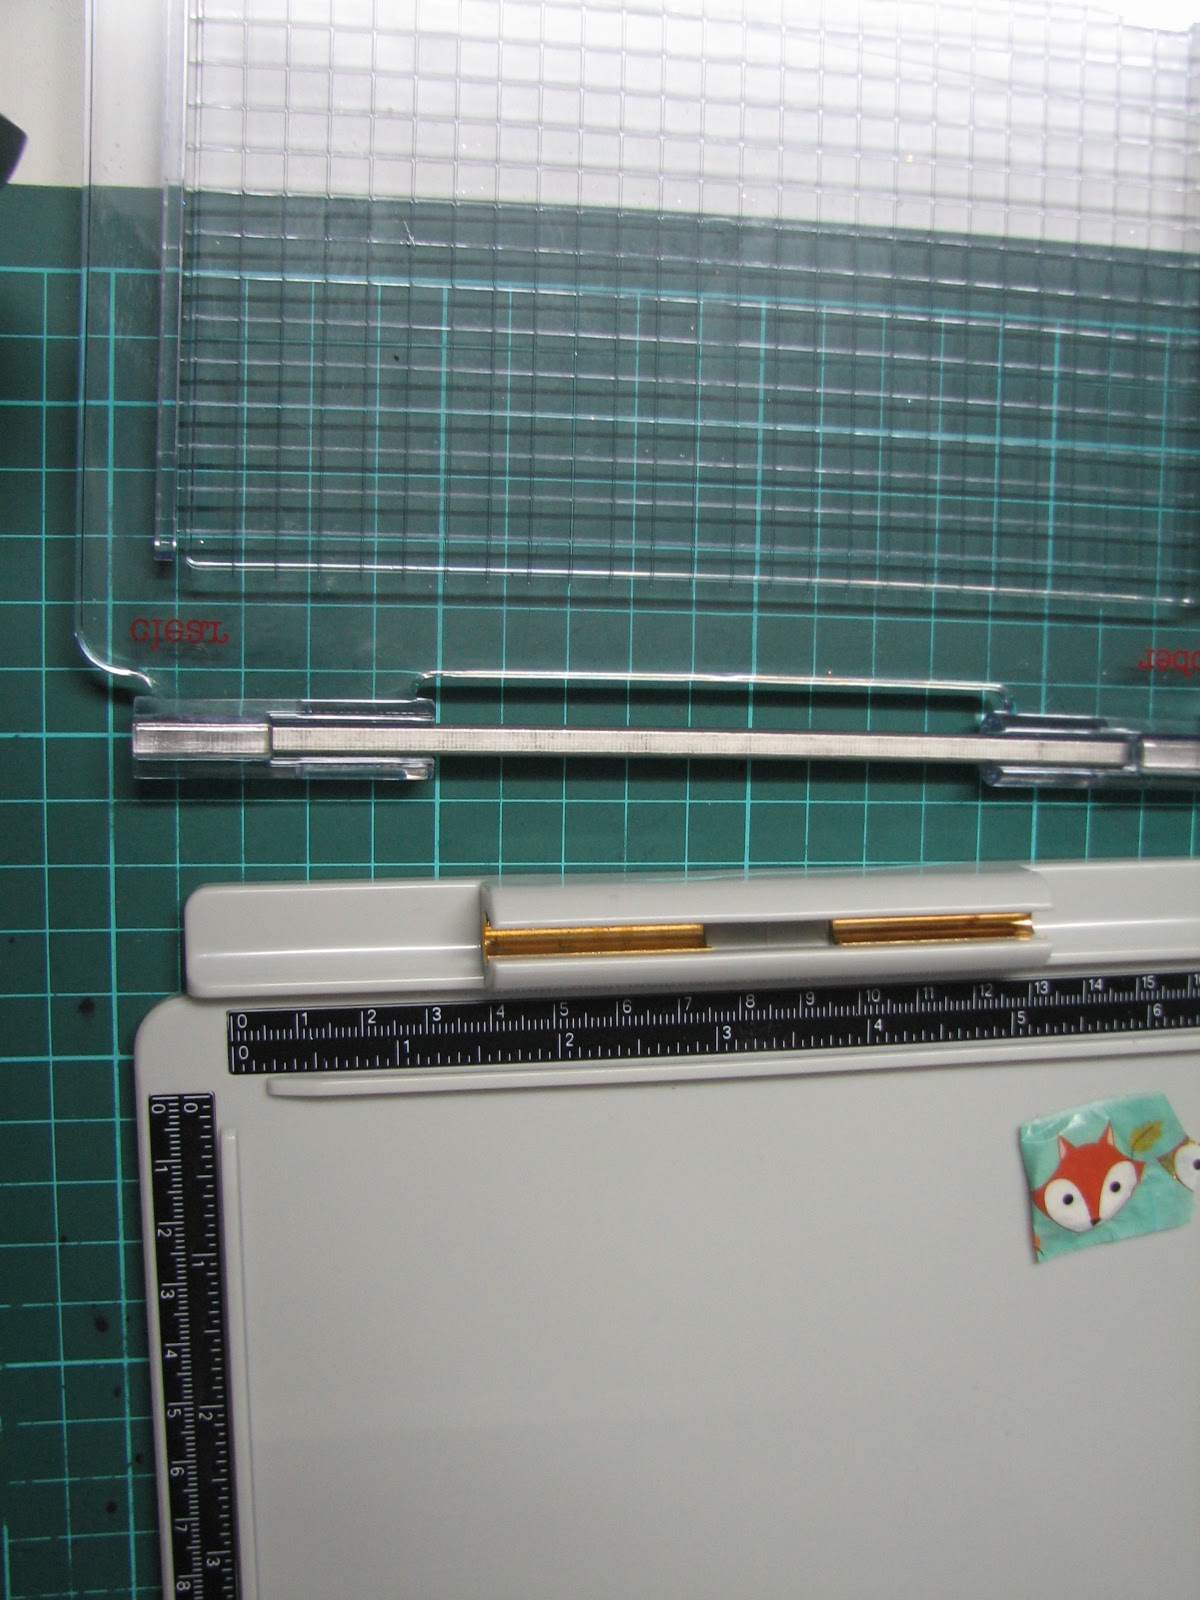
This is the hinge on the original, a metal bar that slots into metal lined plastic hinges.
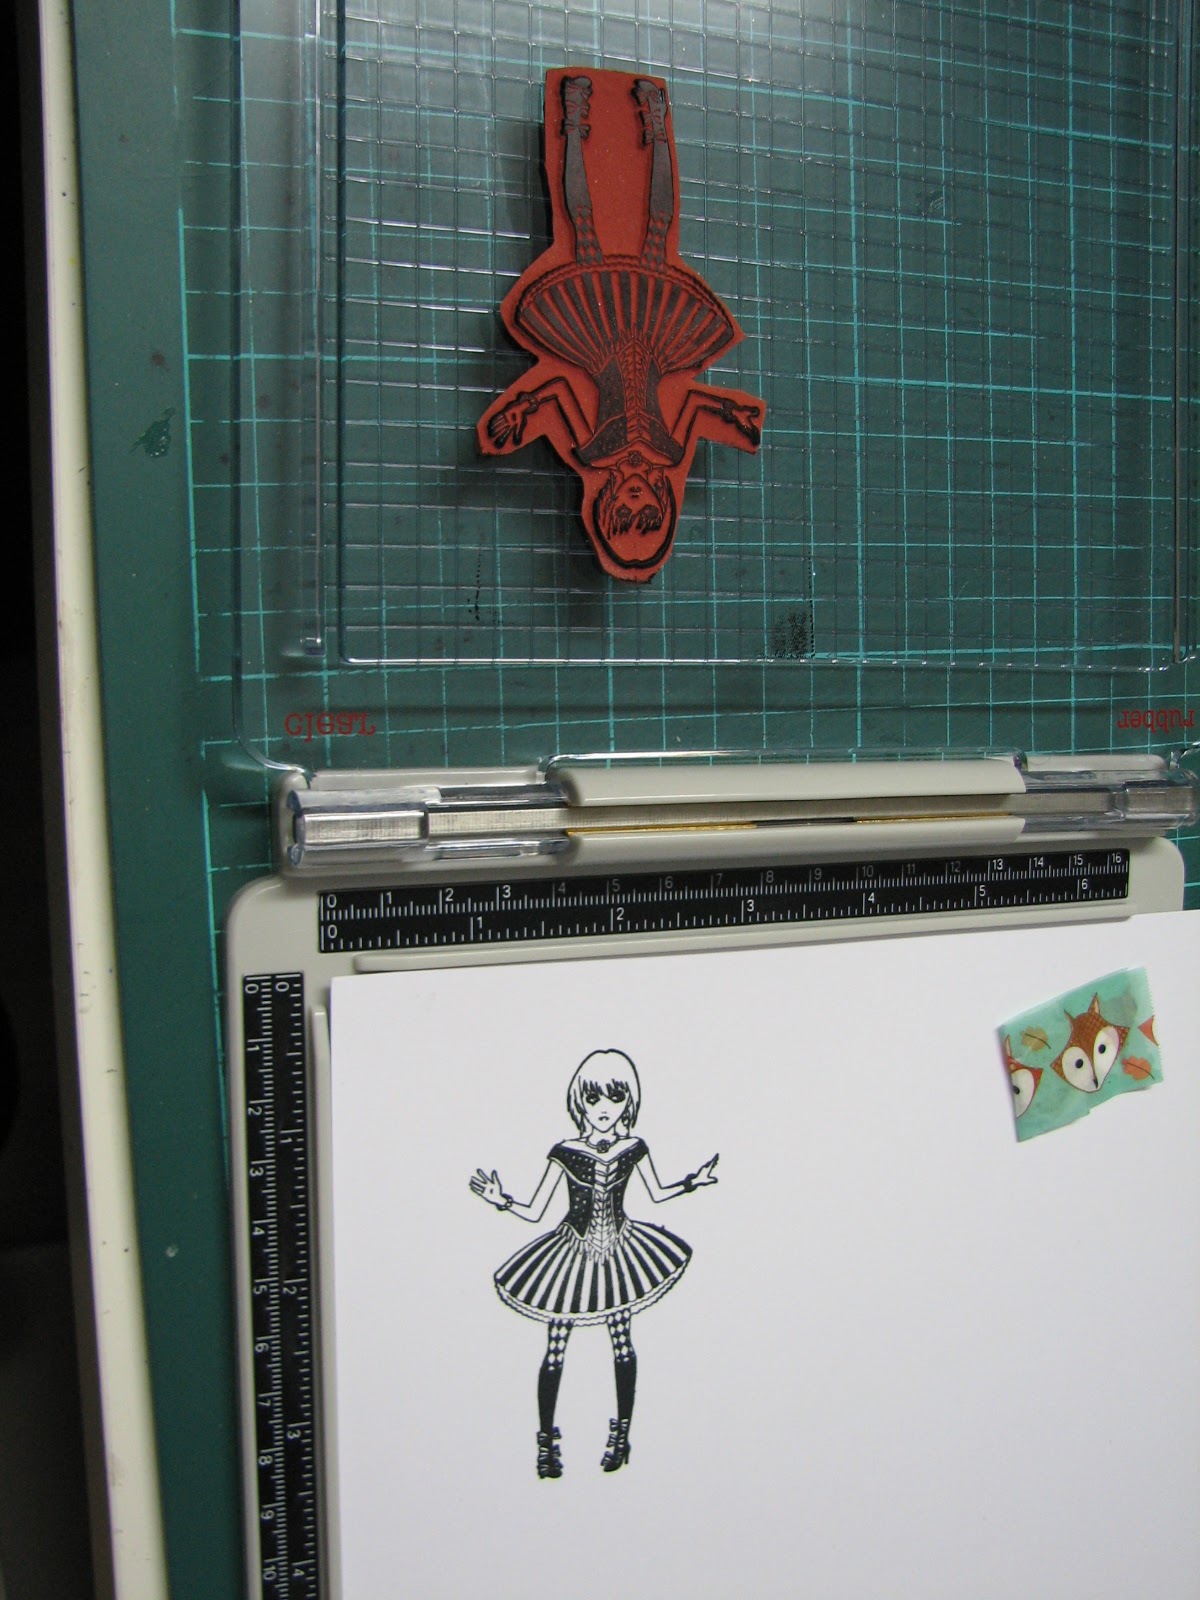
 The stamping plate is swapped between the two sides by standing the plate upright, lifting out, turn, and put back into the slots. Job done.


The travel version has one longer hinge, also metal lined plastic,and the same metal bar


Swapping the plate around is done exactly the same.


The only real difference in the design is the shape of the lower front.


The original has a lip to lift the lid on the left, or right side, depending which type of stamp you have it set for, and the Travel has a central one.

The lid certainly feels just as robust as the original, and Tim did say they were designed to cope with CPR stampers with no problems!

So, onto some stamping with the Travel version.


Using Versafine Clair Nocturne, perfect image first time.


This next info applies to both platforms, and indeed probably all brands of them, but not having used any others, I can only comment on this one.


These are my favourite reasons for using a Platform. See the ink on the lid from the edge of the pad? Something I've often had happen with acrylic blocks. And very easy to accidentally get onto your cardstock too. With the platforms, it doesn't transfer.
Another problem it cuts out is when you accidentally get some ink onto your fingertips, then smudging that onto the stamped cardstock when you stamp the image, because you haven't noticed? Doesn't happen anymore, as after you've inked the stamp, your fingers don't get near the cardstock.

 Another stamping problem can come from ink on the edges of a stamp being transferred to your cardstock, something I know I've had happen in the past. I try and close cut my stamps as far as practical, but sometimes it still happens.Often, the problem is worse with pigment or embossing inks, as the pads are much squishier.


Here, I've deliberately  got ink onto the edges of my stamp. And on the lid, but that was an accident,lol. In the past, I've had had to try and clean that off before stamping.


 But with a platform, as you can see, no ink transfer at all from around the edge of the stamp.


 There is also an easy and totally free way to be able to stamp an image going off your page at the top and side that are not open. I know MISTI make 'corners' for theirs, and probably others do too, but I just cut a couple of strips of cardstock- I used the back of an old notepad- about an inch wide and use them to line things up.


Put your spacers onto the platform,
then place your stamping card where you want it, and place your stamp with however much overhang you want. You could make a variety of different spacers for doing this with.
 Then pick up your stamp as normal, remove your spacers and stamp.
Using thicker cardstock means you can still butt your stamping card into the corner in case you need to restamp.


 It was a while before I bought a Platform at all- the high price of the MISTI put me right off- and I didn't really think I needed it. Then when Tim was demoing his, and I saw some of the benefits, especially being able to restamp if things didn't come out perfectly, I went for it. Plus, his was much cheaper!
 It's not a purchase I have ever regretted. I love that you can line things up, like sentiments, with no eyeballing it to get it straight- which it rarely was. The restamping ability is brilliant, especially for solid, or large stamps.

So, overall thoughts.
The Travel Platform is excellent. It's as sturdily built as the bigger one, and I really think it would be hard work to break it. Just remember that when you want to flip the lid, whichever one you have, make sure it's in the upright position to do so. It should just lift out and slot back in, if it doesn't you haven't got it straight.
 I think, if you are buying a platform for the first time, this is the only size you actually need. It wasn't out when I got the original,otherwise this is what I'd have probably bought. My bigger one will still get used, I'll probably use the Travel for smaller stamps & sentiments. But I really don't think there is any benefit to having the larger one, to be honest, unless you have a lot of HUGE stamps!
 There are Travel cases available for both sizes if you take stuff to classes/workshops etc.
 One final bit of advice from Tim- you can use anything to clean your lid & base beside Acetone (nail polish remover).  He recommended Hand Sanitiser, and it does work a treat. But he said any other type of cleaner would be fine, just never the acetone. I don't think the scratchy sort would be a good idea though.

EDIT:
 Coming in with a bit of extra info here, based on a comment left in my WOYWW post, about stamping problems with the Platform. One of my visitors said she was having problems with U/M stamps, so here is what I have found. U/M can have cling foam on, or be bare rubber. If bare rubber, then I always use these on the CLEAR side of the platform, and I'd add that the thickness can vary a lot depending on the brand. With cling foam, it can depend on whether the stamps have the standard thickness EZMount, or the thinner one, as well as the thickness of the rubber itself. I try and gauge how they compare to a clear stamp- if they seem about the same, then I'll use them on the CLEAR side, if they are thicker, then I use the RUBBER side. Equally, I have often found that I need to use CLARITY clear stamps on the RUBBER side, as they are very, very thick clear stamps.
 On occasions, some bare rubber, are very thin, even thinner than clear stamps. For that, I've found a few sheets of copy paper as a shim help a lot. A lady on SCS recently posted that she had solved this issue using a Silicone Rubber Embossing Mat under her cardstock, and speculated that a Silicone Baking Sheet- often found in Pound/Dollar stores- might work just as well.


An End of an era

An end of an era

I write this with a broken heart, that only time can heal My beautiful, wonderful wifelet Shaz (Silverwolf) passed away peacefully in the ea...