A warm welcome to all my visitors,

Thank you for taking the time to come and look at my blog, I really do appreciate it. I would love you to leave me a comment, even if it’s just to say Hi. It means I can come visit you!

All my designs are original, so copyrighted to me. If I have been inspired by someone elses work, I have named them in the post, and where able, I have provided a link.

Please feel free to use my designs for inspiration, I just ask you to credit me, and provide a link back to my blog.

Thanks, Shaz XX

Wednesday, 12 October 2011

WOYWW #123


Hi Folks, I'm back! Had a busy couple of weeks, and last week we went to Cornwall- love that area. Didn't get the best of the weather, but had a nice break all the same. So a few pictures for you:
This one is taken from the rocks at Tintagel, below the castle ruins. To the left the cave you can see is known as ' Merlins Cave', as Tintagel is claimed to be the birthplace of Arthur, the Once & Future King.The pic on the right is from inside the cave, looking out.


                                      This one is of St Michaels Mount, taken from Penzance.


These next few were taken on a day at Paradise Park, a bird sanctuary in Hayle. ShazinOz will recognise this- its the Frogmouth she posted a pic of recently! They also have some small mammals, and these Red Squirrels were gorgeous! Really tiny compared to the greys.Shaz will recognise this Kookaburra too- they are so funny when they start 'laughing'.


Cornwalls emblem is this Cornish Chough- a little like a blackbird, with a long red beak. This pair had been hand-reared at the park, and were so tame, they came to the wire and were quite happy to be stroked! How cool is that?


Yes, I do point out to Beloved Husband that he is going grey, and he says I gave them to him!


This Celtic cross is a War Memorial- I thought it was gorgeous, but then I adore the Celtic designs.


          Final holiday pic, and this has to be the strangest, but  coolest pub sign ever!   The Bucket Of Blood, in Hayle, Cornwall.


 Back to my Beloved Husband, this week was our second Wedding Anniversary, and this is the card I made him. I went back to the Black & Burgundy theme for the wedding for my colours, and the stamp is by Inca,1052i, Love Poem.


    And this beautiful card is made by Silvercrafter, Marg, from her & her husband, Geoff. The inside is just as gorgeous as the outside, as you can see.


 I have to say, no-one could have better co-in-laws- we consider ourselves exceptionally lucky not only to have a wonderful Daughter-in-law in our family, but to have Marg & Geoff as fellow parents-in-law! So thank you both, we love you!

Well, thats me done for this week, I shall post this up before I go to work, and will be back to visit you all later. Have a great Wednesday.

Saturday, 24 September 2011

Triple Embossed Fake Glass Hearts

The triple embossed hearts I have used lately have been very popular, so I thought I would show you how I made them. By the way, I called this post FAKE glass hearts deliberately- I really hate the word 'faux'! I'm a 'call a spade a spade' type of person!
You will need:
 Heat Gun
UTEE, or clear embossing powder
A coloured Embossing powder
Your choice of inkpad
An embossing pad, or Versamark pad
Texture stamp
Pigment ink, or Staz-on
 Card, or chipboard

Firstly, I cut a number of heart shapes. I still have my old Red Sizzix, and a Hearts die, which has 4 different sized hearts on it.They are cut from any reasonably thick card- the back of notepads is perfect, as is mountboard. I got hold of some old 'sale' cards from a store near me- the sort of thing they stand by sale items. The back of them is white, as you can see. The thicker the card the better, as there is a tendency for thinner card to warp, but you could stick two or three pieces of thinner card together, or have something handy to help flatten them when you have finished. Equally, you could get some interesting dimensional effects from not flattening. I am thinking this could produce some great flowers & leaves.

Next choose your inkpads. You want a base colour, in this case I am using Distress Chipped Sapphire. The black Adirondack will be for another set I want for a mans card. If you are going to stamp into your Triple Embossing, you also want either a Staz-on ink, or a Pigment ink. I have Encore Silver here. I also have a clear embossing pad (you can also use Versamark). This is useful if your embossing goes too hard for each layer to stick to- just pat over with the Embossing ink, and carry on.


 Next find a stamp to stamp into the top layer with. Any swirl/flourish/text stamp is perfect.


Finally, you need your embossing powders. UTEE (Ultra Thick Embossing Enamel) is the ideal choice, however you can still do this using ordinary embossing powder, you will just need more layers, and to be careful with the heating process as the finer grained powder will have a tendency to blow away. To avoid this, start heating from further away and bring your heat gun closer as you see the powder begin to melt.I first started off using ordinary powder, but loved what you could create with this technique, so I bought UTEE, and I got mine from ebay, which came in a plastic bag, and was MUCH cheaper than buying a branded name.Then you need a colour, and on this I have used Heat It Up's 'Blue Glass'.

First off, colour your heart with your chosen inkpad. You don't have to be too fussy getting a  smooth coat- you can see on mine the lines where I swiped the pad over the heart- it won't show later. I've coloured two hearts here, but only try to emboss one at a time, you can start the other one after by dabbing it with the clear pad.If you are going to use a pigment ink to stamp your texture with, ink up your stamp now- the pigment ink will stay wet for a very long time, more than long enough to complete this. If you are using Staz-on, you will have to wait until you are ready to sprinkle the last layer on. In that case, sprinkle on your last layer of EP or UTEE whilst the heart is still wet, tip off the excess, then ink up your stamp before you begin heating.
If your heart cools too much for the EP or UTEE to stick to it  for any reason, you have a couple of ways to put things right. Either re-heat the heart until the layers soften, or dab over it with the embossing pad and then continue.

 WORDS OF WARNING:  Embossing powder, especially UTEE, gets EXTREMELY HOT- don't get it on your fingers (Yes, I learnt the hard way, lol). Now I have two pieces of paper, one I tip the powder onto the piece on, then lift the piece with my scalpel and slip it onto the other piece to heat. Tip your excess powder back into its tub,then you have two empty sheets again to continue the process.

Now sprinkle on your first layer of UTEE, the ink should be plenty wet enough to hold the powder.

Tip on plenty of powder to make sure its all coated, then tip off the excess.


Now heat the powder/UTEE until it melts- it will look a bit uneven on this first coat, as you can see here.


    Repeat this process three of four times if you are using UTEE. If you are using normal fine embossing powder, you may need 8 or 10 layers- just stop when it looks thick enough.


When you have completed your clear layers, you are ready to add the last, coloured layer.Sprinkle your coloured powder into the still melted UTEE, and carefully tip away the excess powder.  Heat with your heat gun.


Your heart should look like this. If you are going to stamp a texture into it, you need to do this whilst the UTEE is still molten. Just press your stamp into the UTEE, don't worry, it does not harm your stamp!, as long as you have either Pigment ink, Staz-on or Versamark ink on your stamp.The ink coats the rubber, and helps to release it from the UTEE. Use Versamark/clear embossing ink if you just want texture, or want to rub some colour into it after, Staz-on if you want a dark imprint against a pale embossing, or a Pigment ink if you want a metallic finish, such as gold or silver.
Your textured Heart.


At this point, I remembered a technique I had seen in Julia Andrus' book, Paper Transformed, where she added Perfect Pearls before reheating to get 'trails' of mica seeming to fall down into the UTEE.The link takes you to the post. So I repeated the above process, until I reached the stage where you add the coloured powder.
What I did now was to sprinkle on my Blue embossing powder & tip off the excess, then I sprinkled a very small amount of Cosmic Shimmer Mica powder on the top, using the little brush that came with it.


           This is how it looked as the powder started to melt, and the heat gun blew the mica across the surface slightly.


It looks a little heavy here,to be honest, and I thought I had overdone it.


You can see the heating has left the surface a little bubbled.


    So, I let it cool a while, then patted it over with the clear embossing pad and sprinkled on another layer of UTEE.
                                       
                                          This is what appeared from beneath the melting powder:
  
 I was really stunned & surprised by how well this little technique worked, to be honest. It really does look like blue glass, with trails of shimmery colour through it.
This is now waiting for the perfect project- that's if I can bear to use it!
  Well I hope this little how to has been of help-if anyone has a question, feel free to e-mail me from the link in my sidebar, and I'll try to help.By the way, I found the Blue Glass Embossing powder available Here,Here,Here and Here. I shall definitely be getting myself another couple of tubs of this :)

Wednesday, 21 September 2011

WOYWW #120

Following on from last weeks tidyfest, I thought I should 'fess up & show what my desk usually looks like when I am working, lol. In the middle of making some wedding stationary samples, and a wedding card. Already had a look at Julias post, and I see we favour the same heat gun. The ever- present Really Useful Box, this time full of UTEE, another one full of sticky back gems/pearls. The chopping board I use when I'm heat embossing, so I don't damage my cutting mat.


Next up is one of this weeks purchases- Tim Holtz Texture Fades folders. Got these for a brilliant price from Craft Superstore- 12 folders for £19.99.


 I've also been scouting e-bay for stamps this week-there are always great bargains to be found.


Got a great selection of stamps, all for next to nothing-can you believe I paid 99p for the Paper Artsy sheet, and its never even been opened!


Final thing on my desk last night, is this wedding card. 

 The Bride & Groom stamp is called At the Altar, by Stampendous. What I usually do is stamp it once onto card, then stamp it again onto coloured vellum, which I cut the overdress of the brides outfit from, and attach with a few blobs of silicone glue.


Occasionally, when cutting out the image, especially when its stamped &heat embossed on vellum, the embossing flakes off in places, or cracks. I either reheat it with the heat gun to fuse it again, or add a little embossing ink with the embossing pen you can see above, sprinkle with a little powder & reheat- good as new again.
The triple embossed hearts were a real delight- I'd not used this particular tub of embossing powder before, although I have had it for quite a while. Its by Heat It Up, and is called Blue Glass. As you can guess, I was trying to get them a similar colour to the vellum. The powder doesn't look overly exciting in the tub, but when I sprinkled on a layer on top of the UTEE and heated it, I got this gorgeous  blue glasslike finish..

This picture doesn't really do it justice, I will make some more & get a better picture for you next week.These look really opaque in the picture, but they actually had a lovely semi-transparent look to them. Hope everyone has a great Wednesday, looking forward to seeing some great desks as always.

Wednesday, 14 September 2011

WOYWW #119- a bit of a tidy up!


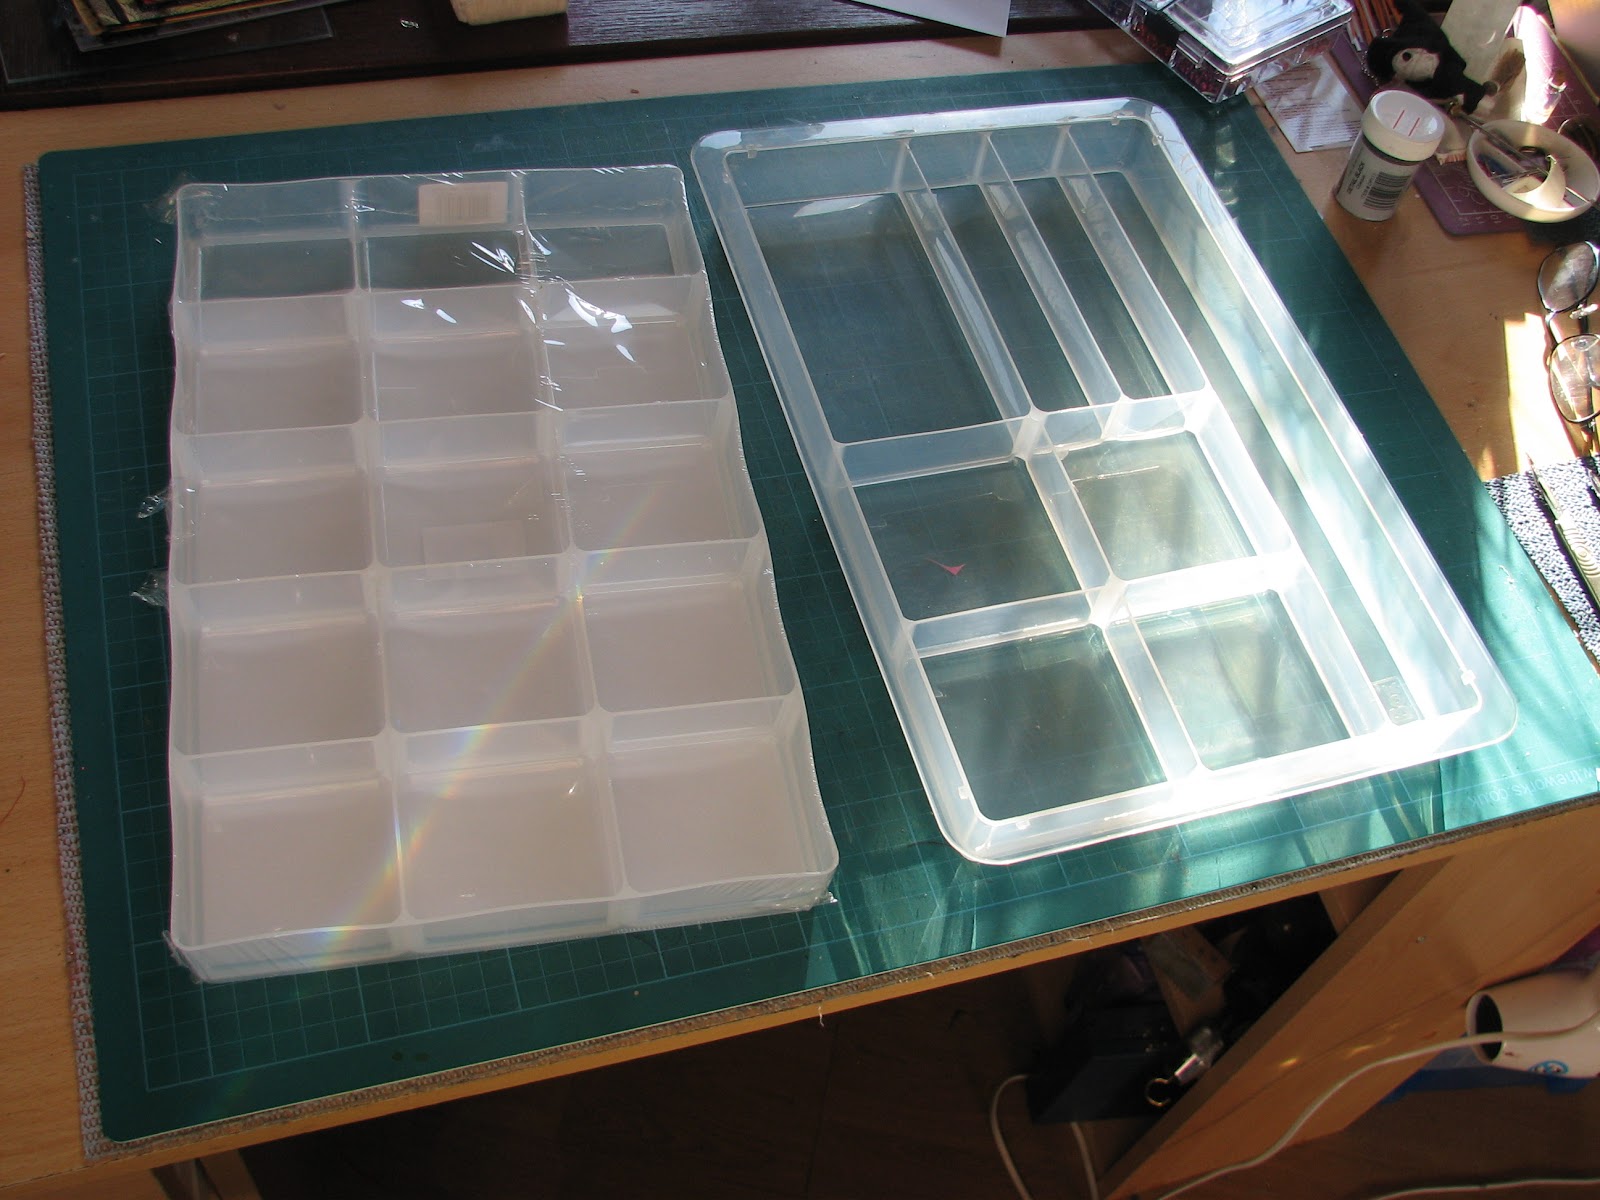
Good morning everyone, and welcome to the weekly wander around the desktops of the world, courtesy of our amazing hostess, Julia Dunnit at The Stamping Ground. The cards I have been busy on are on the posts below, but I had to share a great discovery this week at Staples. Most of you will be aware of my fetish for Really Useful Boxes- if not, go have a look at the pictures of my craft room! Anyway, I came across these really cool inserts for A4 size Really Useful Boxes- you can get two in the standard A4 size (4 litre), or 4 in the 9 litre size, which is twice the depth. My instant thought was how cool for storing little embellishments in- and they are great!

As you can see, one is straight sided, and contains 15 squares, the second has a lip around it to sit on top,and has a selection of different sized compartments.


These are just so cool- I can see a lot more of these being purchased,:)


One or two other random shots of my desk:
 
A selection of tags I've cut out and yes, they ARE in a Really Useful Box.Here are the templates I made for cutting them:
I cut them all from thick card, mountboard would be ideal, then I duplicated the sizes in thick acetate. I thought that if I wanted to cut a tag from a larger piece of work, rather than working on a tag shape, it would be helpful to see what the cut tag would look like.


Last shot of my desk, just some stuff I always have there. My scalpels, and tweezers. These are First Aid tweezers- I like the really fine point. Next to that is a pad of telephone notepaper. They were looseleaf, but I stuck all one end together with masking tape, and the back page is taped down to my desk with low-tack tape. Its great for testing paint/pens/inks on, putting a blob of silicone glue on to pick up with a cocktail stick,sticking the cut-off end of DST to, bits of peeloffs, anything sticky at all. Then just peel off the top sheet & bin it! Theres a tape dispenser with a roll of low-tack tape in it, my reading glasses- I cannot see close up at all without them!The little round white dish is actually a water/paint  bowl for painting, but I have little 'bits' in it- needles for threading, or unblocking glue tubes, Little pieces of bent wire for threading fibres through tag holes, I can see a post- it moon mask as well. Next to that is my anti static bag, behind that is Hettie, my Voodoo string doll keyring.She is sitting on her broomstick in front of a Quartz crystal. Underneath them is a free cutting mat from a craft magazine.  Oh, one more important item- the blue mat stuff under my knives. I bought some rolls of this stuff from my local Poundland- its a non-slip matting, the roll is about 3 feet long, by 18 inches wide.
I also have it under my craft mat:
It completely stops any sliding around- the little piece I use under inkpads when I am brayering, or paint pots & palettes. We even have a sheet in the back of our X -Trail to stop stuff moving about, (the boot  floor is not mat but hard plastic)  and under the mat inside the front door to stop it sliding on the laminate floor. Well, thats my desk tour for this week, hope everyone has a great Wednesday!

Monday, 12 September 2011

Oriental Poppy in Gold

   This is a stamp by Hampton Arts, 4523 Asian Poppy, which still seems to be available, I found it here, and here. The background was brayered with Adirondack Lemonade, Sunshine yellow and Sunset orange, the Post-it note Sun mask was added after the Lemonade.The Image was stamped in Versafine onyx black then heat embossed with clear powder. It is matted onto black cardstock, then mounted to the card front. the base card was cut to 14cm square, then covered with a gold patterned washi paper, I think this was in a pack from Hobbycrafts. The Japanese Shop also has a great choice of washi papers,as do Roze. An Oriental coin and Black & Orange ribbon finished it off.

An End of an era

An end of an era

I write this with a broken heart, that only time can heal My beautiful, wonderful wifelet Shaz (Silverwolf) passed away peacefully in the ea...