Well, I don't know about where you are, but here in the UK it's blisteringly hot. Possibly not as hot as you, but you have to remember we Brits are used to an average one week of sunshine a year, somewhere around Easter, so this is most unusual for us. 😁
Meeting up over at Julias place, The Stamping Ground, ready for this weeks desk-a-thon.
On my desk this week, is another ATC arrival, this time from Kelly. Lovely card & ATC, thank you so much Kelly.
And, talking about ATC's, I think it's high time I sorted them all and got them into storage pockets.
This mountain of ATC's go all the way back to our 5th Birthday, and include the Halloween special we did one year.
The cards that so many send with their ATC's are there too, so I think this job is long overdue.
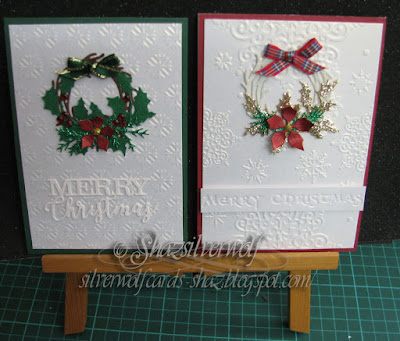
Over the weekend I made a few Christmas cards, for the Christmas Card Club Challenge .
Following the sorting of my embossing folders, I decided it was time I made more use of them!
While I was die cutting, I cut some Bauble shapes from foiled card, then I've added detail to them with texture paste, stencils & glitter.
So that'll be another project to finish later in the week.
And finally.........................
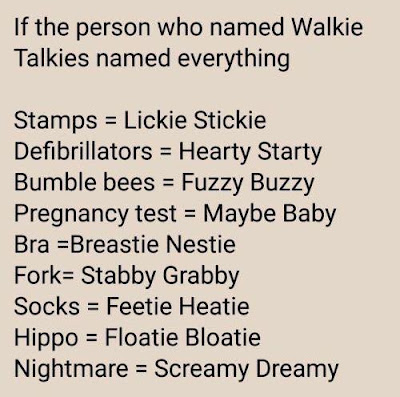
I particularly love the Bee description!
Pages
A warm welcome to all my visitors,
Thank you for taking the time to come and look at my blog, I really do appreciate it. I would love you to leave me a comment, even if it’s just to say Hi. It means I can come visit you!
All my designs are original, so copyrighted to me. If I have been inspired by someone elses work, I have named them in the post, and where able, I have provided a link.
Please feel free to use my designs for inspiration, I just ask you to credit me, and provide a link back to my blog.
Thanks, Shaz XX
Wednesday, 27 June 2018
Sunday, 24 June 2018
Christmas Card Club #13
Hi Ladies, I'm late, but have some cards for this week. Lorraine has set this fortnights challenge, which is Candy Canes/Gingerbread.
Unfortunately, I don't have any stamps or dies that fit the theme, so I've gone back to a Challenge I missed whilst on holiday. That is Christmas Wreaths, which was Ritas choice back in April.
The first two cards use a Penny Black stamp, called Adornment. The first is stamped in Encore Metallic Green pigment ink, and then heat set with Stampendous Metallic Green embossing powder.
The stitched circle dies were bought from The Works.
I added a few acrylic gems to give a bit of sparkle.
The embossing folder used is a Cuttlebug one, and I accidentally put my cardstock in upside down, so it's actually debossed!
This time stamped in Silver Encore pigment ink, and heat set with silver detail powder. Red gems in assorted sizes gives this one it's bling.
The embossing folder is from Craft Concepts.
For the next two I built a wreath using a die from Sue Wilson, called Twig Wreath as a base, and then some holly twigs cut with the Tim Holtz Christmas Mixed Media die, and the Winter Greens die set. I've added some red gems for berries, and a bow at the top. I have no idea where the tiny Poinsettia die cut is from, I rather think someone must have gifted it to me. I had 2, in different sizes, along with some tiny deer. If anyone knows what the die is, I'd love to know. I rather think the sentiment die cut was gifted too, as I don't have a die like that.
The embossing folder is by Dovecraft.
Last card, and made exactly the same way, but this time was cut from white glitter card, and some golden holly added, along with the smallest of the two poinsettia flowers.
The background is a folder that I think was a magazine freebie, as it has no info on it.
The sentiment is also from an embossing folder by Crafts Too, and has 6 sentiments strips on it.
The Sue Wilson twig wreath die cut, along with an assortment of foliage.
Three of the Penny Black stamped images, I haven't done the copper one yet.
Some embossed backgrounds I made up, you can see the Crafts Too one 2nd from the right.
Wednesday, 20 June 2018
WOYWW #472
This week has been mainly organising, with a bit of crafting thrown in. I'm still working on those pics from last week, but as for the rest, I can't show it yet. I'm doing some Christmas Cards for the Christmas Card Club Challenge due this Sunday, and on a birthday card I've been asked to make for a friends girlfriend. So I'm afraid the organising will have to suffice. First off, I decided my inkpads needed a sort out- you'll see why that was a mammoth job in a minute.
This wooden unit was built for me by Beloved Hubby, well over 10 years ago, when I first started stamping. He built it to house my Wooden stamps back then, and it measures 31/2 feet by 3 feet.
He also built me a smaller one- 2 feet by 18 inches, to hold my inkpads.I unmounted the vast majority of my wood mounted stamps, the only ones left are the really big ones on the very top shelf.As my inkpads had outgrown their previous home, - thanks to Tim Holtz, in part, and all the colours in the Adirondack line-they took over the stamp shelves.
And yes, you are quite right- no-one needs that many inkpads. But Need is the wrong 4 letter word, it should be WANT, lol. But I've restrained myself with the Oxides!
This is after organising. The bottom two shelves are dye inkpads.Next one up is pots of Colour Cloud inks- which I was gifted, unused, and I've yet to give them a go- then the next shelf has Staz-on/Memento & Clear embossing pads, including Versamark. I did throw out those horrible Staz-on Opaque pads. Next are pigment pads, with white inkpads on the far left. My Brilliance pigment pads are on the next shelf up, along with some tiny wood peg alpha stamps , and a few other really small stamps.Top shelf now has gesso/mixed media stuff. The Brilliance, as well as some of the pigment pads, I've had for as long as I've been stamping,and the only ones I've had to re-ink are the Encore Gold & Silver.Right underneath the bottom shelf are three Multicolour pads, and two boxes containing Cats eye pads, and the Dew drop type pads.
Then I decided I'd sort out my Embossing folders, so now I have the Christmas ones in a separate tub, so it's easier to get to the others.
Popped into Hobbycrafts on Sunday, while Hubby was in Webbs Aquatic section getting some plants for the fish tank.These box frames were half price, £3 for the smaller ones, £4 for the larger. Not a great deal of anything else though, well not to me, anyway. The papercrafting is getting smaller every time I go in, and the stamping is now almost non existent.Plenty of stuff for other crafts though.
Had a lovely surprise delivered by the Postie this morning.
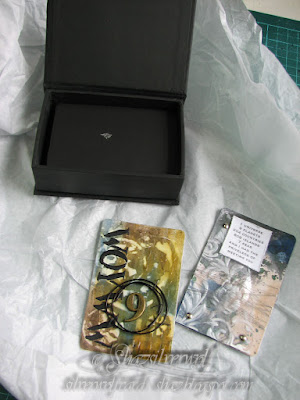
From our lovely Debbie (Tattered Rocks). She hadn't been able to join in the Birthday swap, as she hasn't been well, but sent me this.
A beautifully decorated box, containing an ATC, a little note and a bunch of blank Black ATC cards!
She knows me so well.😏
Well thats me almost done, I'll be adding my link over at Julias place, The Stamping Ground, and I'll be seeing you all later.
And finally................................
I saw this on Facebook during the week, and it made me laugh.
Wednesday, 13 June 2018
WOYWW #471
And another Wednesday rolls round, faster than ever it seems. Time to visit Julia at The Stamping Ground, if you're new to this, Julia has pages at the top of her blog that tell you all about this blog hop, and also all about the September crop.Despite spending the weekend at Download, I managed some crafting at long last on Tuesday, stamping onto some Brusho backgrounds I made a while ago. Which also means I'm making a dent in the UFO box, so that's a bonus.
Not totally finished yet, need to add some colour to this one, and then trim them all down. I'll probably add some foliage to them too, along the tops, after trimming.
I've used a technique with the Brushos I got from Eileen Godwin- less is more! I think I prefer that for overstamping.
We had a great weekend, and I'll put a few more photos at the end, so you can just skip those if you like.
Friday and Saturday were dull and overcast, but dry. Sunday was gloriously hot, in fact I came back with a better tan than I got from a week in the Canaries!
They have viewing platforms with seats for those that are disabled, which is great, as I'd never be able to stand all day like we have in the past.
This was Sunday, and as you can see, I needed to put my sunnies on. Just hadn't bothered yet, lol.
Quick bit of enabling next- Eclipse tape. If you've not heard of it, it's pretty much like a roll of Post It notes, but the whole sheet is lightly tacky, so you don't have to try and get as much of your image as possible onto the edge with the sticky on. It's 10 metres long, and 6" wide, and the masks are reusable, just like Post it ones, so the roll should last for years. Available from Amazon.
And finally......................
The Download pics:
Smoke rings in the sky from the pyros from the band in the first pic, Avenged Sevenfold.
The amazing Axl Rose from Guns N Roses ........
And of course Slash- the most incredible guitarist.
Wednesday, 6 June 2018
WOYWW #470
And the ATC swaps are still arriving! So much amazing artwork involved in them, thank you so much to everyone who swapped with me.If you've never joined in with our regular Wednesday Blog Hop, then pop over to Julias place, The Stamping Ground, and leave your link. It's fine here, we don't bite! While you are there, have a look at the info page about this years crop, in September, in Llandudno again. All you have to do is turn up, chat, eat cake, and a spot of crafting, if you want to. 😀
From Dolores (Cardarian), and our Beloved Leader, Julia.
From top left, Suzanne Alexis, Christine (Bishopsmate), Sylvia (Little Treasures) and last but not least, Jo,( Twiglet) who had already swapped with me, but as I was her PIF, she sent me another. Inside a fab card featuring the work of her daughter, Max, otherwise known as Tilly Teadance. Tilly used to join in WOYWW, but if you are new and have never seen her wet-felted work, go check out her blog.
Onwards, then. No crafting this week, I've been busily organising for our upcoming weekend-
yes, we're off to Download again. Friday to Sunday. Fingers crossed the rain stays away, but for headliners Avenged Sevenfold, Guns N Roses & Ozzy Osbourne, I'll tolerate a soaking.
A subject came up on SCS, about how to line up Oval dies on your card face and get them straight, or to line up your dies to cut from the centre of your card front/panel. Someone came out with an idea so simple, I think we all sat there feeling dumb!
Here it is:
Die cut your oval shape, then fold in half lengthways. Open out and fold widthways. Then mark the folds. Now put the diecut back into the die, and mark the four points on the die. If you mark your card front lightly in pencil, dividing it in half lengthways & widthways, you can accurately place your die to cut,or if you lightly mark your die cut oval to place on top, everything will be straight.
I just cut mine out of scrap paper to demonstrate, but you could actually have a template the same size as your card front, and use that for accurate placement. Works with circles too. One thing I did notice is that the Nesties Scalloped Oval is not symmetrical- you can see on the die markings I made, so it would be wise to mark the top of the die & die cut.
One final thing I keep forgetting to add in, we had a follow up from my last scan (back in April) a few weeks ago, and to be honest, we expected the best result we'd get would be that it hadn't changed in size. However, he said it had shrunk since the scan in December, and it was now half the size it was a year ago, when I first got referred to him. Back then it was 5cm, now it's 2.5. So, way better than we expected, and he was happy to refer me back to my local Oncologist, as he didn't see any need to keep going to the QE. It'll just be monitored with regular scans.
Just quickly hopping back to ATC's- Kim Young sent me one, with a stamp on it that featured a Solar Eclipse. I'm always hanging on to interesting looking stamps, so I still had it, when Kim told me that if you warn up the stamp it changes.
And this is what is revealed when you do- how clever is that?
And finally...................................
I'm sure that applies to most of us too-I'm just amazed our home HAS that many safe places!
Subscribe to:
Posts (Atom)
An End of an era
An end of an era
I write this with a broken heart, that only time can heal My beautiful, wonderful wifelet Shaz (Silverwolf) passed away peacefully in the ea...
-
A couple of weeks ago I mentioned that I had bought these, the new Tim Holtz Embossing Diffusers. You have probably seen, like me, the...
-
I take no credit for this discovery, a lady posted this on Pinterest HERE .Like any of us, I hate having to spend money on 'consumables&...
-
This is the first of the batch of seven cards I made, thanks to some Pinterest inspiration. Here is the card that caught my eye,...