 Well, not a lot of crafting happening still. As you can see in the last post, I've been trying to reorganise my stamps(again). I've had them all pretty much sorted by theme in the past,but then you have the crossovers, the not quite sure what you class it as, and the randoms.I'd separated out all the phrases/sayings/quotes etc from sets, but they rarely get used because I don't think about them.So I've started going back to sorting by manufacturer/set- but then you forget about a lot of stamps on the same theme as you're working with, because they aren't in front of you. My latest solution is making a new binder index of images on my PC, first off by manufacturer. Then I can reprint the sheets/images by theme if necessary. Its easier to flip through an A5 binder of images, than the A4 binders with the stamps in. I've been finding images of the stamps I have on the net, saving the image, then making up sheets in Photoshop.That falls down when the sets are retired- could not find images for a few of my older Elusive Images/Graphicus stamps. Some I still had the printed sheet they came with, but not all. Those I had to stamp out onto the sheet. So I should (!) end up with a sort of cross referencing- the stamp set,indexed by maker and by theme, and also included in the sentiment or quote section. Also means, that should I ever need it for Insurance purposes, heaven forbid, I'll have a digital record of all my stamps. Which is something else I intend to do. A few years ago, we took photos of all the stuff in the house, in case we ever had to make a claim. No-one would ever believe the sheer number of power tools Beloved Hubby has, and I realised its the same for my stamps-23 A4 ring binders, plus some still on wood, so I think its time for the video camera to get some use. Put the result onto a USB stick, and we have one of those fire-proof boxes for documents- which is completely empty, I might add- and will store it in there. Along with said important documents, when I get around to sorting them out. The reason for this ' What I did at the weekend'?- join us over at The Stamping Ground, where our favourite hostess, Julia will be attempting to keep us in order again, for the last WOYWW of January. Where exactly did that month go?

Wednesday 29 January 2014
WOYWW #243
Well, not a lot of crafting happening still. As you can see in the last post, I've been trying to reorganise my stamps(again). I've had them all pretty much sorted by theme in the past,but then you have the crossovers, the not quite sure what you class it as, and the randoms.I'd separated out all the phrases/sayings/quotes etc from sets, but they rarely get used because I don't think about them.So I've started going back to sorting by manufacturer/set- but then you forget about a lot of stamps on the same theme as you're working with, because they aren't in front of you. My latest solution is making a new binder index of images on my PC, first off by manufacturer. Then I can reprint the sheets/images by theme if necessary. Its easier to flip through an A5 binder of images, than the A4 binders with the stamps in. I've been finding images of the stamps I have on the net, saving the image, then making up sheets in Photoshop.That falls down when the sets are retired- could not find images for a few of my older Elusive Images/Graphicus stamps. Some I still had the printed sheet they came with, but not all. Those I had to stamp out onto the sheet. So I should (!) end up with a sort of cross referencing- the stamp set,indexed by maker and by theme, and also included in the sentiment or quote section. Also means, that should I ever need it for Insurance purposes, heaven forbid, I'll have a digital record of all my stamps. Which is something else I intend to do. A few years ago, we took photos of all the stuff in the house, in case we ever had to make a claim. No-one would ever believe the sheer number of power tools Beloved Hubby has, and I realised its the same for my stamps-23 A4 ring binders, plus some still on wood, so I think its time for the video camera to get some use. Put the result onto a USB stick, and we have one of those fire-proof boxes for documents- which is completely empty, I might add- and will store it in there. Along with said important documents, when I get around to sorting them out. The reason for this ' What I did at the weekend'?- join us over at The Stamping Ground, where our favourite hostess, Julia will be attempting to keep us in order again, for the last WOYWW of January. Where exactly did that month go?
Sunday 26 January 2014
Organising stamps, again.

The trouble with this is deciding what goes into what theme, and what if they cross over into another theme as well? Some stamps just seem to defy fitting into any category.

And do I keep any word stamps with the images, or file them with words/definitions etc?
 I bought a couple of new Chocolate Baroque stamps last week, the Serenity & Tranquillity sheets. I thought about putting them into the Oriental section, which does work, but then decided to make a new folder up and store all my Chocolate Baroque/Graphicus/Elusive Images sets together.
Note to self: Do not buy any more, the folder is full!
So I pulled all the images from the various folders they were in, except for the Christmas ones. They will stay with Christmas stamps. Which explains the stamp mountain on my desk.
I sorted them back out into complete sets.
 During the course of this, I realised I have lost a stamp, The Rose Stem Script. I can guess where it is- somewhere at the back of the Expedit unit! This is one reason I have been trying to unmount from the foam backing where possible. I have realised over the years that in a lot of cases, it seems like the foam has shrunk, giving a concave surface to the back of the stamp, which means they don't want to lie flat on the storage sheets, and sometimes drop off.
Of course, this now means I have to re-organise the Expedit while I try to find it.
What I did do was to get images of all the stamp sets, and print them out onto A5 paper. In one or two cases, I had to stamp the images onto sheets and scan them in, as the stamp sets are now retired and I couldn't find images anywhere.
It does mean I can print more than one copy, so I can file one with the CB stamps, and one within the theme(s) it fits, in A5 binders, which will be easier to flick through than the stamp binders. I'm hoping this will work better than previous systems.
Edit: Two hours later, stamp found- along with two others I hadn't missed yet! And the Expedit is clean & tidy again.
Wednesday 22 January 2014
WOYWW #242- A bit of a fishy story
 Morning deskers- how are we all today? Our regular Wednesday link up around the world, courtesy of our Desker Extrordinaire, Julia at The Stamping Ground.Complete cheat, this post, nothing to do with my desk at all. Apart from why I spent almost no time at it over the weekend. We have had an aquarium in our dining room (doesn't that sound posh! its just that these old Victorian houses have two downstairs rooms, lol) for about 13 years, and over Christmas Beloved Hubby commented that the central heating seemed to be evaporating the water, and he needed to top it up. Turns out, it wasn't evaporating, one of the seams had developed a (thankfully) slow leak, about halfway up the side. So, to try and minimise the risk of the water pressure splitting it even further, Hubby gaffer-taped it during the week when he realised what was happening, thats the old tank, complete with plant selection bought to go in the new tank.And the gaffer tape.
 This journey involved a visit to an aquarium supplier near Birmingham, which should have been 15 minutes down the M42. Satnav decided she fancied a scenic tour of Birmingham, took us just over an hour Friday afternoon, so by the time we finally got there it was closed. Return on Saturday, this time completely ignoring the sat nav. Looked at tanks ( HOW MUCH?), went to another place, we spotted almost next door. Then decided to go have a look at Webbs in Hagley. We'd already been to Webbs in Wychbold, who didn't have much, and their aquarium centre website showed a nice big showroom full of various makes of tank. Complete waste of a 40 mile round trip- the fancy centre turned out to be a garden shed with four fishtanks! So back up the M42 to Shirley Aquatics, where we'd started.
 We also decided to swap the wall it was against, which did make it easier to do the swap over. Don't even ask how it long it took to get the backing in place, straight with no creases! Good old DST.

Planted, gravelled and with the fish transferred. All the cables you can see are actually the old light fitting from the other tank, waiting to go into storage. Just in case.
Hasn't got any shoals of fish yet, mainly Plecostamus, a type of catfish. And one Ropefish.

This is the Ropefish, and why there are no shoals of little fish. If it can go in his mouth, it will. So the fish we get will have to be bigger than snack-size, lol.
The fish below is a Plecostamus, a Snakeskin Plec.They can look quite fearsome, and get very big, but eat only algae.And Cucumber. They love cucumber! The stripy snail at the front is a Ninja, or Assassin snail- they eat other snails, which breed like wildfire & infest a tank.

So the only time I actually spent at my desk was during Sunday night, when I played around with the white inkpads in the previous post.
Have a good Wednesday all, I'll be scheduling the post, and will link up before I go to bed.
As a result of doing the re- wiring of stuff into the tank, Hubby came across this on the net, and I thought I'd post it here for anyone who may have purchased electrical goods with plug attached, or new electric plugs. And not just off dodgy market traders- these in the story are on products purchased through traders on Amazon and E-Bay. Dangerous/Illegal Electrical plugs. Its quite a longish read, but check it out when you have 5 minutes, save the link for later. Its quite frightening.
Monday 20 January 2014
A return to the White Inkpad question
Quite a while ago, I did a post on white inkpads- I wanted to make some white on black cards at the time. It came down to having to stamp in Versamark, then heat emboss with white embossing powder to get a nice white image.
I tried a couple of white inks I have, including white Staz-on, which I have to say I hate. Even the Brilliance Moonlight white didn't give me a very good image. Original post here.
So, a few weeks before Christmas, the subject of white inkpads came up on SCS (Splitcoast Stampers) in a forum thread. People were raving about a newish inkpad,by Studio G. One very lovely and generous contributor offered to send me one in the mail, as I couldn't find it available over here. It arrived this week, along with a second one, by Hampton Art, the rubber stamp people.
I've given them both a tryout, both embossed and unembossed, and heres what they look like.

The first one I tried was the Hampton Art pad. Both are a pigment ink, by the way. I tried them out on black card, and I used a sentiment stamp for the first tryout. It gives a lovely thick coating on the stamp, and really looks white.

Then the Studio G inkpad- again a nice coating on the stamp, and it also looks really white.
So here they are stamped on black card, side by side for comparison:

Neither one is heat set or embossed here, just as is. I think the Studio G just has the edge here, but only just.
Now I thought I'd try a more detailed image, and heat emboss with clear powder.
 I'd be happy with either image, but in this one, I think the Hampton Art inkpad just takes it.
Strange. Both on the same piece of black card, both using red rubber stamps, it seems the heat embossing just gives the Hampton Art one a little edge.
So now, I had to see what I would get with white embossing powder.
 And what you get depends a great deal on your embossing powder- the top two are embossed with Stamp'N'Stuff Detail white, and its not as white as you'd expect. More a creamy buttermilk sort of colour. The middle one is using Heat It Up Seafoam White, and again, not very white.
The best result came with WOW! Bright White Super Fine embossing powder.
All in all, they both give a nice white image on dark cardstock, either embossed or not. They both dry without heat setting- by the time I'd done the others, the original un-heat embossed were both dry. Also, the ink wipes off the stamps easily just with a baby wipe. Having had another search, there are still no signs of either pad being available over here- seems they are both only available in the USA.
 |
| My original project |
So, a few weeks before Christmas, the subject of white inkpads came up on SCS (Splitcoast Stampers) in a forum thread. People were raving about a newish inkpad,by Studio G. One very lovely and generous contributor offered to send me one in the mail, as I couldn't find it available over here. It arrived this week, along with a second one, by Hampton Art, the rubber stamp people.
I've given them both a tryout, both embossed and unembossed, and heres what they look like.
The first one I tried was the Hampton Art pad. Both are a pigment ink, by the way. I tried them out on black card, and I used a sentiment stamp for the first tryout. It gives a lovely thick coating on the stamp, and really looks white.
Then the Studio G inkpad- again a nice coating on the stamp, and it also looks really white.
So here they are stamped on black card, side by side for comparison:
Neither one is heat set or embossed here, just as is. I think the Studio G just has the edge here, but only just.
Now I thought I'd try a more detailed image, and heat emboss with clear powder.
Strange. Both on the same piece of black card, both using red rubber stamps, it seems the heat embossing just gives the Hampton Art one a little edge.
So now, I had to see what I would get with white embossing powder.
The best result came with WOW! Bright White Super Fine embossing powder.
All in all, they both give a nice white image on dark cardstock, either embossed or not. They both dry without heat setting- by the time I'd done the others, the original un-heat embossed were both dry. Also, the ink wipes off the stamps easily just with a baby wipe. Having had another search, there are still no signs of either pad being available over here- seems they are both only available in the USA.
Wednesday 15 January 2014
WOYWW #241

I had some extra images from the two cards in the previous post, and with a bit of creative cutting, got four squares from them. And some leftover bits.

Which I decided I could maybe jazz up a bit, with some glass microbeads and Glossy Accents, or some ink & Glossy Accents on top.

 Microbeads- bought from e-bay, way cheaper than buying a branded jar, and arrived the day after I ordered them! 300gr of beads, and 5x A4 double sided adhesive sheets-£8, and free postage.
Distress Inks, Salty Ocean & Dusty Concord with Glossy Accents.

Just Glossy Accents on these four.
Which will all hopefully come together on a card at some point in the near future.
Giving the Documented Life a miss for this weeks, Use something from your mail! Probably 95% of my mail goes in the recycling, what is it with junk mail? I swear, half my bin is junk mail. Not inspiring at all. Janet, Fairythoughts, I am with you completely on this, the weekly thing just takes over, which is why I am only doing the ideas that grab me. Or that I remember to check out. So two weeks in my diary may be it, we shall see. Enjoy your week everyone, will catch up with you later.
Monday 13 January 2014
Quick Birthday cards
So, I finished last weeks Documented life pages, in the post below. Giving this weeks a miss- use something from your mailbox. As mine will be mainly junk mail- isn't it always?- I can't say the idea inspires me. And I'm not getting hung up on doing each week, just the ones that grab me. So I had some stamping time yesterday, and the stamps that came out I was reminded of in a roundabout way. I saw a post on Facebook, where someone was commenting about a bunch of the new release stamp sets from Stampers Anonymous/Tim Holtz Classics, and how they did not credit the original artists- SA seem to claim they don't know who the original artists were.Tim does make it clear he is not the original designer,just that he has chosen his favourite 'classic' images from SA's back catalogue. Having looked at the images, I realised I had a few of the originals, which were red rubber on wood mount. The artist who puts her name to these is Michelle Ward, by the way.

The first image is called Artful Mosaic, and I love it because you can stamp it then colour it, stamp it onto an inked background, or as I have, stamp & heat emboss and it always looks great.
Guess you can see why its called a classic!
Anyway, stamped in black onto White pearl card, then heat embossed with clear powder.
 Trimmed the image down, then matted onto black.I cut and folded a card blank from White pearl card, to roughly 8 x 4 1/4".
Decided I would 'frame ' the image with an embossed line on the front. To do this I opened out the card, and on the inside I drew lightly in pencil around the corners of the image. Then I drew a box all around where the image would be, about a 1/4" out from the original size.

Lined this up on my Hougie board, and embossed the four sides,being very careful at the corners.
I didn't put it exactly central, as I wanted room at the bottom for the sentiment.

DST on the back of the image, and mounted it into the 'frame'.
The Birthday sentiment is a clear stamp from one of Debbie Moores stamp sets.
 Stamped in black onto a scrap of the white pearl card.

The second card I made was pretty much identical, except this time used a stamp called Moon Collage.
I also used a black base card this time. All the techniques were the same though.

Supplies:
Stamps: Moon Collage,Artful Mosaic, now released as SA Classics. Moon Collage is on the newest sheets released this year at CHA.
Black inkpad
Clear embossing powder.
White pearl card.
Black card
Embossing board & stylus
Sentiment- Debbie Moore Twilight Stamp 1
Heat Gun

The first image is called Artful Mosaic, and I love it because you can stamp it then colour it, stamp it onto an inked background, or as I have, stamp & heat emboss and it always looks great.
Guess you can see why its called a classic!
Anyway, stamped in black onto White pearl card, then heat embossed with clear powder.

Decided I would 'frame ' the image with an embossed line on the front. To do this I opened out the card, and on the inside I drew lightly in pencil around the corners of the image. Then I drew a box all around where the image would be, about a 1/4" out from the original size.

Lined this up on my Hougie board, and embossed the four sides,being very careful at the corners.
I didn't put it exactly central, as I wanted room at the bottom for the sentiment.

DST on the back of the image, and mounted it into the 'frame'.
The Birthday sentiment is a clear stamp from one of Debbie Moores stamp sets.


The second card I made was pretty much identical, except this time used a stamp called Moon Collage.
I also used a black base card this time. All the techniques were the same though.

Supplies:
Stamps: Moon Collage,Artful Mosaic, now released as SA Classics. Moon Collage is on the newest sheets released this year at CHA.
Black inkpad
Clear embossing powder.
White pearl card.
Black card
Embossing board & stylus
Sentiment- Debbie Moore Twilight Stamp 1
Heat Gun
A Documented Life- week 2 and running late already!

From Eminem: I don't care if you're black, white, straight, bisexual, gay, lesbian, short, tall, fat, skinny, rich or poor. If you are nice to me, I'll be nice to you. Simple as that. and ' You've got enemies? Good. It means you actually stood up for something in your life.'
From Marilyn Manson: Enjoy your faults.That's what separates you from the rest of the world. And that's what makes you special.
From Dr Martin Luther King: Our Lives begin to end the day we remain silent about the things that matter.
My humour,the quote at the bottom: Depending on the amount of sugar, caffeine,alcohol and tobacco in my system, I'm either a social butterfly or a ticking time bomb!
I'm starting to think I will never be old enough to know better.
Someone just called me normal- I've never been so insulted in my life.
I love music, and the page shows many of the bands I love- AC/DC,Iron Maiden,Aerosmith, Metallica, Disturbed.There were loads more that I didn't have room for- AV7X, Five finger death punch, Kiss, Guns & Roses,Rammstein, Slipknot..... the list goes on.
And actually, I probably wouldn't stop wearing black, even if they did invent a darker colour. I've worn black since my teens ( yes I can remember that far back), and my first question when I find anything I like is,' I like it, but do you have it in black?' Not kidding, a torch is a necessity when you open my wardrobe door. I do occasionally wear other colours, but my colour of choice will always be black.
Wednesday 8 January 2014
WOYWW #240
Good Morning everyone- heres hoping its not too wet/blustery where you are, and that none of you are affected by all the awful flooding. So back into it we go, Wednesdays popping up faster all the time, it seems. Our esteemed leader, Julia, is over at The Stamping Ground, awaiting your link, to display to the world your creativity and tidiness (or lack thereof!).

And here you have it, I'm having a go at week 2 of A Documented Life, and sticking at it for 2 weeks counts as a long term project for me,lol.
Inks, diary, sponges, pictures, and an inked sheet in the background. Towel on my chair, for drying rubber stamps after cleaning.

Now heres the inked sheet in the foreground, with some stencilled bits on it. And gessoed, to tone the colours down a bit. I Added the stencilling whilst the inked background was still a bit wet, and the colours were quite strong. I thought I'd ink a background sheet, as I didn't want the colour to keep seeping through onto other pages, as the diary paper is pretty thin.

This was it before the stencils/gesso, and next to it, my storage solution for stencils & masks. A document folder thingy from Poundland. Keeps 'em flat, and I get to see what I have. It has a sheet of white paper in each pocket, so you can put two masks in each pocket, one either side of the paper.
So thats my Wednesday Show & Tell, now its your turn.
And here you have it, I'm having a go at week 2 of A Documented Life, and sticking at it for 2 weeks counts as a long term project for me,lol.
Inks, diary, sponges, pictures, and an inked sheet in the background. Towel on my chair, for drying rubber stamps after cleaning.
Now heres the inked sheet in the foreground, with some stencilled bits on it. And gessoed, to tone the colours down a bit. I Added the stencilling whilst the inked background was still a bit wet, and the colours were quite strong. I thought I'd ink a background sheet, as I didn't want the colour to keep seeping through onto other pages, as the diary paper is pretty thin.
This was it before the stencils/gesso, and next to it, my storage solution for stencils & masks. A document folder thingy from Poundland. Keeps 'em flat, and I get to see what I have. It has a sheet of white paper in each pocket, so you can put two masks in each pocket, one either side of the paper.
So thats my Wednesday Show & Tell, now its your turn.
Sunday 5 January 2014
A Documented Life-1/1
So New Year, New projects! I have to thank BJ for mentioning this one, and also how she is doing it, which I have shamelessly borrowed.Despite never having completed more than about 1 weeks worth of entries in one, I still buy a diary every year, with the intention that this year will be different. You do not want to know how many unused diaries I have, stored to use in some project or other. BJ mentioned the project A Documented Life, and that she was going to use a diary for it,which sort of made me curious.
Now I have to admit that I am not following the way they are doing it entirely, as they have added a pocket to each week, to add memorabilia etc to. I'm not adding one to every week, I'll just incorporate one if I need it- I do not need encouraging to collect any more bits! We already have a boxful of 'mementoes'- parking ticket stubs, entry tickets, you name it, from places we have visited. I'm just glad photos are digital these days.
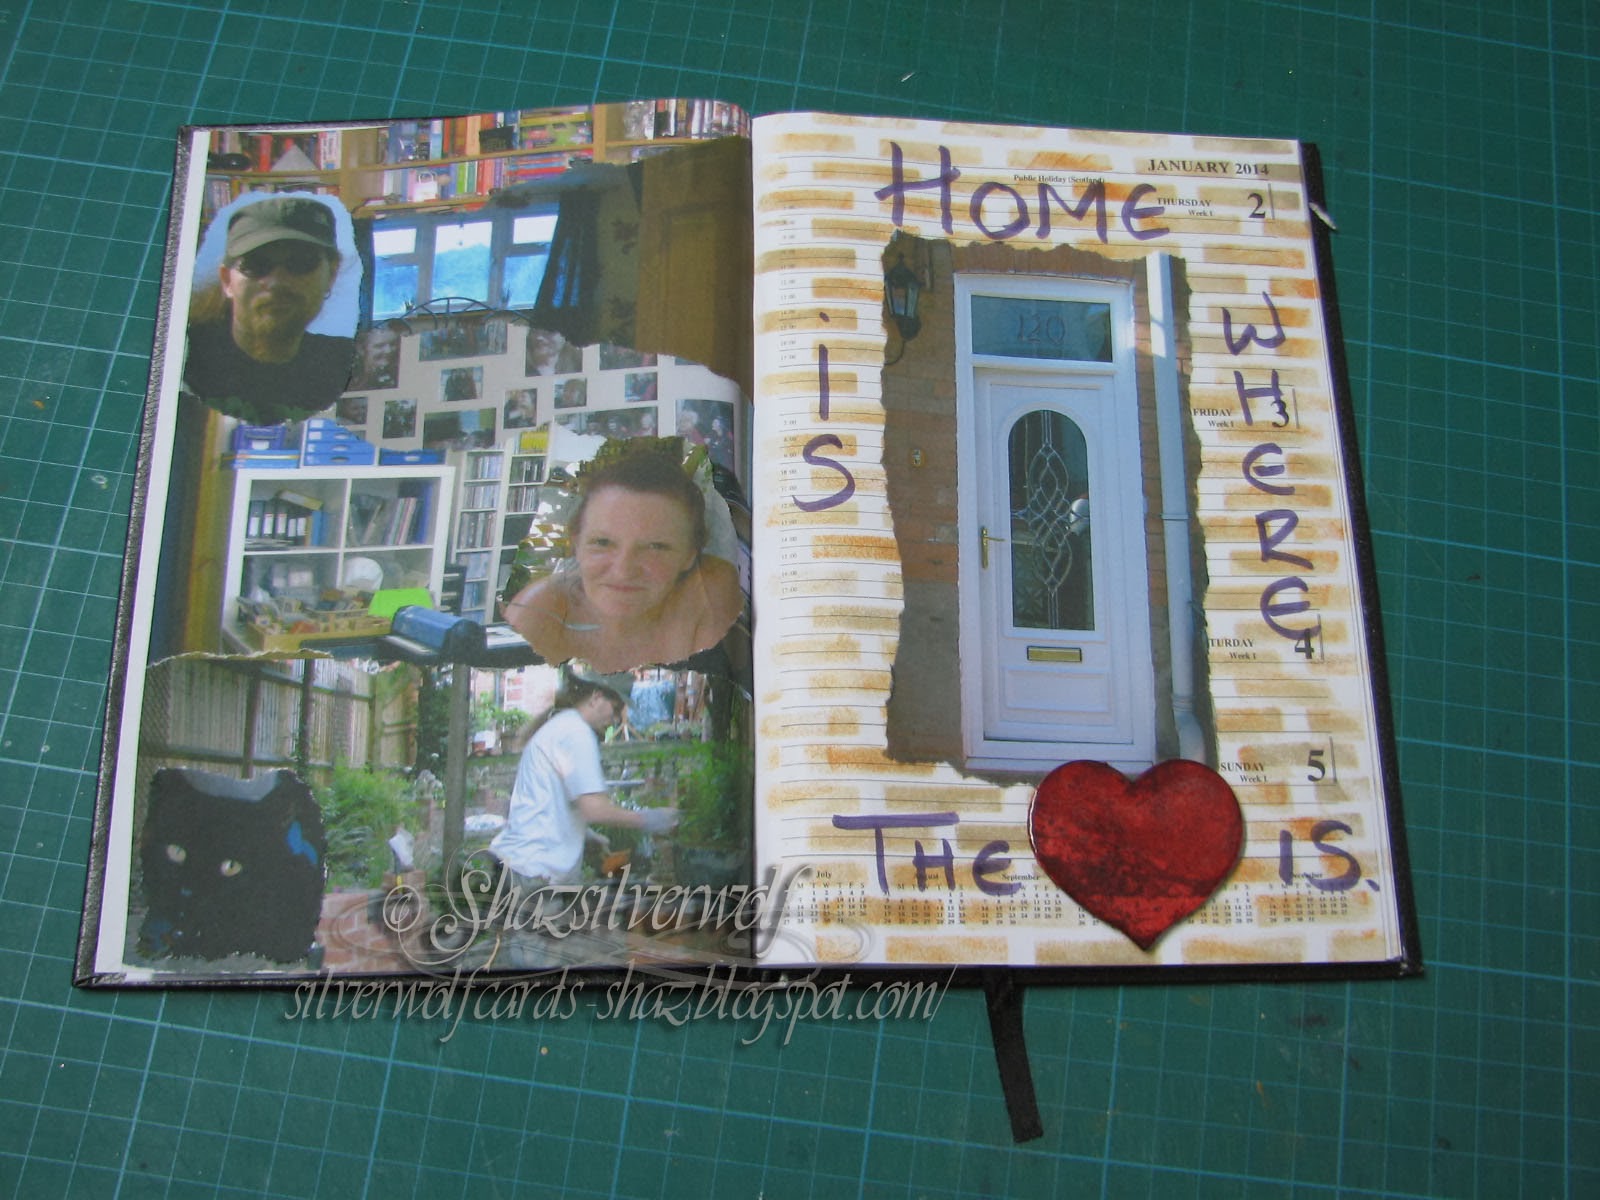
 The idea is they give a weekly challenge for you to incorporate into your planner, and the first was Photograph, sketch, paint or incorporate your front door.
So, off to trawl through photos on my PC for a photo of our front door. I was just about to give up and go take another picture when I found this one- taken on what was clearly a nice sunny day, and with the door slightly open- perfect.

Printed it off, and here it is on my desk, along with the said diary, and a stencil I cut out with my Silhouette, of brickwork. I had a rough idea in my head where I was going with this subject, which was a bit of a shocker, to be fair.

Distress Inks and the stencil gave me a cool background on one page.

Added my photo, torn down rather than cut. This will make you smile- I'm sitting here at my PC writing this post, just added that picture, peered closely at it, and thought 'where the heck have those numbers come from?' Then remembered, its a diary. Not entirely sure I should be allowed sharp pointy things, lol.

Completely gratuitous shot of a mid-craft coffee and Stollen break. You don't want to know how many stollen we need to get through. Thats what happens when you forgot you already bought some.
Forgot to photograph this page before I finished- I printed out a selection of pictures of the inside of the house, as well as Beloved Hubby, Ambrose & myself. The house pictures were layered up down the page, just torn and overlapping. Then I added Hubbys pic, along with Ambrose and me, torn and stuck over the others.

The writing I did with a DI marker, and the heart is a triple embossed chipboard piece.
It was the phrase 'Home is where the Heart is' that gave me the idea for how to do this challenge, and for once, it came out pretty much exactly as I saw it.
The other bonus with this, is that I keep saying I will do an Art Journal- so I may well be killing a couple of birds with one stone here.
I'm not actually expecting to do every week- I'm already a week behind, they posted a new one today-I will just do the ones that appeal. I mean, this weeks is 'use a selfie'- thats never going to happen. It takes at least a dozen attempts to get a picture of me I find acceptable- another good thing about digital pictures. Oh well, off to browse for a reasonably presentable photo of me- that should occupy most of the week.
Now I have to admit that I am not following the way they are doing it entirely, as they have added a pocket to each week, to add memorabilia etc to. I'm not adding one to every week, I'll just incorporate one if I need it- I do not need encouraging to collect any more bits! We already have a boxful of 'mementoes'- parking ticket stubs, entry tickets, you name it, from places we have visited. I'm just glad photos are digital these days.
 The idea is they give a weekly challenge for you to incorporate into your planner, and the first was Photograph, sketch, paint or incorporate your front door.
So, off to trawl through photos on my PC for a photo of our front door. I was just about to give up and go take another picture when I found this one- taken on what was clearly a nice sunny day, and with the door slightly open- perfect.

Printed it off, and here it is on my desk, along with the said diary, and a stencil I cut out with my Silhouette, of brickwork. I had a rough idea in my head where I was going with this subject, which was a bit of a shocker, to be fair.

Distress Inks and the stencil gave me a cool background on one page.

Added my photo, torn down rather than cut. This will make you smile- I'm sitting here at my PC writing this post, just added that picture, peered closely at it, and thought 'where the heck have those numbers come from?' Then remembered, its a diary. Not entirely sure I should be allowed sharp pointy things, lol.

Completely gratuitous shot of a mid-craft coffee and Stollen break. You don't want to know how many stollen we need to get through. Thats what happens when you forgot you already bought some.
Forgot to photograph this page before I finished- I printed out a selection of pictures of the inside of the house, as well as Beloved Hubby, Ambrose & myself. The house pictures were layered up down the page, just torn and overlapping. Then I added Hubbys pic, along with Ambrose and me, torn and stuck over the others.

The writing I did with a DI marker, and the heart is a triple embossed chipboard piece.
It was the phrase 'Home is where the Heart is' that gave me the idea for how to do this challenge, and for once, it came out pretty much exactly as I saw it.
The other bonus with this, is that I keep saying I will do an Art Journal- so I may well be killing a couple of birds with one stone here.
I'm not actually expecting to do every week- I'm already a week behind, they posted a new one today-I will just do the ones that appeal. I mean, this weeks is 'use a selfie'- thats never going to happen. It takes at least a dozen attempts to get a picture of me I find acceptable- another good thing about digital pictures. Oh well, off to browse for a reasonably presentable photo of me- that should occupy most of the week.
Wednesday 1 January 2014
Lilybo Quilt- at last!

Anyhow, the sewing machine was out, as I had to adjust the length on the Louvre blind Hubby was putting up in his window last night, so I decided now or never.


The front of the bag has a panel of bears on it.
The back of the bag has a pocket made from a spare bear patch.

Struggled with the handles a bit- not done those before either.
Main problem I think, is that I don't use my sewing machine enough, so I'm not really very familiar with it, and every time something didn't go right, I had to keep getting the manual out. Also need to remember to change needles a bit more often. I can see wonky lines, which irritates me, but me and straight lines don't get along too well! Anyhow, I'll be packing this up and getting it off to JoZarty over the weekend, along with a little bear for the pocket.
WOYWW #239- The New Year Edition
.jpg)
Wishing a Happy, Healthy, Peaceful & Prosperous
New Year to you & your families.
Well, as Julia did a Christmas Day WOYWW, I’m assuming there will be a New Years Day one too. I hope you all had a lovely Christmas, and that none of you are suffering with all the flooding.
First pic of today is not exactly on my desk, I had to show you one of Beloved Hubbys Christmas presents for me this year. Pretty much every year he manages to come up with something awesome, and this year is no exception.

I had to balance them on top of the radiator- they will go on the wall in our bedroom above this radiator. He had two of our favourite Wedding photos turned into canvas prints! He turned them to Black & White first.
So, what has everyone been up to over the Christmas Holiday? I know we are lucky, we don’t go back to work until Thursday night, many of you will have been working over the holiday, or are already back at work. Despite the break, not a lot of crafting done. Quite a bit of tidying and cleaning though. The only thing I have done is make myself some stencils with my Silhouette and some Transparency sheets.
My Silhouette machine- its one of the original Silhouette digital cutters, at least 10 years old now, but still working just fine.

 And the latest batch of stencils I’ve cut.
The cleaning was a bit of a necessity by now, Hubby has been renovating what was my old craft room, to use for himself for doing computer repairs in. Being a bit of a tech geek, he gets lots brought to him, and the living room usually looks like PC Worlds spares department! Anyhow, that involved much the same as when we did my room- new ceiling/plastered/painted/papered/laminate floor/new woodwork & varnishing.Along with a bunch of Ikea units, its now almost finished.The house is pre-1900’s, and the plaster/woodwork is in the main, the original, so well overdue for an overhaul. As you can see in the pics, around the top of the wall is a white band- this was common, as a picture hanging rail would generally go all around the walls just below this, and then wallpaper went below the rail, and the area above the rail & the ceiling both painted white.Though in those days, it would have been whitewash, not emulsion.

 One change he has made, the door now opens the opposite way. You can see in
the picture, the underneath of the stairs going up to the next level
which leaves an area that’s not very user friendly. So he swapped the door to
open against that now, and moved the light switch.
One change he has made, the door now opens the opposite way. You can see in
the picture, the underneath of the stairs going up to the next level
which leaves an area that’s not very user friendly. So he swapped the door to
open against that now, and moved the light switch.
 This is after the woodchip had been stripped off, and the old laminate
removed.
This is after the woodchip had been stripped off, and the old laminate
removed.

 Work in progress- plastered and painted, new doors being varnished.

 Hubby in mid-construction mode.
 Now he’s moving his stuff in, and said that he probably has more storage than
he really needs. I said I could lend him some stuff to store, lol, he said No,
thank you. Actually, thats not exactly what he said, but you get the idea.
Now he’s moving his stuff in, and said that he probably has more storage than
he really needs. I said I could lend him some stuff to store, lol, he said No,
thank you. Actually, thats not exactly what he said, but you get the idea.

Hubbys room almost finished, just the blind to hang, and his stuff to put away. The built in cupboard has had shelves put in,as in these old houses, storage is at a premium, and also holds the filing cabinet and server.
And a lot of ‘stuff’ that doesn’t have another home.
So thats me for another week, and indeed another year.
Its amazing that this will be my third year of blogging- I know loads of you have been at it for way longer, but I really never realised how much a part of my life it would become, along with all my wonderful WOYWW friends. So, at midnight, I will have raised a glass to each and every one of you ( that’s one glass between you all, tempting though the idea might be ), here’s to the next year xx.
Subscribe to:
Posts (Atom)
An End of an era
An end of an era
I write this with a broken heart, that only time can heal My beautiful, wonderful wifelet Shaz (Silverwolf) passed away peacefully in the ea...

-
 A couple of weeks ago I mentioned that I had bought these, the new Tim Holtz Embossing Diffusers. You have probably seen, like me, the...
 -
 I take no credit for this discovery, a lady posted this on Pinterest HERE .Like any of us, I hate having to spend money on 'consumables&...
 -
 This is the first of the batch of seven cards I made, thanks to some Pinterest inspiration. Here is the card that caught my eye,...
