This turned out to be a side project from some other Christmas cards I was making. These are done with a Sweet Poppy stencil, and some Cosmic Shimmer glitter embossing paste that was among the items I was gifted a while back. I'll post the actual cards in a day or two.
I thought I'd give it a go, to see what it turned out like.
To be honest, it turned out very well, and the real beauty is that you have the glitter look, without any shedding.
On the downside, I think it's very expensive for the amount you get, given that this pot holds 50ml, and retails anywhere between £4.50 and £5.50, depending where you buy from.
Sweet Poppy's own paste comes in 150gr jars, and retails around £9.
After a bit of Googling, it seems that 1ml= 1gr, so you get three times as much in the Sweet Poppy jar, for around double the jar cost.
However, as yet, Sweet Poppy don't seem to do a glitter paste.
It was while testing it- and forgive the slightly blurry photo here- that I had a thought.
As I applied it, it seemed to me it had a very similar look & consistency to glitter glue. It had quite a gritty feel to it too when spreading it over the stencil.
Apart from Stickles, I don't have any glitter glue, but I will be getting a pot to see if it works. I may have to add some glitter to thicken it up, but we'll see.
Now, I had another idea. Could I mix normal glitter into a Translucent paste, and get a good result?
I dolloped some paste (Dreamweaver), onto a small mylar mat. then added a generous amount of blue glitter. The fine stuff- there is a company called Glitter Magic who are often at craft fairs, and any number of retailers on E-bay.
Gave it all a good mix together, I used a combination of a palette knife and an old store card to do this.
I used the same stencil, and it applied just as easily as the ready made one.
This was the piece after I removed the stencil. I left it overnight to dry. At this stage, it looked much the same as the 'real' stuff.
The excess went into a little pot for next time, if it works ok.I reckon I'd probably get 4 or 5 stencils from the amount of paste I made.
Next day, and I've got exactly the same effect- nice glitter sparkle, with no shedding. Now I can mix up any colour of glitter paste, and I'm pretty sure it's going to work out way cheaper than buying little pots.
Pages
A warm welcome to all my visitors,
Thank you for taking the time to come and look at my blog, I really do appreciate it. I would love you to leave me a comment, even if it’s just to say Hi. It means I can come visit you!
All my designs are original, so copyrighted to me. If I have been inspired by someone elses work, I have named them in the post, and where able, I have provided a link.
Please feel free to use my designs for inspiration, I just ask you to credit me, and provide a link back to my blog.
Thanks, Shaz XX
Friday, 29 July 2016
Wednesday, 27 July 2016
WOYWW #373
So it's going to be one of those days. For starters, I overslept. Then I was certain today was Tuesday. Right up till 10 minutes ago, in fact.
But I'm here now, an accident from Sid not helping either!
Then I couldn't find the pictures for todays post, finally realised they are still on the camera.
First up then, I saw this last week, I think on Chris's blog, free with a magazine.
Next, from a walk over the town I had yesterday, I stopped off at Poundland on my way past.
They are intended for use with nail art, but they are essentially embossing tools of all different sizes.
From very tiny to 'normal' size. So, a bargain there if anyone needs any.
A couple of very fine paintbrushes, still two for 3 quid at The Works.
Lastly, a purchase from E-Bay of some Christmas die cuts.
4 of the Merry Christmas A5 pieces,and a selection of silhouette deer, a couple of flowers and squirrels.
A few Bloggers went to Birmingham New Street Station to meet Darnell, as she had a 5 hour break between her trains. A lovely time was had by all, meeting another WOYWWer, Anne ( Copperbeech Crafts) and a few other friends of Darnell.
From the left, counterclockwise, Marg (Silvercrafter), Me, Ange, Donna,Anne (Copperbeech Crafts), Kusum and Chris (Cardius Bloggus).
Gorgeous food in The Handmade Burger Company, and lovely staff too.
Darnell taking that photo, here she is with Marg, and with me.
So, after a bit of a panicked start today, I'll be visiting in a short while, just waiting for a parcel to arrive.
Tuesday, 26 July 2016
Look away now if you don't want to see 'C' cards!
These are the three designs I have so far. All are made with embossing paste and stencils, and were started a couple of years ago, to be honest with you.
They are a mixture of white, gold and silver embossing paste, all by Dreamweaver. I also discovered at this time that you can colour white paste- I added some green ink to it and it worked well. You do have to be careful with this, you don't want to thin the paste too much, so I'd recommend using the darkest colour of whatever you have, that way just a couple of drops will give you a good result.
These are the three Dreamweaver stencils, I'll put the numbers & names at the end.
In every case, glitter was added to the wet paste after the stencil had been removed, the glitter generally matching the colour of the paste.
For the NOEL stencil, I just glittered the snowflake which replaces the 'O'. I used silver and gold, and also green on some.
The post I did originally about this embossing is HERE.
As long as you are careful with the addition of the glitter, then tip off the excess straight down, it's possible to avoid getting much, if any, on the letters either side.
So this weeks plan was to destash as many of these as possible, whilst also attacking the Christmas backing paper mountain!
All the toppers were trimmed and matted onto coordinating card, then trimmed again to leave a narrow border.
The Christmas backing paper mountain- 2 Really Useful Boxes, one a 12x 12, one an A4. Mainly backing paper, although I did actually find a lot of other stamped Christmas images, and also left over cards from the last few years. These I have cut down, and will probably try and make some larger cards with them.
The card blanks are from PDA Card & Paper, and were 148x105mm landscape.
I've used them here as both top fold and side fold cards,the Baubles and Trees being top fold orientation. An assortment of backing papers were used to cover the front of the cards, trying not to use anything too 'busy'.
After they were all mounted, some acrylic gemstones were added in a few places on the baubles for a bit of extra bling.
A greeting was added in a suitable colour- I must admit this photo gave me a panic moment. I thought I'd mounted one of the toppers upside down! Turns out I hadn't, I'd just swapped the side I put the greeting on to avoid the baubles on the paper. Phew!
The Christmas trees also have acrylic jewels added in a colour to match the mounting card. These are not quite finished, I want acrylic stars to add to the star on top of the tree, and I don't have any. Waiting for an Amazon delivery now to finish them.
The greeting is a different stamp, to fit the space available.Also, I used ink colours to match the acrylic gems.
The Noel cards are mounted onto bases covered with Christmas paper, and have an acrylic gem added to the centres of the snowflake. This Greeting is from Clevercut.
The backs of the cards were now stamped with one of the personalised stamps I had from Visible Image. I must admit, this was a bit nerve racking, I was worried about smudging it so much.It all came out ok in the end, but it will be easier on the nerves to do that bit first in future I think.
Recipe:
Card base, PDA Card & Paper
Stencils:
Dreamweaver,
LL468, Vertical Ornaments
LL573, Swirly Christmas Tree
LL511, Noel Snowflake.
Embossing paste, in white, silver & gold.
Merry Christmas stamp, Stamps Away/Clevercut, on NOEL card.
The other two Christmas Greetings I've had for years, and no idea who made them, sorry.
Glitter in red, green, gold, silver & white.
Acrylic gems to match.
Christmas backing papers
Cardstock to match for matting & layering.
They are a mixture of white, gold and silver embossing paste, all by Dreamweaver. I also discovered at this time that you can colour white paste- I added some green ink to it and it worked well. You do have to be careful with this, you don't want to thin the paste too much, so I'd recommend using the darkest colour of whatever you have, that way just a couple of drops will give you a good result.
These are the three Dreamweaver stencils, I'll put the numbers & names at the end.
In every case, glitter was added to the wet paste after the stencil had been removed, the glitter generally matching the colour of the paste.
For the NOEL stencil, I just glittered the snowflake which replaces the 'O'. I used silver and gold, and also green on some.
The post I did originally about this embossing is HERE.
As long as you are careful with the addition of the glitter, then tip off the excess straight down, it's possible to avoid getting much, if any, on the letters either side.
So this weeks plan was to destash as many of these as possible, whilst also attacking the Christmas backing paper mountain!
All the toppers were trimmed and matted onto coordinating card, then trimmed again to leave a narrow border.
The Christmas backing paper mountain- 2 Really Useful Boxes, one a 12x 12, one an A4. Mainly backing paper, although I did actually find a lot of other stamped Christmas images, and also left over cards from the last few years. These I have cut down, and will probably try and make some larger cards with them.
The card blanks are from PDA Card & Paper, and were 148x105mm landscape.
I've used them here as both top fold and side fold cards,the Baubles and Trees being top fold orientation. An assortment of backing papers were used to cover the front of the cards, trying not to use anything too 'busy'.
After they were all mounted, some acrylic gemstones were added in a few places on the baubles for a bit of extra bling.
A greeting was added in a suitable colour- I must admit this photo gave me a panic moment. I thought I'd mounted one of the toppers upside down! Turns out I hadn't, I'd just swapped the side I put the greeting on to avoid the baubles on the paper. Phew!
The Christmas trees also have acrylic jewels added in a colour to match the mounting card. These are not quite finished, I want acrylic stars to add to the star on top of the tree, and I don't have any. Waiting for an Amazon delivery now to finish them.
The greeting is a different stamp, to fit the space available.Also, I used ink colours to match the acrylic gems.
The Noel cards are mounted onto bases covered with Christmas paper, and have an acrylic gem added to the centres of the snowflake. This Greeting is from Clevercut.
The backs of the cards were now stamped with one of the personalised stamps I had from Visible Image. I must admit, this was a bit nerve racking, I was worried about smudging it so much.It all came out ok in the end, but it will be easier on the nerves to do that bit first in future I think.
Recipe:
Card base, PDA Card & Paper
CODE: SCCB-Exp
Colour: White; Size A Single Creased - Regular: 148x105 Landscape (cut 296x105mm)Stencils:
Dreamweaver,
LL468, Vertical Ornaments
LL573, Swirly Christmas Tree
LL511, Noel Snowflake.
Embossing paste, in white, silver & gold.
Merry Christmas stamp, Stamps Away/Clevercut, on NOEL card.
The other two Christmas Greetings I've had for years, and no idea who made them, sorry.
Glitter in red, green, gold, silver & white.
Acrylic gems to match.
Christmas backing papers
Cardstock to match for matting & layering.
Wednesday, 20 July 2016
WOYWW #372
Another week flown past, and this week we're all back round at Julias Place, The Stamping Ground. Great to see you feeling so much better Julia, and lovely to be back with you. Our marvellous LLJ did a great job keeping things up and running, so a big hand for Jan, please!
The desk then, thats what you're here for after all. This week I've made another card with the stencils, and that's in the previous post. After that it became a session of C card making, and a load of stash busting.
Thats the view from the side of my desk, I can't get far enough behind it to get it all in that way.Loads of sheets of Christmas paper here, trying to use it up.
This is the batch of cards that appeared- the embossed toppers I did a couple of years ago. I've got loads of this sort of thing in my Christmas box, and I'm using it up this year, come hell or high water.
Here are the Christmas tree ones, drying after having the bling added. Little acrylic gems to simulate Christmas lights.
Ridiculous, really. Sat in the middle of the hottest days of the year, making Christmas cards. Madness, I tell you, madness.
Last pic for the week, and this arrived for me on Tuesday. A gorgeous black & white scarf sent as an anonymous PIF.
So whoever you are, thank you. It's gorgeous, I love it. And yes, I will continue the chain with a PIF of my own.
NEWSFLASH!
Just had a phone call from my GP's surgery- they have the results of my MRI, and there is no sign of any cancer reappearance. There may be some disc issues, which would explain the sciatica, but otherwise, all that can be seen is evidence of how the internal workings are healing after the surgery. Today is a good day!
Monday, 18 July 2016
Jo's Bubbles stencil & fairies.
Using up another of the stencilled backgrounds I made. I'll put a list of the stamps and inks used at the end.This stencil is called Jo's Bubbles, and seemed perfect for these particular stamps.
I started of with some basic planning, just checking really that certain stamps would actually fit in the circles.
I'd used Adirondack inks, with stencil brushes. Mainly blues, with a very light application of some purples in a few bubbles.
Here we are with most of the stamps in position, it was only when I came to write this post I realised how few photographs I'd taken!
I added some Stickles in purples and blues to give a bit of sparkle.
After the stamping was dry, I trimmed it to size, then matted onto pale blue, purple and dark blue layers of cardstock.
It's mounted onto a 7"x7" card blank, and some purple ribbon added to the left hand side.
The sentiment is from Tim Holtz/Stampers Anonymous Crazy Talk set.
Stencil
Jo's Bubbles.( Clarity Stamp)
Inks:
For the Bubbles stencil I used Adirondacks,
Blues:
Pool,Stonewashed & Sailboat Blue
Purples:
Wild Plum & Purple Twilight
Stamping:
Versafine Onyx Black, Majestic Blue, Deep Lagoon & Imperial Purple.
Stamps:
Lavinia Stamps:
Small Owl, Star Cluster, Small Stars 1, Fairy Orbs (comes in a set of 3 sizes)
Cardio:
Enchanted Garden ( 3 fairies and small individual stars)
Tim Holtz/Stampers Anonymous Crazy Talk CMS236.
Stickles:
Sea Glass ( the turquoise one)
Purple and the Dark Blue is a Dovecraft one.
Wednesday, 13 July 2016
WOYWW #371
And another week has flown past, and here we all are again, meeting up at our Deputy Head Deskers place, LLJ's. Doing a fantastic job of keeping us all organised whilst our Julia recuperates.A few desk shots here, as I've been trying out a few things which aren't working as well as I'd hoped, but I'll post more about those later in the week. A couple of cards have made it off my desk, and they're in the previous two posts.
These two are not strictly on my desk, rather on my dining room table. Aniseed balls. I had a fancy for them, and could not find any locally. Doesn't help that we don't actually have a proper sweet shop in town. You don't seem to see those so much anymore.
Regular aniseed balls above, and black ones, with liquorice, on the right. Who else could have Goth aniseed balls? Rofl!
Beloved Hubby did a bit of internet searching, and found me some. I just found the way they were delivered very pleasing, lol.
Next, some stamps. Some of the new releases from Visible Image.
Christmas ones here on the left.
Some fabulously cool images here on the right, as well as a set of sentiments. And the headphones are made to fit perfectly onto the large skull.
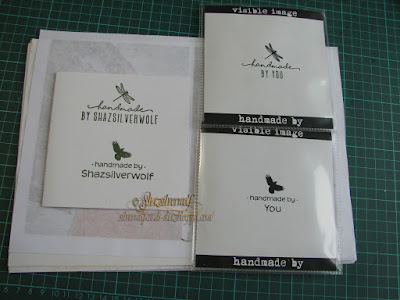
These also arrived this week, back in May, Helen & Mark did a special run, for one month only, of personalised 'handmade by' stamps.
Finally, how I store my stencils. A document folder from Staples, with clear pockets.
I don't have any larger than 7"x7", apart from a couple of A4 ones I cut myself from my Silhouette.
And finally, following on from the pic of my eldest, Ant, with his green beard last week.
One of his friends posted this on FB last week- he was on a course, when this picture pops up on screen.
Ant had told me about this before, it all started with a course he went on when the BBC in Birmingham was being closed down. The guy running it asked Ant if he could use a picture of him in the section of his course dealing with how to stand out and get yourself work when you go freelance!
Suffice to say, every time this guy shows the pic, and asks his group if they know who it is, at least three quarters put their hand up and name Ant. To which the bloke responds, 'my whole point in a nutshell.' 'If you remember Ant, so does everyone who employs him. And when they want someone for a job, and they are all good at what they do, it's the memorable people who get called first.' So his advice, whilst not needing people to dye various parts of themselves crazy colours, is to find some way of standing out from the crowd.
I will visit as many people as I can today, and after that it will possibly be Friday- Virgin are doing some work on the Broadband infrastructure on Thursday, and it could be disrupted for most of the day.
EDIT :
I forgot to say, many of you will have seen Julia's & Jan's posts about Darnells visit to the UK. She will be in Salisbury one day next week- Jan & Julia have the info, so give them a message if you can make it and would like to join them. Also, she will be coming through Birminghams New Street Station on Sunday 24th July. I don't know what time yet, as Marg (Silvercrafter) is making the plans, and I'm going with her. So anyone who could make it to Birmingham next Sunday would be very welcome indeed. Not sure Marg has got an email link on her blog, if you want to know when & where, Email me with the link in my sidebar, and I'll pass on all the info.
Tuesday, 12 July 2016
Clarity & Cardio - Take 2
Here's the second of my Clarity stencil/Cardio stamps cards.
This one was done using the Clarity Abstract Squares 2 stencil, along with a selection of Adirondack brown inkpads, and brushes to apply.
These are the inkpads I used, along with the brushes. The smaller brush was used with the Espresso ink to add some shading, which was further enhanced by going around the stencil with a latex make up sponge at the end.
Change of subject as well for this card- it's all about the birds. I'll list the stamp sets used at the end again.
I'd used Smokey Gray to stamp the tree & birdhouse, then switched to Onyx Black for most of the other images, apart from the Squirrel. He's done in Vintage Sepia. All Versafine inkpads.
Some foliage was added in Olympia Green,and a wire drawn in fine pen to hang the feeder from the branch. Then it was trimmed and matted onto brown, then black cardstock. All mounted onto a 7"x7" card base, with some eyelash wool wrapped around the spine.
Final touch was to stamp Happy Birthday, done in Vintage Sepia, and using one of the new Visible Image ' Go To Words set 1'.
I think the colours lend itself nicely to a masculine card, and perfect for any bird watchers you may know!
Card Recipe:
Cardio/Majestix stamp sets:
Tall Trees ( tree trunk & small branches)
Forest Friends ( owl,bunny, squirrel, some small birds)
Birdsong 1 (birdhouse, bird on birdhouse, bird on feeder & tree)
Summer Wreath (Foliage)
Winter Walks (Flying Birds)
Sentiment:
Visible Image Go To Words Set 1
Clarity Abstract Squares Stencil
Inkpads:
Adirondack in Lake Mist, Latte, Hazelnut,Mushroom & Espresso.
Versafine in Onyx Black, Vintage Sepia, Smokey Gray & Olympia Green.
Subscribe to:
Posts (Atom)
An End of an era
An end of an era
I write this with a broken heart, that only time can heal My beautiful, wonderful wifelet Shaz (Silverwolf) passed away peacefully in the ea...
-
A couple of weeks ago I mentioned that I had bought these, the new Tim Holtz Embossing Diffusers. You have probably seen, like me, the...
-
I take no credit for this discovery, a lady posted this on Pinterest HERE .Like any of us, I hate having to spend money on 'consumables&...
-
This is the first of the batch of seven cards I made, thanks to some Pinterest inspiration. Here is the card that caught my eye,...